In our last trigger course, we took a deep dive into the Remington 700 factory trigger. Now we’ll walk you through a Timney trigger system and explain exactly why this is the upgrade your rifle’s been asking for.
by Lou Patrick
The Remington 700 owner, wanting improved trigger performance, is left with a choice: adjust or modify the original factory trigger or replace it with an aftermarket trigger.
It is my advice to leave the factory trigger alone. Sure, lighter trigger springs are available, surfaces can be polished, the connector can be “permanently” attached to the trigger, a 2.5-lb. pull weight is obtainable, et cetera, et cetera. The reason why I advise against this stems from the question: from 1962 to present, why hasn’t Remington performed these simple, yet “safe” procedures? After all, companies such as Timney Triggers are delivering safe triggers with pull weights well below that of Remington factory triggers, but they are doing so with a completely different trigger design.
The Remington trigger, as designed, will work effectively within its design parameters. Remington adjusted the triggers accordingly and sealed the screws, which is a good indicator for us to leave them alone. Only one adjustment screw found on the 40x and the X-Mark Pro adjustable triggers is unsealed, with Remington providing instructions on how to adjust it.
When it comes to the safety concerns of the Remington triggers, I have used all four versions over the years without incident. I have not personally experienced any problems with Remington triggers; however, it seems that many people have. Why modify a trigger with such a legacy? Your time, effort, and money are more wisely spent, in my opinion, by upgrading the trigger to one that has been designed from its very inception to deliver lighter, cleaner breaks and more trigger control. This appears to be exactly what Remington has done with Model 700 Alpha 1, which features a Timney Elite Hunter trigger.
In our previous article, Your 101 Course in Remington 700 Factory Triggers, we discussed the design, function, and variations of the triggers selected by the factory for use in the brand’s iconic bolt-action rifle. In this installment, we move our discussion to precision-manufactured aftermarket triggers for this popular rifle — specifically, the Timney Elite Hunter — and explain why this probably is the best route to take for anyone looking to improve their rifle’s performance.
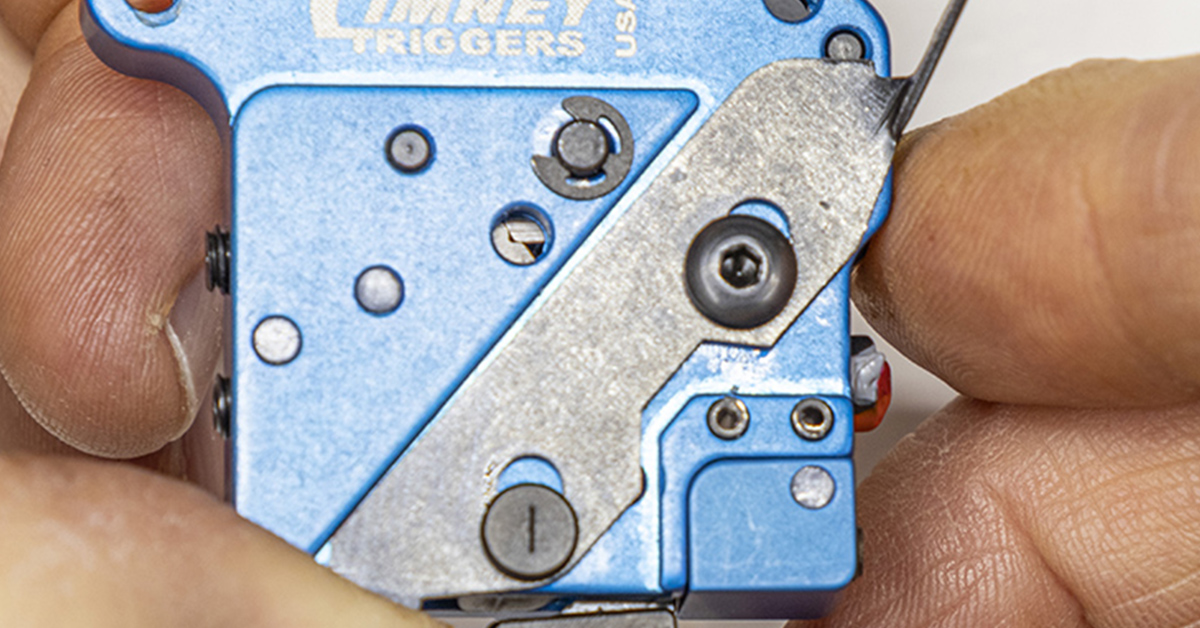
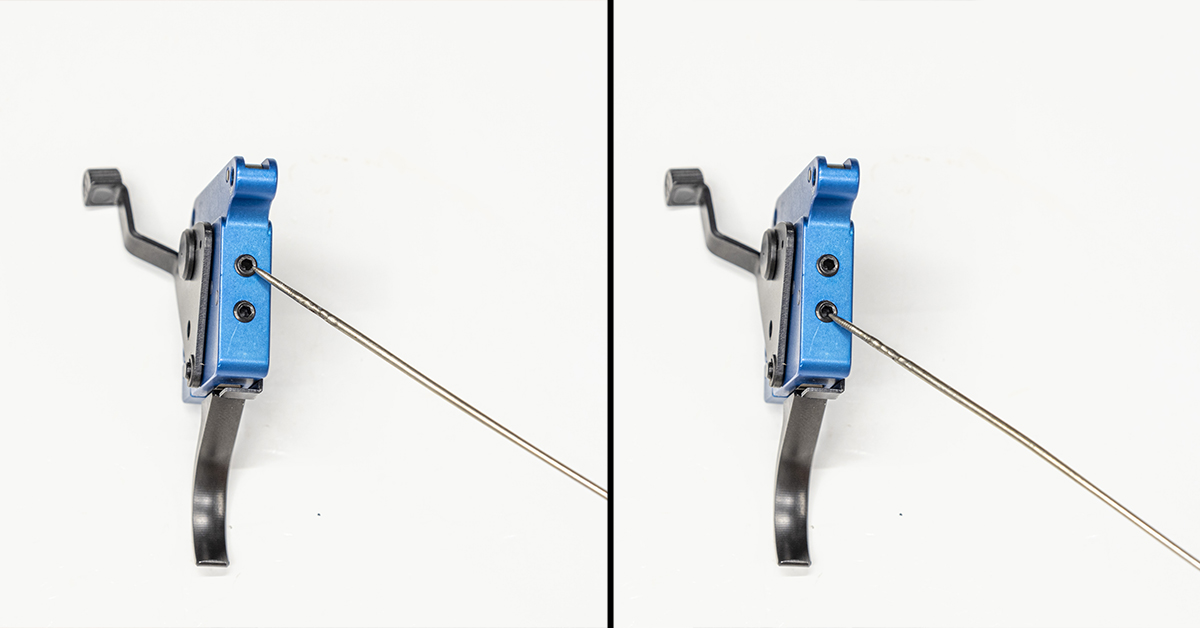
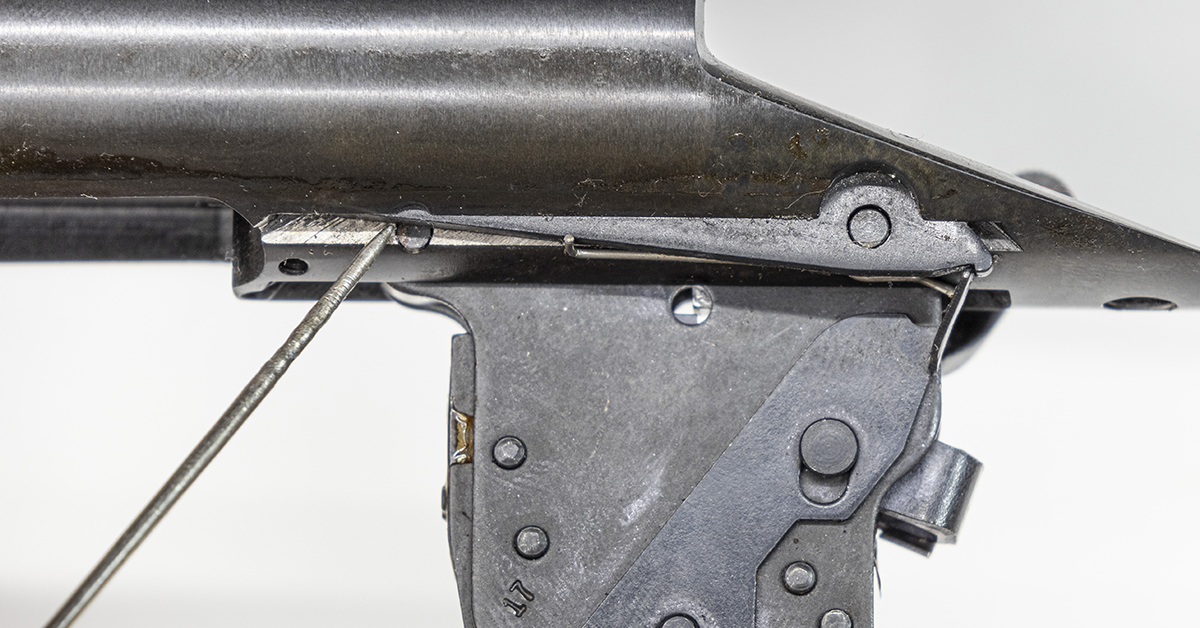
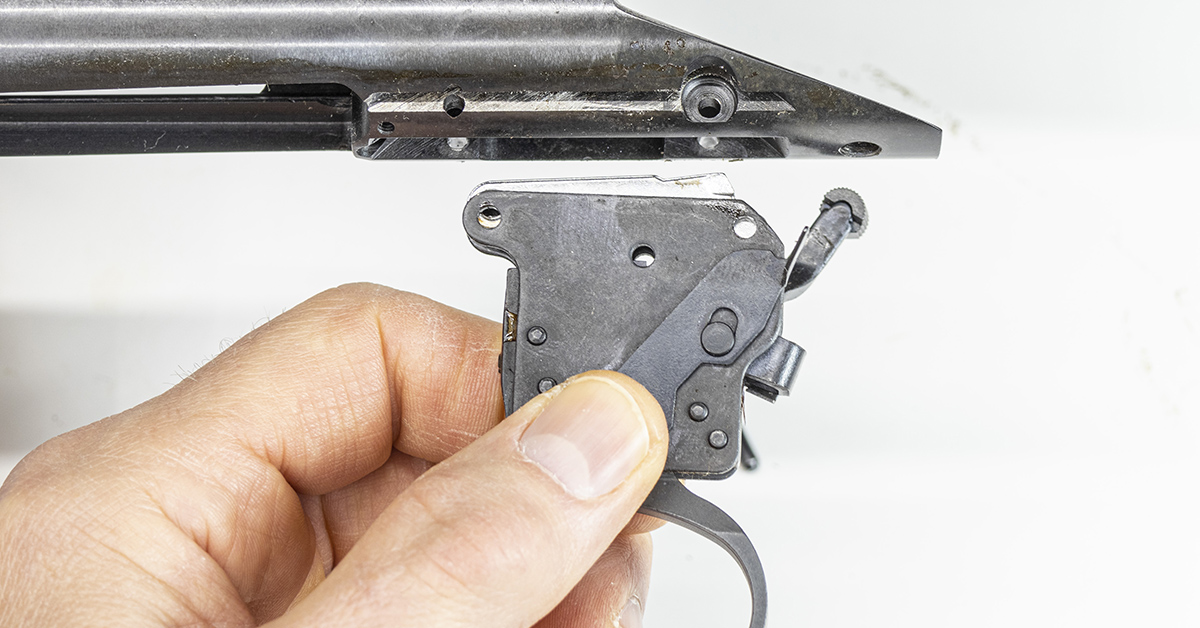
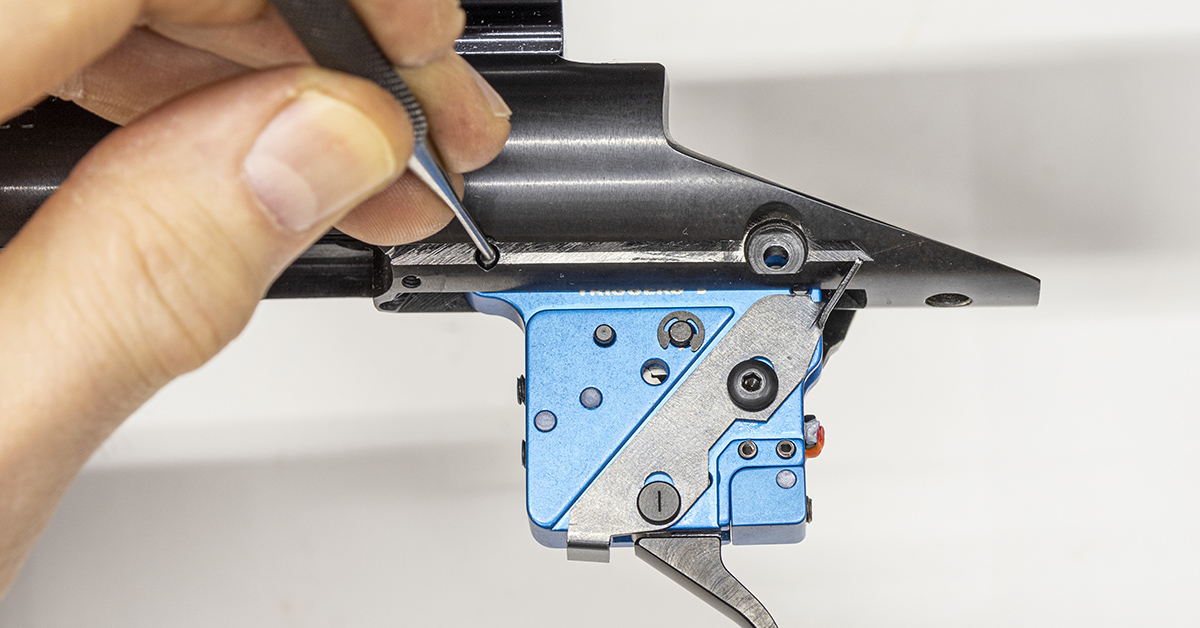
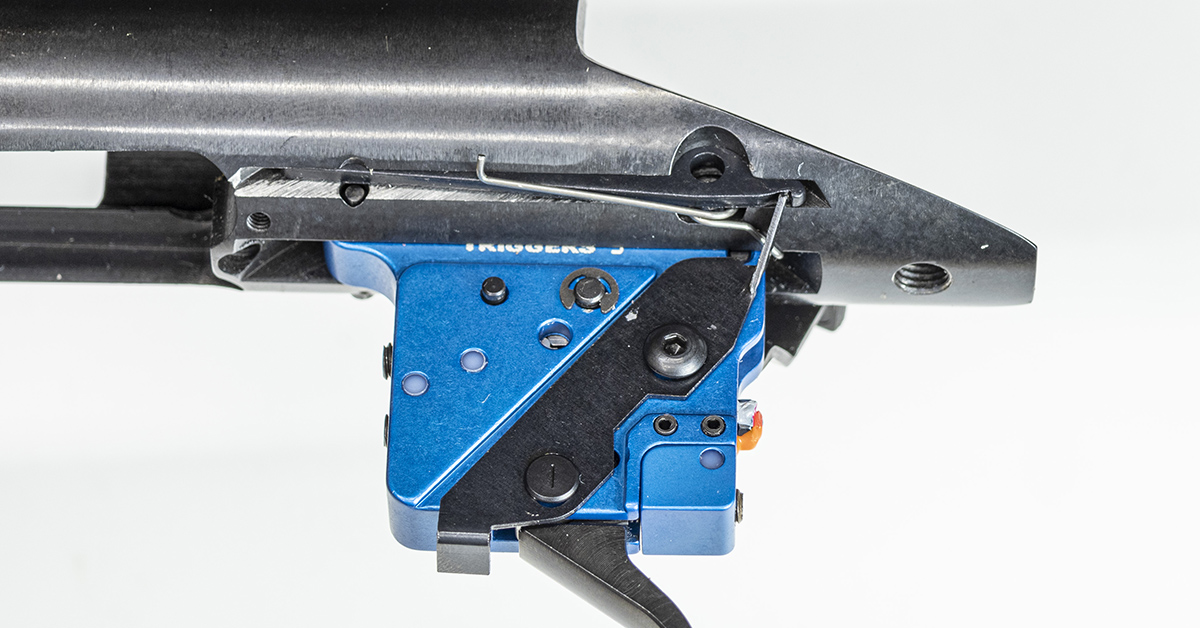
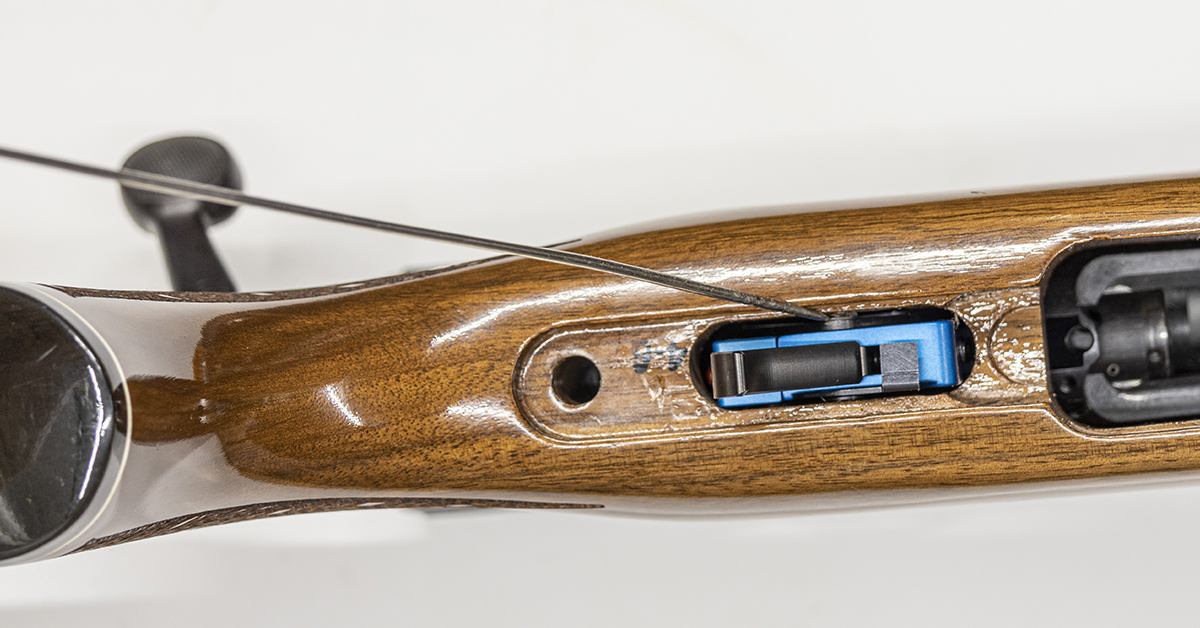
Looking at the inspection port of the Timney trigger, with the sear up, you can see that the engagement surfaces of the Elite Hunter remain in contact with one another. Raise the sear on a factory Remington trigger and you will lose engagement. I point this out only to illustrate that the Timney trigger operates with a completely different mechanism, one with which the factory Remington trigger cannot compete, especially when speaking of a lighter (much lighter) yet safe trigger pull.
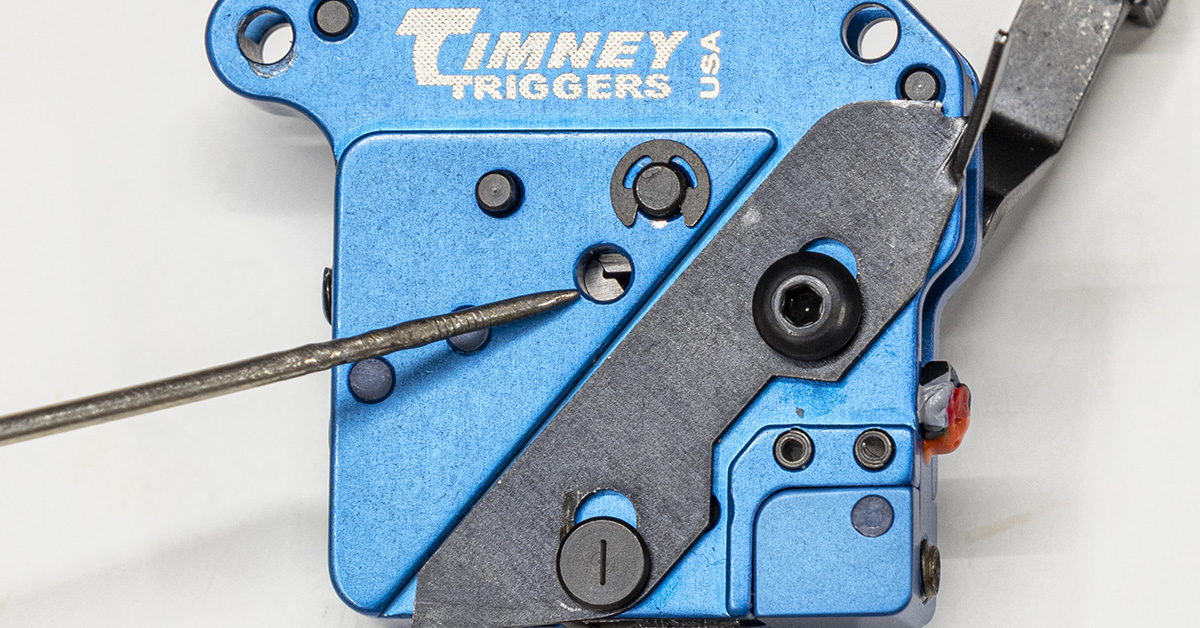
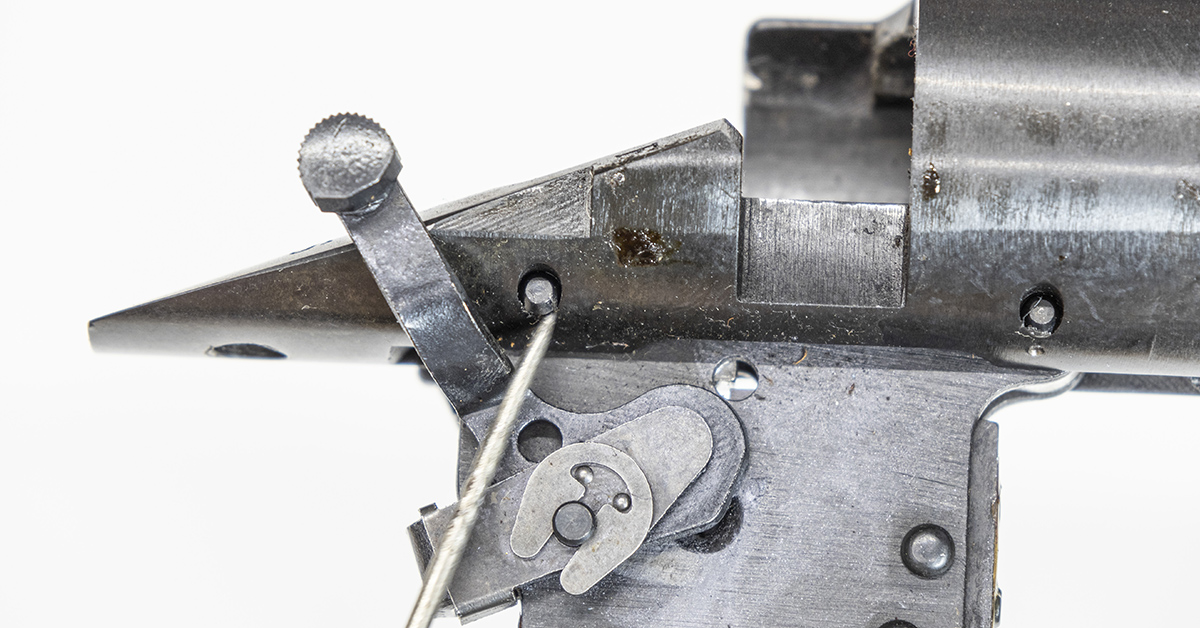
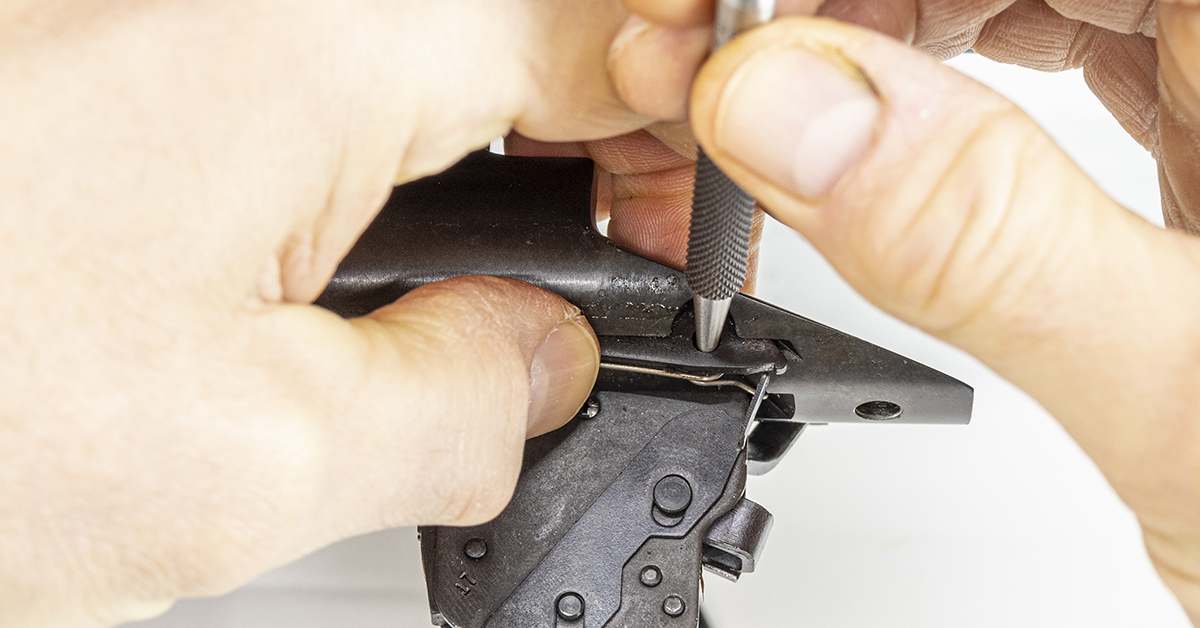
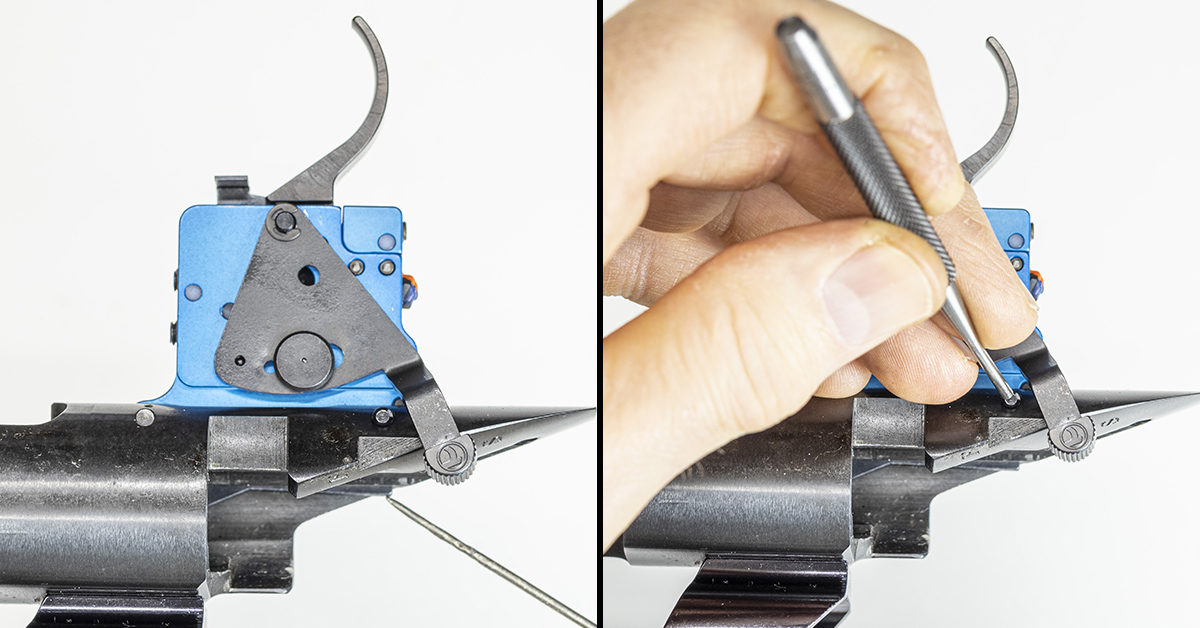
The Timney model 532 seen here is a two-stage trigger. I prefer a two-stage trigger as I believe they provide greater trigger control, which, in turn, enhances safety and performance. In the above picture, with the safety in the fire position, I am pressing down on the sear with the index finger of my left hand. This simulates the downward force that would be exerted by the firing pin head during normal operation. While pushing down on the sear, I am simultaneously pulling the trigger with my right thumb completely through the first stage of trigger pull. Look closely through the inspection port. The component engagement has not been affected at all; They are still fully engaged. If I were to change my mind and decide not to complete the shot and released the trigger at this time, the trigger mechanism would remain fully engaged as though nothing at all had occurred.
In contrast, as the factory single stage trigger is pulled rearward, the engagement surfaces begin to break as you start the trigger pull. If something were to occur that caused you to change your mind and not complete the shot, the trigger is no longer at full engagement. Once the trigger is released, it is expected to go back to full engagement, but will it? You may find that after beginning the trigger squeeze, stopping briefly, and squeezing the trigger again, that the pull is somewhat shorter than expected. Remember, when you place the factory Remington trigger on safe, it blocks the sear and slightly raises it, which will allow the trigger to more easily and reliably move forward to its original position. Without placing the trigger on safe, the sear will remain in contact with the trigger, making it a little more difficult for the trigger to return to its original position.
If you’re not following this, refer to our previous article for a complete understanding of the factory trigger operation. This will give you the background to fully appreciate the engineering of the Timney trigger.

Once you pull through the first stage, you will feel a defined stop. This “stop” can be difficult to explain to those who haven’t experienced it, yet you can feel a stop. Once you feel this stop, you now know that only a slight rearward motion of the trigger is all that is required to break engagement and discharge the firearm.
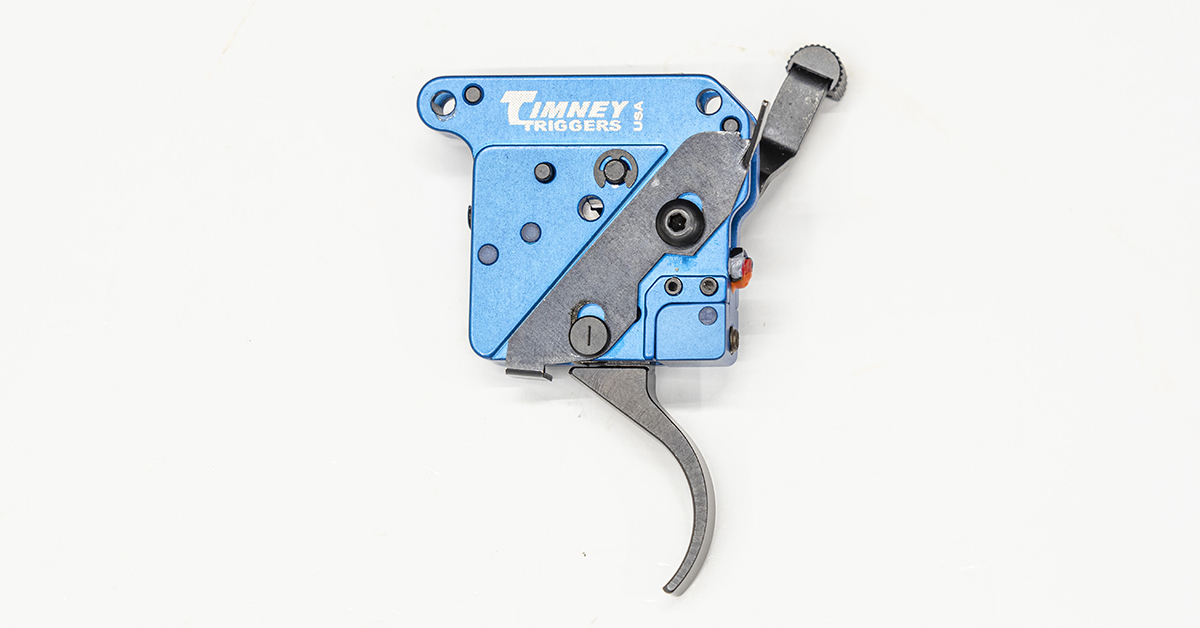
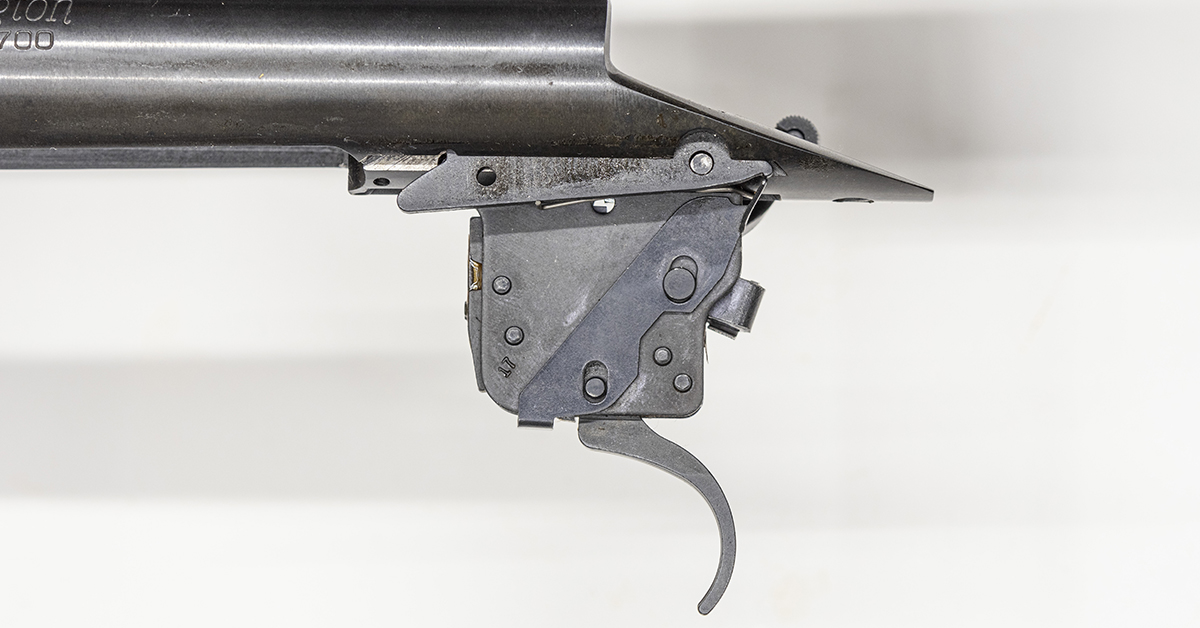
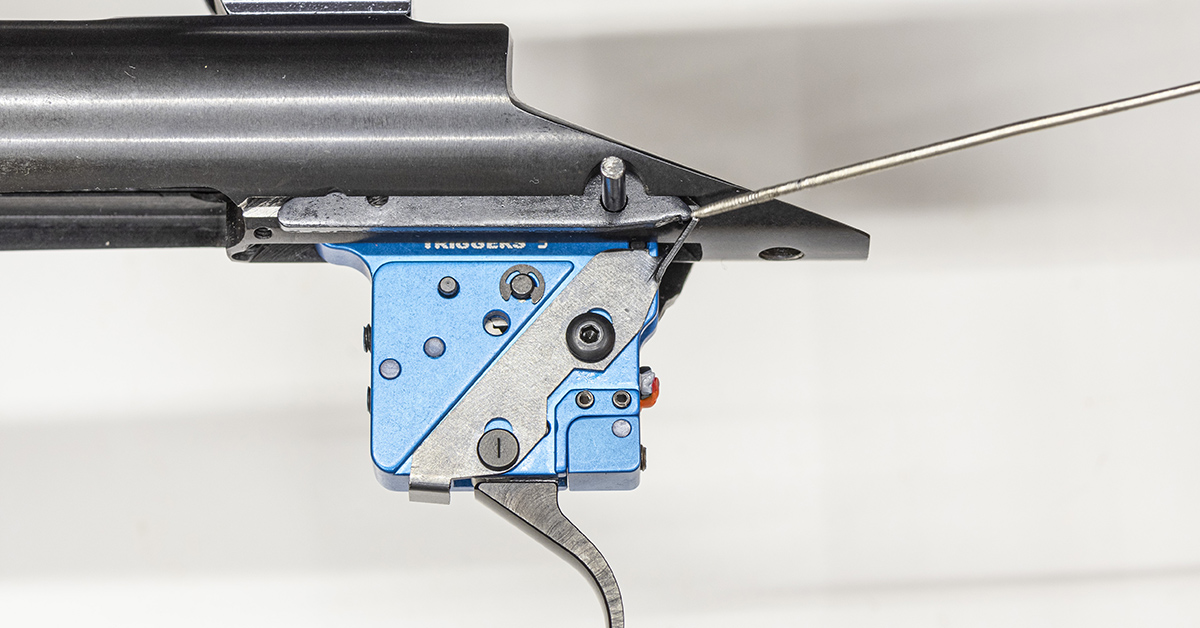
Looking at the front of the trigger, the top screw is for adjusting overtravel. The bottom screw adjusts the 2nd stage pull weight. Neither of these screws are sealed and may be adjusted by the owner. While the overtravel screw is owner-adjustable, it is factory preset for minimum overtravel and reliable operation. Incorrectly adjusted, it is possible to create intermittent operation of the trigger. You may find that the trigger is operating normally, only to discover it to be locked up tight the next time you squeeze it. I found the factory setting perfectly acceptable with no need of further adjustment.

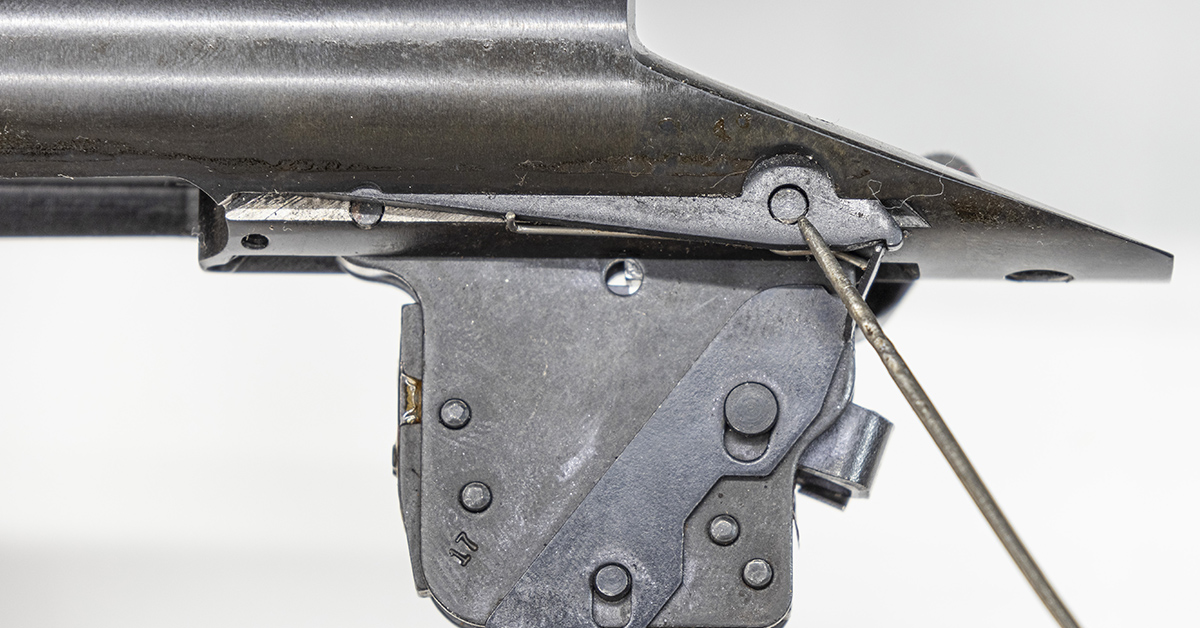
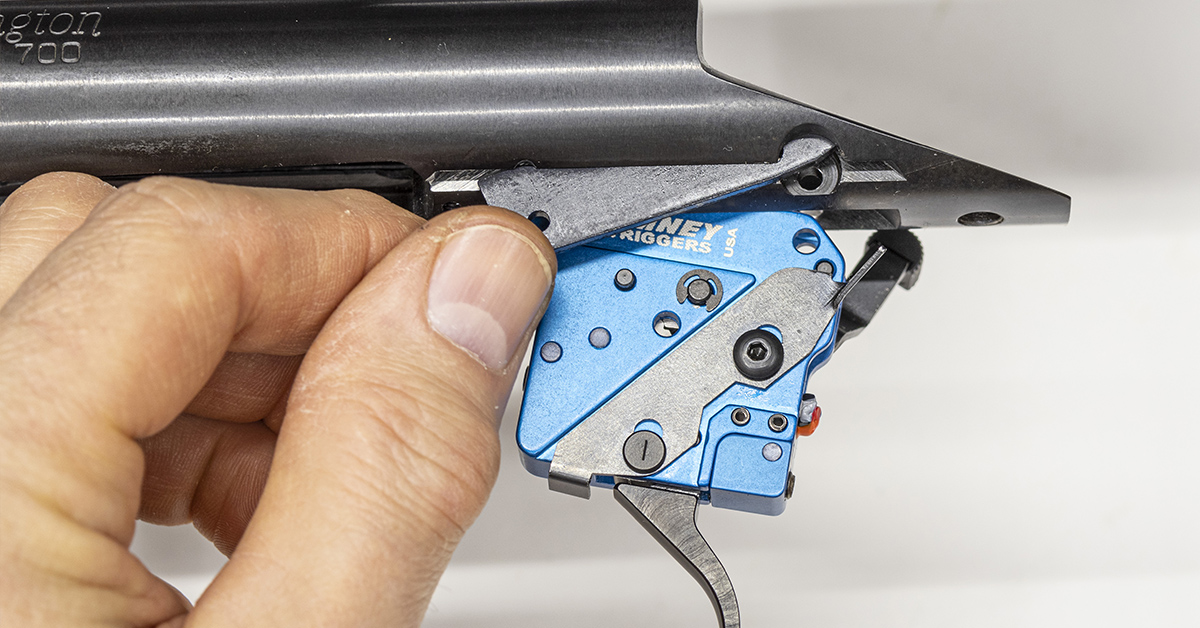
Looking at the rear of the trigger, the top screw adjusts sear engagement and is sealed from the factory. This adjustment is made at the factory for peak performance and safety, so there is nothing to be gained through further adjustment of this screw.
The bottom screw is used to adjust the weight of pull of the first stage and may be adjusted by the owner. The first stage of the Timney model 532 trigger is adjustable from 8 oz. to 1 lb. The second stage adjustability is 8 oz. to 2 lbs. The total weight of pull for a two-stage trigger is the sum of each stage. Adjusted at its max, this trigger will have a 3-lb. pull weight and at its minimum it’s 1 lb. With these weights being spread over two stages, you may find that it has a somewhat lighter, yet controllable feel.
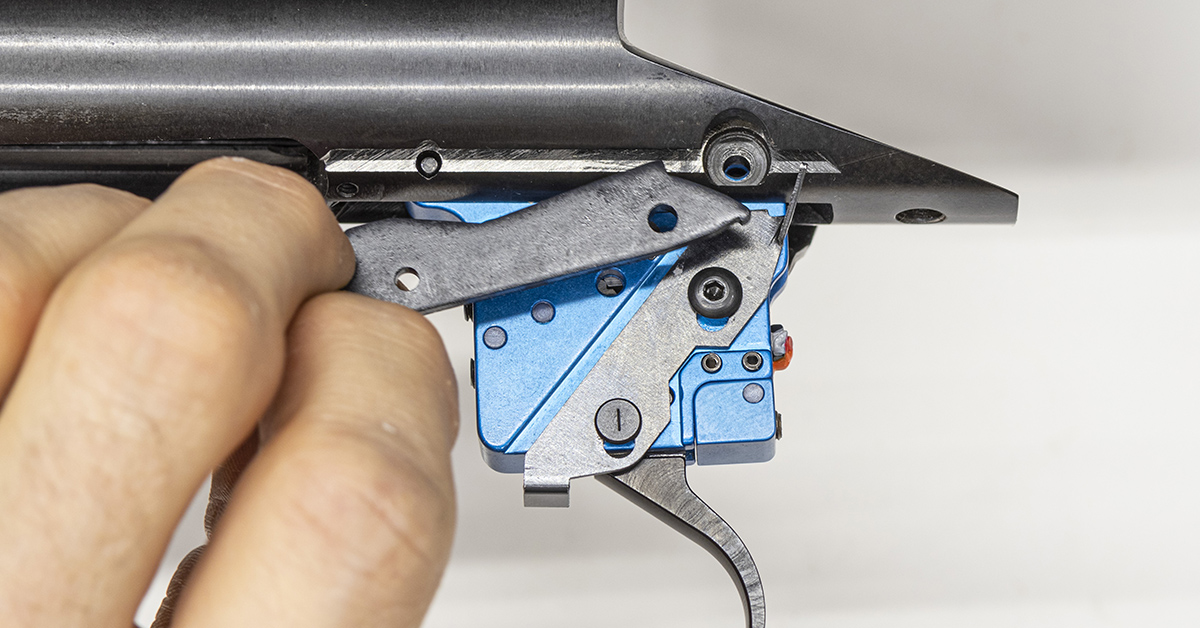
The safety and bolt release levers will operate in the same manner as the factory Remington components. The safety of the Timney trigger blocks both the sear and the trigger.
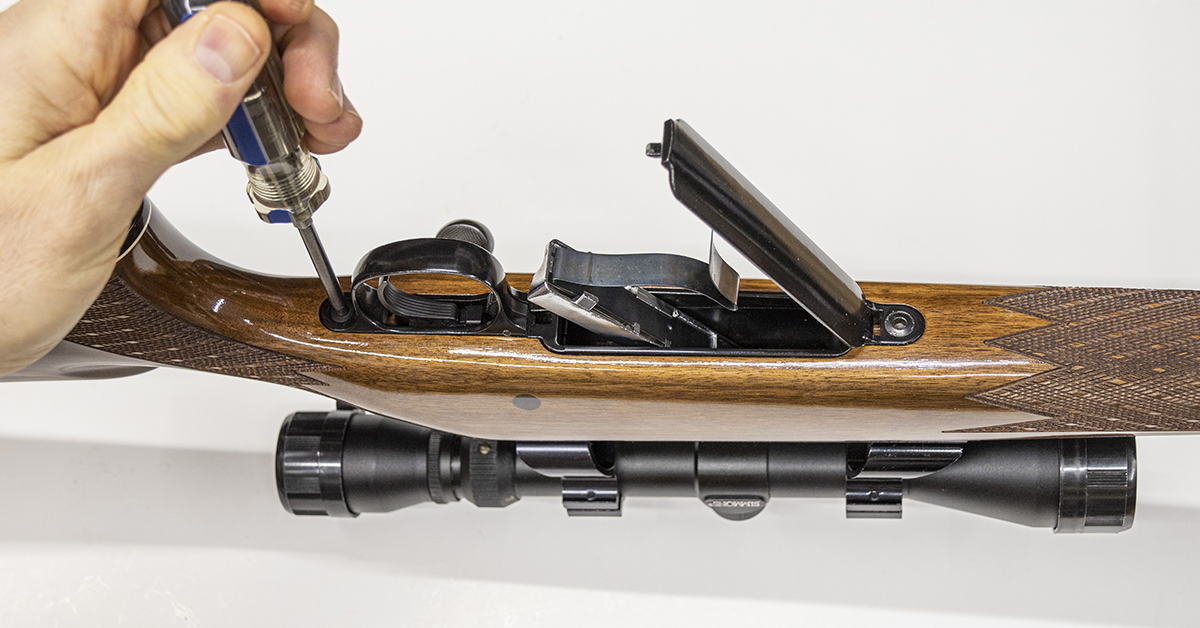
Replacing the Remington trigger with a Timney is a straightforward project easily accomplished by most DIYers. Detailed, easy-to-follow instructions are included with the new trigger. My deviation from those instructions is simply from years of developing a certain process that I followed while working as a gunsmith. As always, ensure that your rifle is unloaded and all ammunition is removed from the work area. If you are working on the BDL version, open the floorplate to relieve the magazine spring tension, and then remove the action screws.
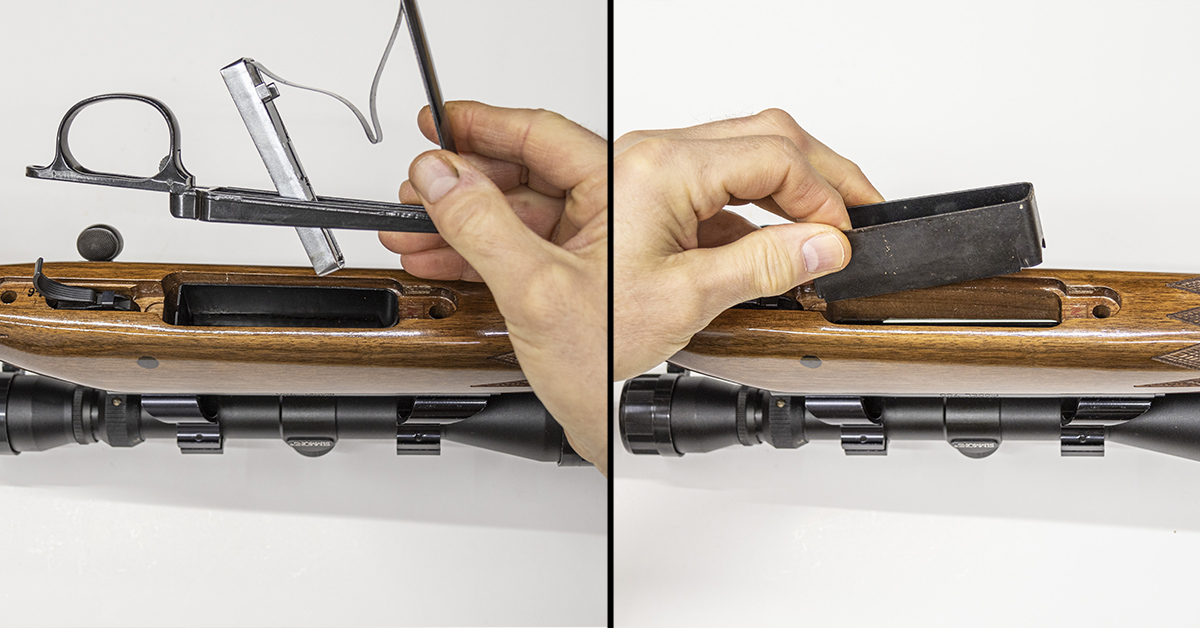
Remove the floorplate/trigger guard assembly and the magazine box.
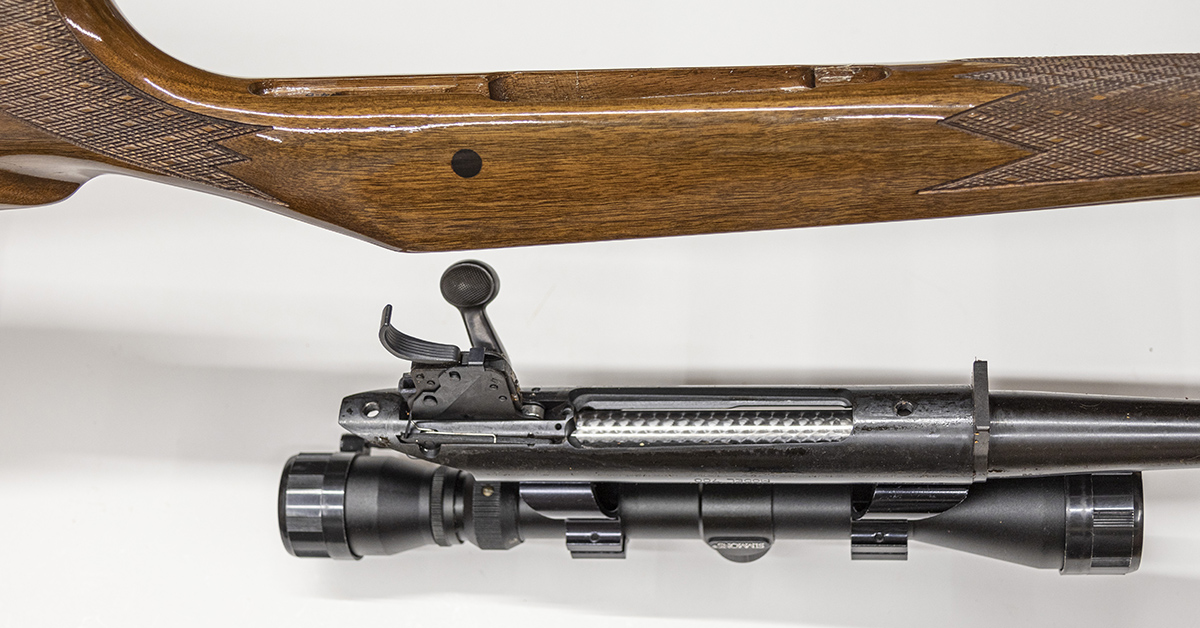
Separate the stock from the barreled action. It is important to note that I have the barreled action held above the work surface with a bench-mounted vise. The receiver is also supported to ensure stability.
Press up on the bolt release and remove the bolt from the receiver. Once finger pressure is removed from the bolt release tab, the bolt stop should automatically pivot upwards into the receiver. Remington 700 bolt stops are known for sluggish operation and often hang up in the open position as pictured. A trigger upgrade is the perfect time to address this issue. Remington bolt stop springs tend to be a little weak, in my opinion, with years of use only serving to further weaken them. Stronger bolt stop springs are available from Holland’s Gunsmithing and Shooters Supply.
Ensure the safety is in the safe position. If not, the rear trigger pin will hit the safety during removal. Also, do not lay the safety lever against the workbench while removing the trigger mounting pins, as this may result in damage to the safety lever. The rear trigger pin has one end that’s chamfered. Installed properly this chamfered end will be towards the safety lever.
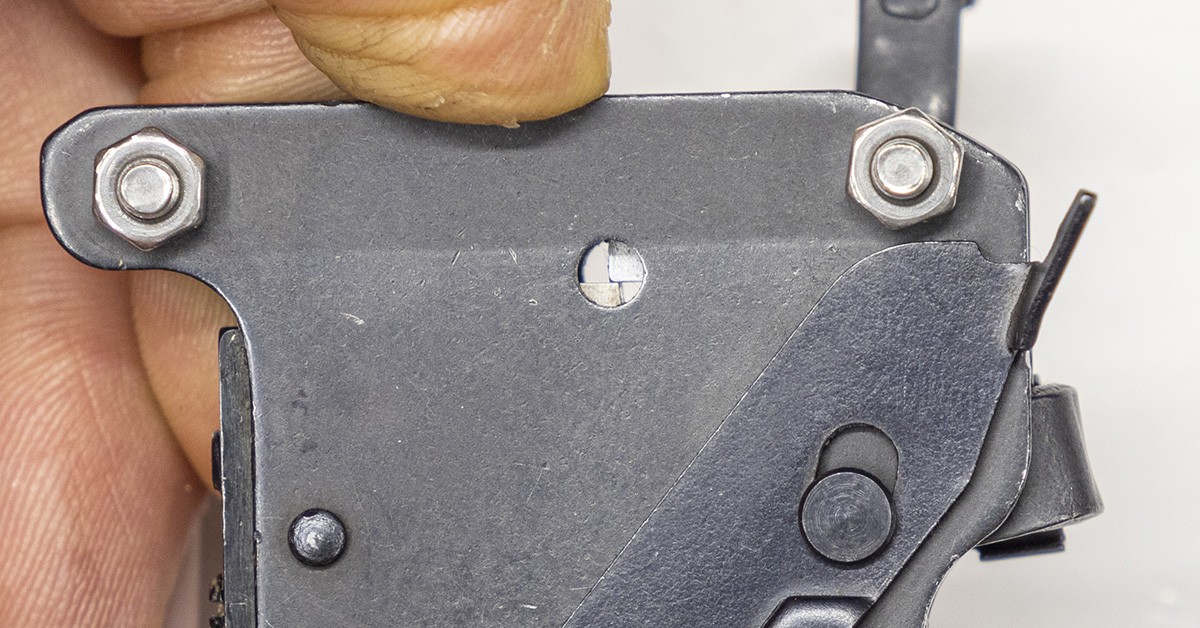
This end of the rear pin is not chamfered. The pin is installed so that it is level with the surface of the bolt stop.
The front pin is slightly obstructed by the bolt stop. The pin should be installed with its chamfered end towards the safety. When properly, installed the pin will be flush or slightly below flush of the receiver, as pictured. This is to prevent interference with the operation of the bolt stop/release.

With a hammer and punch, remove the rear pin.
The sear and bolt stop are under spring tension from two different springs. Maintain control of this spring tension as you remove the punch.
Pivot the trigger slightly downward. Remove the bolt stop spring and bolt stop.
Using a hammer and punch, remove the front trigger pin. The sear and sear spring are held in place by the trigger pins. With the pins removed, the sear and spring will fall out of the trigger housing. Maintain control of these components as you remove the punch.
Remove the trigger from the receiver.
One source of the sluggish bolt stop/release function is old oil and dirt. Thoroughly clean the receiver’s bolt stop recess. Once clean, examine the recess for any burrs that may inhibit smooth operation. Remove any burrs with a small file.
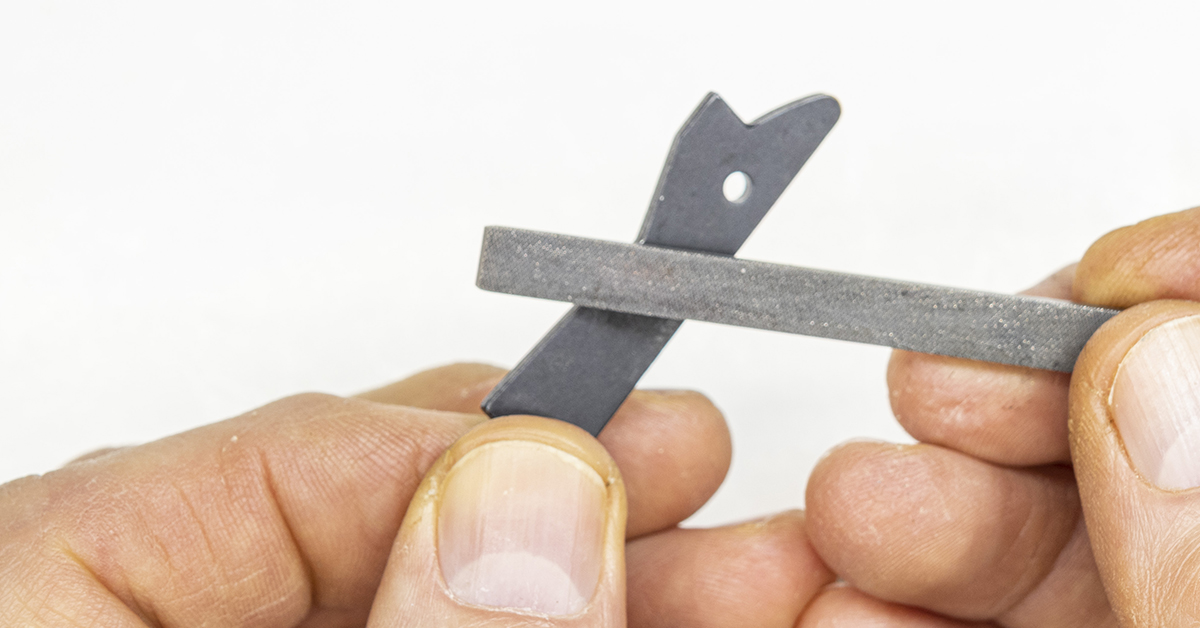
Clean the bolt stop and examine it for any burrs around its edges. Remove any burrs with a small file.
Test-fit the new Timney trigger in the receiver. Check fitment with the safety lever both in the fire and safe positions. During installation, I found slight contact with the safety lever and the receiver. This was easily corrected by carefully bending the safety outward to clear the receiver.
Install the trigger into the receiver and install the front pin. The end of the pin must be flush or slightly below the surface of the receiver.
Trial-fit the bolt stop by rotating the trigger slightly downward and installing the bolt stop.
Install the rear pin through the bolt stop, pushing it far enough into the trigger to ensure that the trigger is in proper alignment. This can usually be done with finger pressure. The bolt release lever on the trigger should engage the rear notch of the bolt release. Ours does not and will require some easy adjustment.

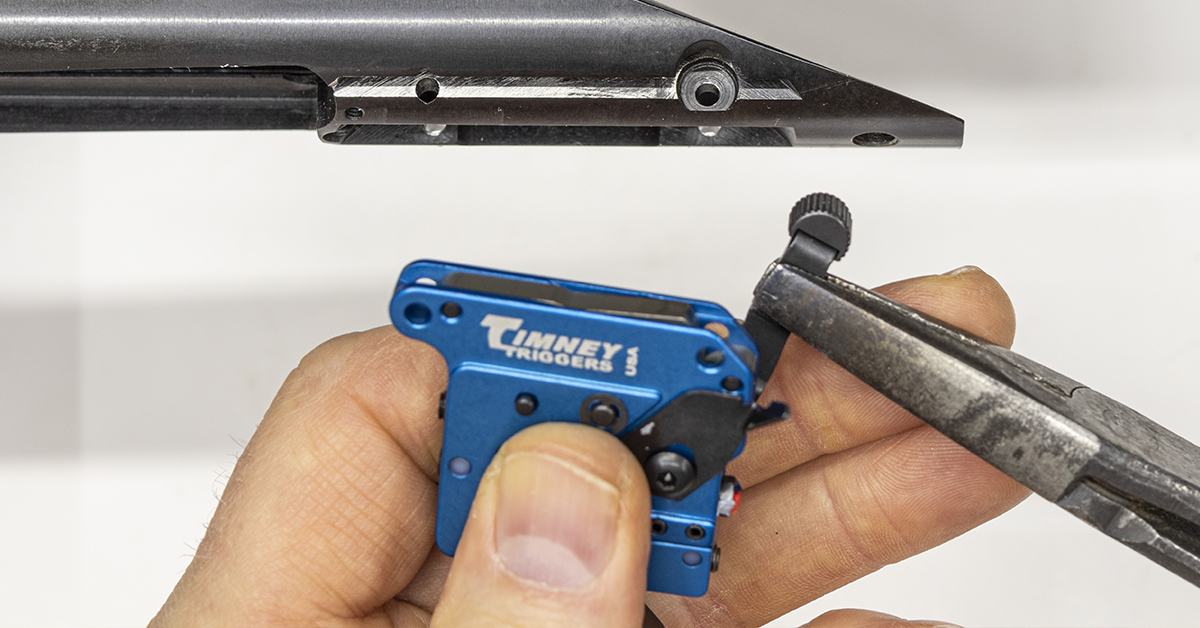
Here, I’m raising the rear pin enough to rotate the trigger downward. Using a pair of pliers (my preference is duck bill pliers), I carefully bend the bolt release lever in the direction needed. Here, the lever is bent inward.
 When adjusting the bolt release lever, go easy and make small adjustments. When properly adjusted, it will engage the bolt stop as pictured.
Remove the rear pin and bolt stop.
Rotate the trigger back into position. Install the rear pin while simultaneously holding the sear down, as the rear pin must pass over the sear during installation.

The rear pin is installed, leaving it exposed just enough to retain the bolt stop spring yet low enough that it doesn’t interfere with installation of the bolt stop. Lightly lubricate and install the bolt stop spring and bolt stop.
The bolt stop and spring are now in position; however, the pin needs to be moved into position to properly retain these components. Look closely at the picture. The bolt stop spring is currently held in position by the pin. The bolt stop is not. The pin hole in the bolt stop is slightly above the pin.
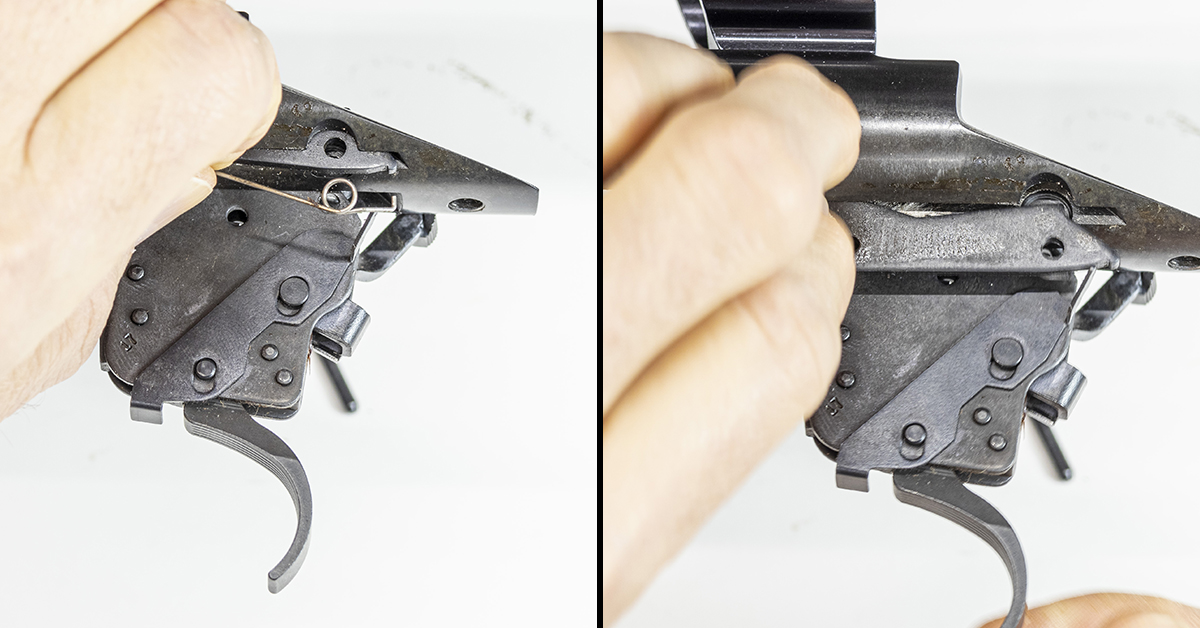
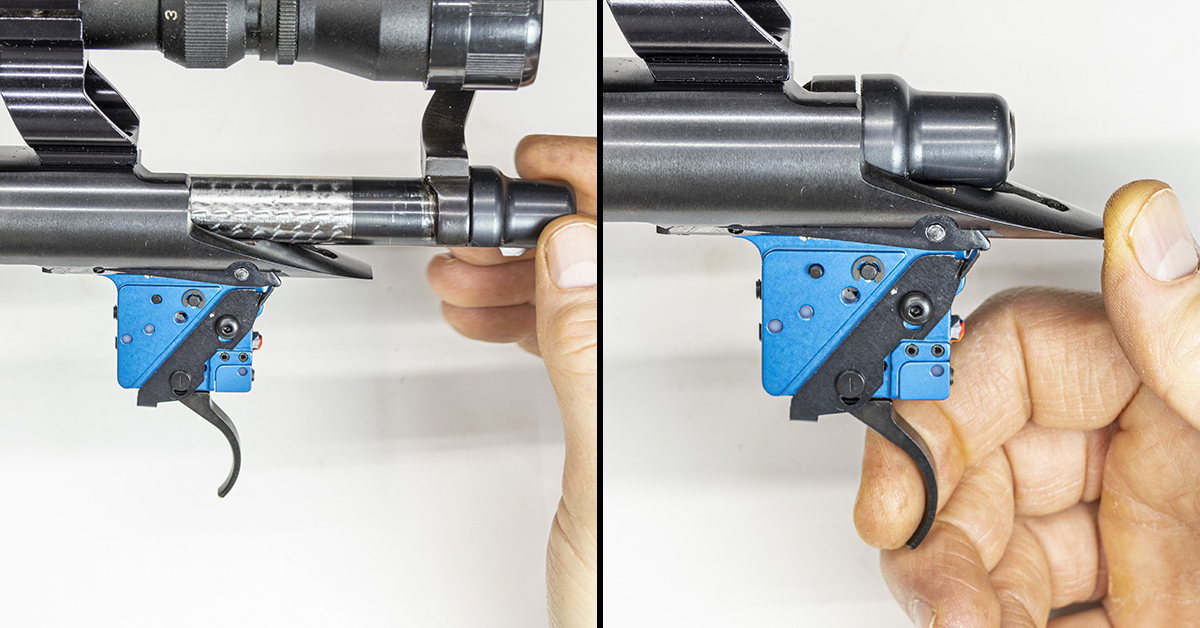
This can be a little tricky the first time around. Work carefully and patiently and you’ll find that it’s not as difficult as it first appears. Rotate the receiver over and gently push downward on the bolt stop (left). You can probably feel the bolt stop move over the pin and drop into the hole. If not, move the pin inward ever so slightly. Once alignment is achieved, move the pin into position.

With the pin properly installed, check the function of the bolt release. Operation should be smooth and snappy.
Install the bolt and do a preliminary check of the trigger’s operation. With the safety in the safe position, squeeze the trigger and the rifle should not fire. Rotate the safety lever to the fire position and the rifle should not fire. Squeeze the trigger and the rifle should fire. Repeat this test a few times to ensure reliable operation.
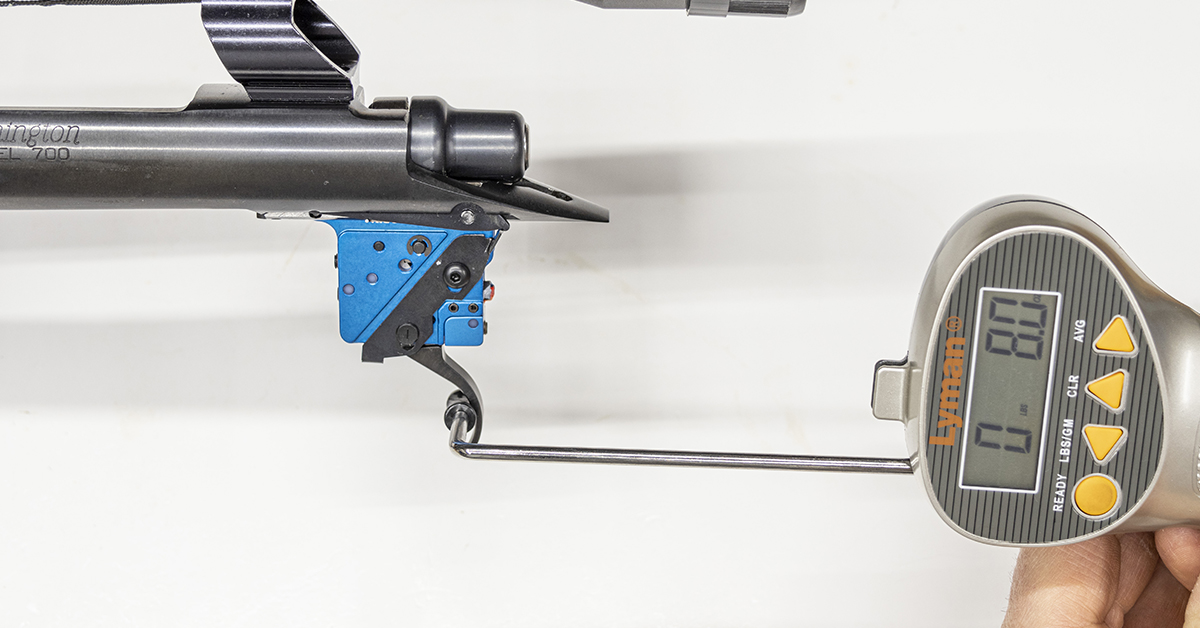
Check the trigger’s pull weight, staying within the weight range of the trigger. Adjust to fit your needs following Timney’s instructions.
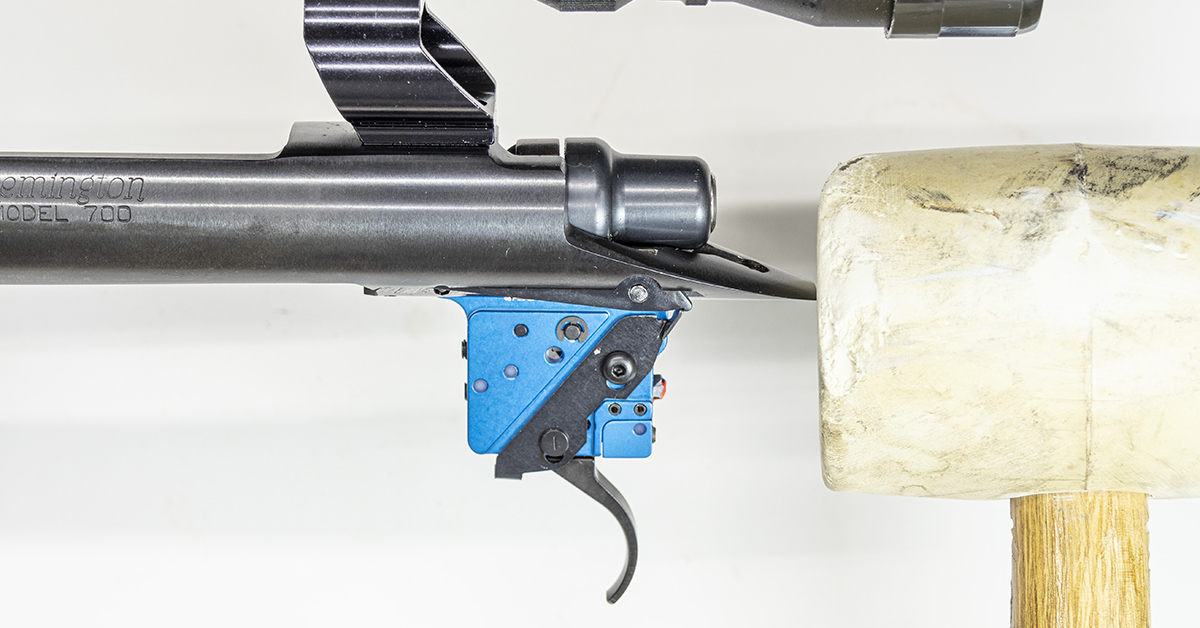
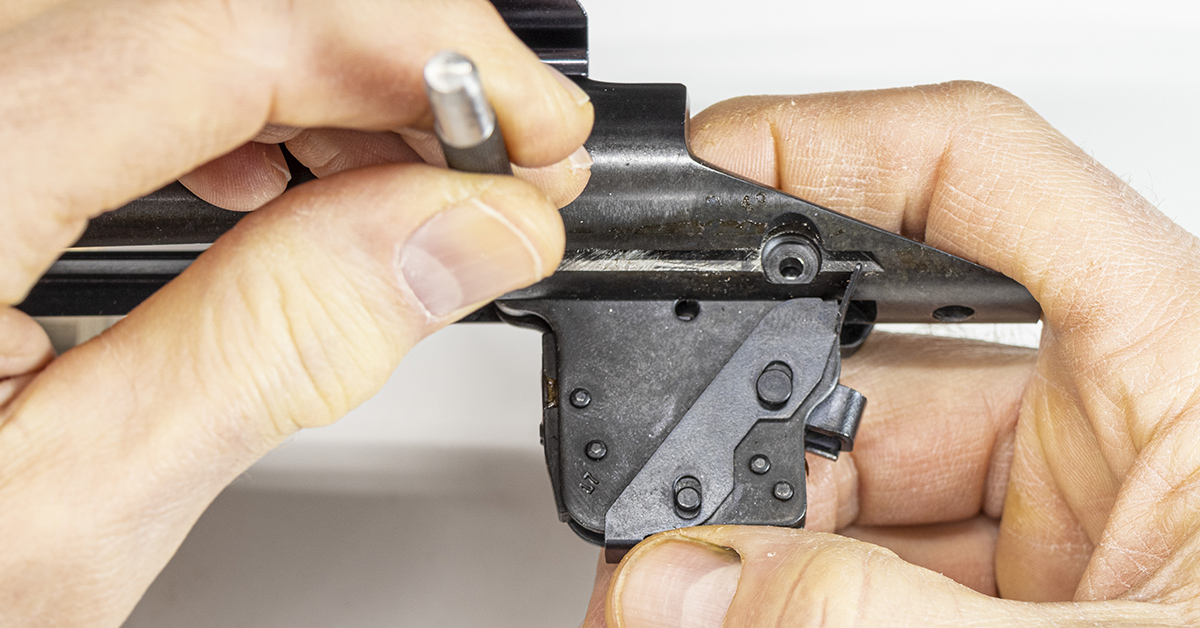
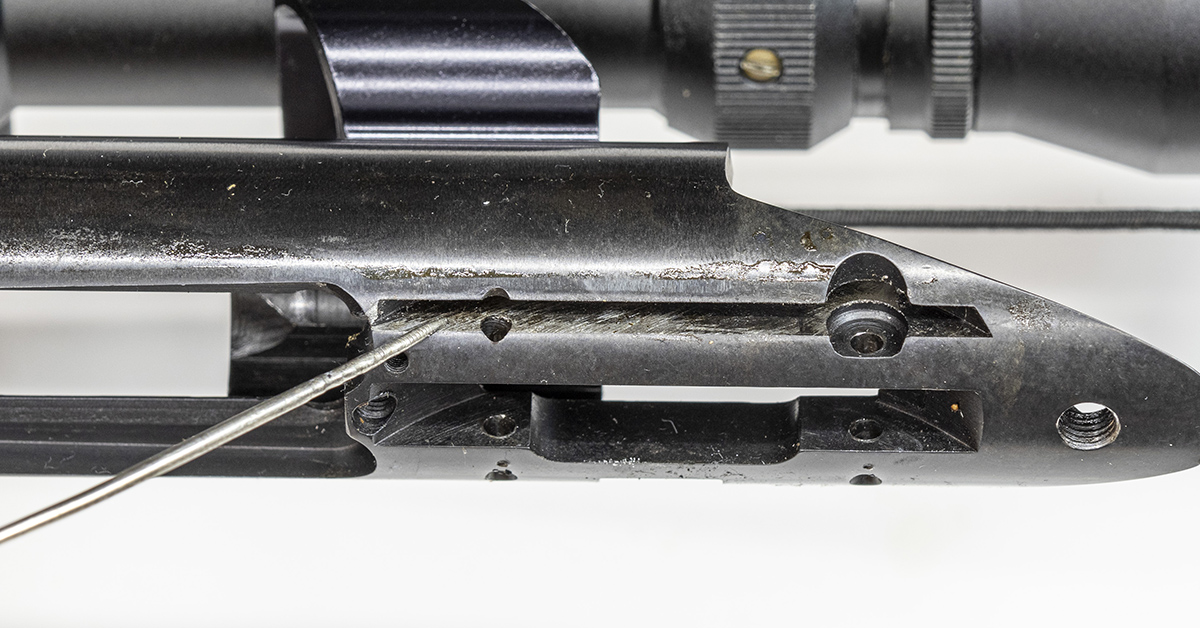
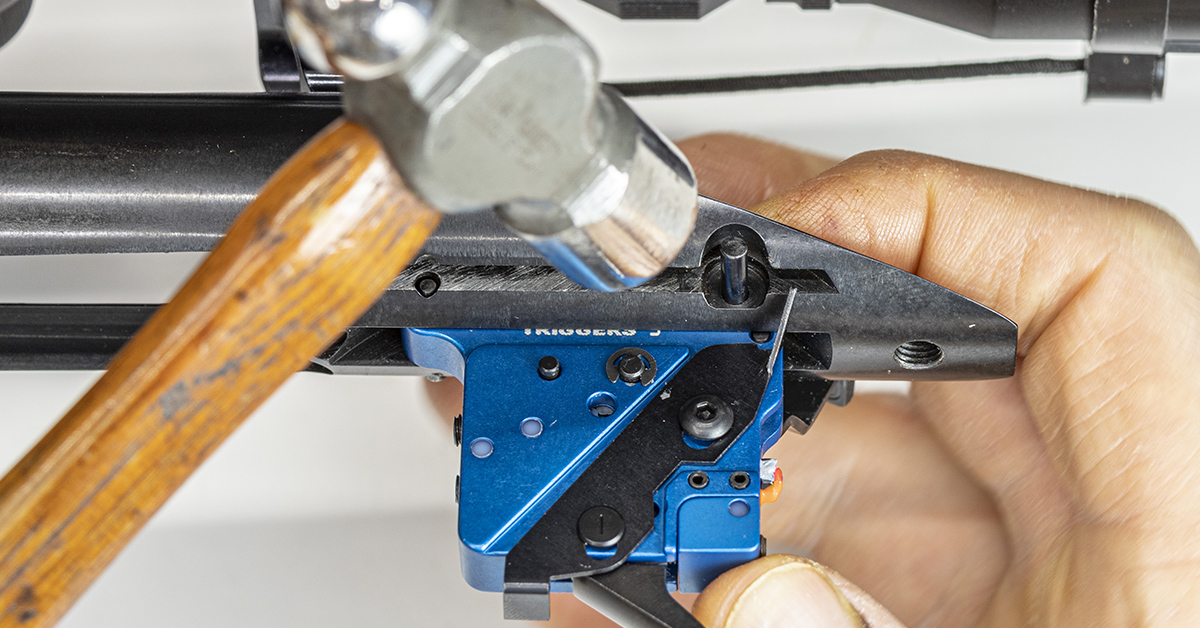
Once adjustments are complete, repeat the previous trigger test, and then work the action briskly to ensure the sear holds and there are no slam fires (firing pin releasing when the bolt is pushed closed). Cock the action, place the safety in the fire position and, using a rubber mallet, strike the very end of the receiver as shown. You must strike the receiver straight. Off-angle blows may cause the sear to release and give an inaccurate result. This should be a rather sharp blow, although we are not driving railroad spikes.
Further reassembly is simply the reverse of disassembly. The only thing being different is you have a new trigger attached to the receiver. The Timney trigger housing is somewhat larger than the factory Remington’s trigger housing. During reassembly, check for contact between the trigger and the stock.
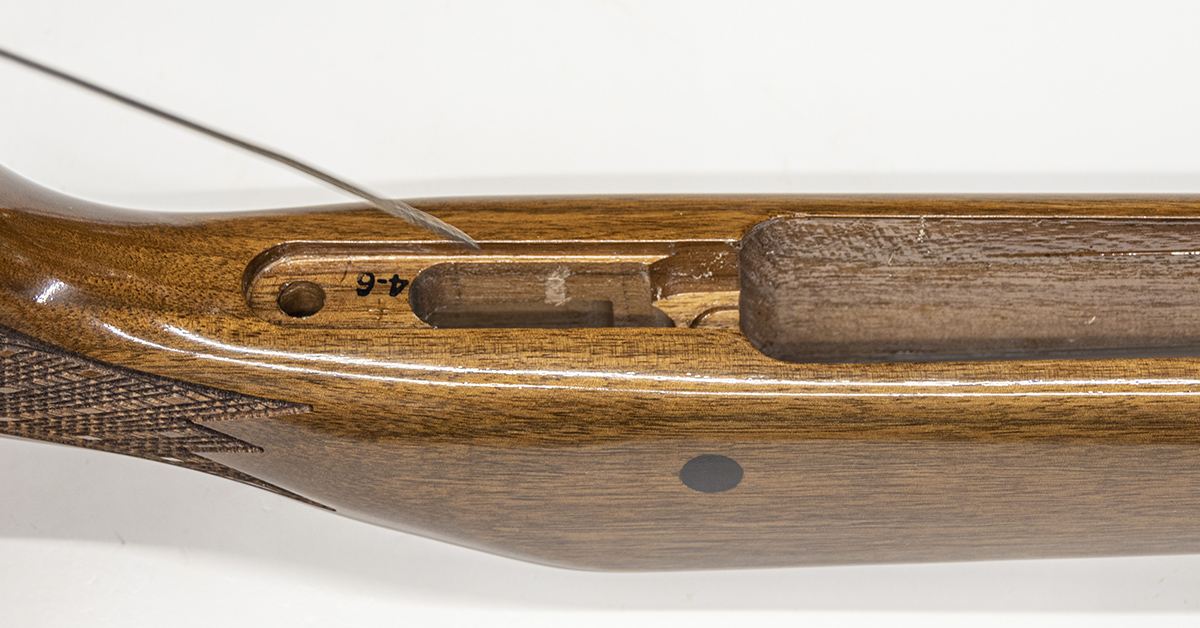
The Timney trigger makes slight contact with this Remington factory walnut stock. This is easily corrected with a small file. Even though your rifle may go together, it is important to ensure that there is clearance between the stock and the trigger housing. Be sure to seal any alterations made to wooden stocks with Birchwood Casey’s Tru-Oil.
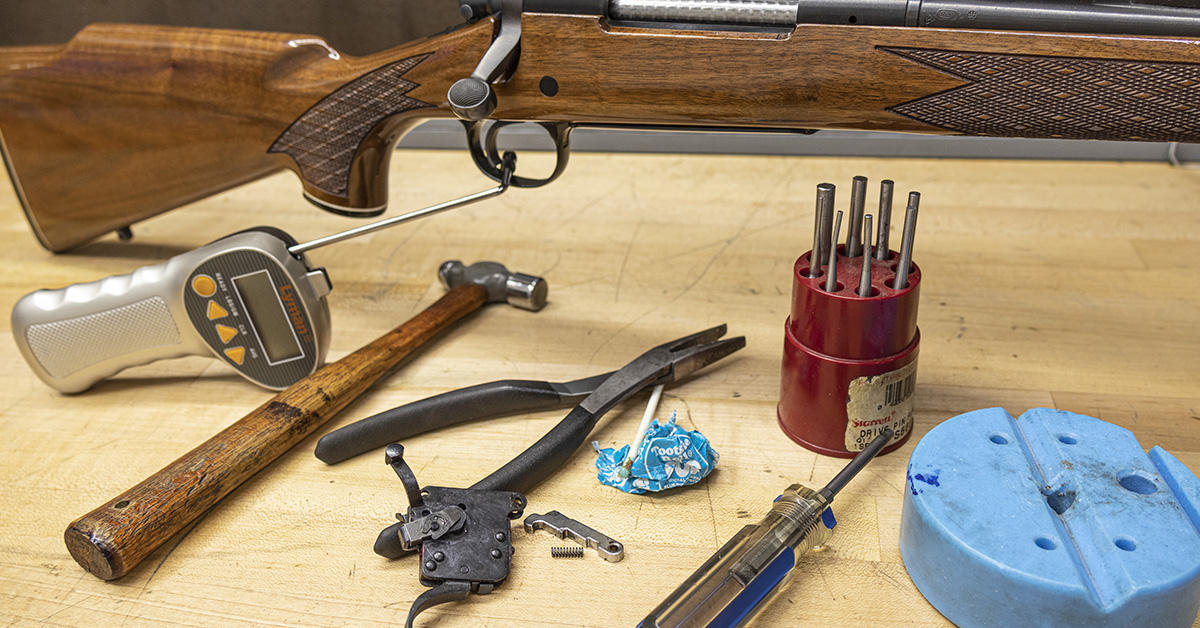
With just a few common hand tools and a little time, the installation of a Timney trigger will have your Remington 700 performing at a new level (and leave the safety concerns of the factory trigger behind). It is a project well worth the investment. As for the Tootsie Pop that comes with every trigger, I certainly enjoyed it, but I still don’t know how many licks…