Cleaning and maintaining a GLOCK pistol is not as intense as some may think…and a lot less complicated than many make it out to be
by Robb Manning
Proper maintenance of a GLOCK pistol goes against pretty much everything you’ve learned about gun maintenance, especially when it comes to solvents and lubrication. Those with a military background who are taught to slather copious amounts of CLP on their M4s can find it particularly perplexing. Those who are OCD about their gun maintenance will find GLOCK maintenance disconcerting, maybe even alarming.
In the early years of my GLOCK ownership, I clung to the old ways of gun maintenance, ignoring the owner’s manual. It wasn’t until I attended my first GLOCK Armorer’s Course that I learned the error of my ways.
Cleaning a GLOCK is extremely easy, and mostly just consists of loosening carbon/debris and wiping it off with a cloth.
Cleaning
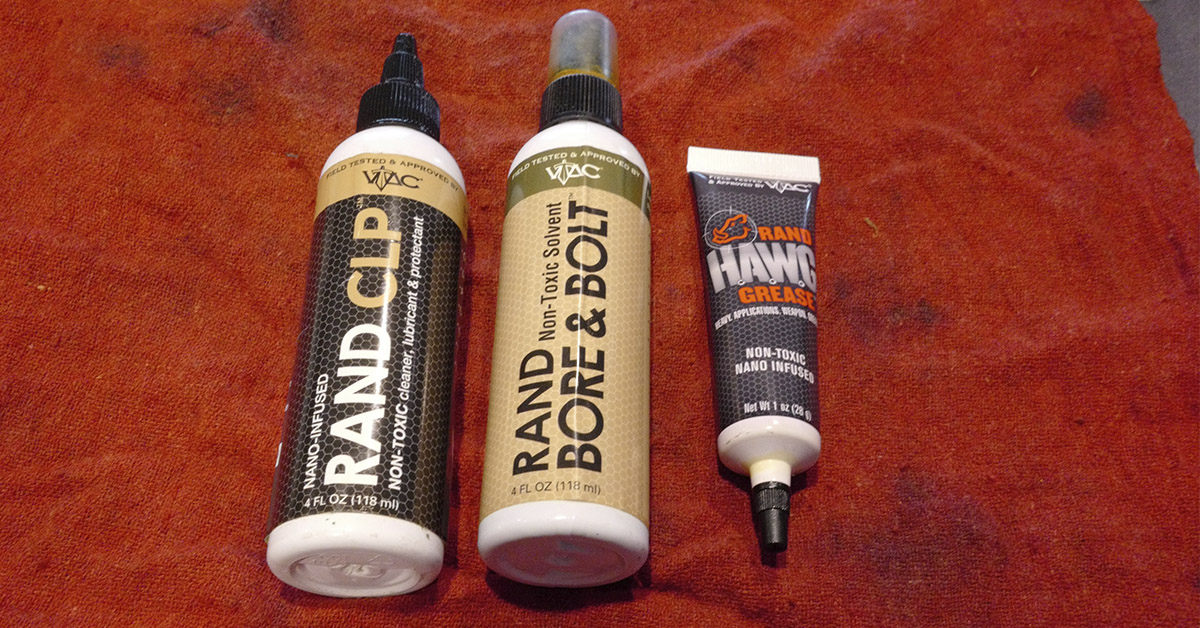
The gear needed for cleaning includes a nylon AP (All Purpose) brush, bore brush and rod (the one that comes with your GLOCK works fine), patches, a rag, wood cotton swabs (optional), and a good lubricant. You can use a product that’s just for lubrication, or you can use a CLP. Use firearm-specific products; don’t use motor oil (which has carcinogens that can vaporize when you’re shooting, and you’re going to breath it in).
As for solvents, rarely are they needed for anything other than the bore. If you do need to use solvent, make sure that when you are done you completely remove the solvent so that the surface is dry, and NEVER get solvent or lubricant inside the firing pin channel. Solvents and/or lubricants attract dirt, and if dirt builds up inside the firing pin channel, it can impede proper function of the handgun. I go as far as to have a couple of nylon AP brushes that I’ve never used with solvent, so solvent residue can’t be transferred to surfaces that I don’t want it on.
Never use Nitrate-based solvents such as Hoppe’s #9 on a GLOCK; it’s not good for nickel plating.
General Cleaning / Maintenance
For cleaning in general, start by skipping the solvents and just use a dry nylon brush to go over all the surfaces in and on the slide and frame until all fouling has been loosened, then wipe it down with a rag to get it off. I finish up with wood cotton swabs to get in the nooks and crannies. Make sure to get under the extractor hook and the slide grooves. Ninety-five percent of the time this is all that needs to be done to clean your GLOCK. If the dry AP bush isn’t enough, then try the CLP, sparingly, and keep in mind what I said about the firing pin channel.
Breaking it down by part:
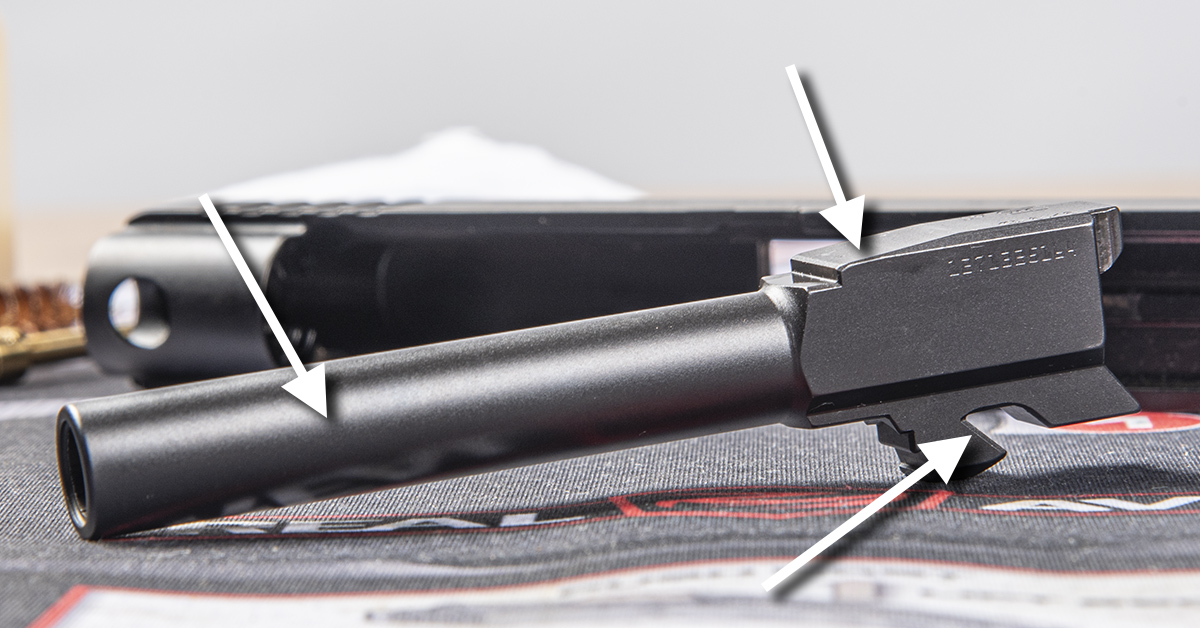
Barrel – Cleaning the bore is where some gun solvent or CLP might be needed. I usually cover a patch with CLP and push it through the barrel, then let it sit for a few minutes. Punch the bore using the proper bore brush, giving it two to four passes, depending on how dirty it is. Push patches through until they come out clean. Use a dry nylon AP brush to clean the feed ramp until all fouling is gone. Also, scrub the lug area. When done, wipe all surfaces down with the rag, making sure it’s completely dry and free of all residues.
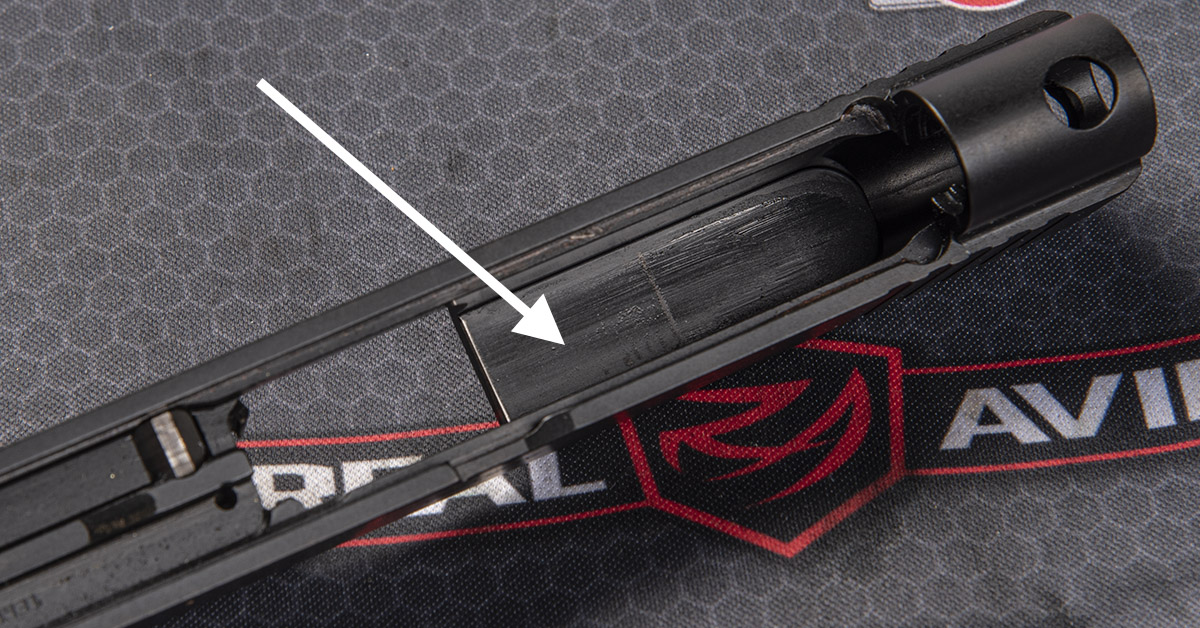
Slide – (Note: new GLOCKs have a copper-colored substance that is factory applied to the inside of the slide. Do not remove; allow it to work its way into the slide as it naturally wears away). Use a dry nylon AP brush to go over the entire inside of the slide until all fouling is loosened. Extra focus should be given to the breech face, under the extractor hook, slide grooves, and the ejection port. Wipe it with a rag to pick up the loosened fouling and finish up using wood cotton swabs to get the detail areas. For stubborn carbon, I scrape it with the wood end of the swab. If that doesn’t work, I’ll use a dental pick. When done, make sure it’s completely dry.
Keep in mind that the coating on the GLOCK slide is about as tough as it gets. It’s almost as hard as a diamond. If carbon is left on the slide, or you don’t clean it at all, nothing is going to happen to it. It’s not going to corrode. Even a used GLOCK with holster wear isn’t going to corrode at the wear spot because the coating is not just on the surface.
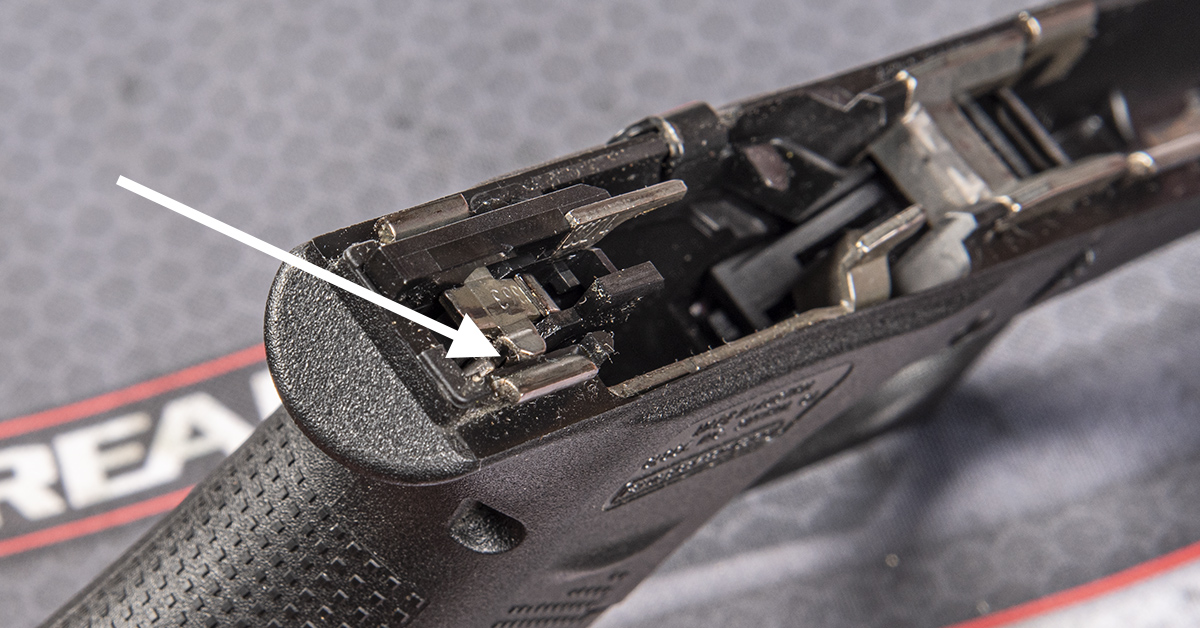
Frame – With a dry nylon AP brush, start by going over the inside surface of the frame, looking for fouling as you go. The polymer surfaces inside the frame are smooth, so carbon wipes off those surfaces easily. Focus on the metal rails and the area where the locking block, locking block pin, trigger bar, and slide stop all converge at the frame. Also, make sure to hit the area to the rear of the trigger assembly where the cruciform and ejector are located. Pull a rag up through the grip, then use it to wipe down what you can reach. Use cotton swabs for all the hard-to-reach places, and once again, make sure it’s completely dry.
Recoil Spring – Scrub between the coils with the nylon brush, then wipe down with a rag. Inspect the spring and guide rod for any obvious wear. Make sure it’s…(drum roll)…completely dry.
Magazines – Try to keep your magazines as dry and free from debris as possible. Unless you notice issues with function, it’s not necessary to disassemble magazines. In fact, GLOCK recommends that you don’t. Just wipe it dry with a rag and clean the follower area with a cotton swab. Sometimes, I’ll push down on the follower with the nylon brush and give the inside a quick clean with a cotton swab; however, if you shoot frequently, follow the advice I was given at the Armorer’s Course: disassemble and clean your magazines about once per year.
If you find it necessary to disassemble the magazine, insert the GLOCK armorer’s tool (or a pin punch) into the hole in the floor plate and push in as far as possible. Never use a wood cotton swab; it’s not strong enough and will break off, and once it’s broken off inside the magazine, it is difficult to get out. It can prevent the floor plate from being pushed in to disassemble the magazine to remove it. I speak from experience.
Once the armorer’s tool is pushed in as far as it will go, use it to pry the floor plate slightly forward. Use your thumb to cover the floor plate and press down to control the compressed magazine spring. Remove the armorer’s tool, then the floor plate, and ease your thumb out to release spring tension. Remove the spring, insert, and follower. Use a rag to get out all the debris and residue. Stubborn areas can be scrubbed with the nylon brush. Before you reassemble, make sure it’s completely dry so as not to attract debris.
Honestly, the armorer’s tool disassembly method kind of sucks. It works, but it’s not that great. I always feel like I’m going to break something or mess up the magazine spring. Real Avid makes a solution to GLOCK magazine take-down.
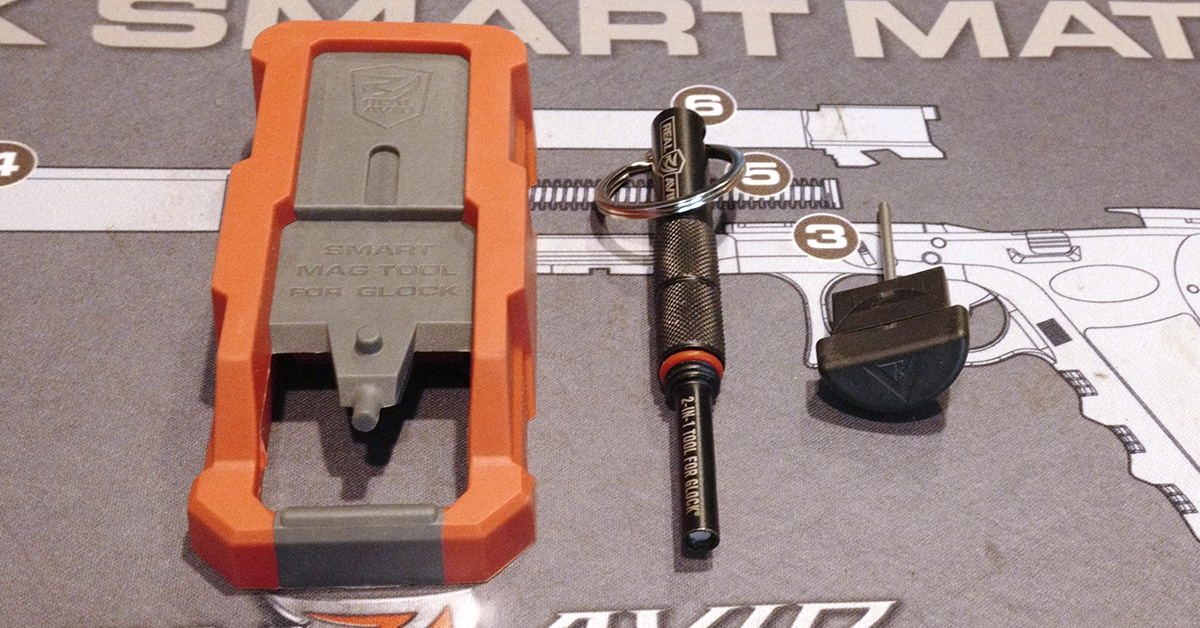
The Real Avid Smart Mag Tool For GLOCK is multi-function. To remove the mag floor plate, hold the tool on a solid surface, insert the floor plate hole onto the tool’s nipple as far as it goes (the front of the magazine should be facing down), and press down on the magazine to pop the floor plate out. While you’re applying pressure downward on the magazine, make sure to also keep pressure so the nipple stays inside the floor plate hole, otherwise it will pop out. Once the floor plate is popped, there’s a recess on top of the tool with a second nipple. Set the magazine in this recess and push it backwards onto the little shelf. This completely removes the floor plate without having the magazine insert and spring fly out. It’s a pretty nifty idea, and you can do this in reverse to assemble the mag as well. One last thing about this Real Avid tool: flip it upside down and there’s a mag unloader.
On the subject of tools, there are a couple more that can come in handy. One is from Vickers Tactical/Tango Down and is called the Grip Plug Takedown Tool. It’s an armorer’s tool that fits into the vacant space in the grip just behind the mag well. If you have your GLOCK, you’ll have an armorer’s tool. It comes in models for Gen3, 4 and 5, and fits most standard and compact frame GLOCKs in 9mm, .40 S&W, and .357 SIG.
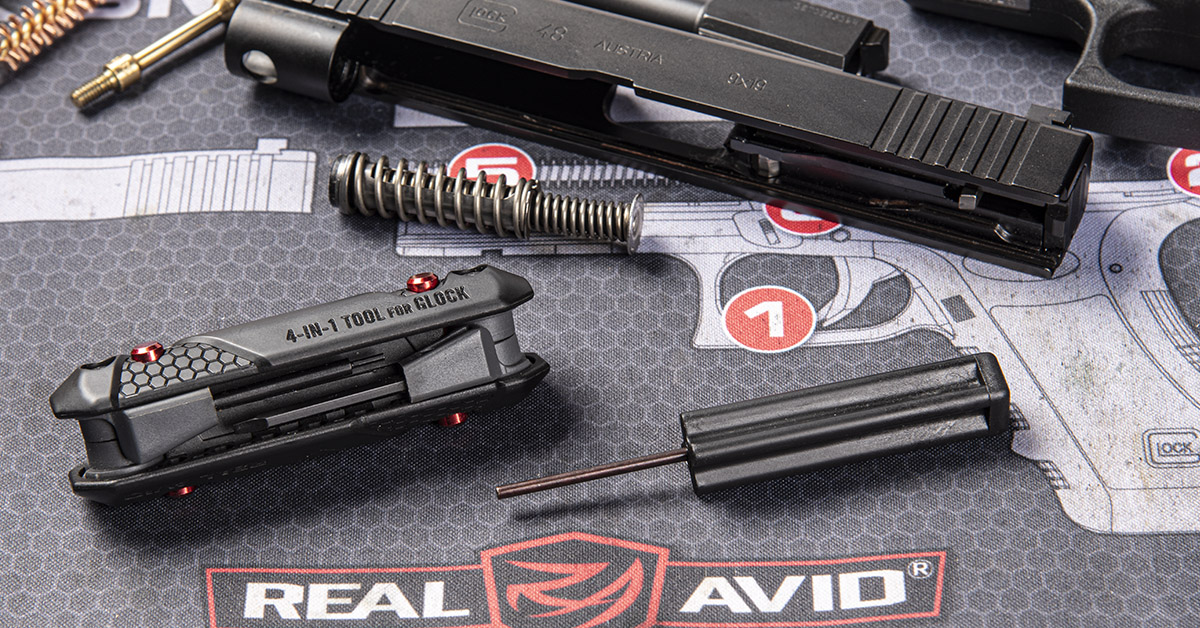
The other tool is from Real Avid and is the 4-in-1 Tool for GLOCK. It’s an armorer’s tool and front sight removal tool, and it comes with an Allen wrench for electro-optics adjustments as well as a small flat-blade screwdriver.
Lubrication
Unlike other firearms — especially pre-GLOCK and non-polymer designs which require a light coating of lubricant/protectant — the GLOCK needs little lubricant. Buy a high-quality oil or grease product. Since so little is used, it will last you a long time. For the most part, specific points are being lubed, so I prefer a syringe-style applicator. GLOCK recommends seven drops at specific points, but my instructor at the armorer’s course uses less than four.
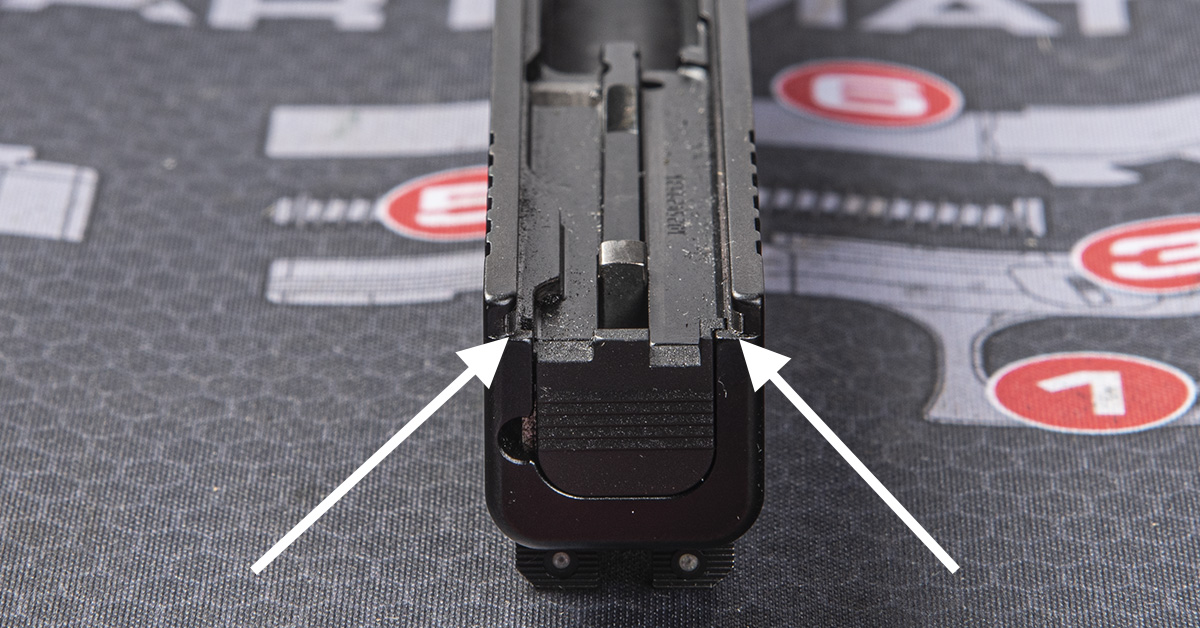
The most important location to place a drop is on the frame, located under the connector hook (right next to the rear right frame rail). This makes for a smoother trigger pull and prevents damage to the trigger bar and connector. Next, place one drop on each of the two slide rail grooves on the slide and allow the drops to run the length of the grooves (once assembled and the action worked, the drops will spread to where they need to go).
GLOCK recommends that you place a drop on the inside of the slide where the barrel hood contacts the slide but use little since the barrel hood also gets a drop. Place one drop each at the barrel lug, barrel hood, and, using your finger, spread a drop around the outside of the barrel.
It’s an important thing to stress, so I’ll mention it again: you never want to leave any lubrication or solvent in the firing pin channel or the magazine because it is a magnet for debris.
Another serious point, but a rather funny one, was told at the armorer’s course. The hole on the underside of the slide, right behind the breech face IS NOT an oil fill port. Someone actually thought this was an oil fill port, and so they squirted gun oil into it until oil started to flow from all other holes. To use the popular vernacular of today…LOL!
If you explore the GLOCKoverse (i.e., online forums), you will hear very different opinions on how often you should conduct cleaning/maintenance on your GLOCK. Some say to clean it after every time shooting it. Some people say you should only clean your GLOCK every thousand rounds or so. Others say you shouldn’t clean your GLOCK until you notice a degradation in function (I’m not buying into that one, and probably won’t ever). I have seen police trade-ins for sale that look like they haven’t been cleaned since being put into service.
Whichever route you choose, if you clean and maintain your GLOCK using the process outlined here, your GLOCK will stay up and running and will likely last longer than you or me.
- TESTED: Beretta PMXs 9mm Pistol - July 26, 2024
- The Correct Way to Clean a GLOCK - January 15, 2024
- Concealed Carry Guns: How Important is Ergonomics? - December 11, 2023