Here’s a slick way to build your own target stand with a minor investment in supplies and a couple hours in the workshop
by Lou Patrick
Paper targets have their place. They provide the means to gather the information needed to make proper sight corrections or to assess the performance of the ammunition. Once these tasks are accomplished, though, paper targets become rather boring very quickly, in my opinion. It’s time to move on to steel targets.
For routine practice, steel targets tend to liven things up as they provide instant feedback that paper targets simply cannot. As soon as the bullet strikes the steel, you’ll hear that satisfying “PING” and the target will move.
Contrast that with paper targets that require you to look through a spotting scope or walk down range to verify hits, and it doesn’t take long for paper targets to become so full of holes that you become lost and confused as to where the last shot impacted. Eventually, the paper target will need to be replaced or the previous bullet holes covered, requiring yet another trip downrange for target maintenance.
Steel targets do not require any more attention on your part. They are also cost-effective target, as I doubt the average shooter will ever wear one out. All that is required after use is a quick coat of flat black spray paint and you’re ready for the next shooting session.
The first concern when getting started using steel targets is the size of target. There are actually two concerns here. First is the thickness of the steel used to make the target. The thickness of the target will dictate the maximum size cartridge that can be used safely. The thicker the steel the greater the impact energy the target can effectively absorb. This means that the rifle shooter is going to need a thicker steel target compared to someone who only intends to shoot handgun cartridges.
Another thing to be aware of when selecting target thickness is that while a target rated for rifle fire can be used for pistol fire, the thicker and heavier rifle target will not react well under pistol fire. The “ping” won’t be as loud, and the target won’t move as much. After thickness, the next concern is the size of the target needed to provide effective, realistic practice.
Targets produced by Shooting Targets 7 are available in a large variety of shapes and sizes. For example, it is widely accepted that the average whitetail deer has a vital zone that is about 10 inches in diameter. A deer hunter can effectively practice using a ten-inch gong while shooting from the various positions that he would expect to shoot from in the field. The company’s website also features a reference chart to guide you in the selection of the proper target thickness for the cartridge you intend to use.
The second concern is what to hang it on. I was recently faced with this same question after updating my 9mm AR carbine. I wanted to start shooting steel again and had to take into account that I would do so on a public range. I needed something that would be easily transported and not require assembly. For handguns and practice with the 9mm carbine, I felt the gong should be about chest high. While it is acceptable for the gong to move upon bullet strike, the stand needed to remain motionless and be heavy enough to provide stability but not so heavy as to limit portability. Once the bullet strikes the target, it’s going to splatter. Bullet splatter will eventually chew up a wooden stand.
With all this in mind, I decided to give black iron (gas) pipe a try.
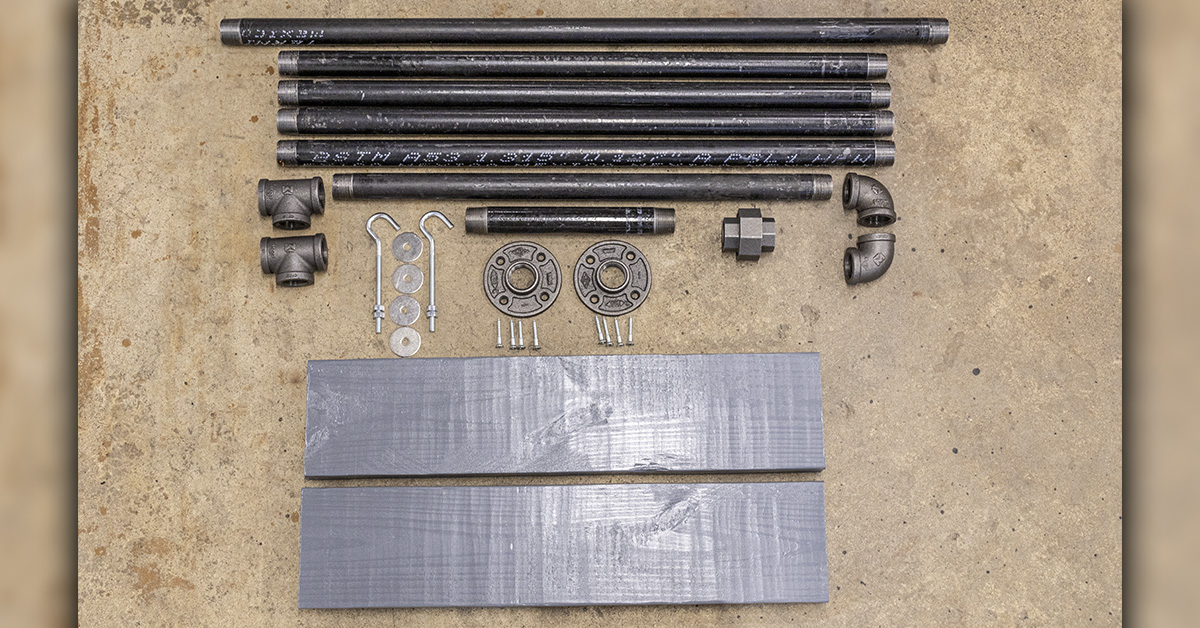
All components of this target stand are off-the-shelf items from the local hardware store and no custom cutting or threading of pipe was needed.
All pieces of pipe and pipe components are one inch in diameter. Needed pipe segments include:
- (1) 36-inch length
- (4) 30-inch length
- (1) 24-inch length
- (1) 10-inch length (this piece is referred to as a nipple)
Additional materials include:
- (1) union
- (2) “T” fittings
- (2) 90-degree elbows
- (2) floor plates
- (2) 5/16-inch hooks (nuts were provided with the hooks)
- (4) 5/16-inch fender washers
- (8) #12 x 1 ¼-inch wood screws
- (2) 2x6x24-inch wood
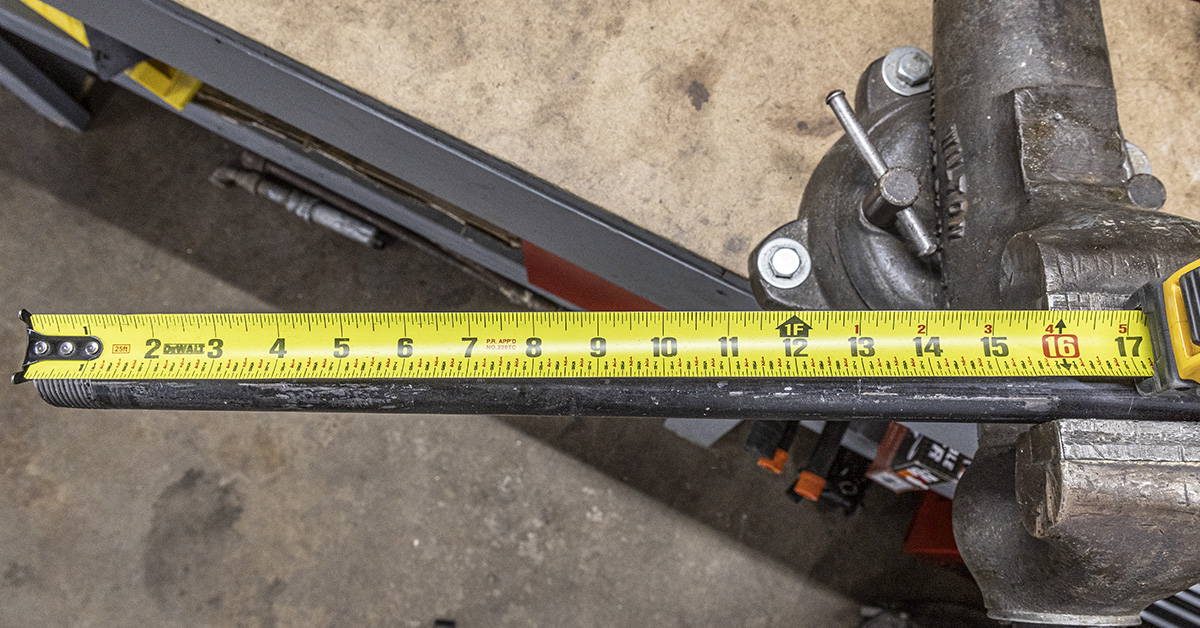
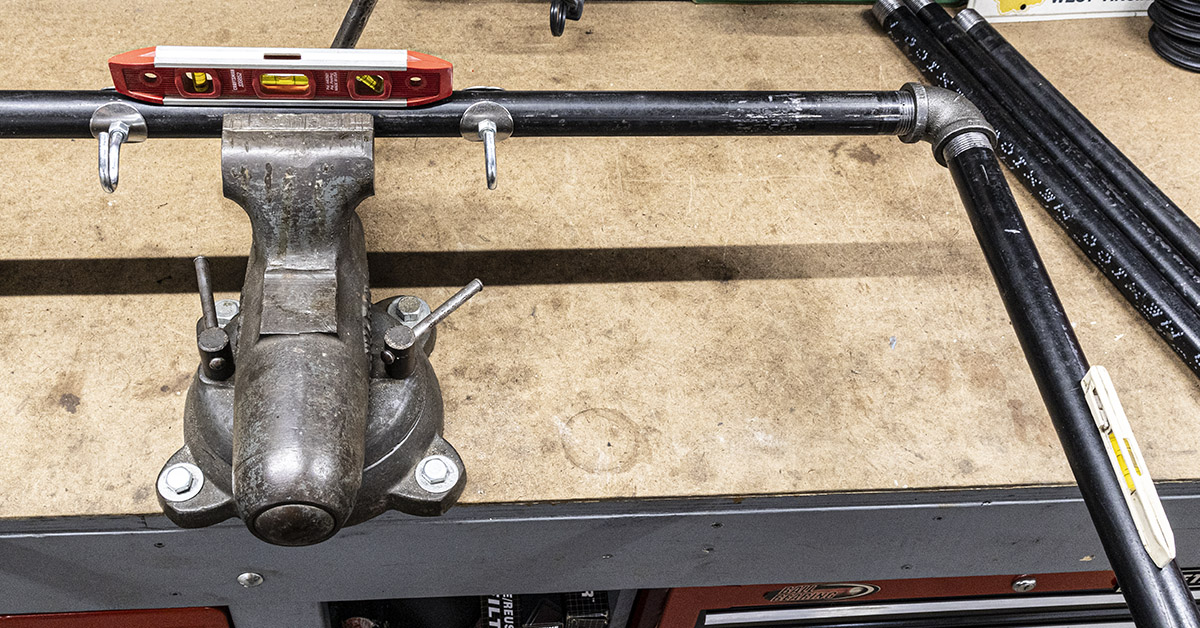
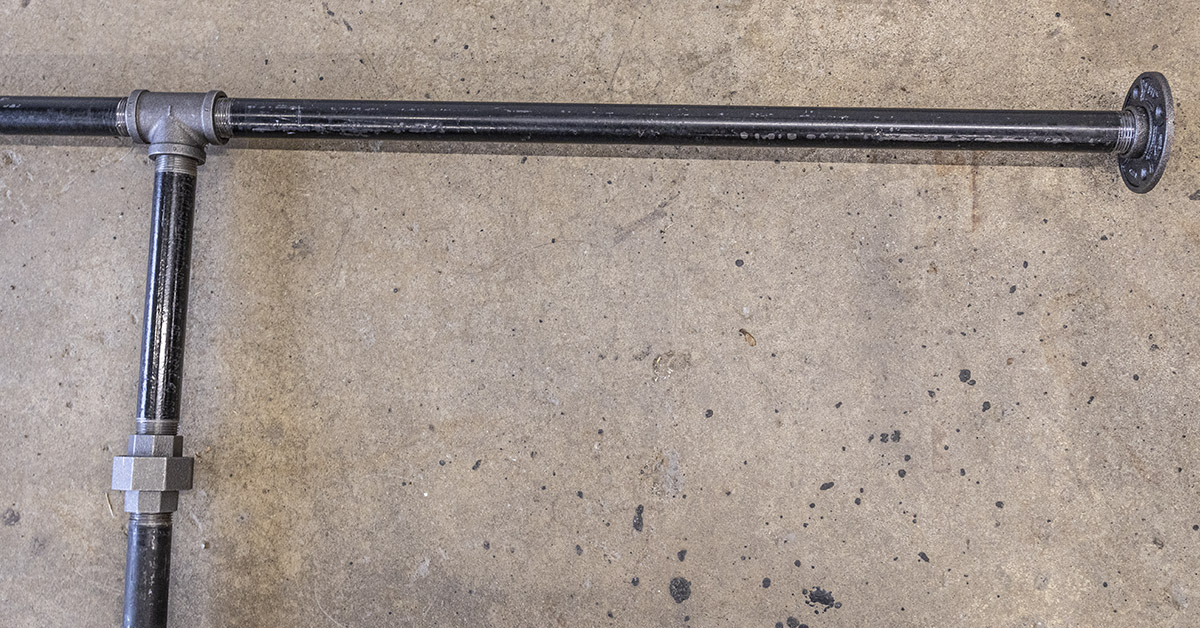
The 36-in. piece is for the top cross member. I started by measuring back 13 inches from each end of the pipe and marked these locations completely around the pipe. These will be the locations for the hooks. You cannot drill at this time because the elbows must first be installed to gain proper alignment.
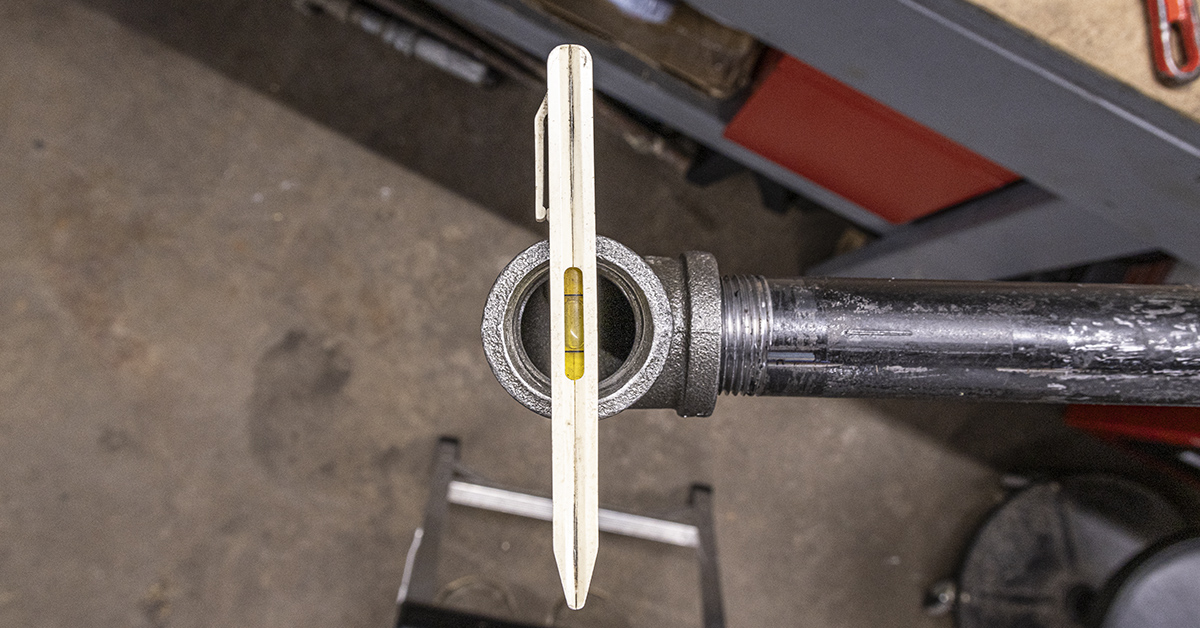
With the pipe secured in a vise, install an elbow wrench-tight on each end of the pipe. Once tight, ensure that the elbows are pointing in the same direction. This is easily accomplished by placing a level on the elbow.
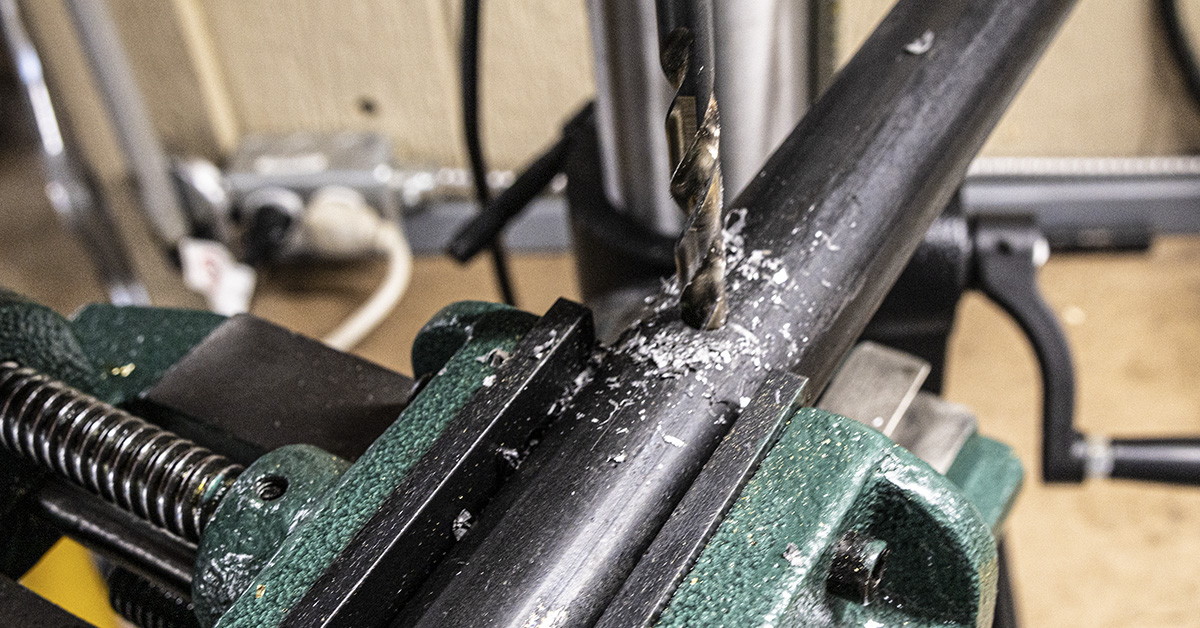
The pipe is held level across its length in the drill press vise. A level on the elbows will ensure that the vertical axis is properly aligned for drilling. Use a 5/16-in. drill bit to drill through the pipe at the lines previously marked 13 inches back from each end.
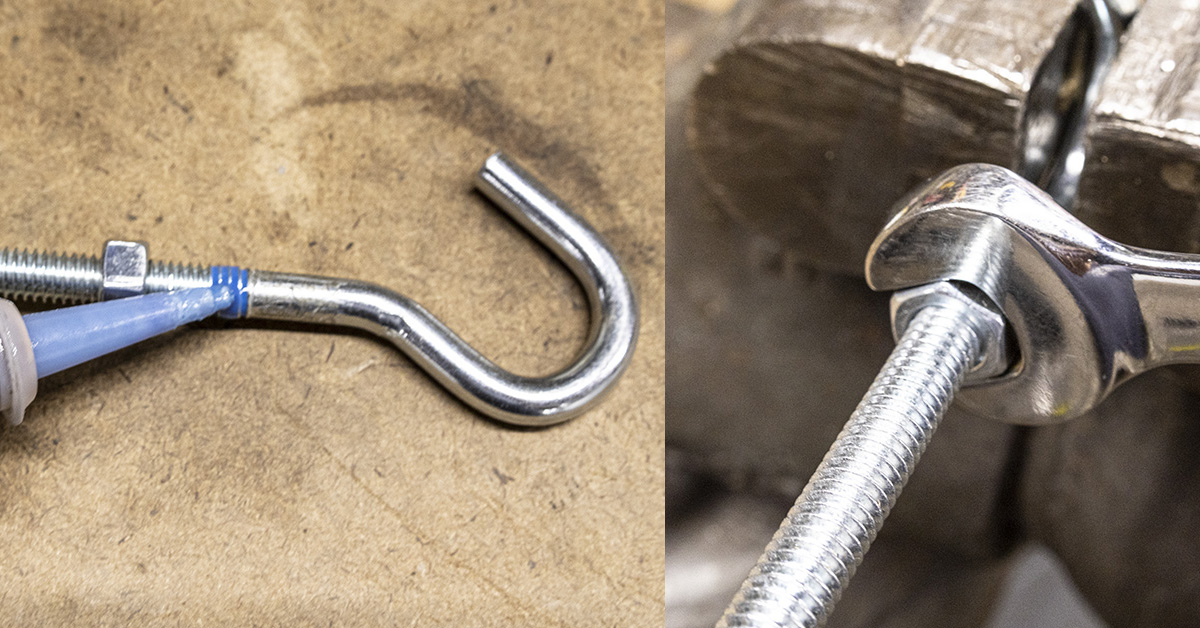
Apply blue Loctite 242 to the end of the threads near the hook and tighten the nut into position.
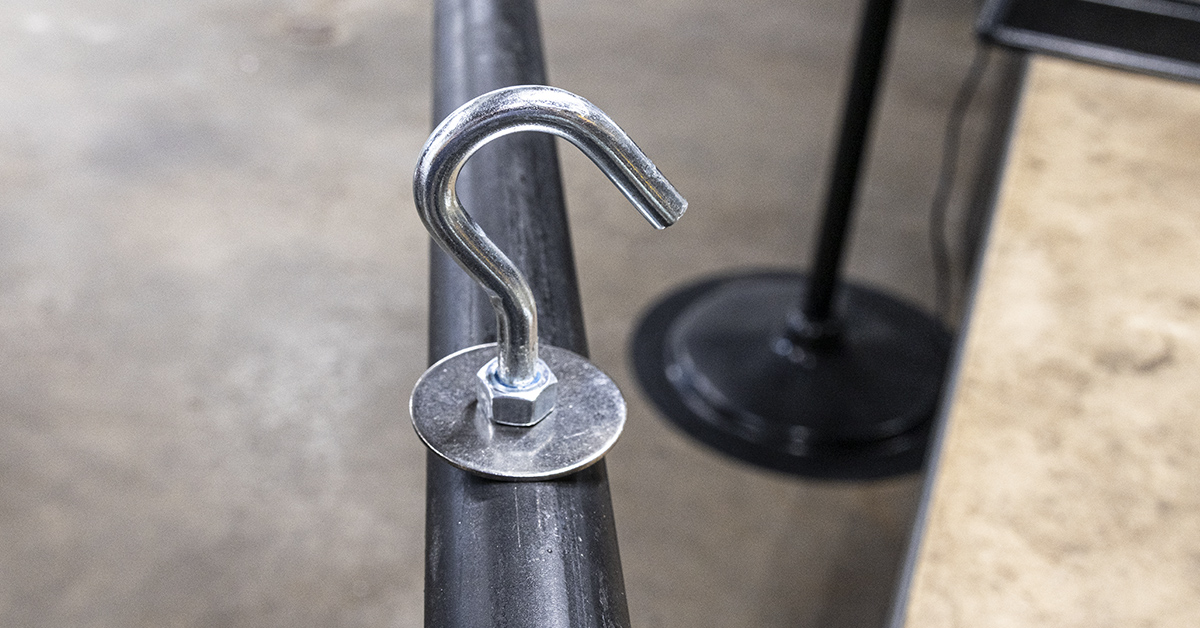
Place a fender washer behind the nut and install the assembly into one of the drilled holes in the pipe. Install a fender washer on the opposite end of the hook, bringing it to rest against the bottom of the pipe. Apply blue Loctite 242 to the threads of the hook just ahead of the washer and then install the nut and tighten it in place. Repeat this process for the other hook.
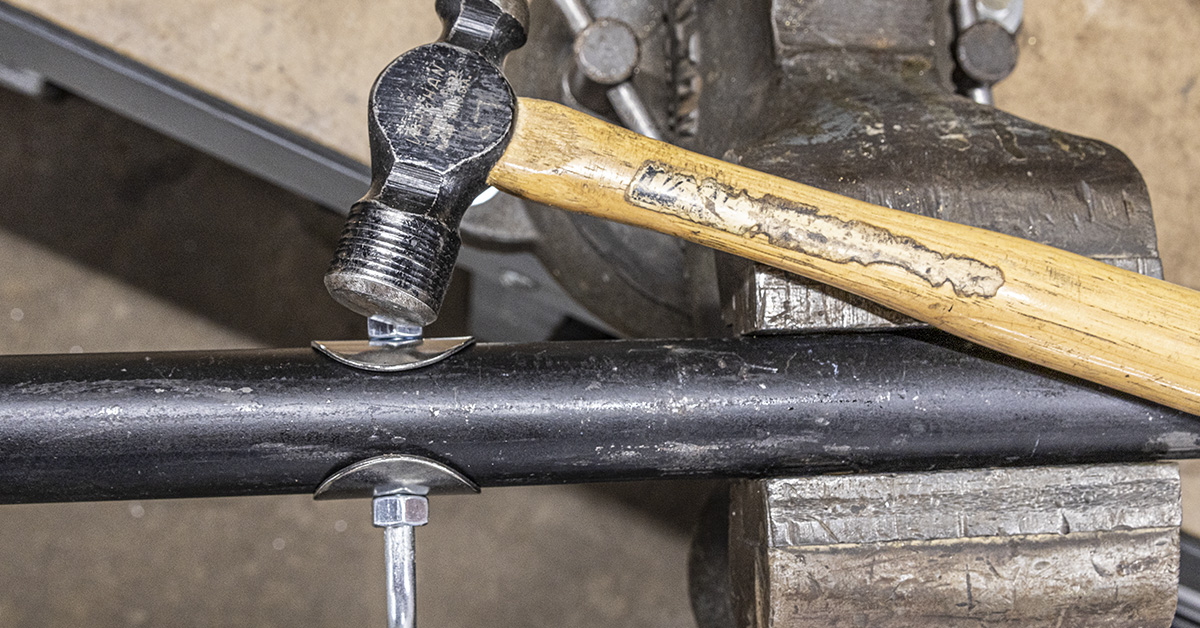
With the assembly secured in a bench vise, use a small hammer to form the fender washers around the contour of the pipe.
Install a 30-in. length of pipe into each elbow. While not a necessity, I found it easier to maintain alignment by holding the components level in the bench vise as pictured.
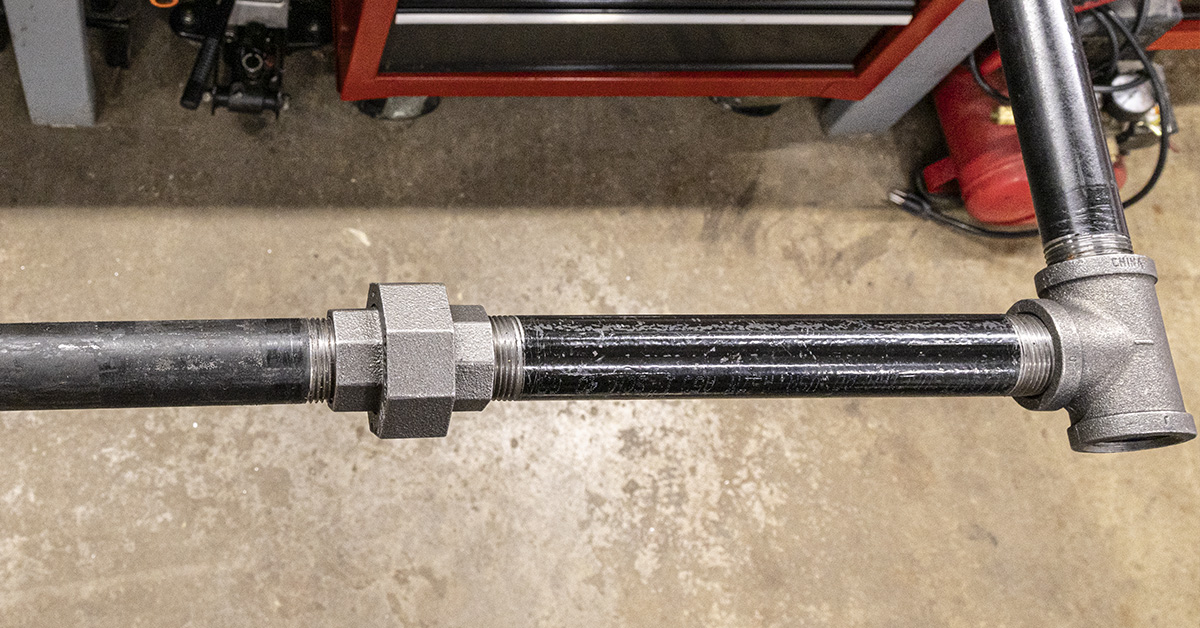
Install a “T” fitting at the end of each of the 30-in. pipe sections. Ensure that the “T” fittings are wrench-tight and pointing inward towards each other. Next, install the center cross member consisting of a 24-in. pipe section, a union, and the 10-in. pipe section as pictured.
Install the remaining 30-in. sections of pipe to the bottom of the “T” fittings and then install the floor plates to the end of the pipes.
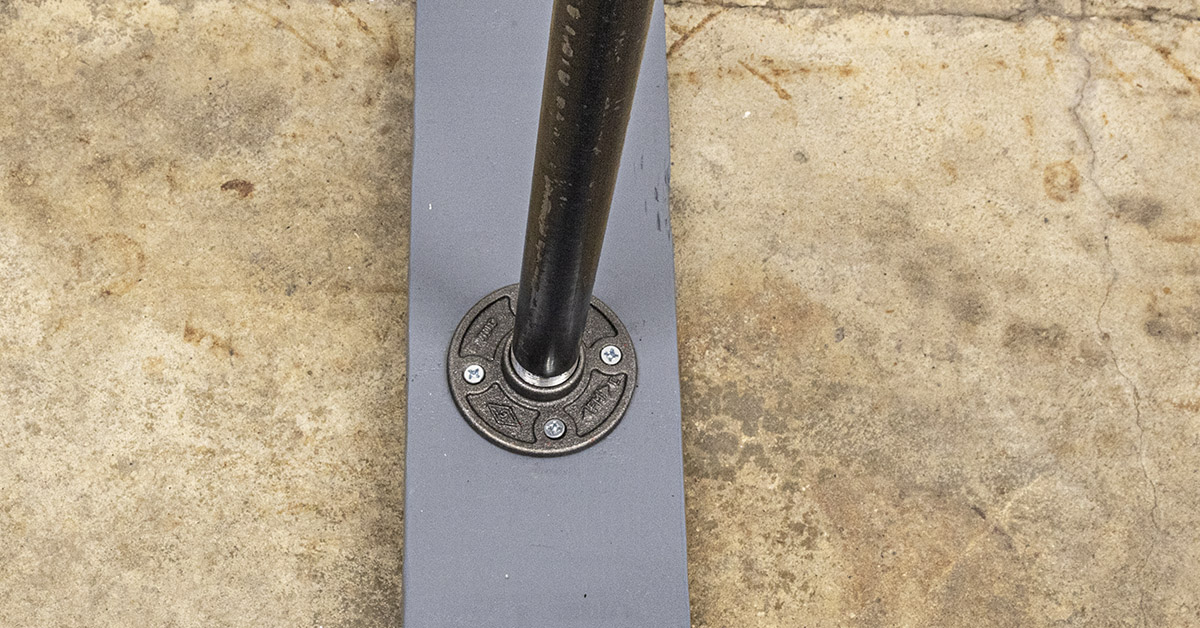
Center the floor plates onto the 2x6x24-in. bases and attach them using the #12×1 ¼-in. wood screws.
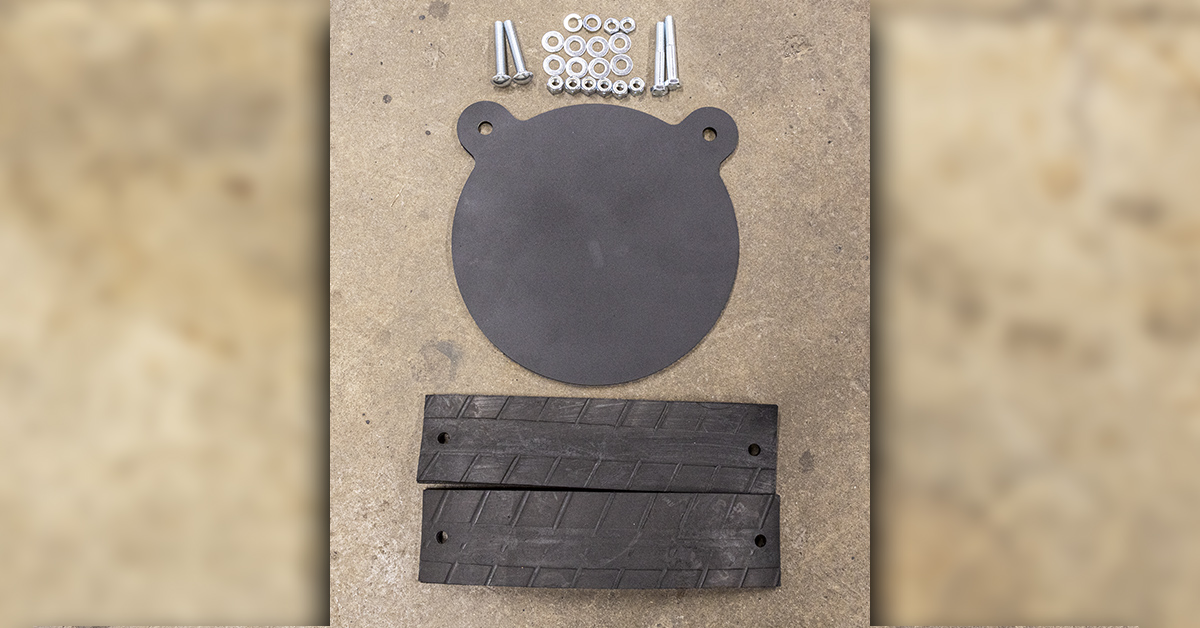
The steel gong from Shooting Targets 7 arrived with a somewhat gold/yellow-colored zinc coating. This coating protects the target against corrosion and spall. In order to reduce glare, I painted the target flat black. The mounting hardware and straps are also from Shooting Targets 7. To hang the gong, I opted for the rubber straps since they tend to help the target to settle down quicker following bullet impact and will not “wrap up” as chains are prone to do. The straps pictured are 12 inches long. I needed to cut these straps in half, making them 6 inches long to get the gong at the desired height.
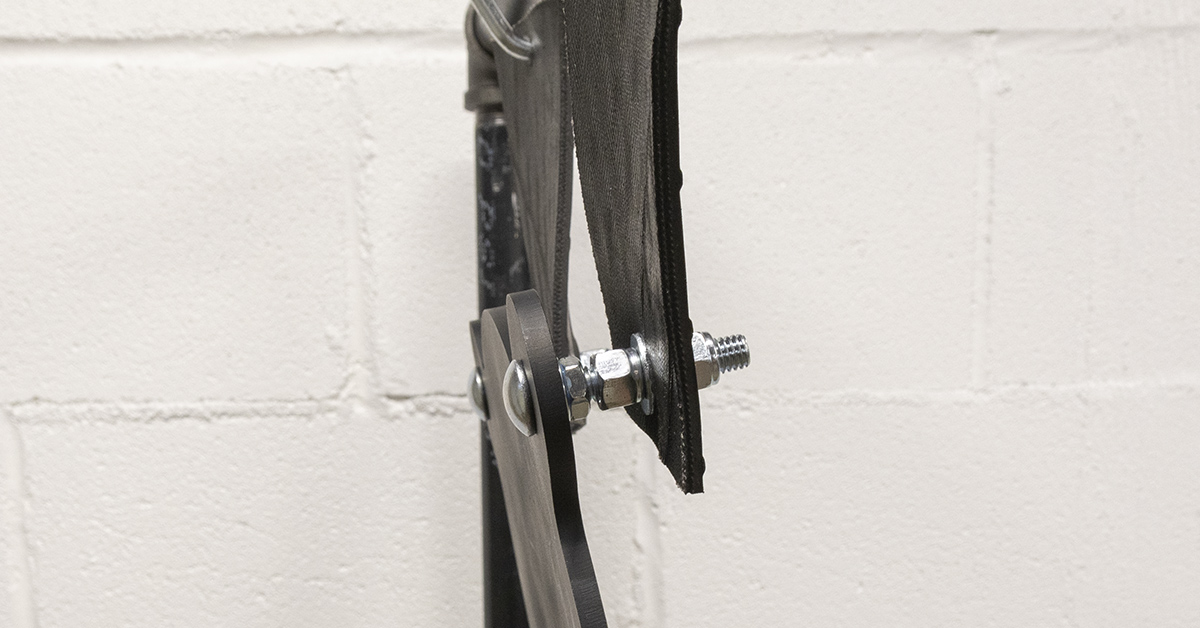
Follow the manufacturer’s instructions to attach the hardware and straps to the gong. Properly installed, the gong will hang with a slight angle going down and back away from the shooter. This backward angle aids in deflecting the bullet and the subsequent splatter downward following impact. The gong pictured is ¼-in. thick and is rated for pistol cartridges only (except .44 Magnum). It is important to mention that I feel this stand is only for use with pistol cartridges (except .44 Magnum) even if using an appropriate gong that is rated for rifle fire. This stand will most likely move around or perhaps get knocked over by rifle fire. For use with a rifle, it is best to check out one of the solutions offered by Shooting Targets 7 or a slight redesign of this concept, which I would begin by making it lower.
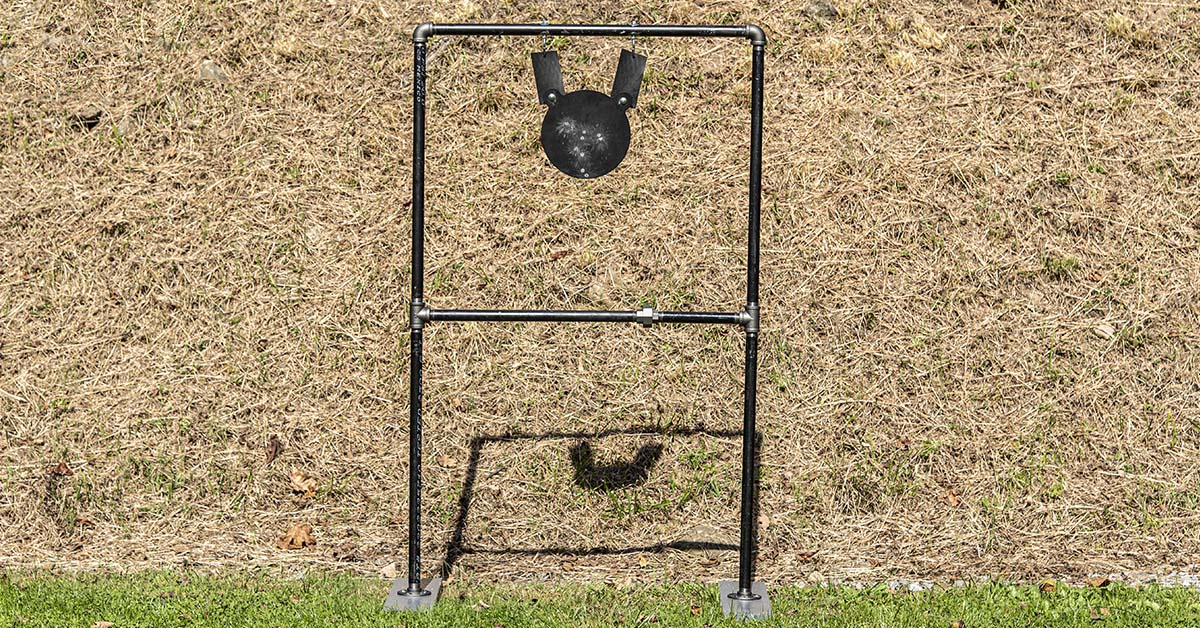
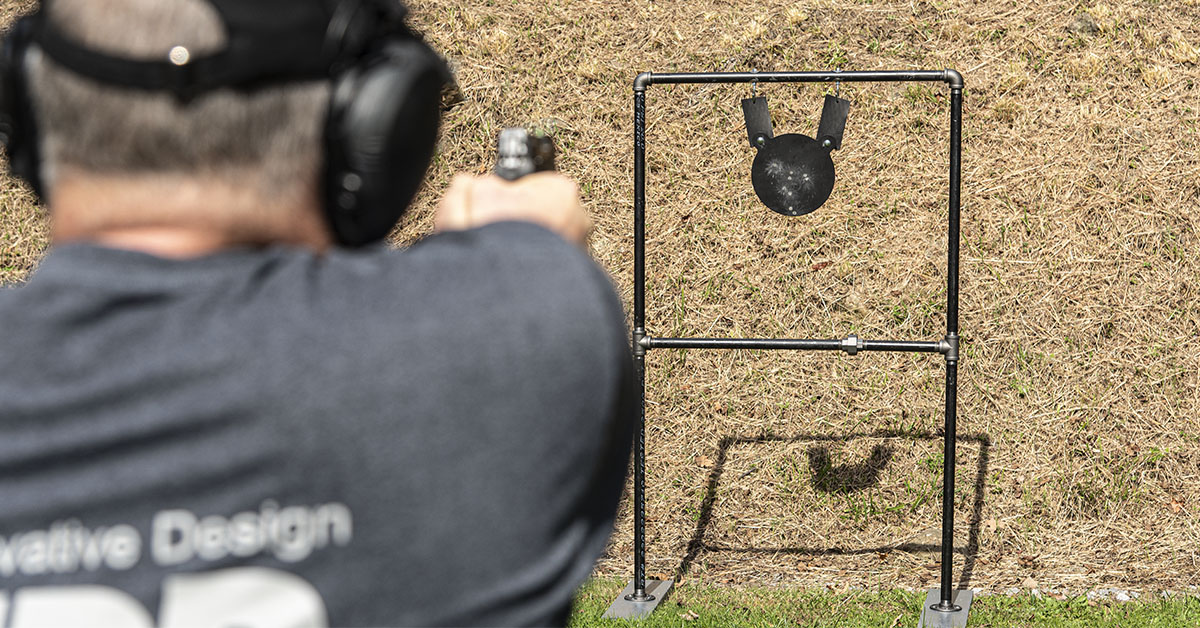
After assembly, I realized that this project went pretty much as planned. At first glance, it looks a little large; however, the gong is at chest height and is centered within a rather large “window.” This large window cuts down the possibility of bullet strikes to the stand. The stand is heavy, but not unwieldy. It also fits comfortably (no room to spare) within the back of the RAV4 with the rear seat folded down. Setup on the range takes only a couple of minutes. All that is required is to hang the gong on the stand and carry it out to the desired location.
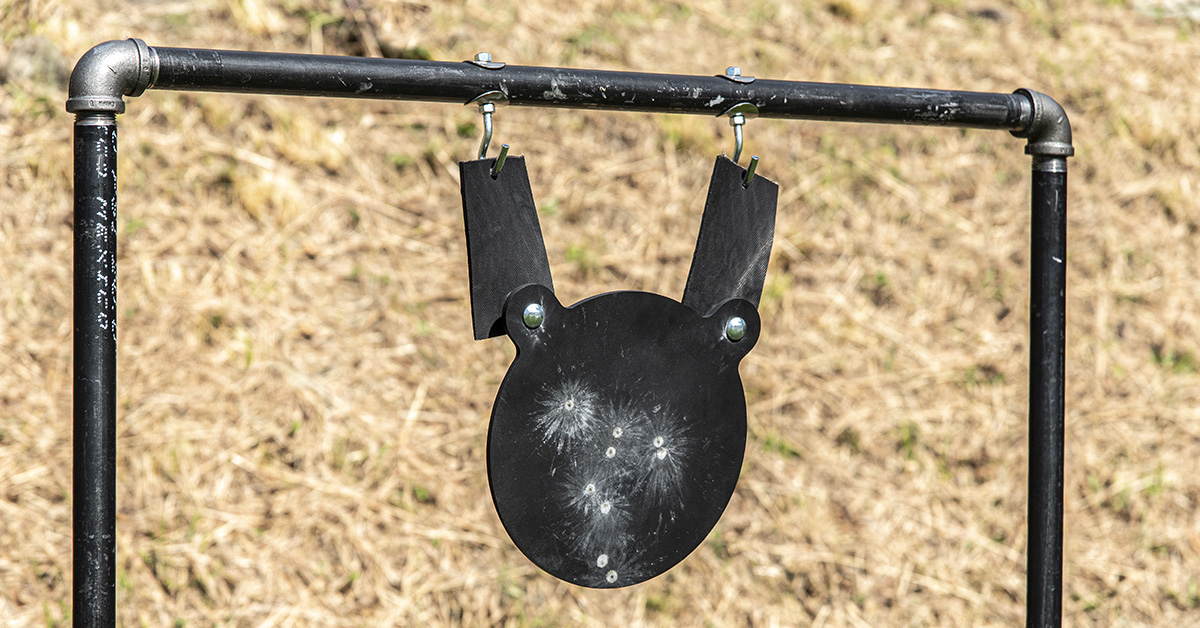
Using an AR-15 carbine chambered in 9mm and firing Winchester 124-gr. NATO ammunition at 25 yards, the gong reacted with every hit as expected, yet the stand stayed rock steady.