Inspired by Anderson Manufacturing’s new A4 rifle series, we finish our “old school” project by showing you how to build your own AR-15 rifle lower receiver assembly
by Rob Reaser
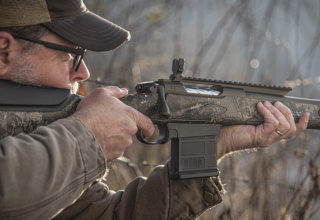
As we discussed in our previous installment Return of the AR-15 A4 Rifle: Pt. 1, the more we pondered the makeup of a true fighting firearm, the more our thoughts returned to the proven design and simplicity of the M16A2- and A4-style AR-15 rifles. A full-length rifle absent add-ons, magnified optics, and electro-gadgetry, one that can deliver rounds on target from here to way out there with iron sights, is a rifle that you can count on. For worst-case-scenario defense, that’s what makes the most sense in our minds.
Evidently, we were not alone in that thinking.
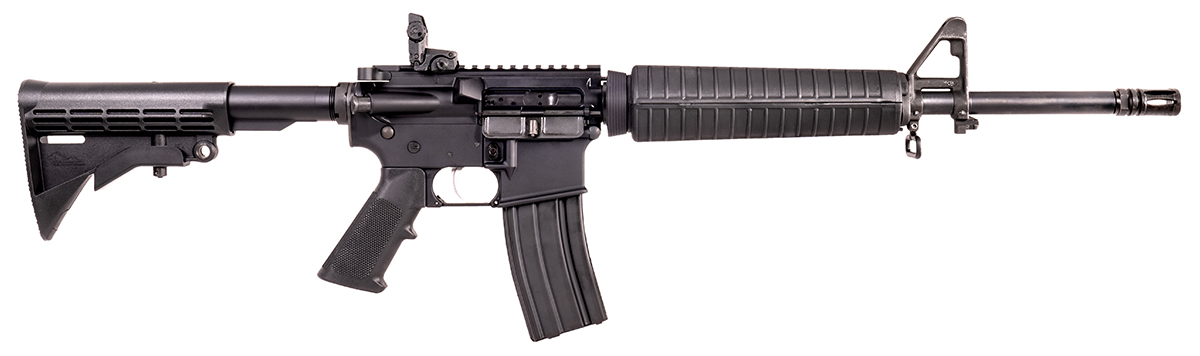
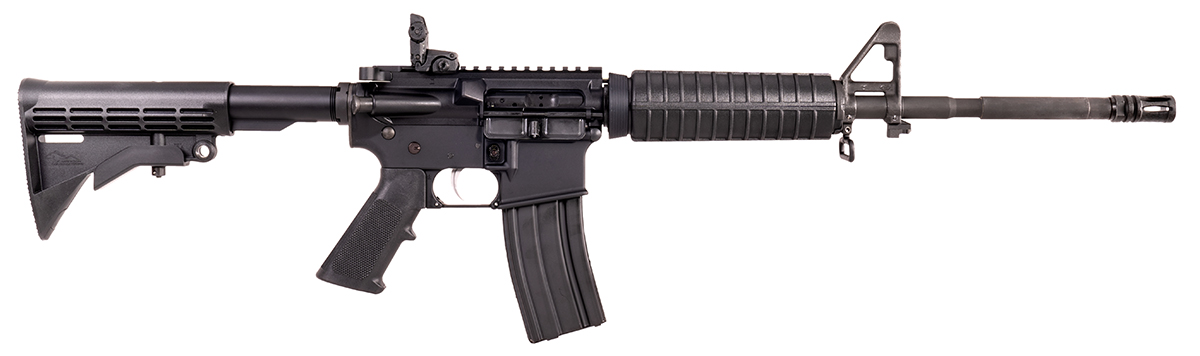
Recently, Anderson Manufacturing introduced a line of firearms called the Anderson A4 series. Based on the M16A4, the A4 series firearms have everything you need and nothing you don’t. With prices ranging from $559 to $599, they are also priced right for defense-minded shooters looking for an all-business, no-frills protection platform. Available in a rifle-length, mid-length, carbine-length, and a pistol configuration, the Anderson A4 series is a nod to the classic M16A2/A4 rifles. The difference is that these rifles come with a flip-up backup sight affixed to the flat top receiver rather than a carry handle/rear sight assembly.
Here’s the rundown…
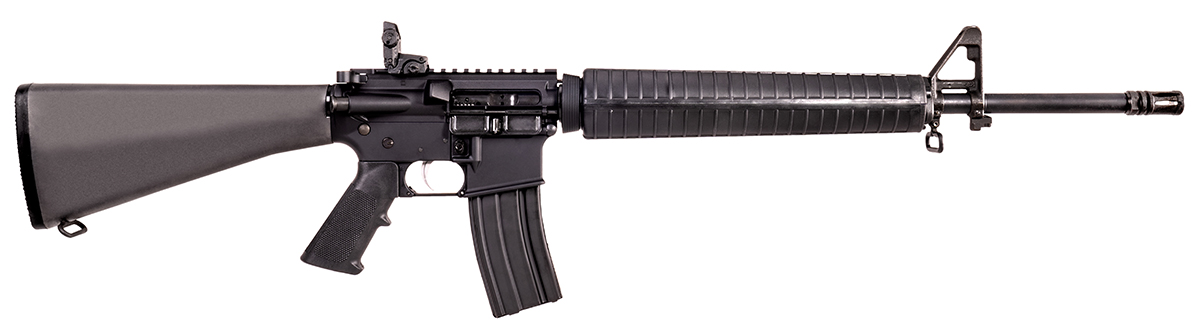
20-inch AM-15 5.56 NATO A4 Rifle
- 20-inch government profile barrel
- 1:9 twist
- fixed rifle stock
- rifle-length hand guard
16-inch AM-15 5.56 NATO A4 Mid-Length
- 16-inch government profile barrel
- 1:7 twist
- adjustable stock
- mid-length hand guard
16-inch AM-15 5.56 NATO A4 Carbine
- 16-inch government profile barrel
- 1:8 twist
- adjustable stock
- carbine-length hand guard

10.5-inch AM-15 5.56 NATO A4 Pistol
- 5-inch 4150 chrome moly vanadium barrel
- 1:8 twist
- adjustable stock
- SBA3 Tactical Pistol Brace
Since we already had plans to build an A4-style rifle from scratch, we naturally tapped Anderson Manufacturing for the necessary parts. If you are interested in building your own AR-15, Anderson makes it easy. As the country’s leading manufacturer of AR-15 components, they have everything you need to make the job go smoothly. This includes numerous barrel configurations with the front sight assembly pre-installed, and complete individual upper, lower, and buttstock kits with all the essential parts included. You can further shorten the distance by purchasing Anderson’s AR-15 upper and lower receiver build kit, which includes almost everything you need plus the stripped upper and lower receivers. The stock kit will be a separate purchase that we’ll discuss in a moment.
The only things missing for the beginning AR builder are the tools, and for that, we can offer no better recommendation than the Armorer’s Master Kit from Real Avid. This kit has everything you need to assemble an AR-15 as well as to simplify routine maintenance. Incorporated in this kit are some unique tooling solutions that make the work so much easier. With an MSRP of $279.99, the Armorer’s Master Kit is an investment. But considering the low price of building your own A4-style rifle from Anderson’s parts kits and the cost of most assembled AR-15s on the market today, buying the tool kit makes it a financial wash — only you now have the tools you’ll need to make future rifle builds, so the kit amortizes itself quite nicely.
The A4 rifle lower receiver assembly is no different than any other AR-15 lower except for the buttstock, buffer tube, buffer, and spring. These parts are specific to the rifle-length AR-15 when compared to the mid-length or carbine-length gas system rifles. So, if you intend to build a classic-style lower receiver like we’re going to show you here, be sure to get the Anderson A2 buttstock kit.
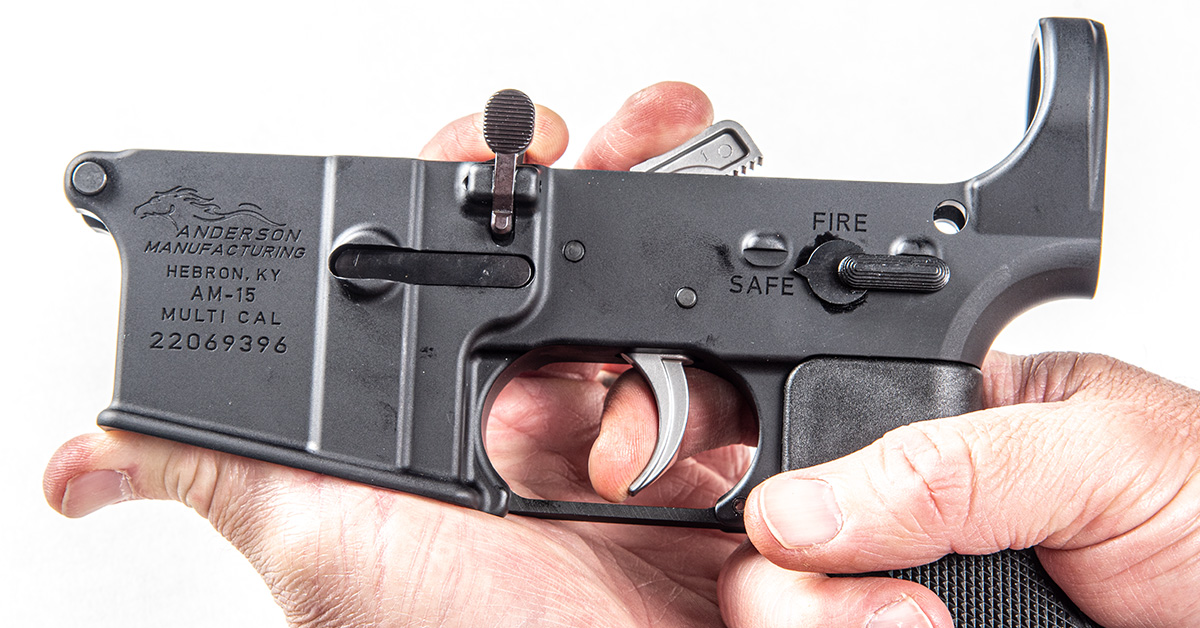
Assembling the AR-15 Rifle Lower Receiver Group
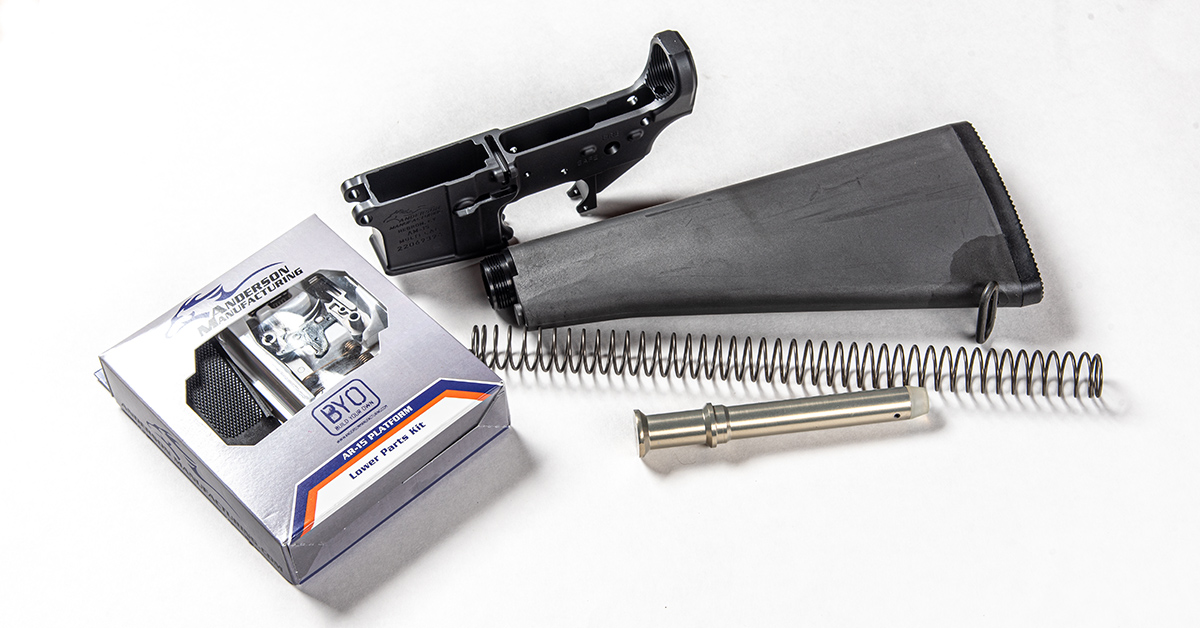
Here are the lower assembly parts you need. The lower receiver kit includes all the small parts that go onto the receiver. The stripped lower receiver is a separate item that requires an FFL transfer. The stock components are included in the Anderson A2 kit, made up of the rifle stock, buffer tube, buffer spring, and buffer.

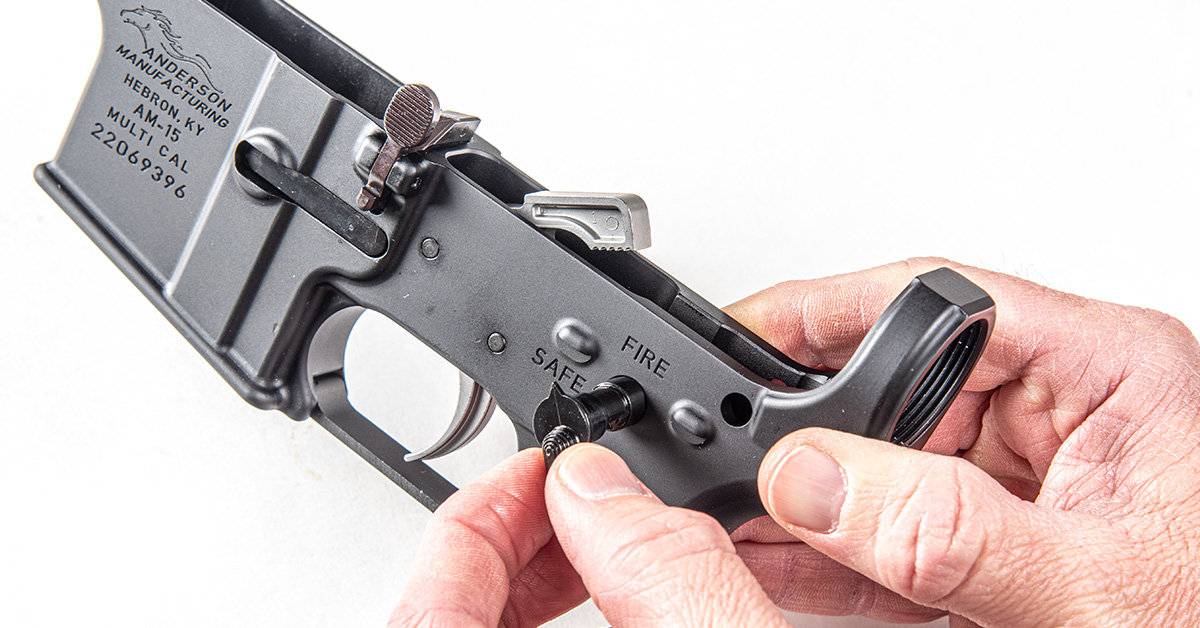
We begin with the magazine catch assembly. This includes the magazine catch, catch button, and catch spring.
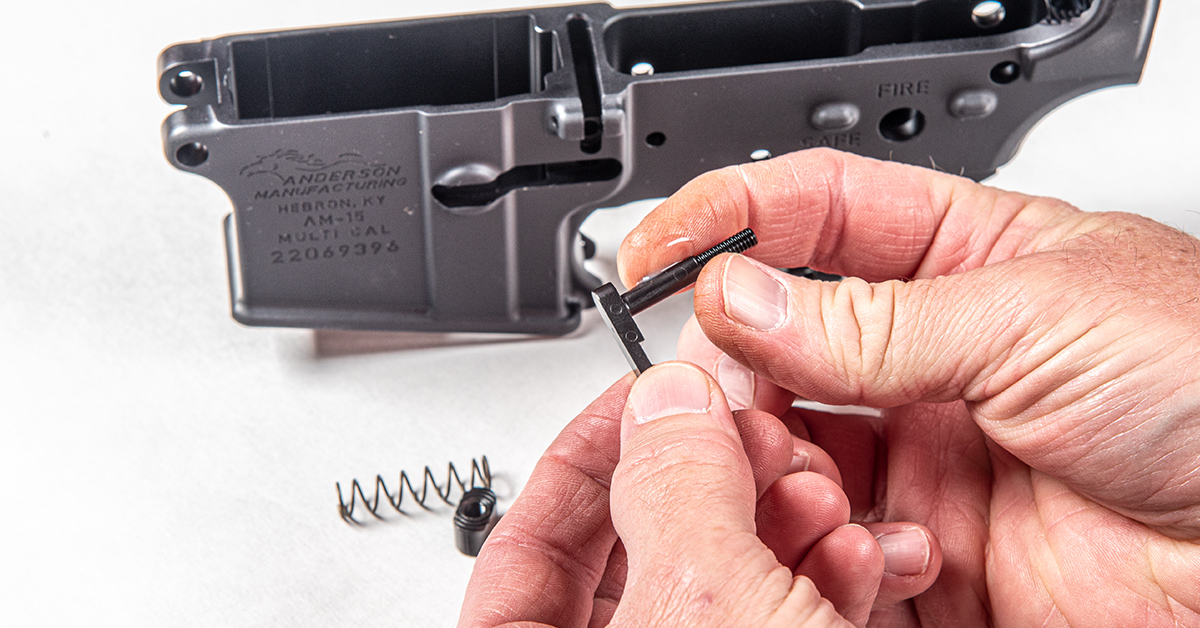
Lightly lubricate the magazine catch. For our builds, we use U.S. military surplus LSA weapons oil, although any light oil or mineral oil will also work fine.
Insert the magazine catch into the left side of the receiver and, after lightly oiling the catch spring, insert it onto the magazine catch through the right side of the receiver.

Begin initial threading of the catch release button onto the magazine catch. Push in on the button and rotate the magazine catch to thread it into the release button.
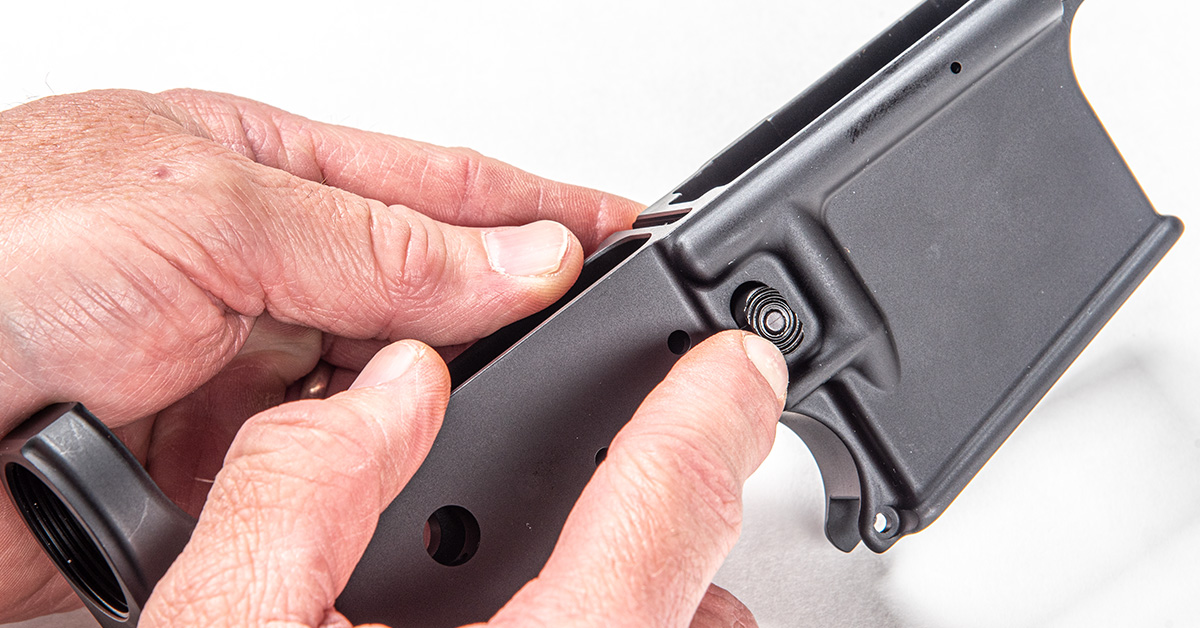
Continue to rotate the magazine catch until the end of the shaft is flush with the end of the catch release button.
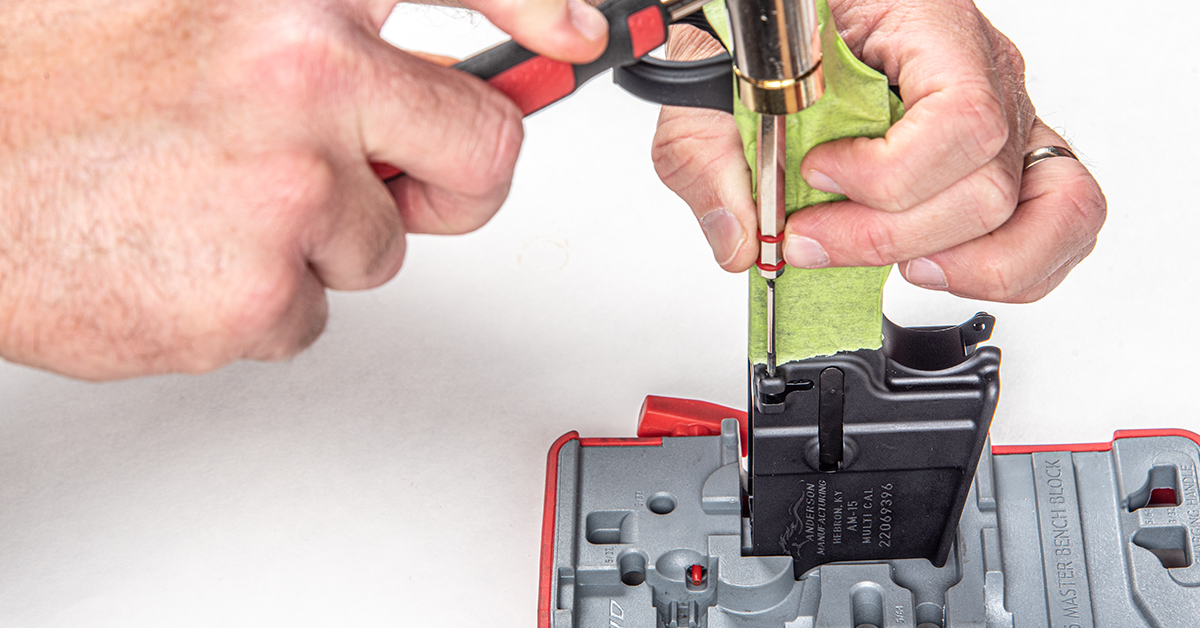
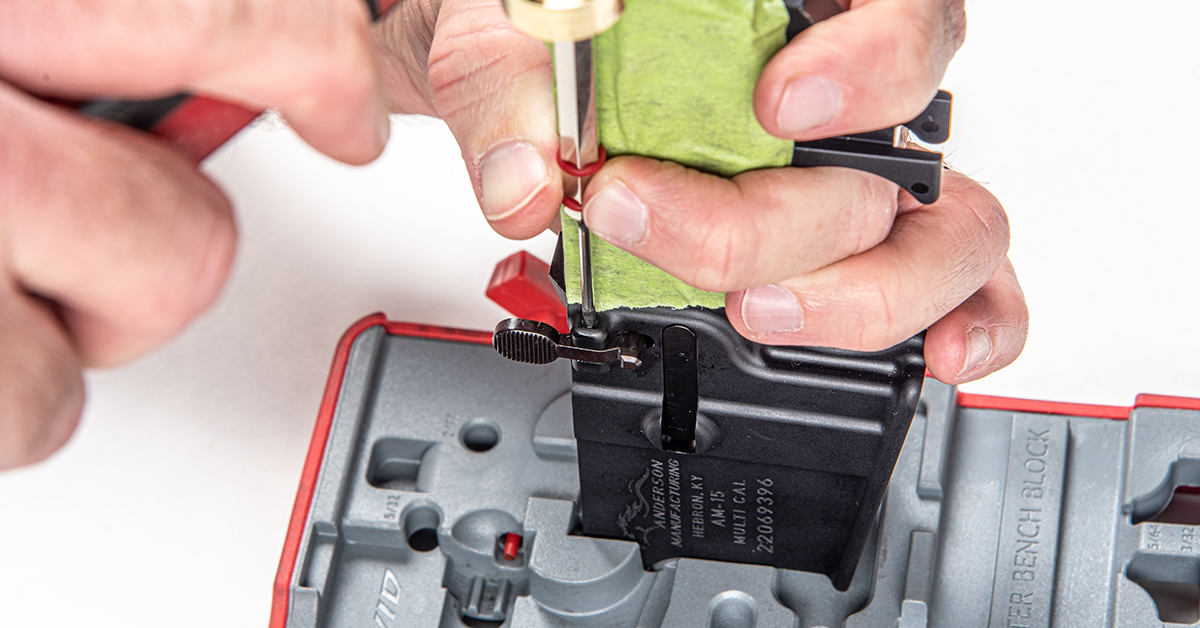
The bolt catch assembly consists of the bolt catch, bolt catch plunger, bolt catch roll pin, and bolt catch spring. Begin the installation by covering the left side of the receiver with masking tape to prevent scratching or damage during installation of the bolt catch assembly. Here, we’re using the Master Bench Block found in the Real Avid Armorer’s Master Kit to support the receiver.
Tap the bolt catch roll pin into the rearmost boss until it is flush to the inside of the boss. You need to leave room for the bolt catch to insert between the two bosses. The Armorer’s Master Kit has the standard and roll pin punches needed for each AR pin application. Be sure to use roll pin punches for installing roll pins.
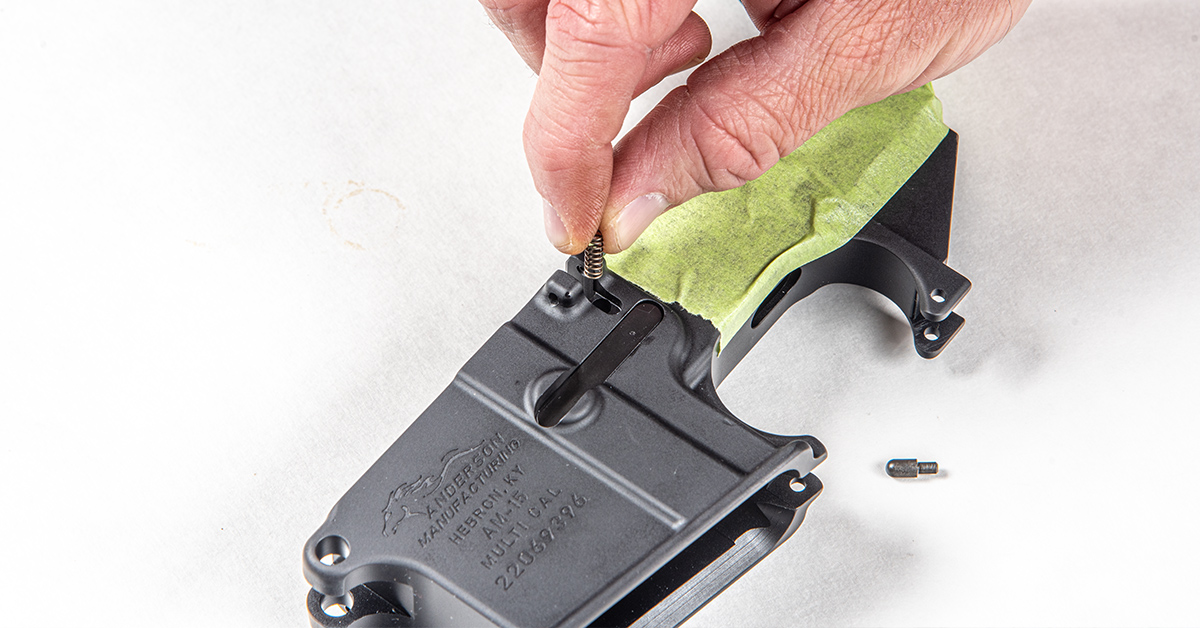
Lightly lubricate the bolt catch spring and insert it into its hole in the receiver.
Lightly lubricate the bolt catch plunger and insert it into the spring as shown.
Lightly lubricate the bolt catch and position it into the receiver as shown.
The objective is to drive the roll pin through the bolt catch and into the opposite receiver boss. The pin should fit evenly in the bosses and the bolt catch should pivot freely in the receiver when correctly installed.
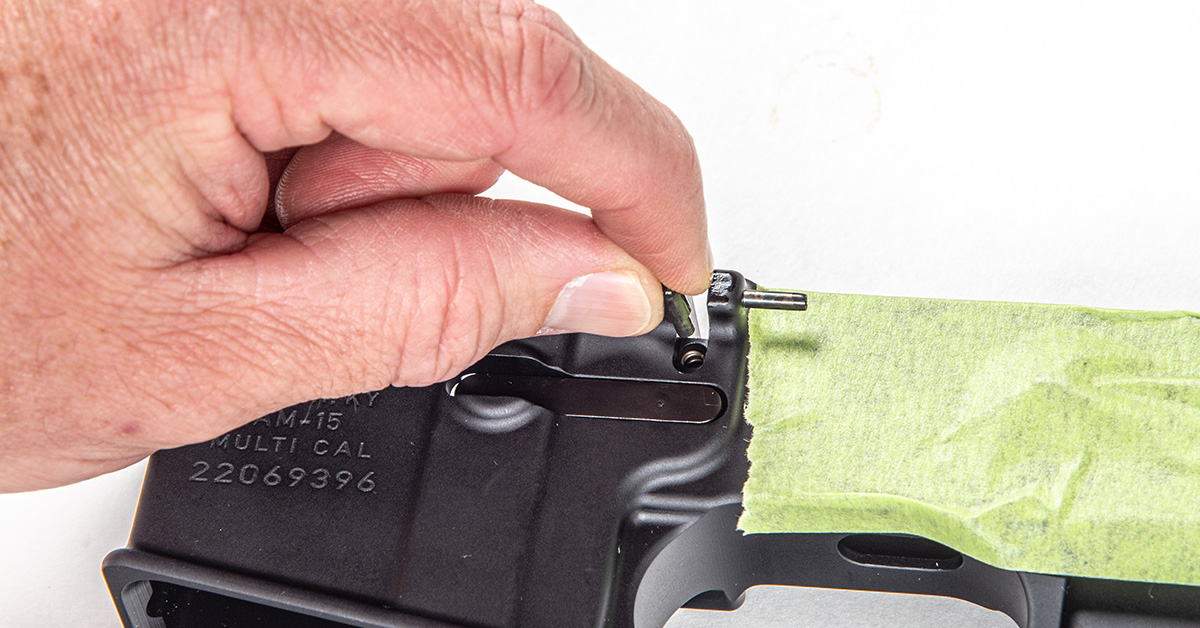
Moving to the pivot pin assembly, lightly lubricate the pivot pin detent spring and insert it into its hole in the receiver.

Lightly lubricate and insert the pivot pin detent in front of the spring, flat end first.
Real Avid’s pivot pin installation tool is a big assist for getting the pin assembly correctly installed into the receiver. Basically, it keeps the spring and detent safely captured in the receiver while the pin is installed. Instructions are included with the tool. We highly recommend this tool because the pivot spring and detent are the two components most likely to “fly out” during assembly, never to be found again. If that happens, it’s “project stop” until you find them or get replacement parts.
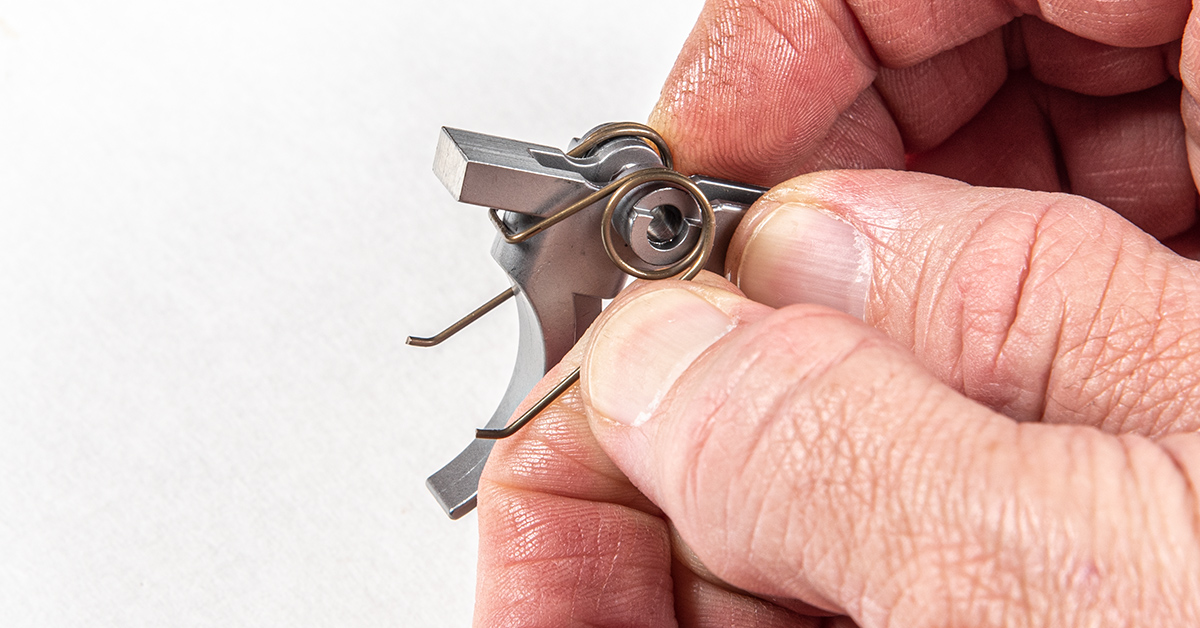
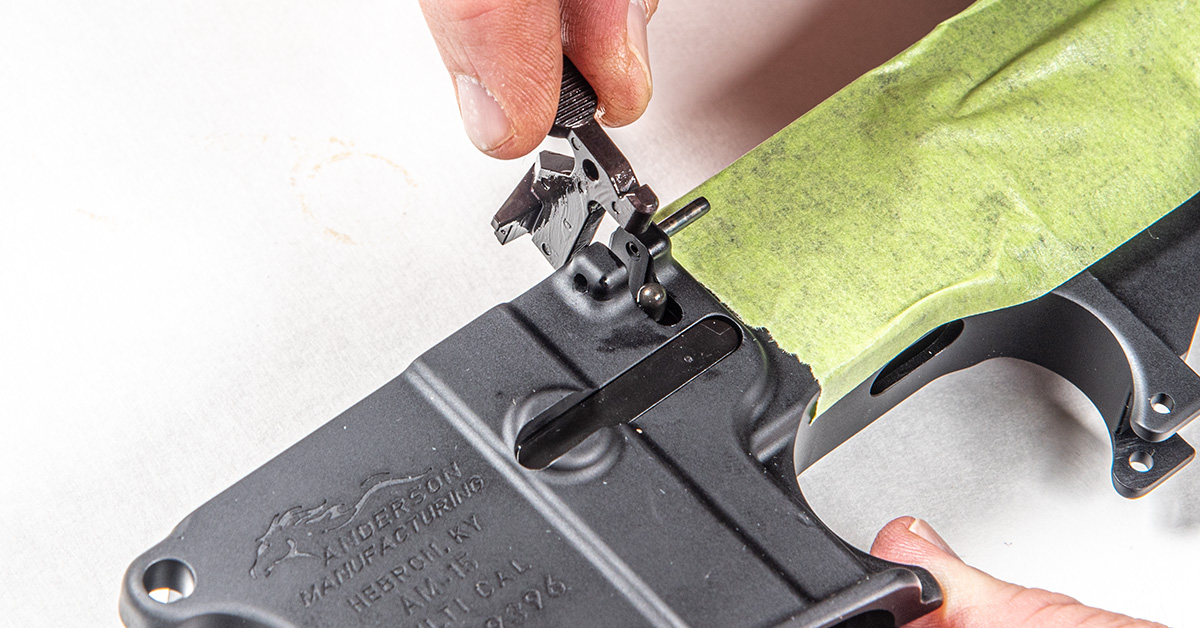
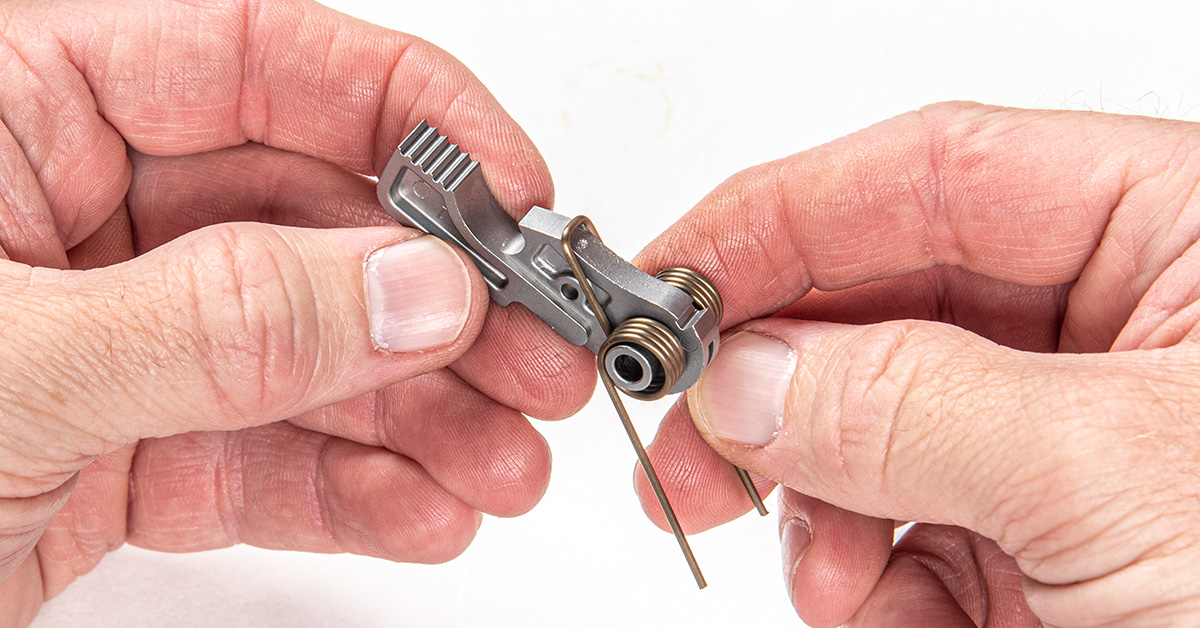
Lightly lubricate the trigger spring and install onto the trigger as shown.
Lightly lubricate and install the disconnector spring into its location in the trigger, large end down.

Lightly lubricate and place the disconnector into the trigger with the notch positioned atop the disconnector spring.
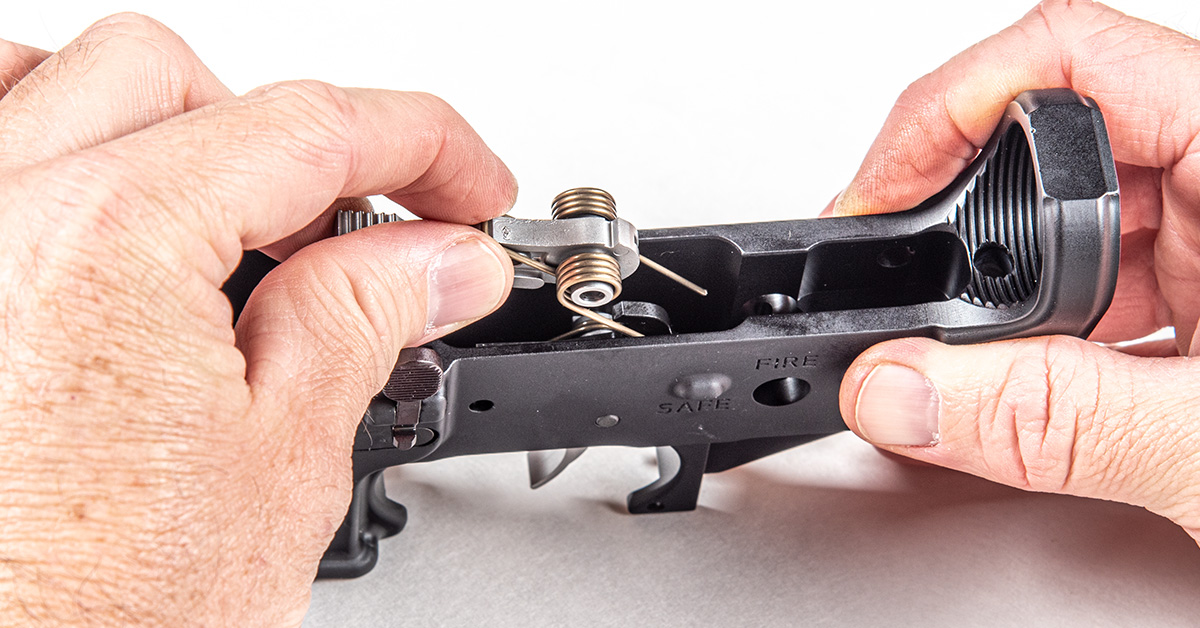
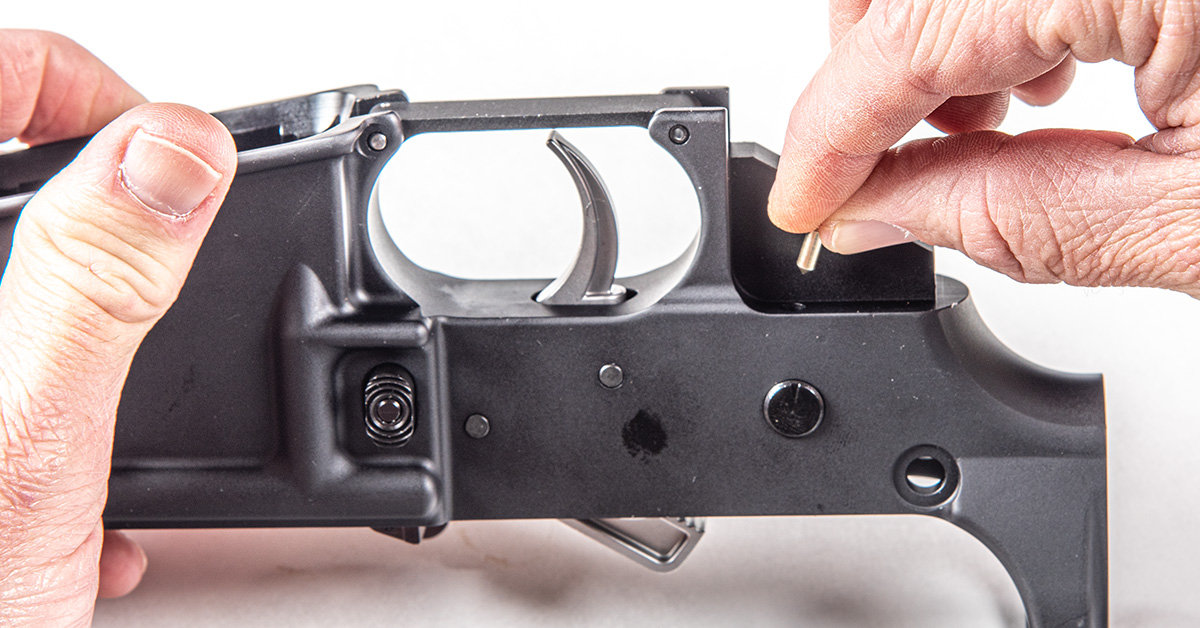
Install the trigger assembly into the receiver as shown. The trigger spring “legs” should lay across the bottom of the receiver and point forward.
Insert a punch through the receiver and trigger assembly to serve as a slave pin to ensure alignment in the receiver. Next, insert the lightly lubricated trigger pin through the assembly to secure the trigger in the receiver. The pin should be installed flush with the receiver.
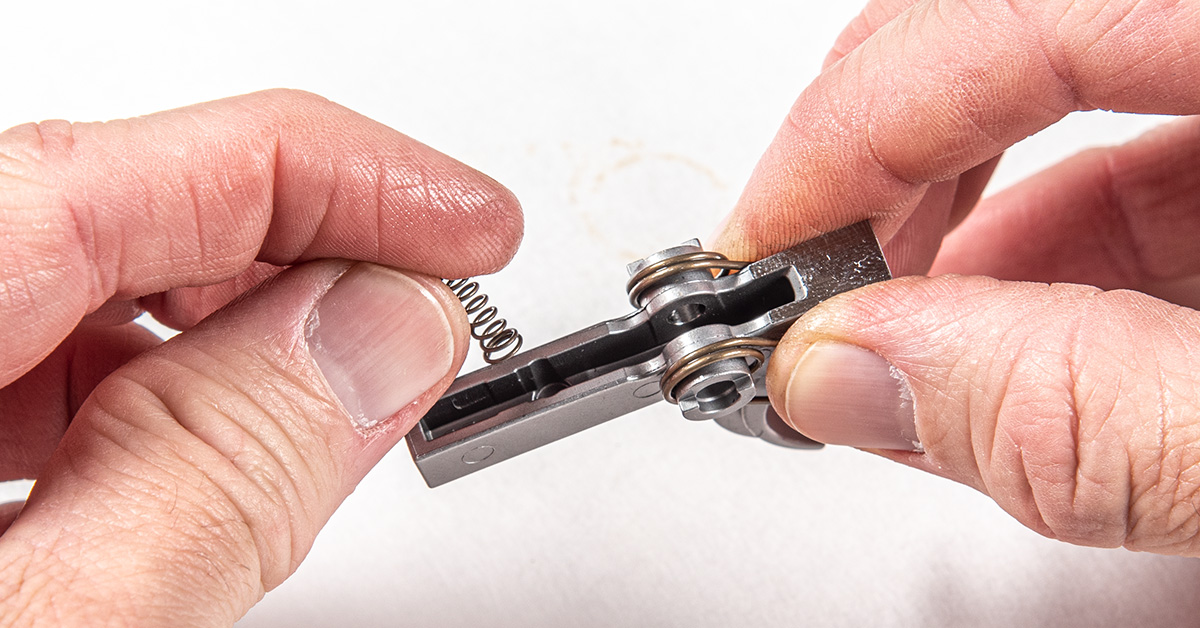
Lightly lubricate the hammer spring and install onto the hammer as shown.
Install the hammer and spring assembly into the receiver as shown.
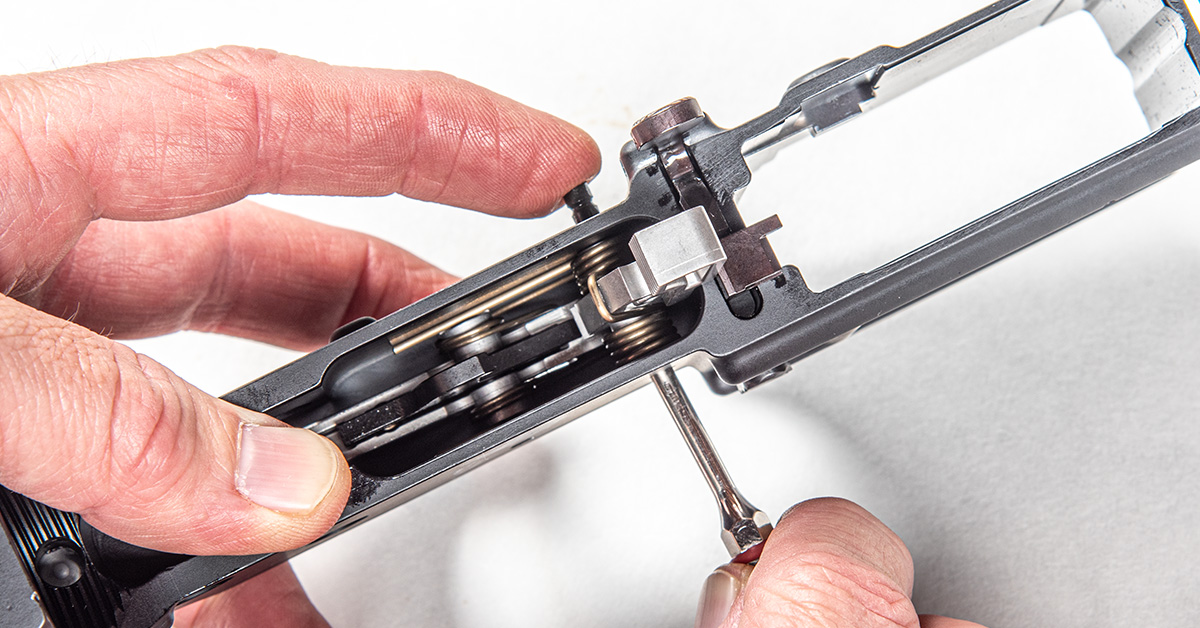
Orient the legs of the hammer spring to lie across the top of the trigger, as you see here. Again, use a punch to align the hammer and receiver pin holes and then push in the hammer pin, using the punch as a slave pin. Seat the pin equally in the receiver.
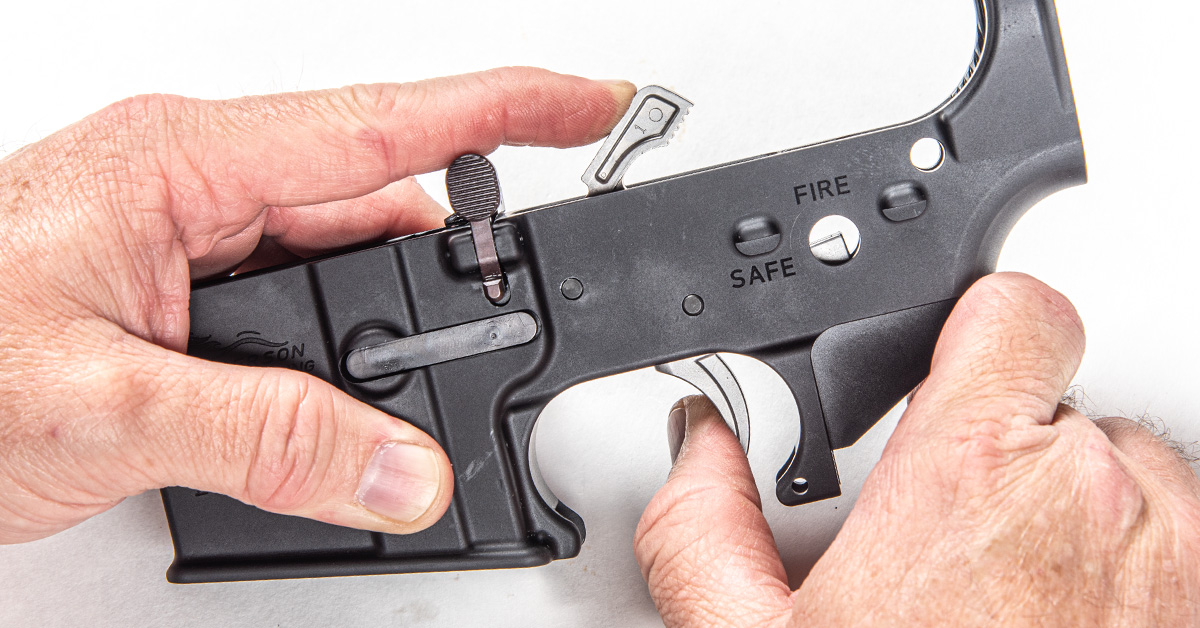
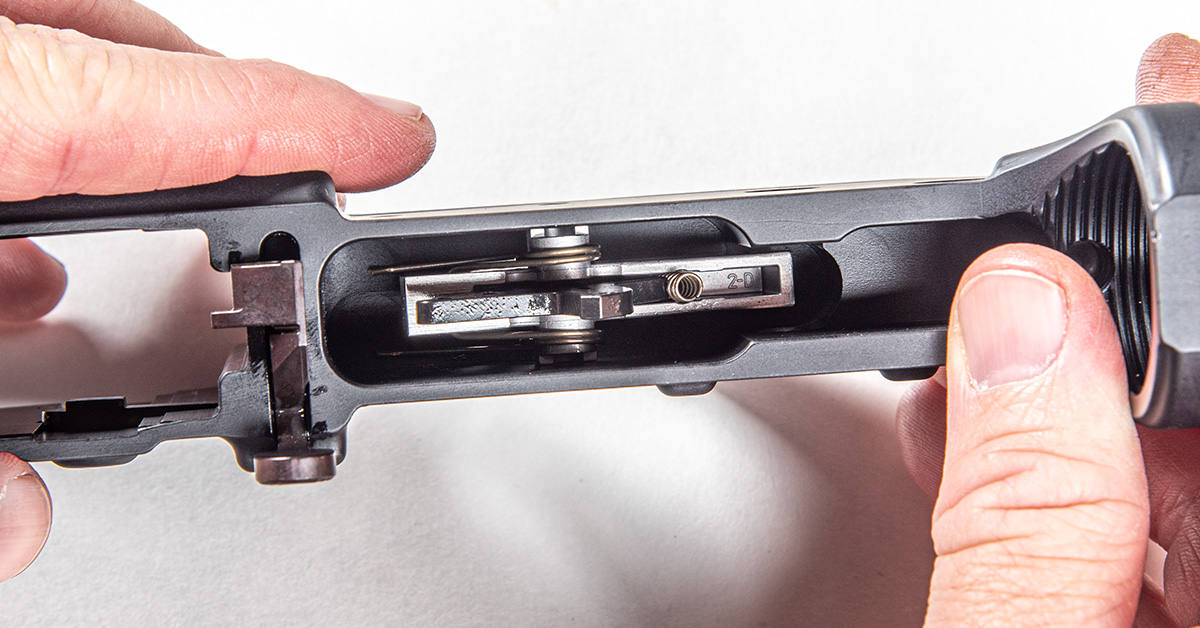
Test the function of the trigger group, making sure to control the hammer so that it doesn’t hit and damage the receiver.

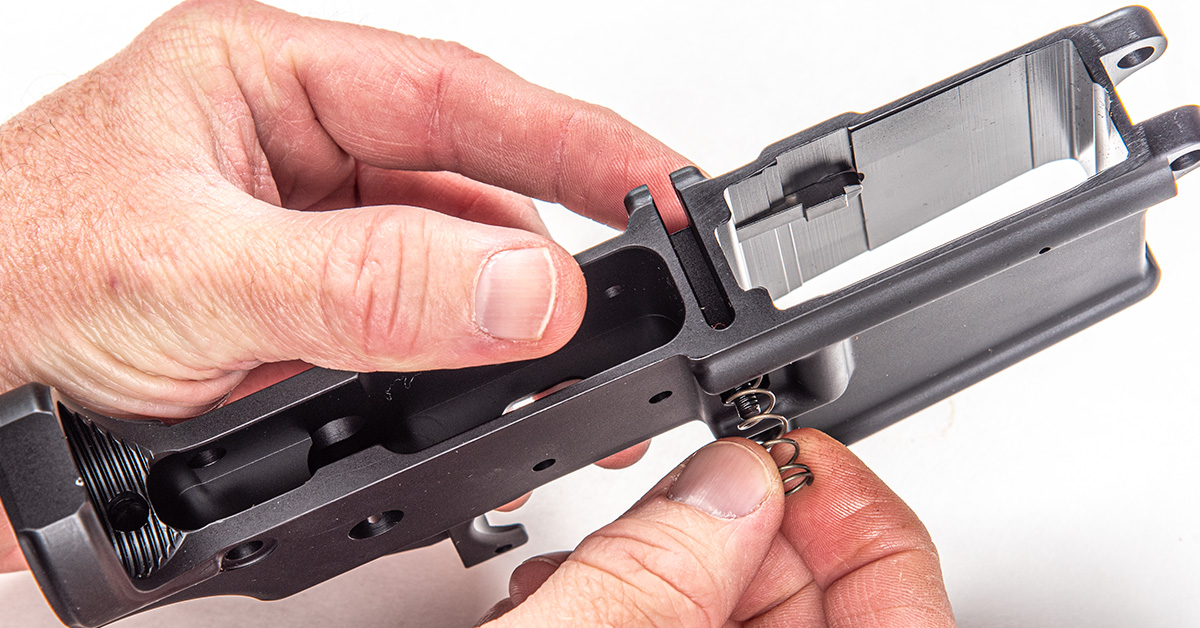
Trigger guard installation is simple enough. Insert the end of the trigger guard with the captured spring detent assembly into the front of the receiver. Once in place, swing the rear of the trigger guard into position and secure by tapping the roll pin into place. For this procedure, you must fully support the bottom of the receiver beneath the roll pin or you may damage the receiver. The Master Bench Block offers this support, or you can use playing cards stacked to the appropriate height for support. Use a roll pin punch to finish seating the roll pin flush in the receiver.
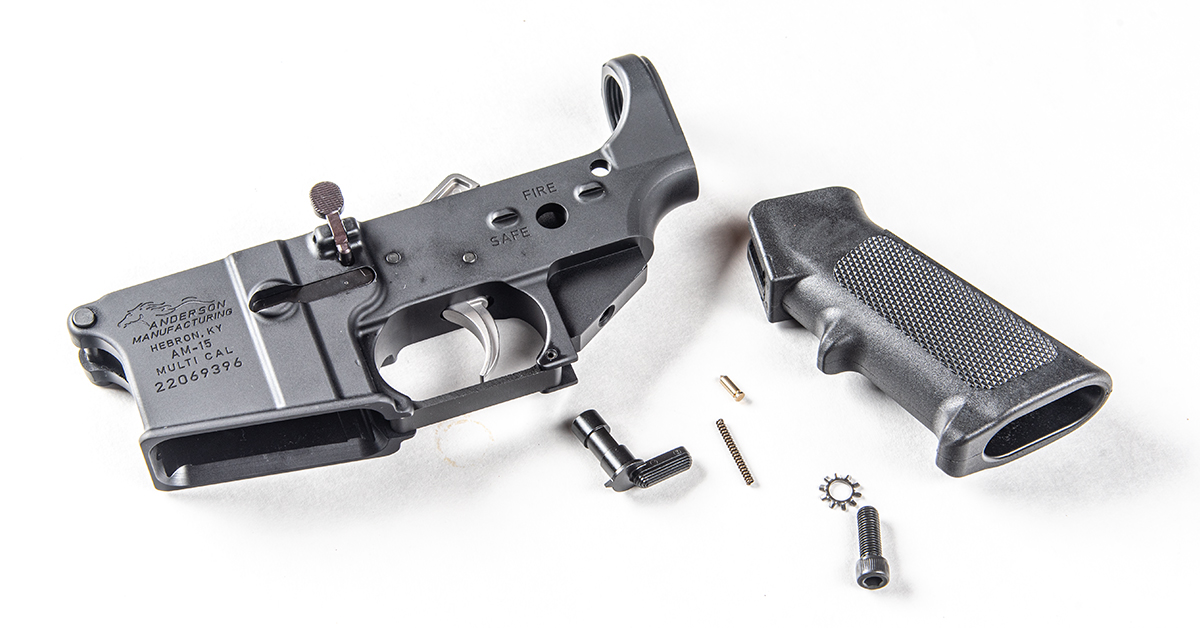
The selector and grip assemblies install together. These consist of the selector, selector detent spring, selector detent, grip screw, grip lock washer, and grip.
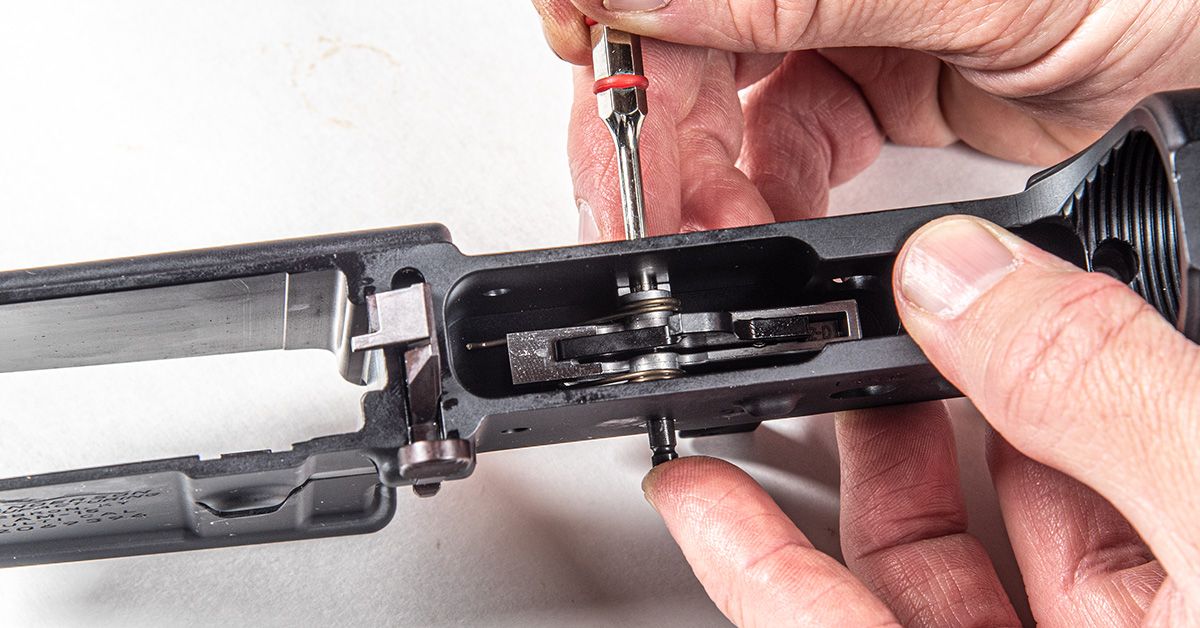
With the hammer in the cocked position, lightly lubricate and install the selector lever into the receiver.

Install the lock washer onto the grip screw. Be sure the screw threads have been degreased with denatured alcohol and then apply a small amount of medium-strength thread adhesive to the lower threads.
Turn the receiver upside down and install the lightly lubricated selector detent into its hole in the receiver, pointed end down.
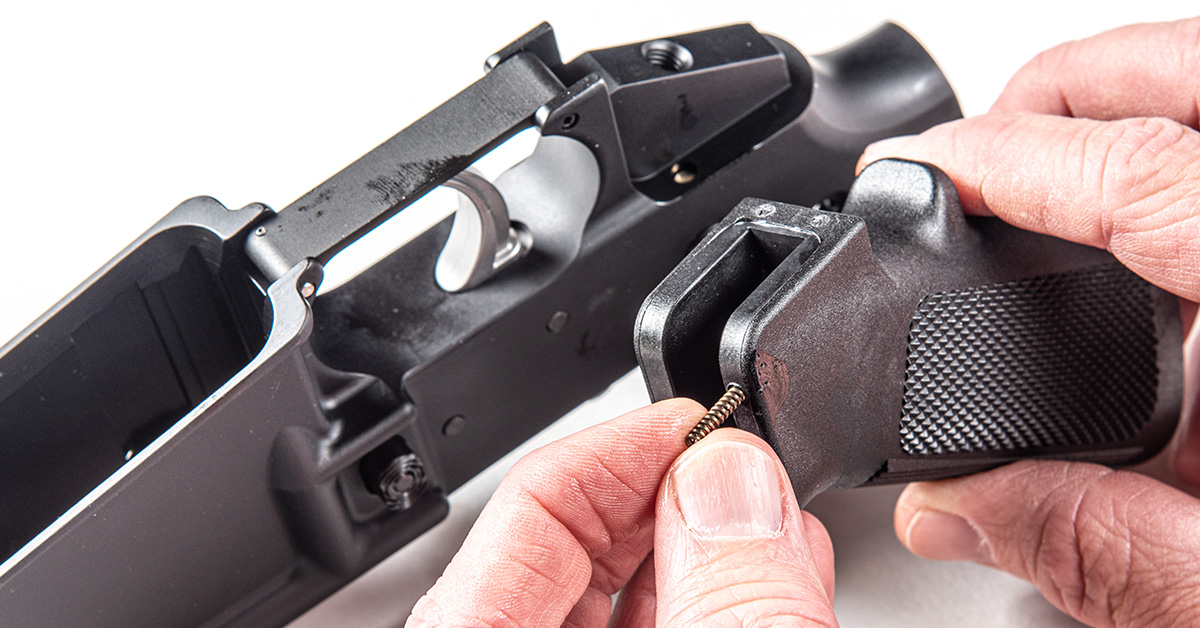
Install the lightly lubricated selector detent spring into its hole in the grip.

Position the grip onto the receiver, making sure the selector detent spring moves into its hole in the receiver.

Keeping the selector detent spring in place, install the grip screw to secure the grip to the receiver.
Do a quick function check to ensure the trigger, trigger reset, and selector are working properly. Just be sure not to allow the hammer to fall against the receiver.
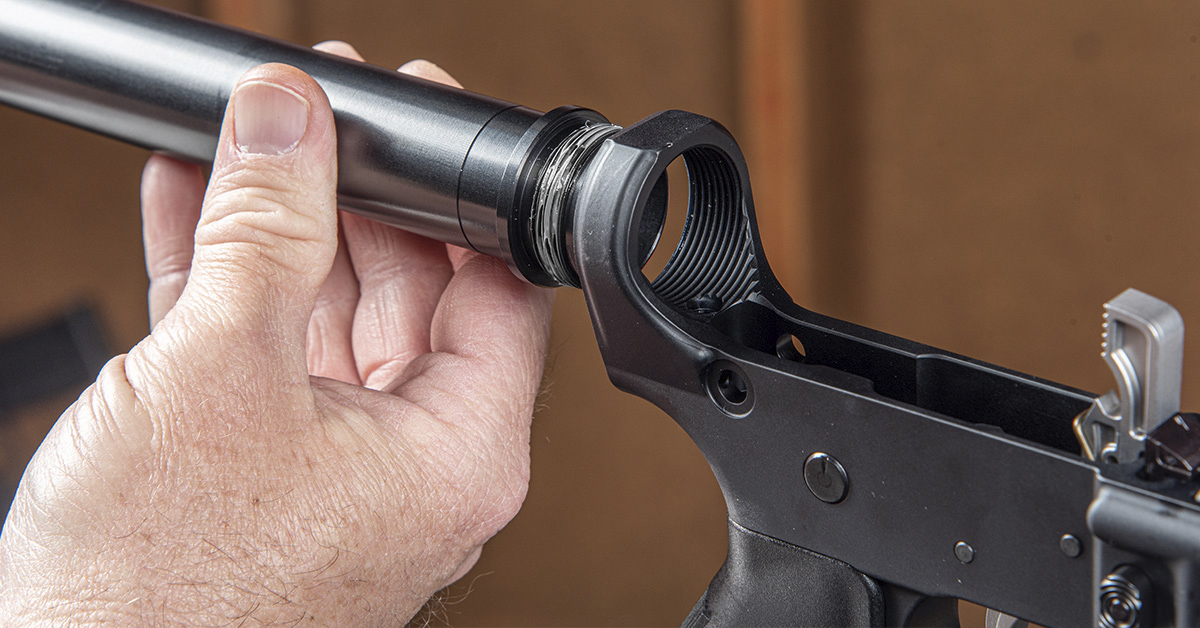
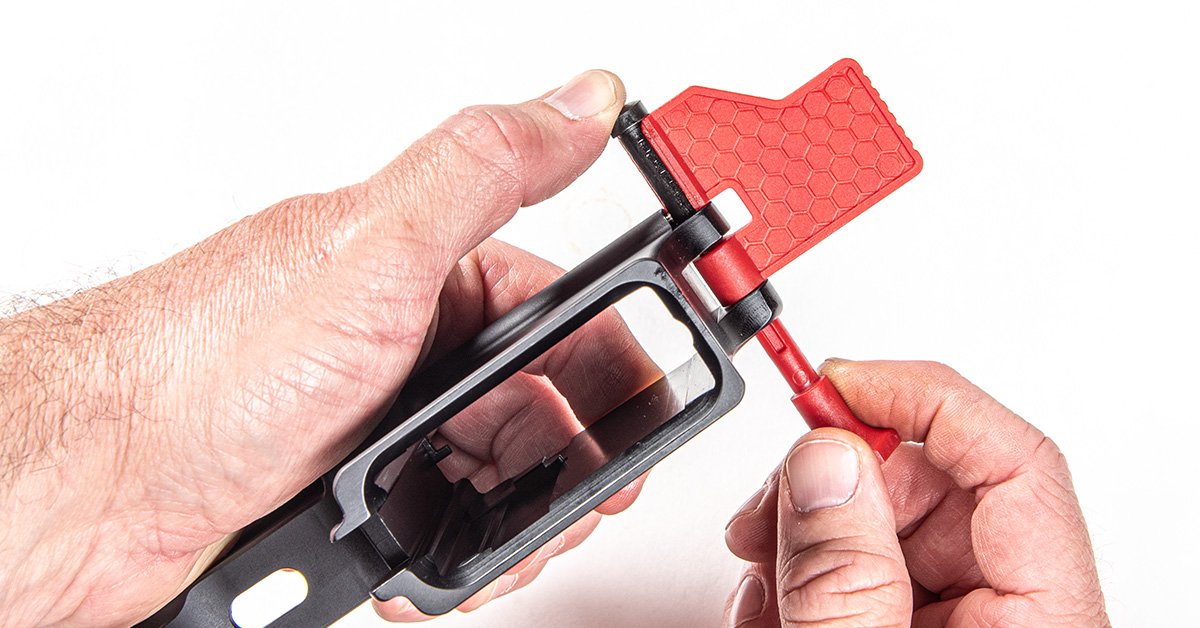
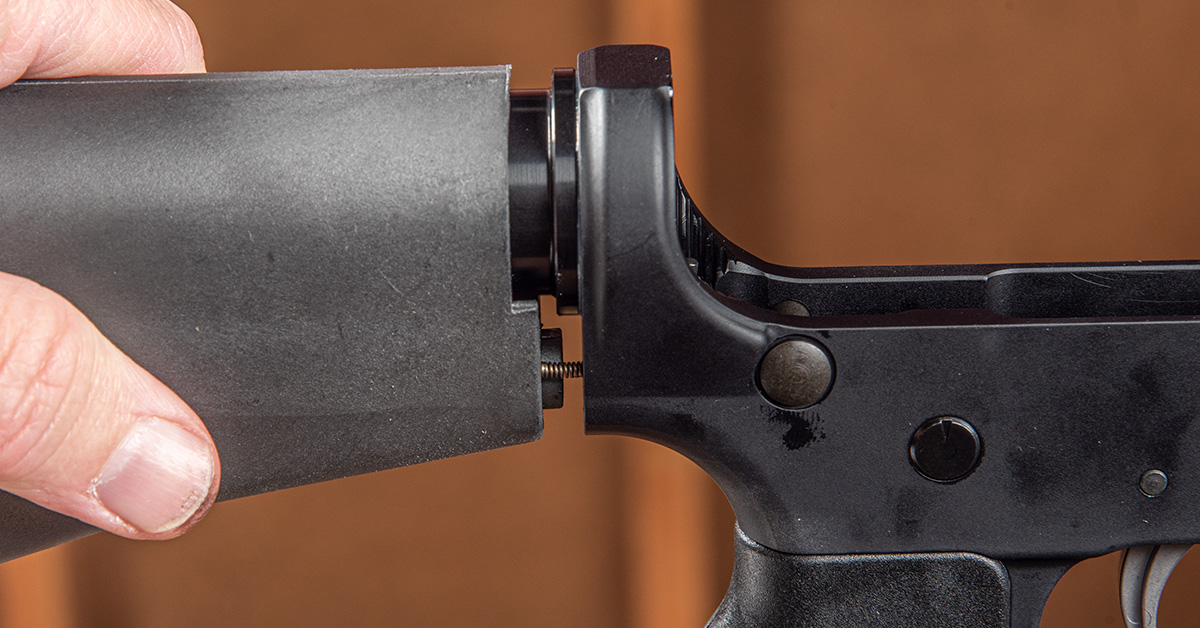
Use a lower receiver vise block (we’re using the Real Avid Smart-Fit AR15 Vise Block) to secure the receiver in a bench-mounted vise. Apply molybdenum disulfide grease to the buffer tube threads and begin threading the buffer tube into the receiver.

Leaving room to access the buffer retainer spring and retainer, insert the lightly lubricated buffer retainer spring into its hole in the receiver.
Install the lightly lubricated buffer retainer onto the spring.

While holding down the buffer retainer, screw the buffer tube into the receiver. At this point, the buffer tube should have captured the retainer while allowing free up and down movement of the retainer.
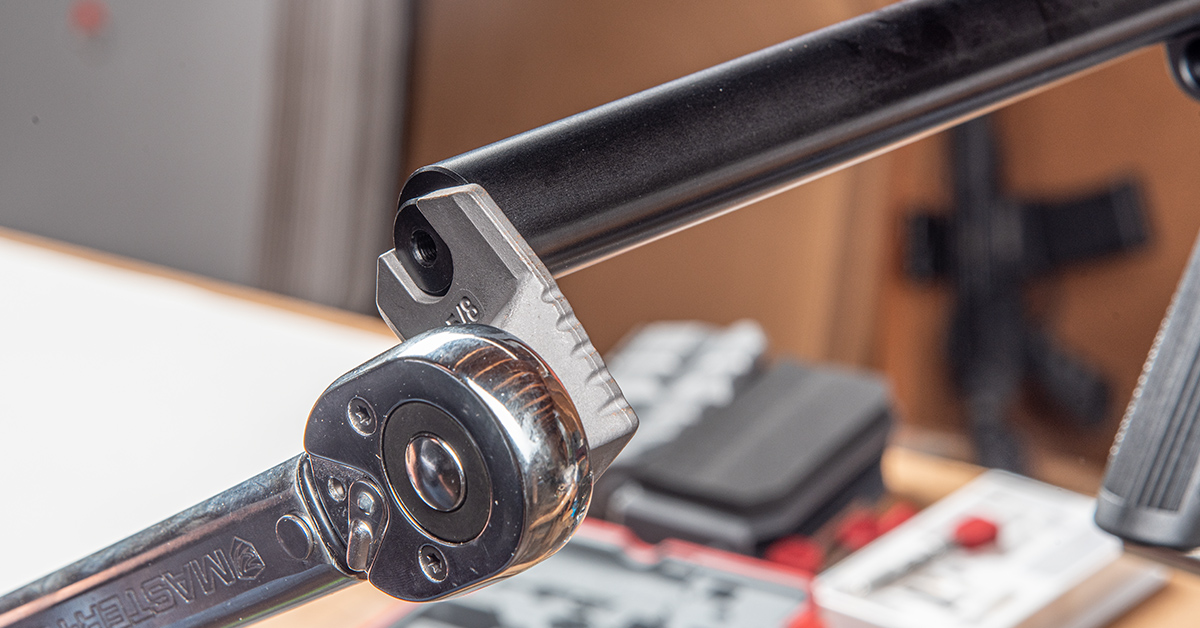
Torque the buffer tube to 35 ft/lbs. Here, we are using the 5/8-inch crowfoot and torque wrench from the Real Avid Master-Fit A2/AR15 Crowfoot Wrench Set.
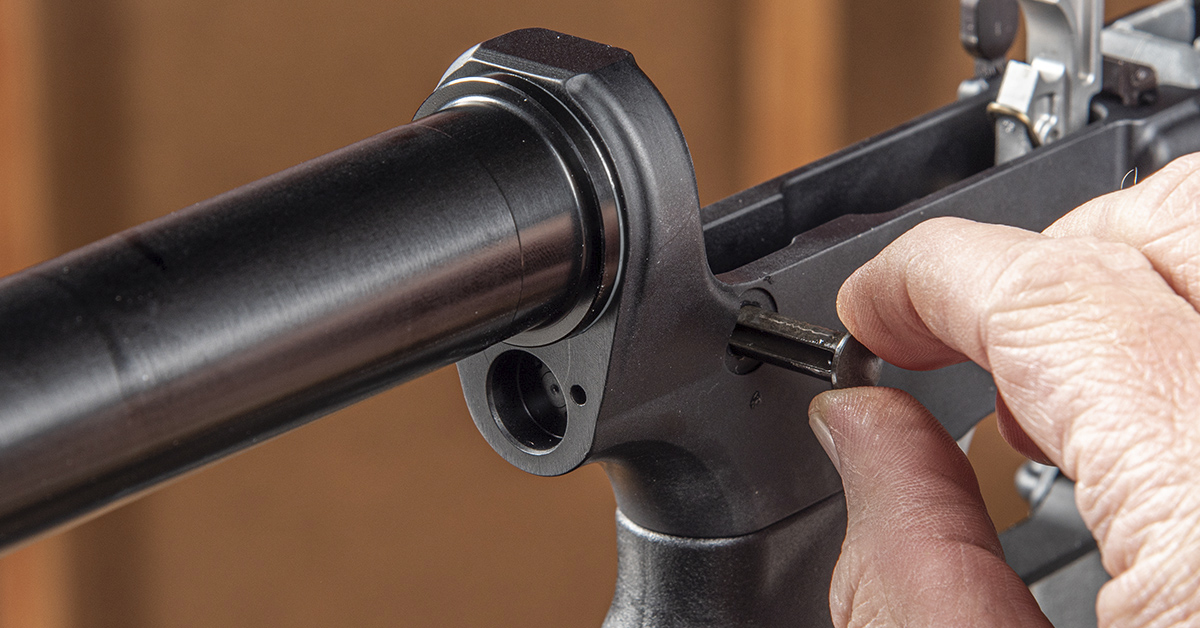
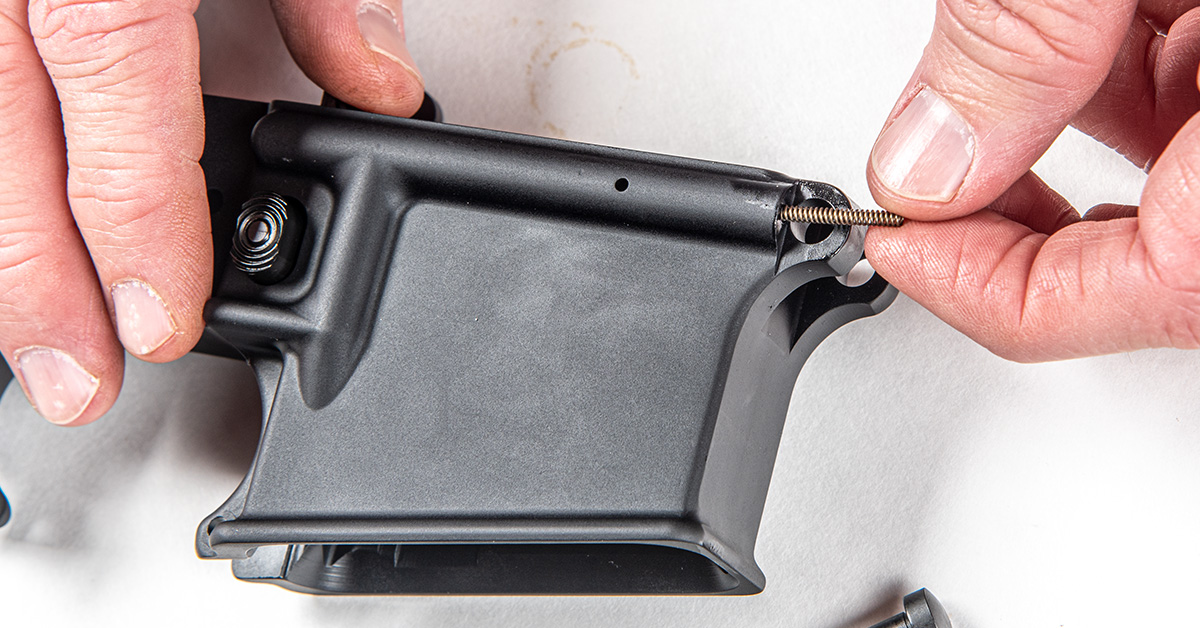
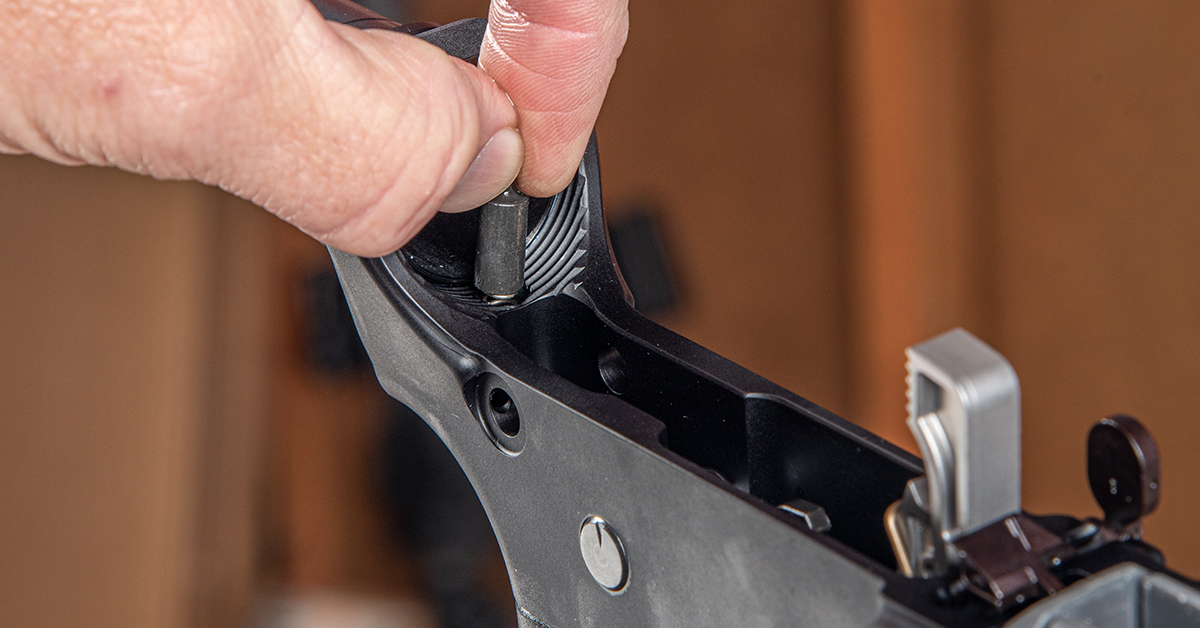
Install the lightly lubricated takedown pin into the receiver with the detent groove facing the rear, as shown.
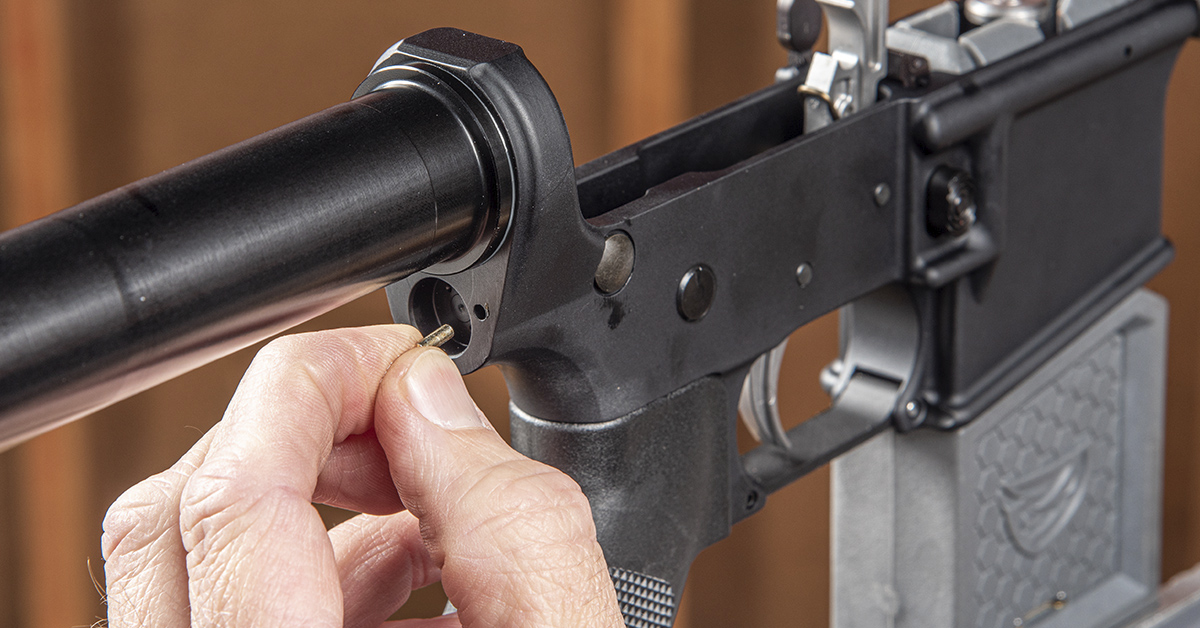
Install the lightly lubricated takedown pin detent into its hole in the receiver.
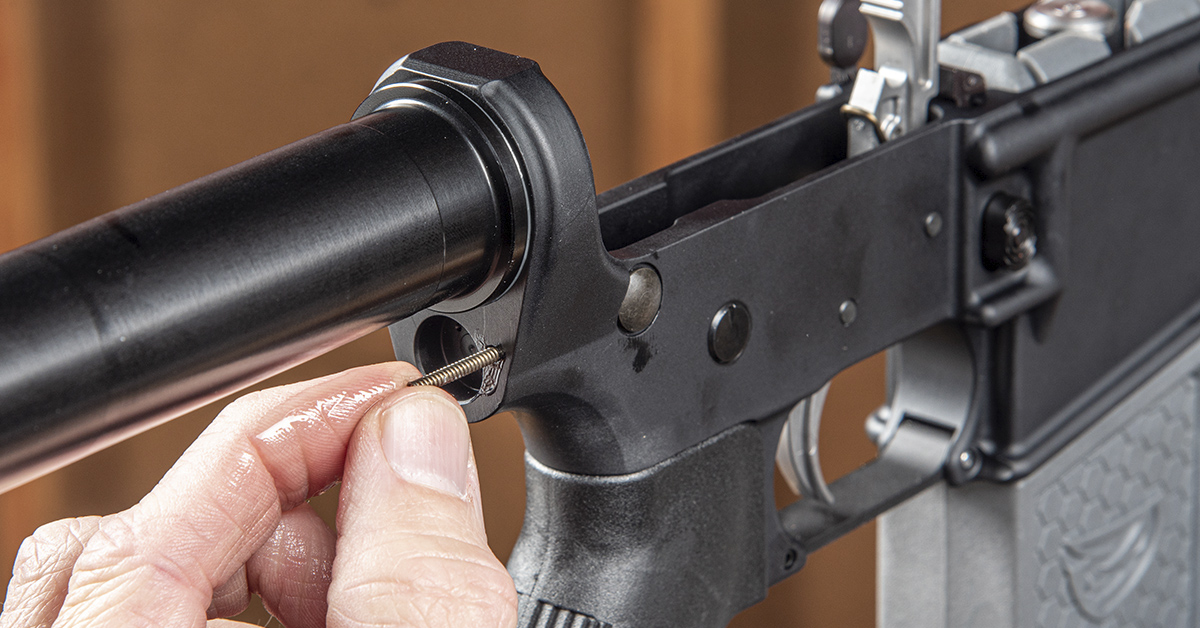
Install the lightly lubricated takedown pin detent spring into its hole in the receiver.
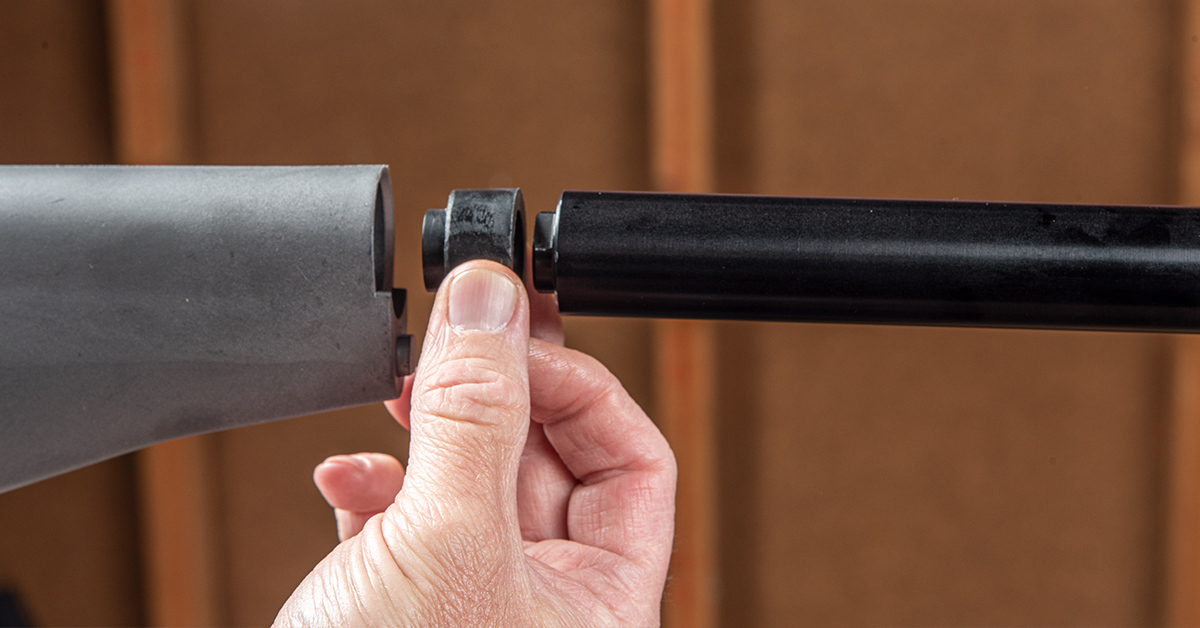
The rifle stock includes an A2 buffer tube spacer that installs onto the buffer tube followed by the stock. Install the spacer and the stock onto the buffer tube.
While keeping the takedown pin detent spring aligned with its hole, push the stock all the way onto the buffer tube.

Tighten the stock screw to secure the stock to the buffer tube.
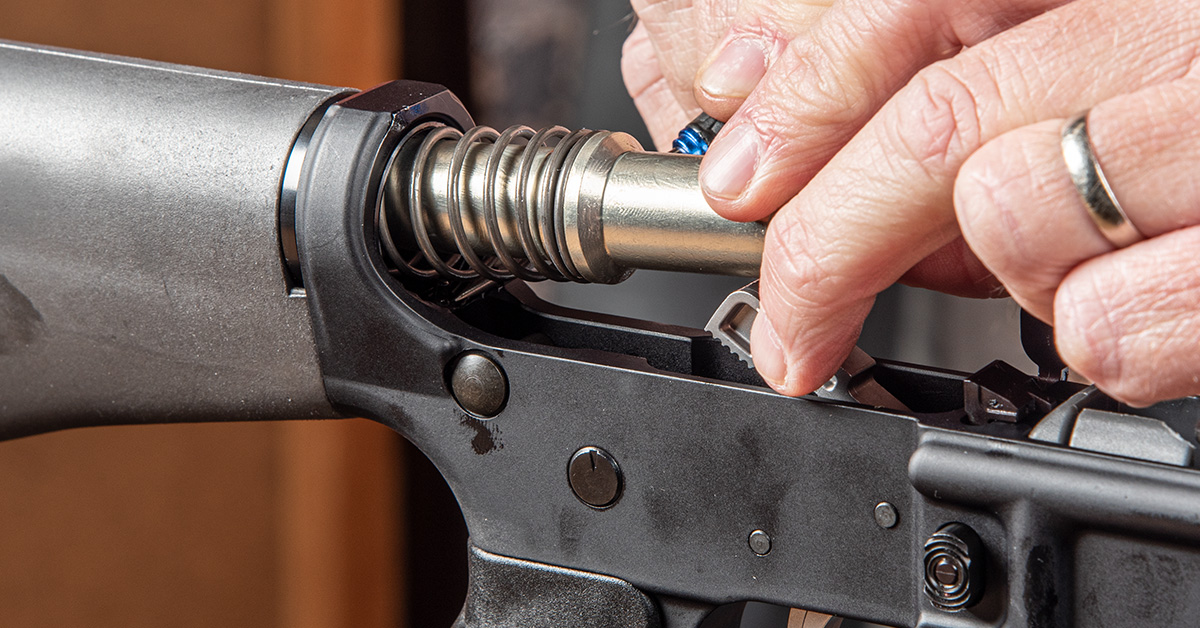
Lightly lubricate the buffer spring and buffer. Install the buffer onto the buffer spring by pushing the flat end of the buffer into the end of the spring and twisting. With the buffer and spring assembled, insert the end of the spring into the buffer tube. Use a flathead screwdriver to push down on the buffer retainer so the buffer can be fully inserted into the buffer tube.

Correctly installed, the buffer and spring assembly can move inside the buffer tube and remain captured by the buffer retainer.
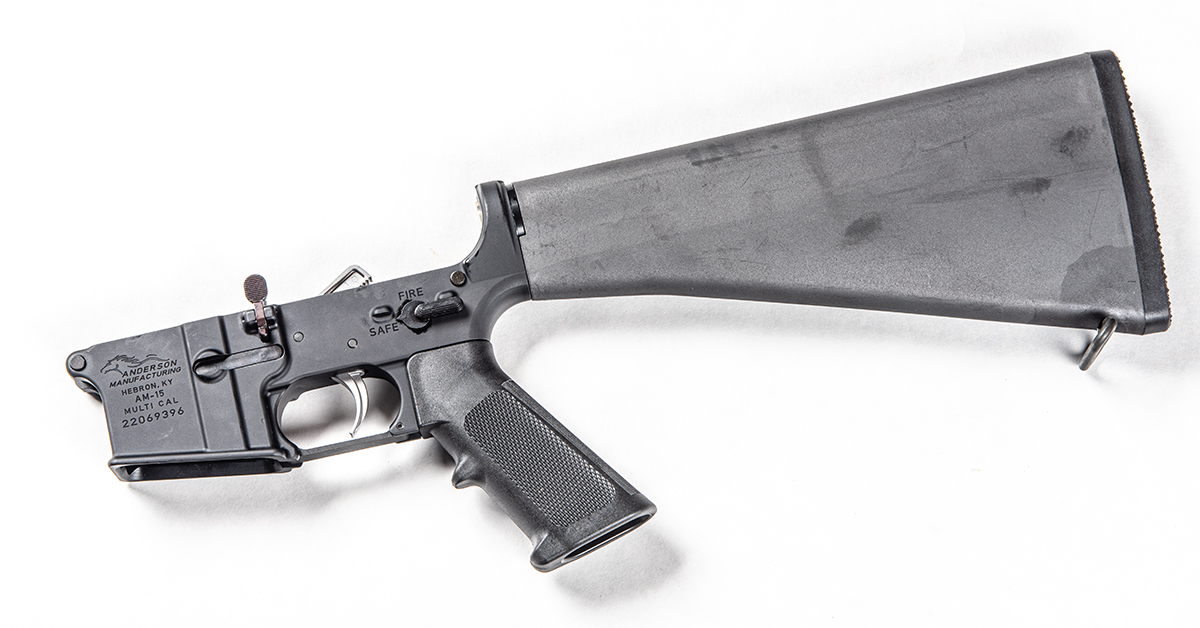
The A2-style rifle lower receiver assembly is now complete.
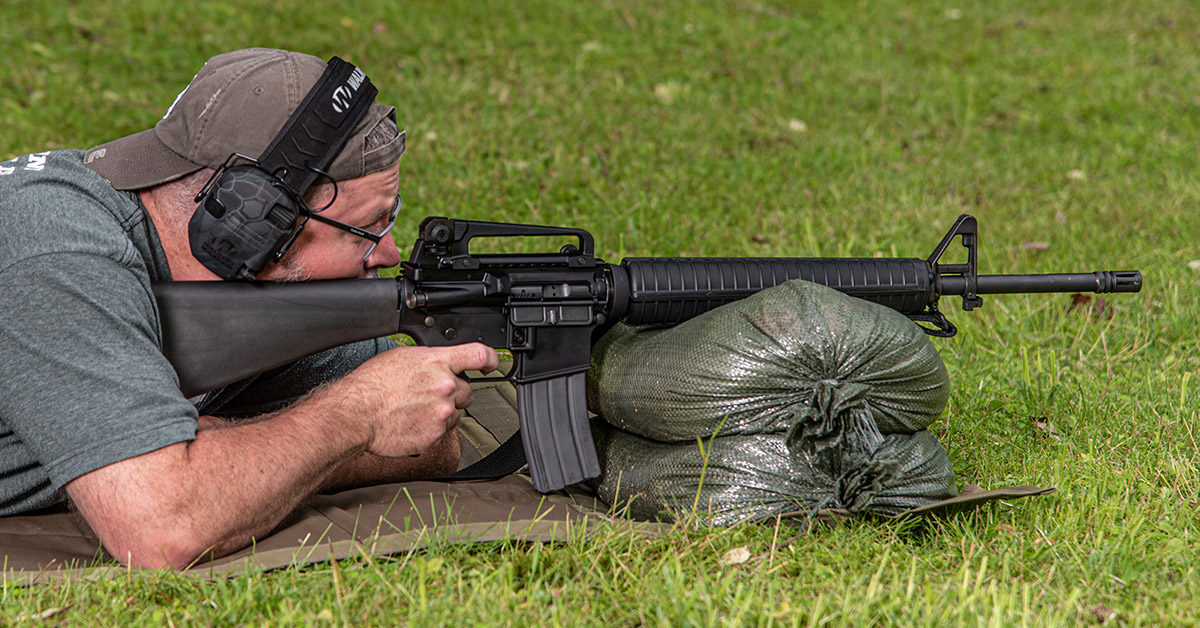
Be sure to check out our final installment of the Anderson A4 rifle build series, where we take our rifle to the range and show you the U.S. military method for setting up the A4 sight system for a 300-meter battlesight zero and go over the fundamental shooting positions for marksmanship development.