Not all pistols that come from the factory hit where you aim. Here’s how to zero your drift-adjustable sights at the shooting bench.
by Rob Reaser
The many new the handgun owners who entered our ranks in 2020 have hopefully, by now, had the opportunity to become accustomed to their firearms’ operation and have learned the fundamentals of marksmanship. Some of those new shooters have likely discovered that their handguns are consistently grouping shots somewhere other than the bullseye at which they are aiming. Others may be ready to step up to firearm DIY upgrades, like installing aftermarket sights, and aren’t sure how to zero their new open sights.
If that sounds like you, understand that some pistols require minor sight adjustment (typically the rear sight) to get on target. Overall, manufacturers do a darn good job of getting their sights close to zero alignment at the factory, but in a mass production environment and given that the extremely short sight radius (distance between the rear and front sights) exponentially compounds the difference between the sight picture (sights aligned with the target) and point-of-impact (where the bullets actually strike the target), it is understandable that some handgun sights are going to be a tad “off.”
Handguns with adjustable rear sights make short work of getting the sight picture to match the point-of-impact. Most pistol sights, though, do not come with adjustable rear sights that are easily shifted for elevation (up and down) and windage (left and right) by simply turning a screw. The majority of handguns come with what are called “drift-adjustable” sights.
Check out our video above for an explanation of drift-adjustable sights and how you can make those necessary adjustments at the range.
Handguns with drift-adjustable sights can only be adjusted for windage, or left/right shifting of the point-of-impact, because these sights tend not to have any means for adjusting elevation. Knowing which direction to move the rear sight is something that often confuses beginners. Fortunately, it’s not difficult to figure out, as you can see from the below illustration.
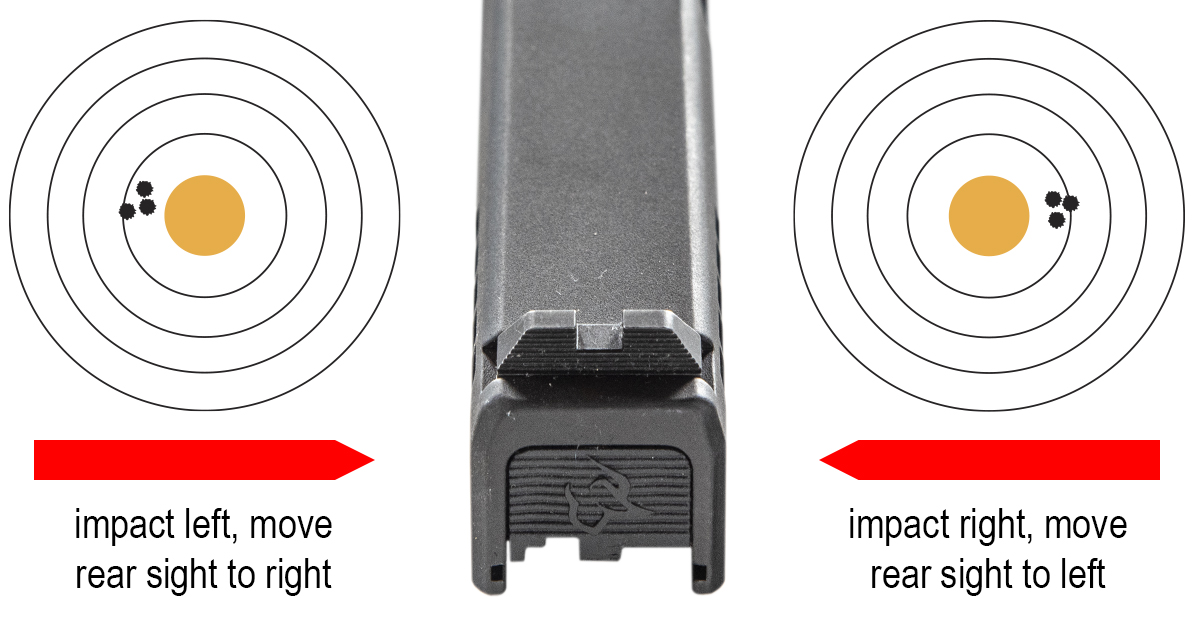
If your point-of-impact is consistently left of the point-of-aim, the rear sight must be moved to the right, or in the direction opposite of the point-of-impact. Another, perhaps simpler, way of thinking about this is that you need to move the rear sight in the direction you want to move the point-of-impact.
As for adjusting elevation, there are a couple ways to go about it. The first method is to learn where to adjust your aiming point.
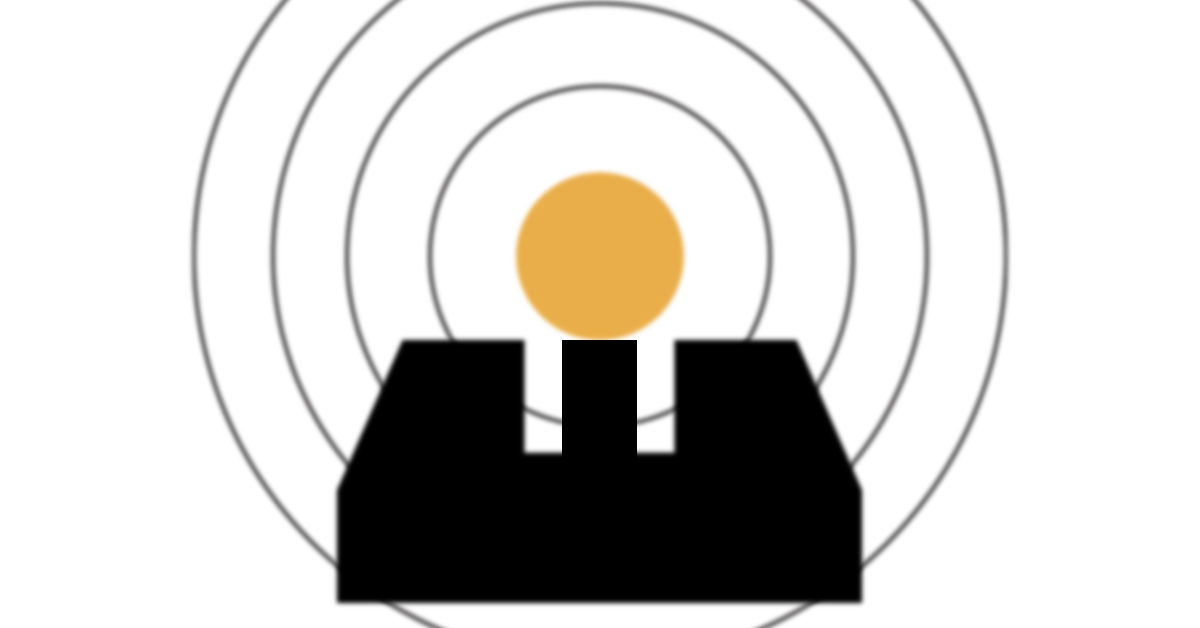
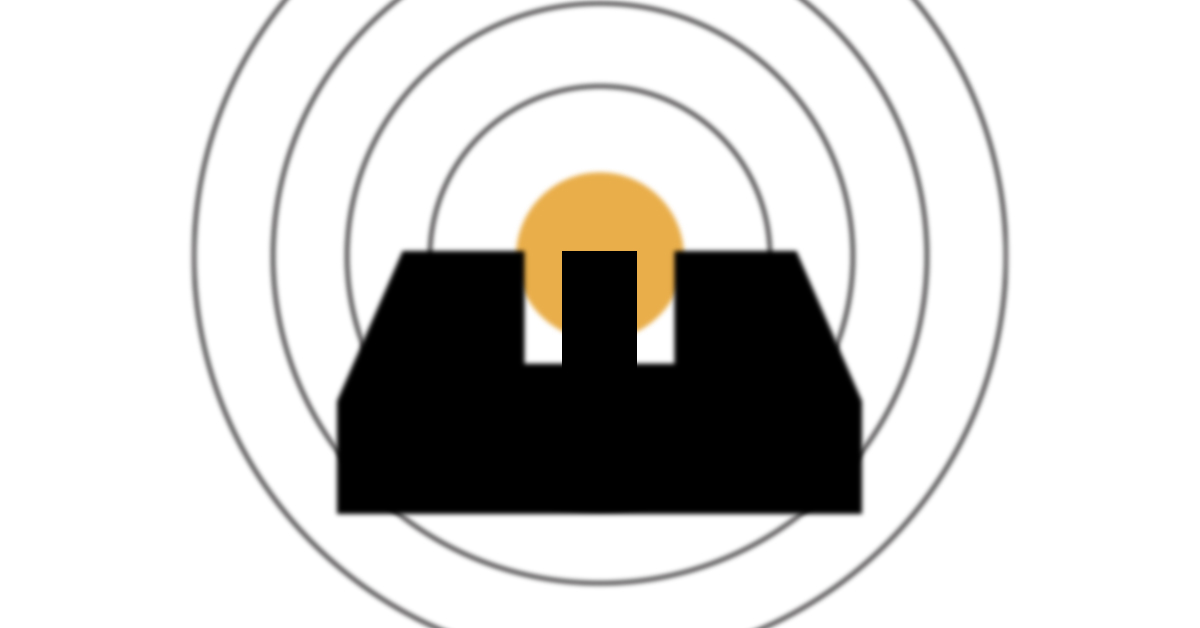
This is what a proper sight picture looks like at typical defensive pistol distances (out to around 15-20 yards). The eye is focused on the front sight (clear) and the target and rear sight are out of focus (blurry) because the human eye can only focus at one distance at a time. This sight picture is known as the “lollipop” since the point of aim (target) sits atop the front sight, resembling a lollipop. Note that the top of the front sight is aligned with the top of the rear sight, and the front sight is perfectly centered within the rear sight notch.
Point-of-impact with this sight picture should be about on the bullseye or perhaps slightly lower, depending on the gun, distance to target, and type of ammunition being used. If the point-of-impact is significantly higher or lower, you can adjust by changing your aiming point.
For example, consistently low point-of-impact can be adjusted by moving the aiming point up, say, to the center of the target, as seen above. For consistently high point-of-impact, simply move the aiming point lower relative to the target.
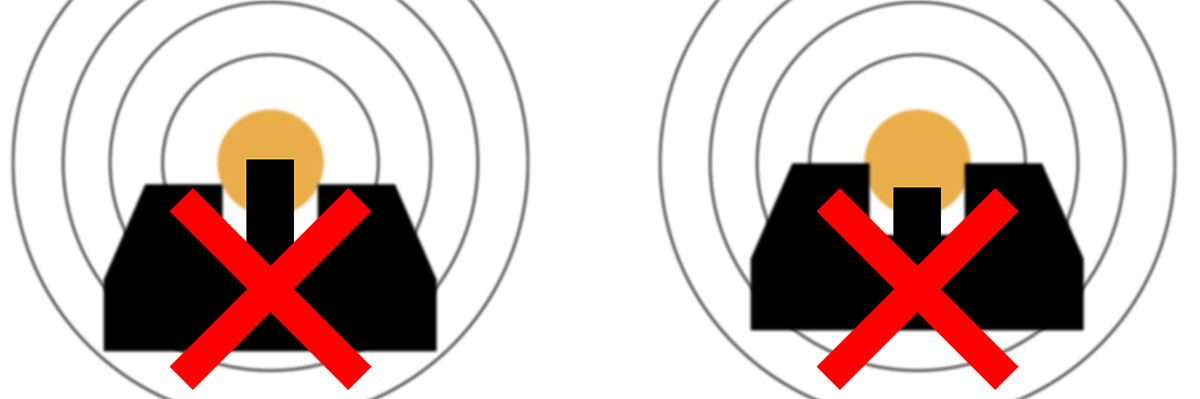
Keeping the proper sight alignment (top of front and rear sights level) and learning where to aim on the target to adjust for elevation is preferred over changing the relationship of the front-to-rear sight. As the above examples show, removing a fixed reference point for sight alignment (tops of the front and rear sights) eliminates consistency in aiming, resulting in a loss of accuracy. It’s always best to minimize the variables, which is why it is recommended to learn to adjust the point-of-aim to alter point-of-impact elevation, if you must, than to disrupt sight alignment.

The preferred method for adjusting elevation is to experiment with different ammunition. As with rifles, handguns exhibit different points-of-impact with different ammunition. A change in bullet weight, bullet profile, powder charge…even primer type can affect point-of-impact. Bullet weight, in particular, can alter high/low point-of-impact, so begin by shooting different weight bullets, preferably of the same brand ammo, and keep at it until you find the combination that works best for your gun.

Zeroing drift-adjustable handgun sights can take time, but by employing a good sight adjustment tool, such as Real Avid’s Master Sight Pusher demonstrated in the above video, and experimenting with different ammunition loads, you can quickly shorten the distance between “almost there” and “bullseye!”