Taurus delivered a big-bore winner with its Raging Hunter revolver. Here’s how to set yours up for some serious whitetail action.
by Rob Reaser
I must admit to falling instantly in love with the Raging Hunter when Taurus rolled out its behemoth big-bore, large-frame revolver several years ago. Sure, the grip and trigger reach hit the limit of my medium-sized hands, and, yes, the weight-forward bias took some wrangling after shooting a couple boxes of .44 magnum rounds. But…DANG!..the range time was nothing but fun.
That year, I dropped a nice Florida porker with the gun at 30 yards using open sights. Quite the confidence-booster, that. A year later, I decided to go after wild hogs again, only this time with a red dot. Two boars occupied the meat hook on that trip.
Now, it’s time to turn the Taurus revolver loose onto some whitetail fun and get the gun properly dialed in. What do I mean by that?
Well, a handgun is really no different than a long gun when it comes to the ingredients needed to wring out its full performance potential. The basics, in other words, are the same. We’ll cover each of those areas in a moment, as well as some special consideration I had to take (and you may, too) to bring my Raging Hunter up to speed. But before we dive into the particulars of setting up a hunting handgun, a quick tour of the Taurus Raging Hunter is in order for those of you who may be interested in trying out a handgun this hunting season.
The Hunting World’s Bad Boy Revolver
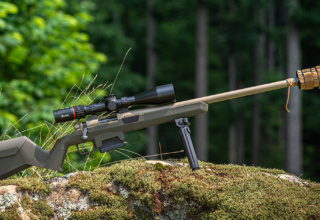
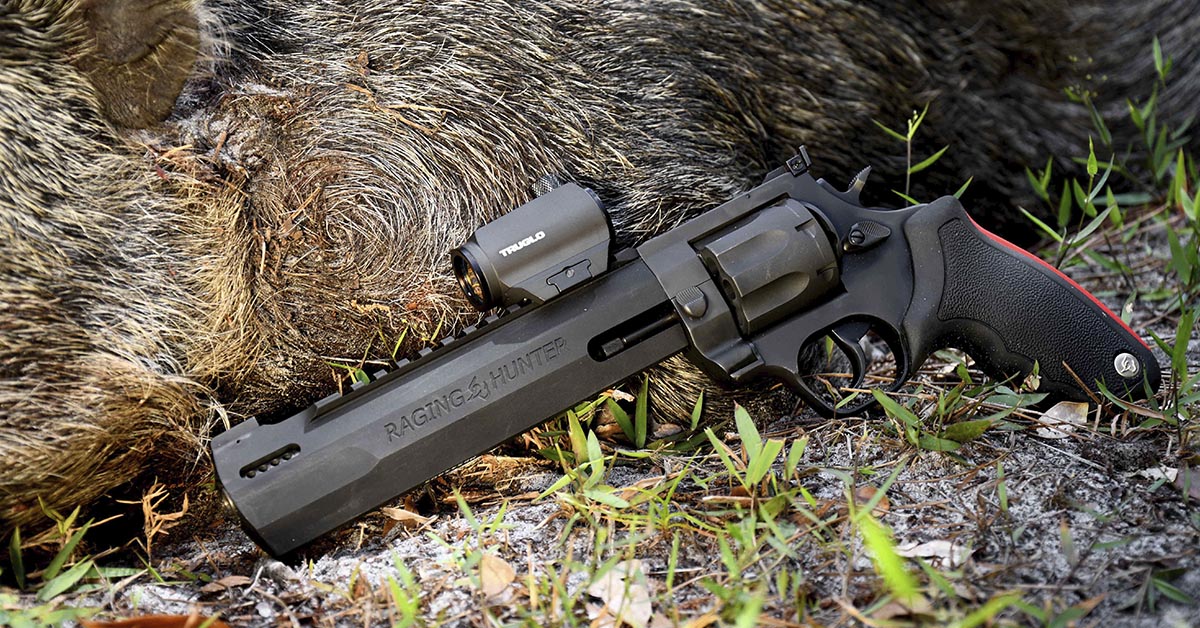
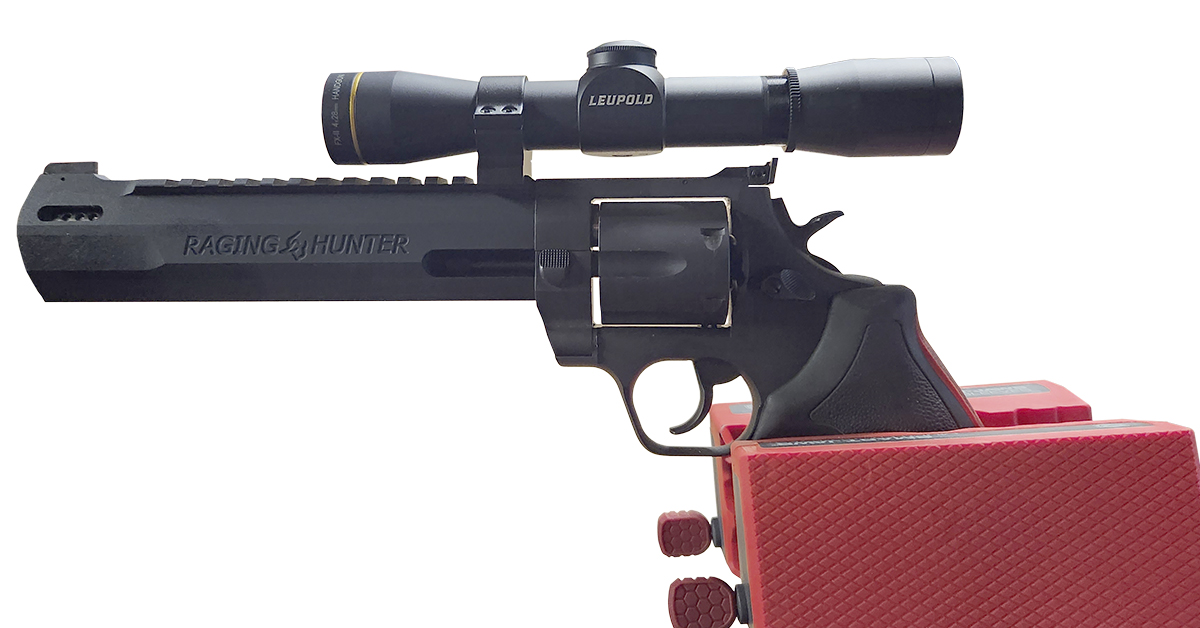
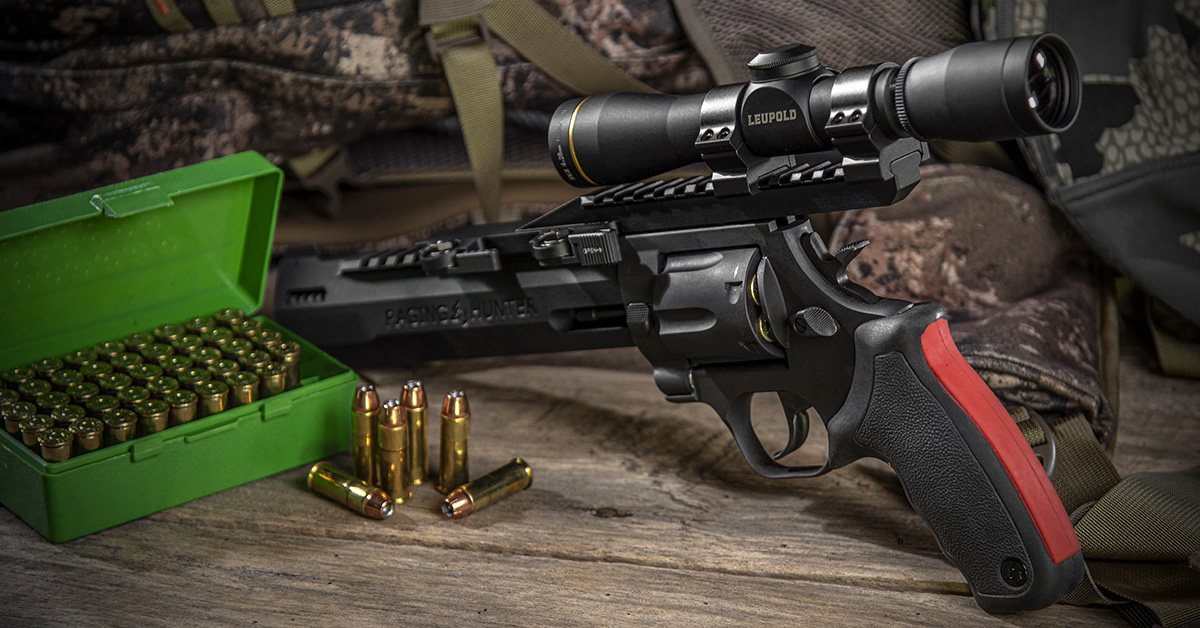
The Taurus Raging Hunter debuted in 2018 chambered for the .44 Magnum round. Boasting a whopping 8.37-inch ported stainless-steel barrel with an aluminum barrel shroud and integrated Picatinny rail on top, the Raging Hunter caught the attention of everyone in the shooting sports industry. The NRA publication American Hunter even named it the “Hunting Handgun of the Year” for its 2019 Golden Bullseye Award.
In keeping with its heavy-caliber mission, the Raging Hunter is built to the task. The barrel porting does its job of mitigating muzzle rise so you can more quickly get back on target should a follow-up shot prove necessary. The cushioned rubber grip fills the hand and offers ample acreage to grip and to distribute the recoil impact. The grip is also exceptionally sticky, so you don’t lose your hold after the shot is fired.
The frame and cylinder are stout pieces made of alloy steel to manage the heavy loads. In addition to the standard thumb piece, the Raging Hunter includes a front cylinder latch. Between the two, the cylinder stays firmly locked when the gun is rocked.
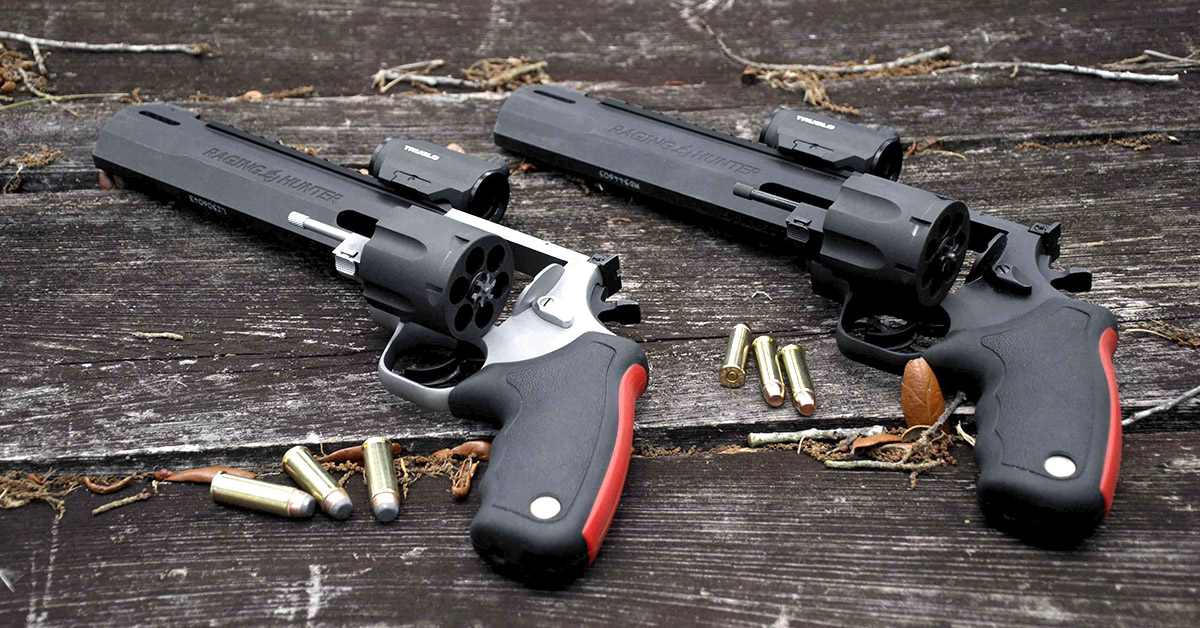
Since its introduction, the Raging Hunter line has expanded significantly. There are now two additional barrel lengths offered — 6.75-inch and 5.12-inch — and four additional chambers: .357 Mag/.38 Special +P, .454 Casull, .460 S&W Magnum, and .500 S&W Magnum. You can check out our review of the .460 S&W Magnum bruiser here. Suffice to say, there are plenty of configurations to choose from if you’re ready to take the handgun hunting challenge.
Spring Upgrade
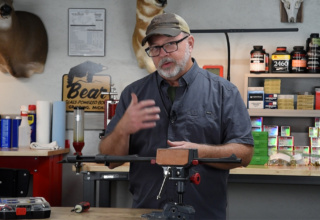
One of the first things I do to almost every firearm I intend to use with regularity is upgrade the trigger system. For revolvers, this means, at a minimum, lightening the hammer and trigger springs. The lighter pull can significantly minimize shooter-induced error in single-action mode (hammer cocked) and makes double-action shooting much easier while also boosting accuracy potential.
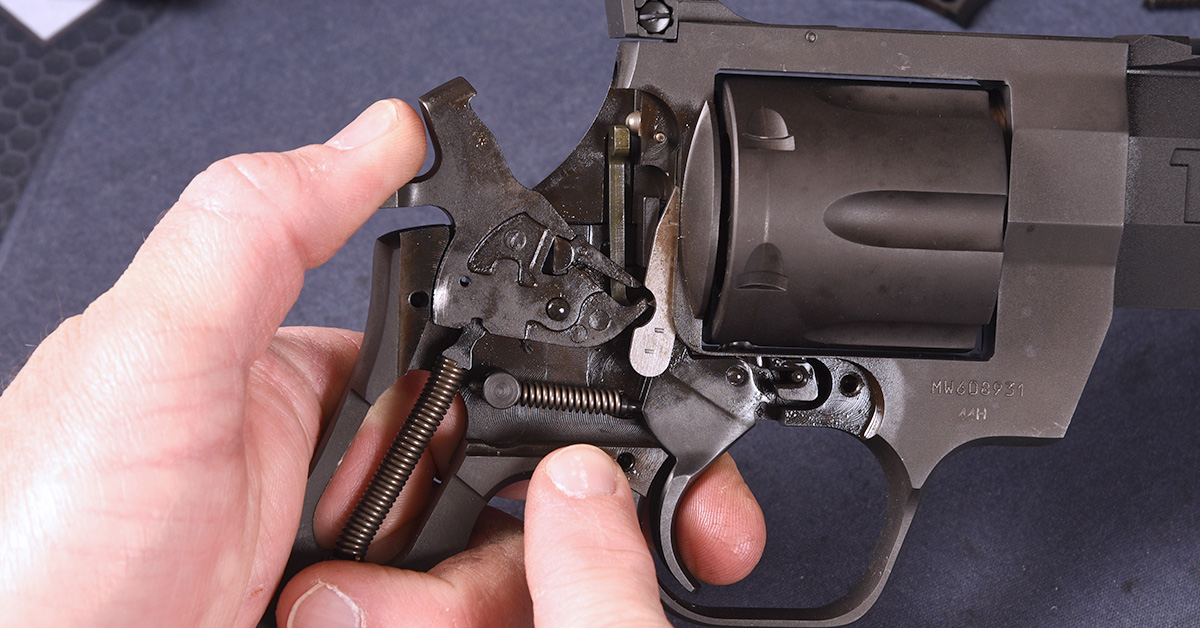
Fortunately, Taurus revolver hammer and trigger springs are easy to swap out for reduced power/weight springs if you have patience and a quality set of parallel-ground screw drivers. I had already installed the Wolff Gunsprings Shooter’s Pak on my Raging Hunter, choosing the 10-lb. trigger spring and the 10-lb. hammer spring. This dropped the single-action pull to 4 lbs./14.0 oz. and the double-action pull to 9 lbs./7.7 oz. Go here to see the step-by-step process for installing the reduced-power spring set.
Optic
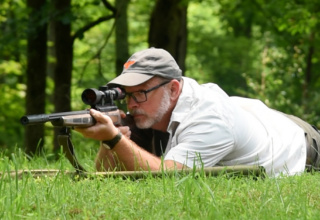
While I’ve had unquestionably good results using a red dot on the Raging Hunter, I can’t get past the need for a slightly magnified, crosshair-reticled scope for deer hunting. Most of my whitetail hunting takes place in the timber, where obstructions are plentiful and available light is an issue at dawn and dusk. A low-magnification scope with good light transmission is the perfect solution for making clear shots in brushy environments and for picking up the target when the light is sketchy.
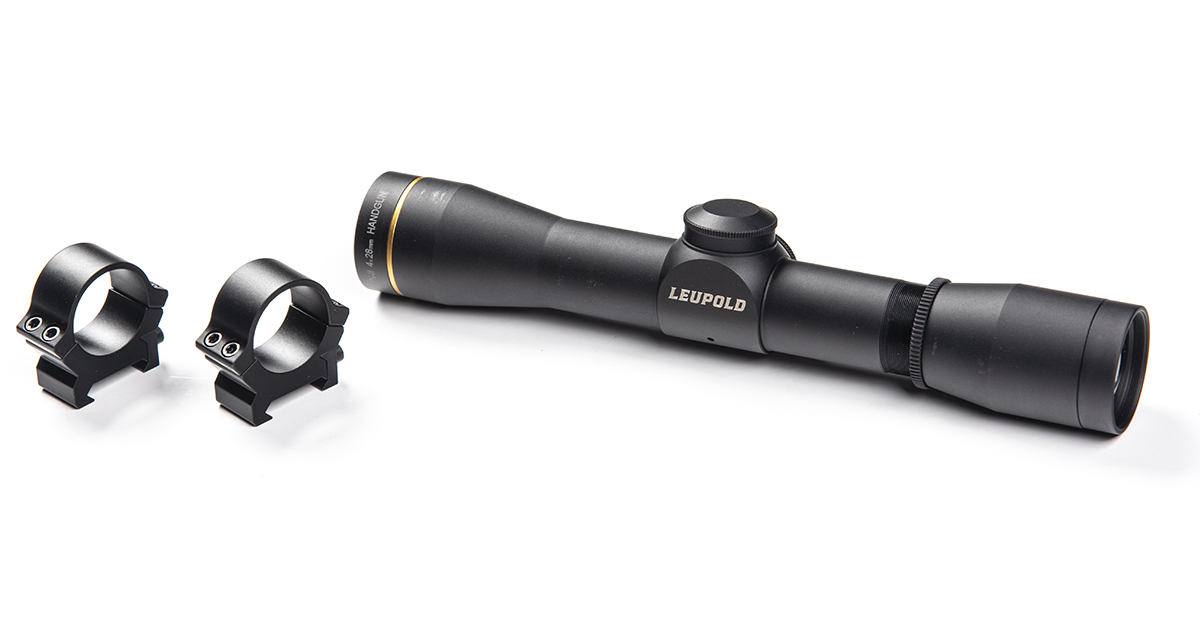
For the Raging Hunter, I chose the Leupold FX-II 4×28 with a conventional duplex reticle. Weighing a scant seven ounces and measuring about 8.5 inches in length, the FX-II delivers all I need for a handgun optic and nothing more — clean and simple, compact and light. To mount the scope onto the Raging Hunter’s Picatinny rail, Leupold’s one-inch low-profile (0.73 inches) PRW2 rings were the obvious choice. These rings are low enough to clearance the revolver’s rail and frame and get the line-of-sight as close to the barrel bore as possible.
Everything seemed fine in theory, but you never really know what you’ve got until you start piecing it all together. I started by mounting the rings as far back on the Picatinny rail as I could. That’s when I discovered that the scope’s eye relief, long as it is at 18 inches, was not nearly long enough for me to get a full sight picture with the gun presented for fire. In short, the scope would have to be moved back…by a good bit.
To get a workable eye relief, the scope would need to be mostly centered above the frame. Mounting it exclusively on the Picatinny rail put the FX-II too far forward, allowing for only a small image and massive vignetting (dark ring) that simply would not work.
How to move the scope back? Mounting it to the frame wouldn’t work without major gunsmithing and I didn’t want to drill and tap it for a mount. After much online searching for a solution that would allow the scope to mount to the Raging Hunter’s Picatinny rail while moving the scope reward enough to achieve the proper eye relief, I zeroed in on the Tactical Extended Picatinny Riser (PN #LT608) manufactured by LaRue Tactical.
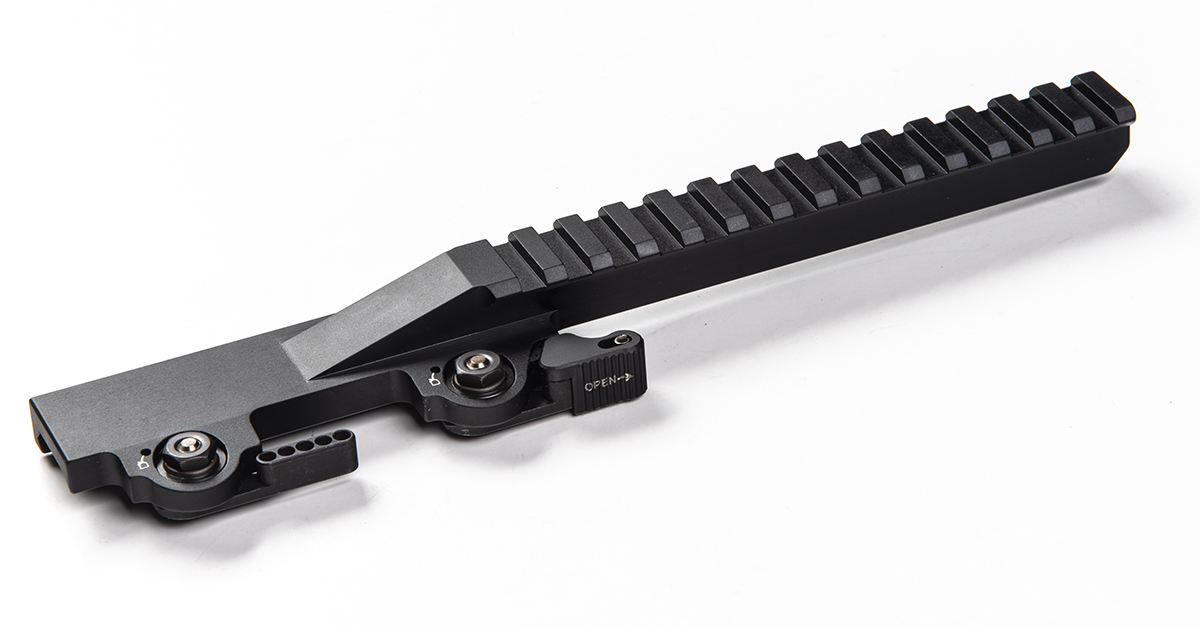
Although developed for use on Springfield M1A rifles to bring magnified scopes with short eye relief closer to the shooter, I couldn’t see why this wouldn’t work on the Raging Hunter for the same purpose. After discussing it with LaRue’s sales and customer service manager Michael Alexander, he felt that the extended riser should work fine. That was good enough for me since my options were limited.
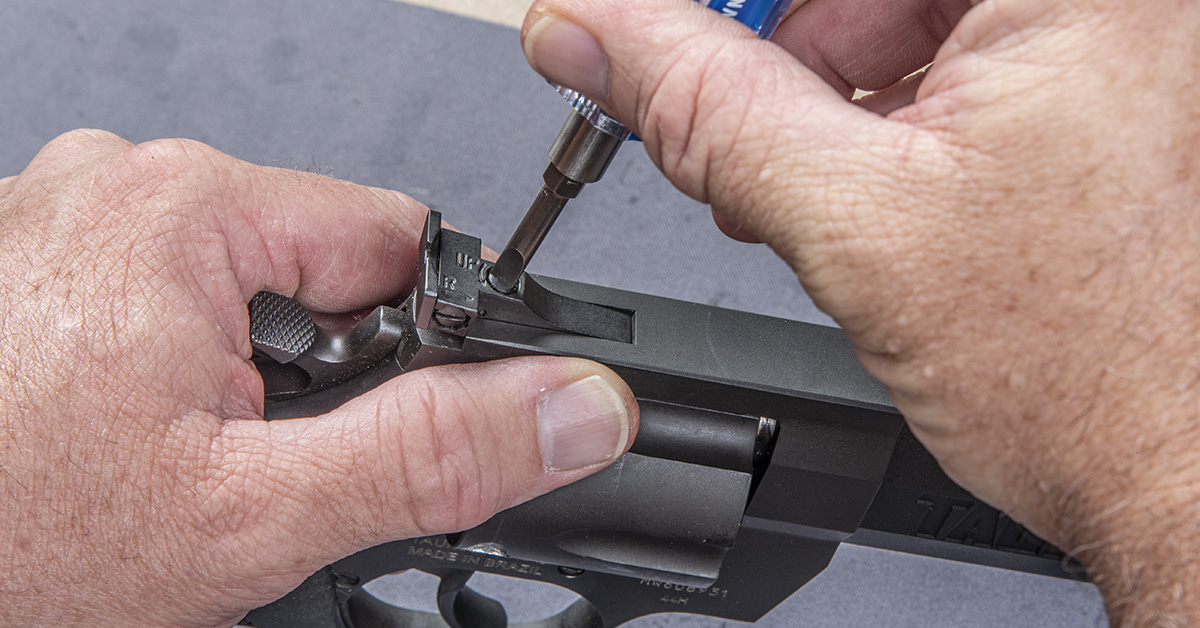
A trial fit of the LaRue extended riser revealed that the Raging Hunter’s rear sight would need to be removed. I began by loosening the sight’s elevation screw.
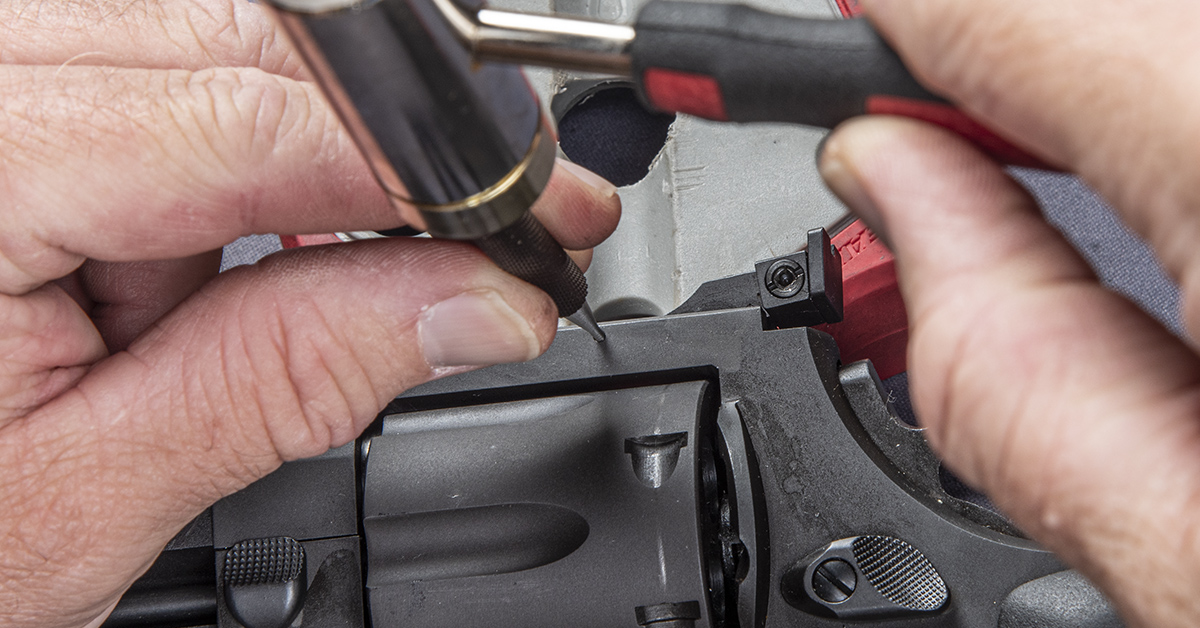
Next, I knocked out the sight retaining pin with a 1/16-inch pin punch.
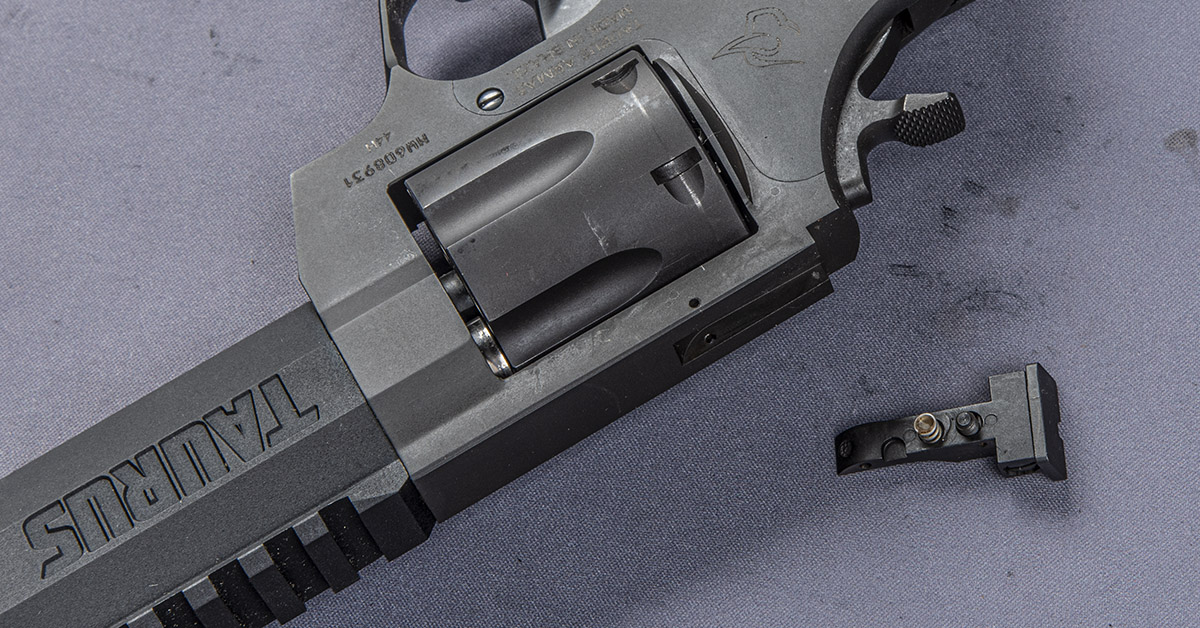
The sight, rear sight spring, and retaining pin were transferred to a small sealed-top baggie for safe storage.
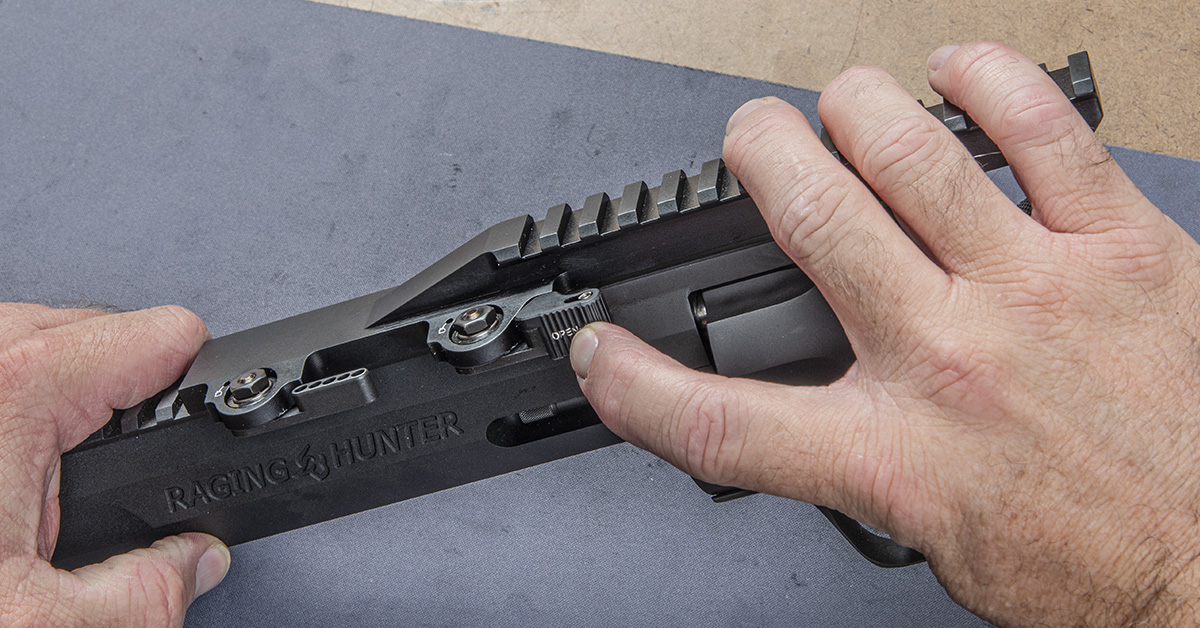
The extended riser features two over-cam clamping levers to solidly secure the riser to a Picatinny rail. The rear lever also features a lock system that, when engaged, ensures that the riser will not accidentally come loose from the rail. LaRue claims that the precision manufacture of this extended riser means you won’t lose your optic zero should you need to temporarily remove the assembly from the firearm. While installing the extended riser, I did note the close tolerance fitment with the gun’s Picatinny rail, so I have no reason to doubt that the extended riser will hold a zero, just as LaRue states.
When secured in place, the extended riser greatly expanded the scope ring mounting options. The riser doesn’t interfere with the frame and there is ample room to access the hammer spur for cocking. Knowing that I needed to bring the scope as close to my eye as possible, I secured the ring mounts as far back on the rail as I could.
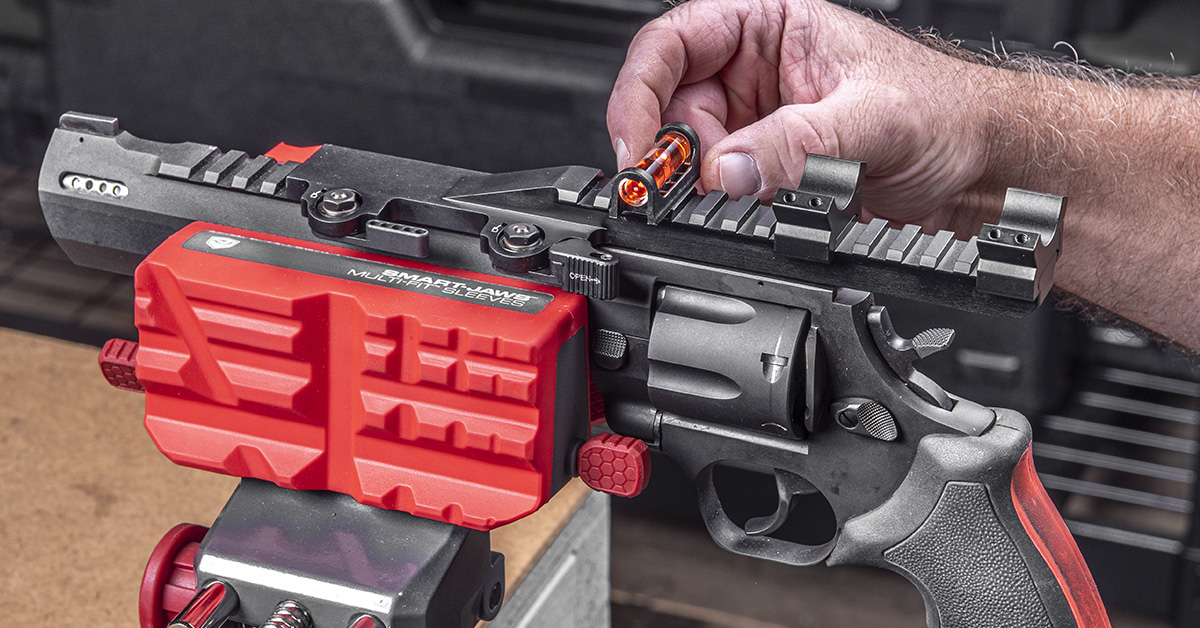
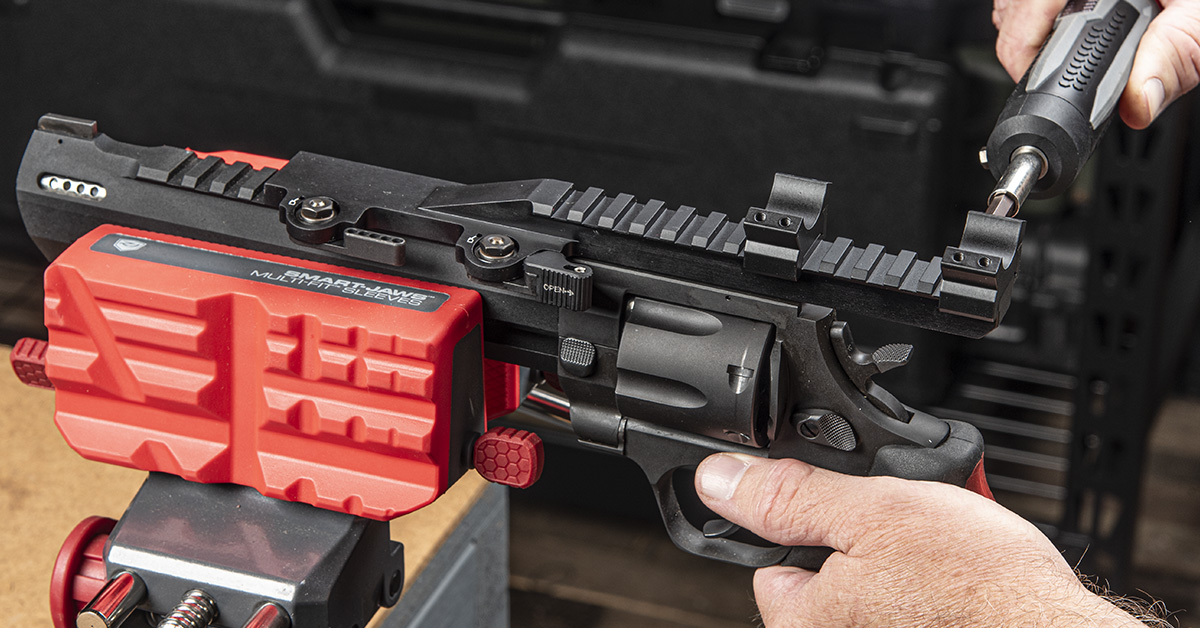
To ensure that the scope reticle would be aligned perpendicular to the bore, I set a level across the extended riser and leveled it in the Real Avid Master Gun Vise using the new Smart-Jaws Multi-Fit sleeves to clamp against the barrel shroud.
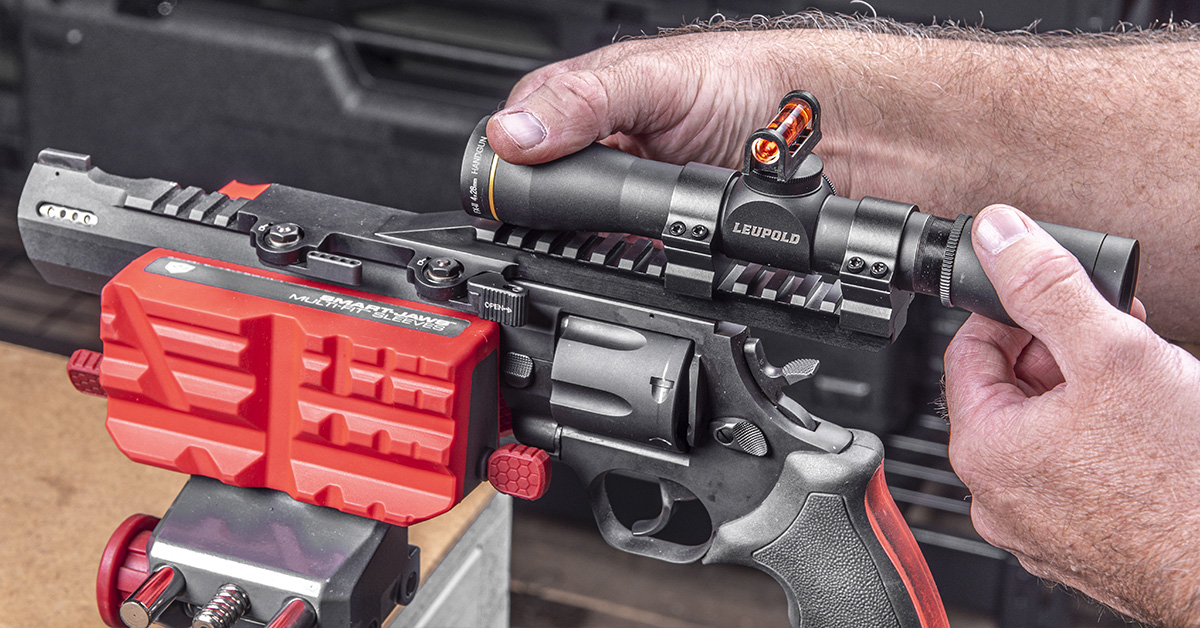
Next, I set the scope onto the mounts, using the turret cap as a leveling base, and then lightly snugged the rings before rotating the scope to level. This is a “rough-in” way to level up a scope (additional refinement may be necessary), but it gets you in the ballpark.
Most importantly, the LaRue Tactical Extended Picatinny Riser placed the scope exactly where it needed to be for the correct eye relief. At full presentation, I get a quick, clear sight picture with no vignetting.
There is also a bonus to this setup. Moving the scope back this far massively negates the weight-forward bias of the gun by shifting the scope weight over the grip. This makes the revolver well-balanced and much easier to aim unsupported. That’s a big win for a hunting handgun.
Load Development
Finding the most accurate load for your firearm — any firearm — is essential. The smallest change in load composition, be it bullet type, bullet weight, powder charge, seating depth…even primer type, can influence group size and point-of-impact. This is why serious shooters and hunters will try multiple cartridge brands and load configurations before identifying and settling on the load that shoots the tightest groups from a particular gun.
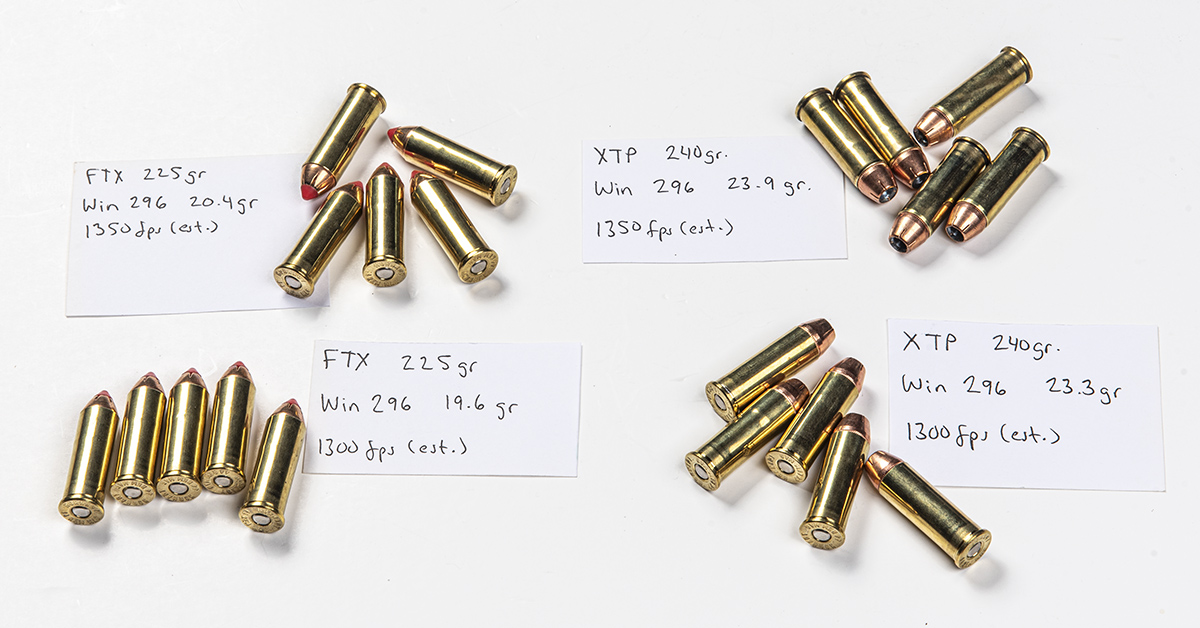
For the Taurus Raging Hunter, I decided to get the best from what I had on-hand. With a couple boxes each of Hornady 225-grain FTX and 240-grain XTP bullets stashed from the pre-scamdemic days, I worked up four different loads using Winchester 296 powder and Federal primers. The variables would be the bullets and the powder charge. Using the Hornady Reloading Handbook as my guide, I loaded the two heaviest rounds below the maximum charge for each bullet. This was to give me the greatest possible velocity for optimal terminal performance.
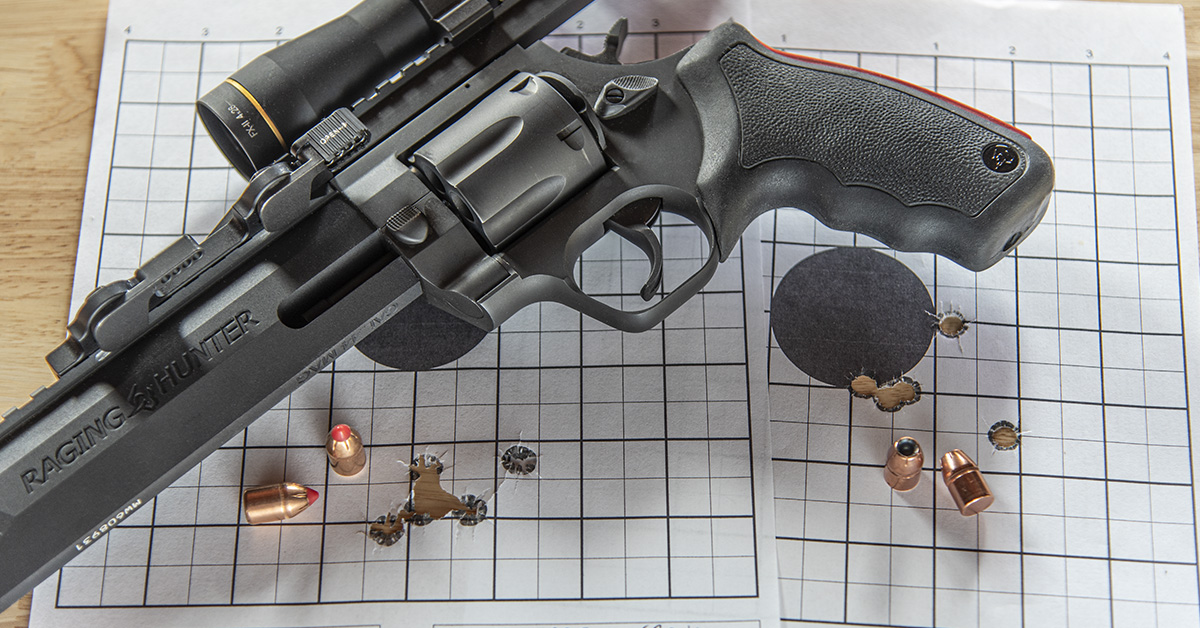
After a quick 25-yard sight-in, I moved the target to 50 yards for the load testing. The results were quite clear.
- FTX 225-gr. w/20.4 gr. Win 296: 1.703 in.
- XTP 240-gr. w/23.9 gr. Win 296: 1.729 in.
- FTX 225-gr. w/19.6 gr. Win 296: 2.072 in.
- XTP 240-gr. w/23.3 gr. Win 296: 2.580 in.
The Raging Hunter definitely favored the higher velocity loads with both bullet types. With a scant 0.026-inch difference between the two tightest five-shot groups at the same theoretical velocity, I decided the hotter XTP load would be the one for this pistol since that same load delivers a best 1.454-inch group from my Henry Big Boy X tactical lever-action at 100 yards with a red dot. This way, I have one load for two different firearm platforms.
Hunting big game with a handgun offers several advantages — most prominent in my mind is the lighter carry weight and greater mobility I have when compared to carrying a long gun. Because most of the shots taken from my hunting stand average 40 yards, with 75 yards being the maximum shootable distance I have on my deer stands, the Raging Hunter in .44 Mag is all the medicine I need.
Another advantage of the handgun is that it puts a new spin and a greater challenge to the hunting game that has become boringly routine for many of us. Handgun hunting sharpens your focus, hones your marksmanship and hunting skills, and, when successfully deployed, elevates the hunting experience ten-fold.
If this is your year to pick up the handgun for hunting season, the Taurus Raging Hunter is a great revolver to start with.