If you have an A2 rifle that is collecting dust, these crafty mods will turn it into a Service Rifle competitor and put you on the path to serious marksmanship skills
by Lou Patrick and Rob Reaser
EDITOR’S NOTE: This is an extension of the article published in the 2020 issue of GUNS DIY magazine, available on newsstands around the country beginning July 28. Pick up a copy to read more do-it-yourself firearm articles covering handguns, shotguns, bolt rifles, and more.
There has been an entire generation of folks who have come into the shooting sports via the AR-15. Sadly, many haven’t a clue what marksmanship skills are all about.
Most of the ARs that are purchased today are a far step away from the A2-type rifles that were in such demand after the Clinton-era Federal Assault Weapons ban sunsetted in 2004. Since then, the AR platform has morphed into innumerable variations, replete with railed handguards, advanced optics, more barrel configurations than you might think possible, and the expectation that ARs will ultimately be further customized and accessorized after the purchase.
All great stuff, and we love it. For many shooters, though, the overt accessorizing eventually takes the challenge out of shooting and boredom sets in. When shooters rely on bench rests, magnified optics, bipods, red dots, drop grips…even lasers…something gets lost in the translation. That “something” tends to be marksmanship skills.
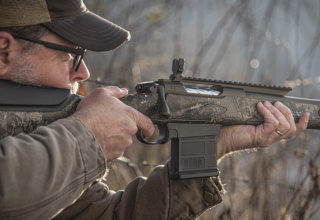
As with any skill set, marksmanship requires learning to shoot the proper way in the classic shooting positions — standing, sitting, kneeling, and prone. It also takes practice, practice, and more practice. Hard work? Yes. Fun work? Absolutely! In our book, learning and practicing shooting with a base rifle like the A2 (which is derived from the U.S. military’s M16A2) is INFINITELY more fun than drilling holes in a target with a rifle loaded with gadgets.
To promote and maintain shooting skills among the military and the American populace, in 1903, Congress established the National Board for the Promotion of Rifle Practice along with the National Matches. These eventually transitioned to what is known now as the Civilian Marksmanship Program, highlighted by the annual National Matches the organization hosts at Camp Perry, Ohio, each year.
If you want to learn more, visit thecmp.org. Our purpose here is to show you how to build an A2 rifle that will facilitate honing your shooting skills and allow you to compete in the CMP or the NRA’s Highpower Service Rifle events. What’s more, we will show you the same rifle modifications and techniques used by the gunsmiths at the U.S. Army Marksmanship Unit for service personnel competing in these divisions. And, yes, you can do it to the rifle you have parked in the gun safe that’s probably doing nothing right now but collecting dust.
There are a few areas we look at when converting a standard A2-style AR-15 into a match competitor. Through it all, the idea is to maintain the original M16A2 appearance per the competition regulations. In other words, performance modifications are fair game so long as they do not radically alter the outward appearance of the rifle from its military-issued form. That means “stealth mods” are in order. These include:
- Converting to a free-float tube assembly.
- Upgrading the trigger with a pull weight ≥ 4.5 pounds.
- Installing National Match sights.
- Adding weights to the buttstock and handguard.
- Installing a National Match Service Rifle sling.

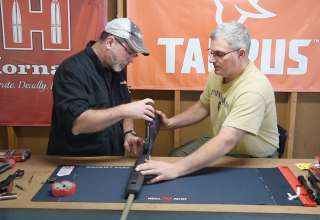
Preparing a factory-grade AR-15 for competition use is easily accomplished with a few hand tools and the proper match grade components. That is not to say you can’t compete with a standard A2, but a few modifications to help the shooter can do wonders for the kind of downrange performance you’re looking for. It is a simple matter of changing out a few issue parts for match-grade parts.
Perhaps the greatest accuracy improvement is changing out the issue barrel for a high-quality match-grade barrel. Unfortunately, this also comes with a high match-grade barrel price. You should also consider how many rounds have been fired through the current barrel along with your marksmanship level. It makes little sense to throw out a good factory barrel in exchange for a match-grade barrel when you are still cutting your competition teeth. It is far wiser to wear out that factory barrel through practice, practice, practice. You can then make the switch to a match-grade barrel once the original factory barrel is worn out and you have elevated your marksmanship skill set. This also serves to keep down the initial cost of competing for, as any competitive shooter will tell you, there is a lot of ancillary equipment needed. It is with this, the beginner in mind, that we prepare a Rock River Arms Standard A2 rifle for competition use.
Free-Float Tube and Installation

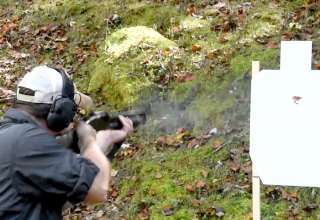
It well established that free-floated barrels tend to shoot more accurately than those that are not. A problem for AR competitors is that as-issued AR barrels are not free-floating. The forward handguard attachment point and front sling swivel are barrel-mounted components. This becomes a problem for competitors when in a shooting position and using the sling for additional support. Tight sling pressure is directly transferred to the barrel and can cause inaccuracy.
The solution for competitors that must keep the AR-15 looking like an as-issue service rifle is to install a free-float tube that will be hidden under the handguards, keeping the rifle match legal. The free-float tube floats the barrel by moving the front sling swivel attachment point to the float tube, positioning it directly under the front sight assembly and maintaining the as-issued look. The front handguard attachment point is also relocated to the tube, completely free-floating the barrel and enhancing accuracy. The Rock River Arms Match free-float kit comes with everything needed to float the barrel on your soon-to-be competition-grade rifle.

The jam nut supplied in the RRA kit and used to keep the tube tight measured 1 3/8-inch in diameter. The jam nut also has a 1/8-inch hole, requiring the use of a 1 3/8-inch spanner wrench with a 1/8-inch pin to tighten it. A strap wrench is used to hold the tube in place while tightening the jam nut with the spanner wrench. Once your float tube kit arrives, it’s wise to measure the tube and jam nut to ensure you have the tools needed prior to beginning your work.

Separate the upper receiver from the lower receiver. Remove the charging handle and the bolt carrier group.

Remove the handguards.

Before the float tube can be installed, some barrel-mounted components must be removed. Secure the barrel in a bench vise with padded jaws to protect the barrel. We’re using a Real Avid armorer’s wrench to remove the flash suppressor and crush washer.

Using the Real Avid AR15 Master Bench Block along with a hammer and punch, remove the pins attaching the front sight assembly to the barrel. CAUTION! Look closely at those pins, as they may be tapered. Many AR-15 rifles will have taper pins in this location, meaning they can only be removed in one direction. Remove the taper pins by placing the punch on the end with the smallest diameter. Our Rock River Arms A2 did not have taper pins.

With the pins removed, remove the front sight assembly from the barrel. This may be a snug fit and require a little persuasion with a hammer. Tap easily and straight. The front sight assembly will slide off the front of the barrel.
The float tube kit is supplied with a new front sling swivel rivet; however, you will need to use the current front sight-mounted swivel. Also, the front sight swivel mounting surface will need to be altered for the installation of the float tube. The float tube kit includes a gas tube with a slightly different bend than the issue gas tube. These components will need to have the necessary modifications made and then assembled in order to properly locate the float tube during installation.

Using a Dremel tool with a cut-off wheel, cut off the formed end of the rivet. A small file can be used in the absence of the Dremel. Work carefully to avoid damaging the components that will be reused.

With a hammer and punch tap, out the rivet.

The sling swivel mounting surface on the bottom of the front sight will need to be removed. This provides clearance for the float tube sling swivel mounting surface. Using a Dremel tool with a cut-off wheel, remove this, cutting close to the front sight base.

Finish by filing the surface even with the front sight base.

Apply a little cold blue to the bare metal to prevent rust.

Part of our upgrade includes a match sight installation. This is a good time to change the front sights. With an AR-15 front sight tool, remove the front sight by turning it counter-clockwise.

Lightly lubricate the threads of the Match front sight and thread it into place, making sure the sight base is even with the front sight housing. The top of the Match front sight is not flat like the issue sight. The top of the match front sight has an angle. This sight should be installed so the high side of the sight is away from the shooter.

Using the new sling swivel rivet supplied in the float tube kit, install the front sling swivel onto the float tube. A front sling swivel rivet tool is available, however, in the absence of such a tool, careful use of hammer and punch will suffice for a one-rivet installation. Keeping the rivet head tight against its mounting surface and using a small punch, slowly roll the rivet material around its circumference. Working slowly and deliberately, good results will follow.

Once the rivet material is close to the mounting surface, finish off with a larger punch to ensure the rivet is seated tightly in place.

The original gas tube, not having the proper bend for use with a float tube, will need to be replaced with the gas tube supplied with the kit. Remove the original gas tube. Next, install the new gas tube in the same manner as the old one was removed. With the tube gas port facing towards barrel, align the gas tube pin hole with the front sight pin hole and install the new roll pin supplied with the kit.

A larger diameter punch will easily seat the new roll pin flush with the front sight surface. With the necessary modifications made to the front sight assembly and the sling swivel mounted onto our new float tube, we can turn our attention back to the upper receiver.

Secure the upper receiver in a bench vise using the Real Avid Lug-Lok block and remove the barrel nut with the armorer’s wrench.

A little heat may be needed to aid in the removal of the barrel nut. Heat from a propane torch will not harm the rifle’s finish.

The new barrel nut supplied with the kit has a threaded extension that allows the installation of the float tube; however, it does not include the delta ring components. We will need to remove these components from the original barrel nut. Looking at the original barrel nut, you will see a snap ring. This ring is easily removed with snap ring pliers or a small screwdriver. Once removed, the spring and ring will slide off the barrel nut.

Installation of the delta ring components onto the new barrel nut is simply the reverse of removal. Ensure the snap ring is properly seated into its groove on the barrel nut.

Slide the new barrel nut assembly onto the barrel and install the barrel into the upper receiver. Apply anti-seize (Molybdenum disulfide or Brownells Action Lube) compound to the receiver threads.

Thread the barrel nut hand tight.

The barrel nut torque specification is 30 to 80 ft/lbs. Using the Real Avid armorer and torque wrenches, torque the barrel nut to 30 ft/lbs, loosen the nut (not with the torque wrench), torque to 30 ft/lbs, loosen the nut, and torque to 30 ft/lbs again.

There is a hole in the delta ring and a space in the spring that allows the gas tube to pass into the upper receiver. Using a small punch, align the two. If a barrel nut serration blocks the gas tube passage, the barrel nut may be tightened beyond 30 ft/lbs in order to align barrel nut serrations with the gas tube. Never loosen a barrel nut to gain alignment, nor tighten over 80 ft/lbs.

Once proper alignment is achieved, degrease the barrel nut tube mounting threads with denatured alcohol. Also degrease tube and nut threads.

Thread the jam nut on first, placing it close to the delta ring, then thread the tube into position.

Next, slide the front sight assembly with the gas tube into place. Ensure that the gas tube passes easily into the upper receiver and that the front sight pin holes align properly with holes in the barrel. There should be a slight clearance between the front sight and handguard mounting flange. Once everything is aligned properly, hold the tube in place and hand-tighten the jam nut against the tube. At this time, it is best to test fit the handguards to ensure they will install properly. Adjust as needed until the above criteria is accomplished, then remove the handguards and front sight/gas tube assembly.

While holding the jam nut in place, unthread the tube to expose the threads underneath. Apply red Loctite and then thread the tube back to its location against the jam nut.

While holding the tube in place, loosen the jam nut to expose the threads underneath it. Apply red Loctite and tighten the jam nut against the tube. The application of red Loctite is optional and requires the use of heat if components need to be disassembled in the future. The authors find it wise to use red Loctite during this installation, as a loose float during a match ruins the day.

Using a strap wrench to hold tube in place, tighten the jam nut against the tube with a spanner wrench.

Before the Loctite has time to dry, install the front sight and gas tube assembly into place and ensure that you have maintained proper alignment. Adjust if necessary, then allow the Loctite to cure before work continues.

Once the Loctite has cured, install the front sight pins. If the pins are tapered, install the small end first.

Apply molybdenum disulfide anti-seize compound to the muzzle threads.

Slide the crush washer onto the barrel with the small diameter towards barrel. Next, install the flash suppressor hand tight.

The flash suppressor torque is 15-20 ft/lbs. When using the A2 version, ensure that the suppressor is properly oriented with the vents up and the enclosed portion down.
National Match Sight Installation

The Rock River Arms National Match sight kit includes all components needed to swap out the sights on your AR. The narrower front sight post, with its angular surfaces, will appear sharper when viewed through the rear sight. This, combined with hooded rear sight and a smaller peep, provides a more precise sight picture for the match rifle. One-quarter minute windage and elevation drums allow the shooter to fine-tune point-of-impact.

With a hammer and roll pin punch, remove the rear sight roll pin. Be careful as you remove this roll pin, as there is a spring directly beneath it. A special tool is available to aid in compressing the spring; however, careful use of a hammer and punch is all that is needed for disassembly. With the roll pin removed, turn the elevation drum until the rear sight unthreads out of the housing.

With the rear sight assembly removed, the elevation drum will remain in place, being captured by its detent. Slide the elevation drum out of the upper receiver. Be careful, as the detent may come out with it and roll across the bench.

Lightly lubricate the rear sight detent spring.

Install the spring into the new rear sight housing.

Lightly lubricate the rear sight detent.

Install the rear sight detent on top of the spring.

Lightly lubricate the rear sight elevation drum.

Lightly lubricate the rear sight threads.

Install the rear sight elevation drum into the receiver.

Being careful to keep the detent in place, install the rear sight into the receiver.

Turn the rear sight elevation drum, drawing the rear sight down into the receiver.

This slot in the threads of the rear sight allows passage of the roll pin. Ensure this slot aligns with hole in the receiver prior to installing the roll pin.

With a hammer and roll pin punch, start the roll pin into the receiver.

With the roll pin started, invert the receiver and, using a small punch, compress the spring and while simultaneously driving the roll pin into place.

Once the roll pin has properly passed over the spring, lay the receiver onto its side and seat the roll pin flush to the surface of the receiver.
National Match Trigger Installation

The Rock River Arms National Match trigger kit has everything needed to give your rifle a match-legal 4.5-pound two-stage trigger. Many older ARs used larger .169 diameter hammer and trigger pins. Newer ARs use the smaller .155 diameter pins. If in doubt, check the pin size prior to ordering the trigger.

While not always necessary, the authors find it best to remove the pistol grip and safety. The safety detent and spring are held captive by the pistol grip and will fall out of receiver once the grip is removed. With the appropriate screwdriver, remove the pistol grip screw, grip, safety, spring, and detent.

With the safety detent and spring removed from receiver, the safety lever will slide out of the receiver.

With the hammer in its forward position to relieve spring tension, use a hammer and punch to remove the hammer pin. The hammer can then be removed from the receiver.

Use a hammer and punch to remove the trigger pin and then remove the trigger from the receiver.

Lightly lubricate the contact surfaces of new two-stage trigger.

Lightly lubricate the hammer and trigger pins.

Install the trigger. Ensure that the legs of the trigger spring straddle each side of the trigger cut out in the receiver. Next, install the safety lever and rotate to the fire position.

Lightly lubricate the contact surfaces of the hammer.

Prior to installing the hammer, ensure that the safety lever is in the fire position. Look closely inside the receiver at the top of the trigger. and you will see a small notch on each side of the trigger where the trigger pin passes through. This is where the legs of the hammer spring rest. Install the hammer into the lower receiver. The spring legs will straddle the trigger and will rest upon the top of the trigger pin within the notches.

Once the hammer pin is started, it may be necessary to lay the receiver on its side to maintain alignment of the hammer and receiver holes. Gently tap with a hammer and the pin will easily pass through the hammer and receiver. If the pin does not move easily, do not hit it harder. Instead, check the pin/hole alignment and ensure safety is in the fire position.

Lightly lubricate and install the safety detent and detent spring.

Install the pistol grip.

Check for proper function of the trigger. Do not dry fire and allow the hammer to contact the receiver. Carefully control the hammer movement with your thumb or with a dry-fire block.

Assemble the upper receiver and lower receiver assemblies and perform a function check.
Installing Handguard and Stock Weights

Lightweight ARs may be fine to carry afield, but on the firing line in match conditions, even the relative light recoil of the 5.56×45 cartridge can move the shooter out of position. The solution is weight…and a fair amount of it. Adding weight to your ARs stock is easy and will help keep you in position under recoil. Rock River Arms has both the handguard and stock weights. The buttstock weight, or rear balance wedge, is around 3.5 pounds and one handguard weight is about 3.6 pounds. Depending on how heavy you want your rifle, the Thermold A2 handguards can accept two handguard weights.

The rear balance wedge fits into the space normally occupied by cleaning accessories inside the A2 stock storage compartment. Our buttstock weight required a little trimming to get the trap door closed.

The handguard weight was a perfect fit in our lower handguard, falling easily into place.

The handguard weight did not have any influence on the fitment or installation of our handguards. If you find the additional weight to be too heavy, you can easily trim them to your liking.
National Match Sling

The issue nylon sling of the AR-15 does not provide the strength needed by the match shooter. The best solution is the National Match Service Rifle All Weather Sling manufactured by Turner Saddlery and sold by Rock River Arms. Made from Biothane, it is strong, has the feel of broken-in leather, and is approved for CMP and NRA Service Rifle competition.

A National Match sling install concludes the competition rifle conversion. With all the upgrades complete, this rifle weighed in at 17.2 pounds.

- Build Your Pistol Marksmanship Foundation - June 29, 2021
- Upgrade Your Long Range Rifle the Easy (and Inexpensive) Way - October 22, 2020
- Your Best Survival Choice if it All Goes South - October 13, 2020