High-quality base model AR-15s, such as the RRAGE from Rock River Arms, can put a reliable, accurate rifle in your hands for a terrific price. Here’s how to take it to the next level.
by Rob Reaser
“Let me count the ways.”
Shakespeare didn’t have AR-15 modifications in mind when he penned this line, but he may as well have. One of the many appeals of the AR platform is that, since the rise of the AR-15 aftermarket over the last decade, the customization options have become almost endless. With a mind-boggling array of accessories and variations on core components, it can be challenging for the new AR owner to separate the “cool” from the practical.
Our philosophy on firearm upgrades and modifications is simple.
Nope, that’s it.
You were waiting for something more?
OK…let’s take a slightly deeper dive.
By “simple” modifications, we mean only those changes which enhance practical performance while simultaneously staying out of the way of basic operation. Of course, we’re talking about ARs designed primarily for personal defense—a rifle you may use extensively on the range for recreation, practice drills, or even competitions, but at the end of the day, its real purpose is for personal protection. In that light, we want all modifications to improve that mission while not getting in our way should a situation become “life or death” real. In other words, less is more. We want nothing that adds any additional operational steps, nothing that introduces new actions or nuances to the loading/aiming/firing sequence, and nothing that adds extraneous weight or that may promote snagging or finger-fumbling.
Clean, streamlined, and functional are the parameters.

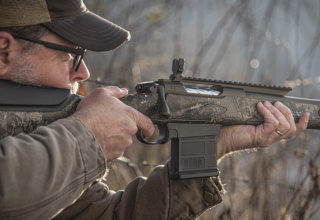
With that in mind, it’s great to come across a rifle like the recently introduced Rock River Arms RRAGE. For either the new AR owner or someone who is well familiar with the platform, the RRAGE presents an almost ideal starting point for developing a solid defense rifle. The extruded aluminum A4 upper was designed to blend almost seamlessly with the proprietary design carbine-length handguard, so it not only looks smooth, it feels smooth in the hand, providing a light and easy grip up front with no sharp edges or unnecessary rails to get in the way. Of course, if your vision of a defensive rifle demands forend accessories, the free-floating handguard is M-LOK compatible.
The other desirable aspect of the RRAGE is its incredible price. With an MSRP of $760 and retail availability of around $660, the RRAGE brings affordability back to the AR-15 world.
Part of that low price point, though, means the rifle comes as basic as it gets. No sights are included, the trigger is MILSPEC, ditto for the pistol grip, and while a 6-position stock is part of the package, it’s not exactly a comfortable shoulder. But all that is okay because getting a reliable and accurate rifle for under $700 means select upgrades to match one’s needs and shooting style are easy to accommodate. Best of all for the AR first-timer or DIY enthusiast, any necessary upgrades are simple to do at home.

We recently picked up a new RRAGE in 5.56 NATO for the purpose of developing a no-nonsense home defense rifle, since living in the country makes this a viable (and desirable) protection option. To that end, we worked up a handful of upgrades that, in our opinion, make the most sense from a tactical-use perspective. As you can see from the following build sequence, anyone can make these modifications regardless of experience level and with minimal tools.
Here are the parts we selected to upgrade…

Let’s face it. The MILSPEC-style collapsible stock, while fully functional, is not exactly comfortable on the shoulder when wearing street clothes thanks to the hard plastic, aggressively textured butt plate. It also offers no accommodations for a quick-detach (QD) swivel sling mount for those who prefer that style of sling attachment.
One of our favorite aftermarket buttstocks is the RRA Operator CAR stock. It comes with a ribbed rubber butt pad that is comfortable on the shoulder, offers a no-slip grip, and includes two integrated QD sling mounts. The robust, trapezoidal cheek piece offers an excellent cheek weld for left- or right-hand shooters, and the stock is six-position-adjustable so you can get just the right length of pull. The butt pad also features a push button that allows you to slide it down to reveal two O-ring-sealed battery compartments.

As with the MILSPEC butt stock, the standard A2 pistol grip, while quite functional, doesn’t exude the best ergonomics. For a fuller, no-slip grip that promotes better weapon retention, trigger finger positioning, and optimal muzzle control, we like a finger-molded grip with a more pronounced palm swell and a rugged rubber coating. A prime example is RRA’s Hogue rubber pistol grip. We find the ergonomics to be spot-on, and the rubberized surface means a positive grip in any condition, even when wearing gloves.

Many shooters favor ditching the stock flat trigger guard with a curved “winter trigger guard.” The original idea behind this was to allow shooters to more easily get their finger onto the trigger when wearing heavy winter gloves. The fact is, this upgrade just makes sense whether you are wearing heavy gloves, tactical shooting gloves, or no gloves at all since easy finger access to the trigger is always a desirable goal. RRA’s winter trigger guard is made of 6061 aluminum and provides ample room for getting that finger on the trigger in a hurry.

Optics versus open sights comes down to personal preference when we’re talking about a primary sighting system. We like a red dot sight for pretty much all AR shooting, unless long-range or hunting is in the cards. For a defensive rifle, though, a good red dot gets top billing—something with adjustable illumination, generous eye relief, and a 2mm dot for more precise aiming at longer ranges. The TRUGLO 20mm Red Dot fits that slot.
When choosing a red dot, be sure to take into consideration whether you want to run open backup sights. If so, you’ll need an optic system with a mount that provides absolute or lower 1/3 co-witness with the open sights. The TRUGLO 20mm we picked comes with both a standard and a raised mount for either straight optic or combo optic/open sight setups.

Although a red dot optic is our preferred primary sight, we consider backup open sights an absolute must-have for a defensive rifle. Batteries die and optics do fail on occasion. Should that happen, we want to be able to carry on the fight. This is where flip-up backup sights come in. There are many to choose from, such as RRA’s NSP model. These simply slide onto the receiver and handguard top rails and secure via a single retaining screw. The RRA NSP rear backup sight features two apertures, one large and one small. Use the large aperture for close-in work or flip up the small aperture for long-range shooting.

Finally, we consider a two-stage aftermarket trigger to be an essential upgrade for any AR. Simply put, a refined trigger is probably the single-most important modification you can make for improving a shooter’s accuracy potential because it will run smoother and break cleaner than a MILSPEC trigger. That leads to reduced shot disturbance and better firing control. RRA offers a couple two-stage trigger kits with a 4.5- to 5-pound pull that, we feel, is spot-on for both defensive and target shooting applications.
The AR-15 Upgrade Basics
Yet another advantage of the AR platform is that most upgrades can be made independent of one another and as time and finances allow. All the modifications we’ve discussed thus far can be done one at a time. Since we are doing all these upgrades at once, we’ll do all the disassembly first and then install the new components.

Disassembling the AR trigger system requires only a hammer and 1/8-inch punch, although a bench block is recommended to protect parts and to help prevent losing the trigger and hammer pins. After ensuring the rifle is clear of ammunition and is rendered safe, separate the upper and lower assemblies. Start by tapping out the hammer pin from the left side and removing the hammer from the receiver. Next, tap out the trigger pin and remove the trigger.

Use an appropriate-sized driver (the screw head type may vary depending on the manufacturer) to remove the grip screw located inside the grip.

Once the grip screw is removed, be careful when separating the grip from the receiver. The safety selector plunger spring is positioned partway in the grip, so you don’t want to lose this small part.

Although not part of the grip swap process, we went ahead removed the safety selector and plunger from the receiver (arrow) because without the grip installed, both parts are loose and may fall out. They will be reinstalled during the grip installation.

Remove the adjustable stock from the buffer tube by pulling straight down on the adjustment lever and simultaneously sliding the stock off the tube.

The rear of the trigger guard secures to the receiver with a roll pin. This pin will be re-used to install the new winter trigger guard, so use an appropriately sized roll pin punch to carefully tap it out from left to right. To prevent damaging the receiver, support it on a bench block.

A captured spring/plunger secures the front of the trigger guard to the receiver. To remove, depress the plunger with a punch and remove the trigger guard.
This completes the disassembly process for all the components we are installing.

Install the new winter trigger guard by inserting the forward end into the receiver (plunger/spring end). Next, position the roll pin end of the trigger guard into the receiver. Roll pin tweezers are helpful in aligning the roll pin while tapping the pin into the receiver. Use a bench block to support the receiver and start the roll pin into the receiver. Gently tap the roll pin. If you feel hard resistance, the trigger guard through-holes are not properly lined up with the roll pin. Stop tapping, if this is the case.

We have found that inserting a punch through the opposite side of the receiver will easily align the receiver and trigger guard pin holes, allowing the roll pin to be tapped gently into place.

Prior to installing the grip, reinstall the safety selector and insert the safety selector plunger into its slot below the selector, pointed end first.

Install the safety selector plunger spring into its slot in the new grip.

Thoroughly clean the grip screw threads with denatured alcohol to remove any oils before adding a small amount of medium-strength thread locker to the lower threads.

Place the grip into position on the receiver, making sure the safety selector plunger spring seats in its slot beneath the plunger, and then tighten the screw snug.

Installation of the new adjustable stock is the reverse of the removal. Position the stock onto the buffer tube, pull down on the adjustment lever, and slide into position.

Moving to the trigger assembly, lubricate all pins and metal-on-metal contact points with firearm grease (go here for lubrication details). Begin by orienting the trigger as shown, with the lower legs of the trigger spring pointing forward. Lower the trigger into position, working it below the safety selector and into the bottom of the receiver. Once in place, push down and forward on the trigger while inserting a 1/8-inch punch through the left side of the receiver and through the trigger pin holes. This will align the assembly so you can insert the trigger pin through the right side of the trigger. You may be able to push the pin in with only your fingers if the holes are correctly aligned, or light tapping may be required.

To install the hammer assembly, orient the hammer spring as shown. The lower legs of the spring must point toward the rear of the receiver and lay across the top of the trigger pin. There is a lot of spring tension here, so it is easiest to push the hammer into the cocked position and then align the pin holes. Once aligned, insert a 1/8-inch punch into the left side of the receiver to maintain alignment. Next, insert the hammer pin from the right side, allowing it to follow the punch. Again, you may be able to fully insert the pin with finger pressure only, or gently tap it into place with a small hammer. If you feel any hard resistance, stop, evaluate, realign the holes, and try again.

Once the trigger assembly is installed, perform a benchtop function check to make sure the hammer cocks, the trigger releases the hammer on FIRE and doesn’t release the hammer on SAFE, and that the trigger reset and safety selector are working. When doing this, be careful that the hammer doesn’t strike the receiver, as it could crack the aluminum. Always keep your thumb pressed firmly against the hammer face during the function check.

Installation of the backup sights is as simple as correctly orienting the sights as shown and sliding them onto the Picatinny rails. We recommend placing the rear sight as far back as possible and the front sight as far forward as possible in order to gain the maximum length sight radius. Once positioned, tighten the retaining screws to secure.

Add the optic of your choice and your rifle is ready for action. Here, we utilized the raised optic mount included with our TRUGLO 20mm Red Dot. It raised the optic enough to provide a 1/3 lower co-witness with our RRA backup sights. This gives us a clear view of both our red dot and backup sights.