With its ballistic diversity and expanded applications, the question isn’t why you would want a .300 BLK rifle, but why you don’t already have one
by Lou Patrick and Rob Reaser
EDITOR’S NOTE: This is an extension of the article published in the 2020 issue of GUNS DIY magazine, available on newsstands around the country beginning July 28. Pick up a copy to read more do-it-yourself firearm articles covering handguns, shotguns, bolt rifles, and more.
We all appreciate the multitude of flavors the AR platform brings to the table. From numerous chamber options to the seemingly unlimited variations on core components and accessories, there are more ways to work up an AR than there are recipes in a Betty Crocker cookbook.
One of the key advantages of the AR platform is the ability to separate the upper and lower receiver assemblies and utilize their broad compatibility with other receiver assemblies. The AR owner can take advantage of this by building an upper receiver in practically any configuration, including one capable of firing a different cartridge. This provides shooters with two rifles for the price of one and half while also aiding marksmanship with the continued use of a familiar trigger pull courtesy of the original lower receiver.
When building an AR upper receiver that has a different chamber than what we’ll call the “base rifle,” the intended cartridge should be considered carefully. If you are on a budget, that may mean selecting an upper receiver chambered for a cartridge that will work with your base rifle’s bolt carrier group and magazine type. The perfect example of this is the popular .300 Blackout chamber. An upper receiver chambered in .300 BLK delivers a cartridge ballistically different than the typical .22 caliber (5.56mm/.223 Rem) bullet can provide, yet it is highly cost-effective because it uses the same bolt carrier group and magazine as the base 5.56/.223 chambered rifle, assuming it retains the correct headspace dimensions.
Why the .300 BLK?
Diversity is often the hallmark of a standout cartridge when deployed from a more utilitarian rifle platform, such as the AR. And arguably no cartridge offers greater diversity in ballistics and in use as does the .300 BLK.
With the availability of both factory-loaded supersonic and subsonic ammunition, the.300 BLK can be considered two different cartridges rolled into one. Loaded with 125-grain spitzer bullets, this cartridge is nearly the ballistic twin to the popular 7.62×39 cartridge, for which Soviet-era weapons such as AK-pattern rifles, along with RPD and RPK light machine guns, are chambered. Consider the following data from Cor-Bon:
- 7.62×39 125 grain bullet; muzzle velocity 2400 FPS, muzzle energy 1600 ft-lbs.
- .300 BLK 125 grain bullet; muzzle velocity 2250 FPS, muzzle energy 1406 ft-lbs.
As you can see, the .300 BLK stands as a robust defense cartridge in supersonic trim, and when sporting a well-engineered expanding bullet, is brutal on varmints and quite adequate on larger game such as whitetail deer.
The bonus factor of the .300 BLK, and what many shooters and AR enthusiasts find so intriguing, is the availability of factory subsonic ammunition. Subsonic .300 BLK cartridges give us the ballistic equivalent of firing a completely different cartridge out of the same upper receiver. If you take into consideration the possibilities of home defense, slow moving heavy bullets fired at close range can have a definite advantage. Cor-Bon subsonic data is:
- .300 Blackout 240 grain; muzzle velocity 1000 FPS, muzzle energy 533 ft-lbs.
That is more muzzle energy than a 230-grain .45 ACP load yet includes the ability to fire more accurately and at greater distance while utilizing the same 30-round magazines you already have. When cartridge manufacturers and handloaders find that optimal balance between a longer, heavier bullet and a powder combination that steps close to the line but doesn’t quite cross the supersonic threshold, you have a cartridge that truly shines for defense purposes and for hunting larger game like hogs, whitetails, and pronghorns.
Twist Rate
If you plan to build a .300 BLK upper and take full advantage of the subsonic capabilities this cartridge has to offer, rifling twist rate is critical. As velocity decreases, bullet rotation will also decrease, which will lead to bullet instability and possibly tumbling — both of which are detrimental to accuracy. The loss of bullet rotation due to lower velocity can be countered by selecting a barrel with the proper rifling twist rate. Firing heavy .30 caliber bullets at subsonic velocities requires a 1:8 rate of twist or faster to ensure bullet stability.
Another consideration for the AR builder is the gas port location. Firing subsonic ammunition will not produce the same amount of gas pressure at the gas port as standard supersonic ammo. Because of this, the gas port will need to be located closer to the chamber. For our project, we are building a 16-inch barrel .300 BLK carbine. While this is not a pistol, we used a pistol length gas system to provide sufficient gas and ensure reliable subsonic operation.
Buffer and Spring Considerations
As usual, there is no free lunch. When we change one thing, we must consider the downstream impact. Moving the gas port back and closer to the chamber ensures reliable operation of subsonic ammunition, however, this could result in cycling the action too violently when firing supersonic ammunition. Fortunately, this is easily compensated for with an adjustable gas block, a heavier buffer, a heavier buffer spring, or a combination of all three components. One quick solution is a JP Enterprises silent captured spring buffer assembly. This allows for full adjustability of the buffer and buffer spring weight for your tuning needs. Since this system would strain our budget for this project, we decided to stay with standard components.
With a pistol length gas system placing the gas block under our handguard, this makes adjusting the gas system difficult when changing ammunition. Therefore, we opted for a standard low-profile gas block. This decision left us with altering buffer weight to compensate for the different gas needs of our carbine when changing from one type of ammunition to another.
There are four different non-budget breaking-buffer weights readily available for the AR carbine. When making the initial buffer selection, you must keep in mind that the lower receiver will also be used with the original upper receiver. It is best if you can switch from one upper to the other without having to make a buffer change, even though a buffer change is rather simple.
Considering variations in ammunition from one manufacturer to another, climate and elevation can also influence chamber pressure. Thus, we advise experimenting with different buffer weights and the ammunition you intend to use. Buffer designations are indicated on the face of the buffer. A standard buffer will have no markings. The remaining buffer weights will be stamped H, H2, or H3, with H3 being the heaviest. If your lower receiver has a standard weight buffer, you can buy an H3 buffer, which includes three tungsten weights, and cover all the bases by simply changing the internal weight combinations to create any of the desired buffer weights.
The goal is to find the heaviest buffer that allows proper operation when firing supersonic and subsonic ammunition, with the H2 buffer being a good place to start. The H2 buffer can also stay in place when switching back to an original 5.56/.223 upper assembly, although the H2 may prove to be too heavy to allow proper function when firing subsonic .300 BLK ammunition. If this is the case, try the lighter standard buffer and all should be fine.
Buffer weights are comprised as follows:
- Standard – Weighs 3 ounces, 3 steel weights, 3 rubber pads.
- H – 3.8 ounces, 2 steel weights, 1 Tungsten weight, 3 rubber pads. This buffer comes standard in factory Colt 16-inch barrel carbines chambered in 5.56 x 45.
- H2 – 4.6 ounces, 1 steel weight, 2 tungsten weights, 3 rubber pads.
- H3 – 5.4 ounces, 3 tungsten weights, 3 rubber pads.
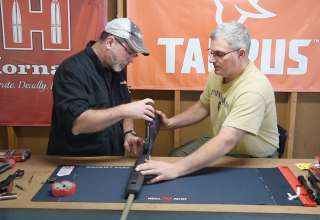
The Hardware
For our .300 BLK upper receiver build, we tapped the folks at Anderson Manufacturing, who not only sell complete rifles, but also the necessary components for you to build your own. From the company’s stash of parts, we selected the following:

- AM-15 stripped upper receiver (#D2-K100-A000)
- AM-15 upper receiver kit (#G2-K642-000)

- .300 BLK barrel, 16-inch, 1:8, pistol, heavy contour (#B2-K004-CN07)

- AM-15 gas tube, pistol length (#D2-K060-003)
- AR-15 gas block kit, standard rail, .750-inch barrel diameter (#G2-K054-A000)

- AM-15 handguard kit, free-float, 12-inch, M-LOK-12 (#G2-K066-M000)

- AR-10 A2 style flash hider (#G2-L031-A000)
The Tools & Supplies

As with any project, having the proper tools makes the build process go smoothly, correctly, and minimizes damaging expensive parts. If you plan to enjoy AR platform builds and modifications for more than one project (and once you get a taste of it, we’re sure you will), it’s great to have a comprehensive tool set that performs all the necessary operations. You’ll find such tools in Real Avid‘s AR15 Armorer’s Master Kit. At $249.99 MSRP, it is an investment, but one that eliminates the frustration of not having the right tool for the task. This kit has everything you need to take your AR project from a pile of parts to a competed firearm the right way.

In addition to the build tools, you will also need to purchase a set of GO and NO-GO gauges for the .300 BLK, which you can find at Brownells. These gauges are necessary any time you assemble a new barrel/bolt combination, swap out a barrel or a bolt, or wish to routinely inspect your rifle for safe operation. These gauges measure chamber length, a dimension derived from the barrel and bolt combination and one that must be checked to ensure the combination delivers a chamber that falls within SAAMI specifications.
For supplies, you do not need much. Mineral oil and Molybdenum disulfide grease (Action Lube) will be needed for lubrication. Denatured alcohol is used for degreasing parts, and blue Loctite is often recommended for installing handguard set screws.
Before You Begin
Prior to starting your build, be sure to have an open bench or table to work on, preferably one that includes a mat or other surface that will not mar or scratch your new parts and that will keep parts from rolling onto the floor. The Real Avid Smart Mat is our choice because it provides a cushioned surface to work on and it includes a parts tray to safely stow the several small components that are part of most AR-platform builds.
Next, inventory all parts to ensure that you have everything needed to complete the build. Make sure the parts are correct and undamaged and organize them into their sub-assemblies. For example, the flash suppressor and crush washer go together; the forward assist and forward assist retaining pin go together; the dust cover, dust cover pin, E-clip, and spring go together; et cetera. Place the sub-assembly groups on the work bench where they will not interfere with the work but are within easy reach.
Headspace Dimension Check

As mentioned, every new bolt/barrel combination must be checked for safe minimum and maximum headspace dimension. The easiest way to do this is with the bolt disassembled and before you install the barrel. If you find a problem now, you can replace one or the other parts until you are within specifications. If you find a problem after the build, well, you will have to start over. Begin by removing the bolt from the bolt carrier. If you do not know how to do this, you should become more familiar with the AR platform rifle before attempting this project.

The Real Avid AR15 Master Bench Block allows you to easily disassemble and reassemble the AR-15 bolt, which you must do to accurately check headspace dimension. Orient the bolt into the bolt recess as shown and rotate the ejector pusher to push in the ejector.

Use a roll pin punch to tap out the ejector retaining pin. Be careful not to lose it or damage it, as this must be reinstalled.

Once the pin is removed, back out the ejector pusher and remove the bolt from the bench block. Remove the ejector and ejector spring from the bolt face and note the ejector’s orientation. The flat portion of the ejector is positioned underneath the roll pin, which holds the ejector in place.

Return the bolt to bench block with the opposite side facing up. Use a punch to push out the extractor retaining pin.

Remove the extractor assembly from the bolt, being careful not to lose the extractor spring installed beneath the extractor.

Thoroughly clean the GO and NO-GO gauges with denatured alcohol and a clean shop towel to remove any dirt, debris, or oil, as these can interfere with the headspace dimension measurement. Do the same for the chamber, breech face, and locking lugs on both the bolt and the barrel extension. Start by inserting the GO gauge into the barrel chamber.

Insert the bolt into the barrel extension and rotate the bolt to simulate the locking sequence. If the bolt and barrel combination meet the minimum SAAMI headspace dimension, the bolt should turn and lock into place behind the barrel extension lugs. If it does not, the barrel/bolt combination does not meet the minimum headspace dimension and is not safe to use. Acquire another bolt or barrel and try again. If it does meet the minimum headspace dimension, repeat the process using the NO GO gauge.
With the NO GO gauge inserted, the bolt should not lock into place behind the barrel extension lugs when rotated, indicating that the barrel/bolt combination is within the maximum headspace dimension and is safe to use. If it does lock into place, consult a professional gunsmith or contact the parts manufacturer.

Assembling the bolt is the reverse of the disassembly. Lubricating as you go, insert the extractor into the bolt and install the extractor retaining pin.

Install the ejector spring and the ejector in the bolt, keeping the flat portion of the ejector facing the firing pin channel, as shown.

Rotate the ejector pusher to push in the ejector. Insert a punch into the ejector retaining pin hole to ensure the flat portion of the ejector is below the pin hole. The goal is to provide a clear path for the ejector retaining pin.

Use the retaining pin pliers supplied with the kit to grasp the ejector retaining pin and start it into its hole. Finish seating the pin using a roll pin punch. Both the extractor and ejector retaining pins should seat evenly within the bolt.
Receiver Assembly

Position the dust cover and dust cover hinge pin into the upper receiver as shown. The arrow points to the small C-clip, which is positioned toward the front of the receiver.

Here is the aggravating part of the build. Push the hinge pin through the dust cover and stop halfway through. Position the dust cover spring onto the pin, as shown, with the long end of the spring toward the front of the receiver and flat against the cover. Next, grasp the opposite end of the spring and rotate it toward you one revolution so that the small spring end (now under tension) presses against the receiver. This is the hard part: while holding the spring in this position, push the dust cover pin the rest of the way through the spring and on through the other side of dust cover. This process can be difficult and painful but keep at it until you get it.

Finish by pushing the hinge pin until it stops against the C-clip. Here you can see the correct orientation of the dust cover spring.

Lightly lubricate the forward assist arm and spring and install the spring as shown.

Insert the forward assist assembly into the receiver in this orientation. The flat portion will be facing the retaining pin hole.

Place the receiver into the bench block as shown. The bench block will compress the forward assist spring to provide clearance for the retaining pin. Tap the retaining pin into place, using a roll pin punch to finish seating.
Gas System and Barrel Assembly

Insert the gas tube into the gas block as shown. The tube’s gas port will align with the block’s gas port and the gas tube retaining pin holes will align horizontally with the corresponding holes in the gas block.

Installing the gas tube retaining pin can be a bit aggravating because you are tapping on a work piece that is rounded. Also, the gas tube tends to rotate in the gas block during this process, so you need to make sure to keep the retaining pin holes aligned. Get the roll pin started by holding it with the pliers and tapping it into position. Once everything is aligned, finish seating the pin with a roll pin punch.

The Armorer’s Master Kit comes with a Lug-Lok upper vice block that supports the upper receiver. Set up the vice block per the instructions and install the upper receiver.

Lubricate the receiver threads with molybdenum grease.

Insert the barrel into the receiver, aligning the indexing stud on the barrel extension with the notch in the receiver threads (arrow).

Most aftermarket hand guards utilize a proprietary barrel nut, as is the case with our Anderson Manufacturing handguard. Position the barrel nut over the barrel and hand tighten onto the receiver.

The barrel nut must be torqued to between 30 and 80 ft/lbs. Do this using the armorer’s wrench and torque wrench included in the Armorer’s Master Kit. This is a three-step process, wherein you torque the nut to specifications (we like 50 ft/lbs), loosen the nut, torque again to spec, loosen the nut, and make your final torque. In all, you will have torqued the barrel nut three times. This ensures a proper seating of the barrel and nut.

Install the gas block/tube assembly onto the barrel until the block seats against the barrel shoulder. As you do this, you will need to guide the gas tube into the upper receiver, as shown.

Two set screws secure the gas block to the barrel. Clean the screws with denatured alcohol to remove any oils and then add a small amount of blue Loctite to the threads.

Install the set screws into the bottom of the gas block.

Slide the handguard onto the upper receiver assembly, making sure it seats fully against the receiver.

Follow your handguard manufacturer’s installation instructions. A level placed across the receiver and handguard Picatinny rail sections will ensure proper alignment. Our Anderson Manufacturing handguard utilizes three clamping screws and two set screws. We recommend degreasing and applying blue Loctite to all set screws.

Lastly, install the flash suppressor. Begin by applying molybdenum grease to the threads. You can position the crush washer with the wide end in either direction, depending on how it seats on the aftermarket barrel and whether one orientation or the other interferes with the wrench. Ours did not interfere with the Real Avid wrench and the tapered end seated perfectly against the shoulder on the barrel, so we chose that orientation. Using the armorer’s wrench, tighten the flash suppressor to 15-20 ft/lbs. If your slotted flash suppressor is not vented on one side, be sure the final torque places the unvented portion at the 6 o’clock position (toward the ground).

Perform the following test to ensure the gas tube is properly aligned with the bolt carrier gas key. Hold the barrel at a 40-degree angle (muzzle down). Pull charging handle to rear. While holding the bolt carrier assembly to rear, push charging handle forward. Release the bolt carrier assembly. The bolt carrier assembly should close and lock under its own weight. If it does not, remove the bolt from the carrier and slide the carrier (without the bolt) back and forth in the upper receiver and barrel assembly. If the gas tube hits the carrier key or if the gas tube binds on the carrier key, try to correct the malfunction by adjusting (slightly bending) the gas tube in the area of the handguard.

To explore the full function and advantages of your new .300 BLK rifle, spend some time at the range shooting ammo from various manufacturers to find the one that meets your accuracy and terminal performance requirements. This includes both supersonic and subsonic ammunition. Be aware of any potential cycling issues and overall performance as you transition between different velocity ammunition and adjust your buffer tube weight and recoil spring weight as needed. The goal is to find a setup that delivers reliable operation with supersonic and subsonic ammo and will work with your base rifle’s chambering when configured with the original upper receiver (assuming a 5.56/.223 chamber).
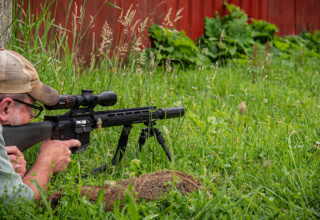
A Tale of Two Cartridges
For the initial range testing of our Anderson Manufacturing .300 BLK upper receiver, we selected one supersonic and one subsonic cartridge to evaluate speed/energy performance and cycling.

The upper was fitted to a Rock River Arms lower receiver built for 5.56 NATO — meaning it came with a standard-weight buffer and buffer spring. To our delight, both the 125-grain supersonic and the 220-grain subsonic ammo cycled flawlessly, eliminating the need to fiddle with spring rates or buffer weights.
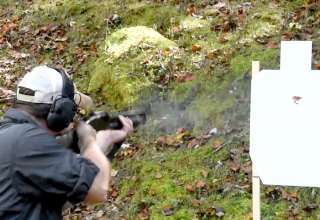
Using doppler radar to check velocity and energy, we noted minor discrepancies between the published performance of the factory ammo versus our setup. Note that we do not know the barrel length used by the factory to arrive at their numbers (most likely they were longer than our 16-inch build barrel). Barrel length, of course, will affect muzzle velocity and subsequent downrange energy. Our testing showed the Black Hills supersonic ammo delivering higher numbers than the company’s published data; Fiocchi‘s subsonic ammo fell slightly under the published data.
Black Hills 125-gr. Open Tip Match
- Velocity: 2161 FPS (muzzle); 1948 FPS (80 yds)
- Energy: 1296 ft-lbs (muzzle); 1099 ft-lbs (80 yds)
* Factory muzzle performance: 2100 FPS, 1224 ft-lbs
Fiocchi Matchking HPBT
- Velocity: 986 FPS (muzzle); 968 FPS (80 yds)
- Energy: 475 ft-lbs (muzzle); 457 ft-lbs (80 yds)
* Factory muzzle performance: 1020 FPS, 508 ft-lbs (calculated)
As for trajectory variations between these cartridges, we compared the two loads at 100 yards. With the 125-grain Black Hills zeroed at 100 yards, the Fiocchi subsonic dropped approximately 14.3 MOA at that same distance. The 220-grain subsonic bullets remained stable throughout our testing, with no visible keyholing — verifying that our 1:8 twist rate will serve us well going forward.
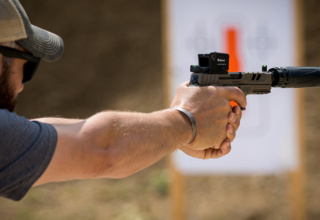
An Optic Made for the .300 BLK
Whether for hunting or general-purpose use, we consider the .300 BLK to be an under-150-yards cartridge for most practical uses. This lends itself to an optic designed to work within that range. After contemplating and trying a few options, we ultimately settled on the Omnia 6 by TRUGLO.

The Omnia 6 offers 1-6X magnification, and features a reticle that is ideal for fast, short-range engagement and for more deliberate sighting at distance. Called the All Purpose Tactical Reticle (A.P.T.R.), this illuminated, glass-etched reticle includes a large peep that is perfect for centering on your target quickly at the kind of close distances you might expect when shooting subsonic ammo. For those longer shots, the illuminated crosshairs provide bullet drop compensation out to 600 yards, since this scope was calibrated for 55-grain 5.56 NATO ammo.
What delighted us was that the Omnia 6 provided point-of-impact sighting for both the 125- and 220-grain ammo. At 100 yards, the center crosshair was spot-on for the supersonic loads. Switching to subsonic, the bottom crosshair (600 yds. for 5.56 NATO) put our rounds right in the bullseye. Your results may vary, of course, but to serve on a dual-purpose hunting/defense platform, the Omnia 6 delivered the results we hoped for. No need to change optics for different use scenarios or ammo changes.
- Build Your Pistol Marksmanship Foundation - June 29, 2021
- Upgrade Your Long Range Rifle the Easy (and Inexpensive) Way - October 22, 2020
- Your Best Survival Choice if it All Goes South - October 13, 2020