Sometimes, we get lucky with a factory rifle and random ammo selection. The other 95-percent of the time, accuracy requires testing, tuning, and tweaking in several areas. Here’s what you need to know to shrink group sizes in your hunting rifle.
Those who have owned several hunting rifles over the course of many years have, no doubt, experienced the full range of performance from off-the-shelf guns and ammunition. Some combinations can cut bullet holes while others lead to frustration and long strings of expletives. In the latter cases, the easy answer is to blame the gun, blame the ammo, blame the scope, or find some reasonable scapegoat to explain the lack of accuracy.
The truth, though, rarely points to a single cause of poor shot groups. Almost always, several factors play a part in rifle accuracy—accuracy being defined as repeatable point-of-impact. And this is the important thing to understand when you set out to improve hunting rifle (or any rifle’s) accuracy: there is no “magic bullet” to achieving small group sizes. Rather, there are a few key areas that, when blended together, can provide the shot placement consistency that we all seek.
Ammunition Selection
Walk into any sporting goods store with the intention of finding “the best” ammo for your rifle and you’re quickly hit with the question of, “Which one?” Each cartridge has choices between manufacturers, bullet weights, and bullet designs. To make matters more challenging, different manufactures often load their ammo with different propellants and primers. These components have different burn characteristics that can greatly affect point-of-impact among cartridges of the same caliber loaded with the same weight and type of bullet.
So, how do you know which one to choose? Ask the guy or gal behind the counter? Nope. They can only offer you anecdotes and speculation. Look it up online? Nope. Same deal.
The hard fact for many hunters to swallow is that there is only one way to determine what ammo will shoot most accurately out of any particular gun…and that is to shoot them all to see which provides the smallest group.
What many shooters who have not delved deep enough into the science of shooting are surprised to learn is that every rifle barrel is unique. Variations in manufacturing, materials, and molecular arrangement among barrels built side-by-side on the same day in the same facility will react differently—even when firing ammunition of the same lot from the same box. Why? Barrels oscillate when a round is fired through them, and each barrel oscillates a bit differently due to the aforementioned variations. This oscillation changes the barrel position at the moment the bullet exits the muzzle. The influencers here are bullet weight and, to a greater degree, the gas pressure and burn rate of the propellant. As a result, ammo X shot from barrel Y may shoot a 1 MOA group at 2 o’clock while the same ammo shot from barrel Z (same make and manufacturer as barrel Y) may shoot a 2.5 MOA group at 6 o’clock.
Similarly, different ammo shot from the same rifle will almost always reveal different points-of-impact and group sizes due to the variations in pressure, burn rates, and bullet weight among the varying cartridge models.
To illustrate this, look at the initial groups we shot from our project rifle—a new, out-of-the-box Remington 700 SPS in 6.5 Creedmoor. With the same environmental conditions, bench set up, and shooter all the same, we shot three different ammo loads and achieved as many different group characteristics. If we did nothing else to the rifle, we know that, in its factory form, with the ammo tested thus far, Federal 135 gr. Hybrid Hunter is what this gun liked best. Were we to shoot ten more different types of ammo, we may find some that provide even tighter groups and some that shoot looser groups. The point is, the only way to know is to shoot different ammo to find which one works best. This is a large task, but you can narrow the search.
First, determine the rifle barrel twist rate. Rifling twist induces the bullet to spin on its axis, allowing it to maintain stability in flight. The rate of twist in a barrel determines the weight range of the bullet to be used. Here’s a quick guide to rifle twist rates and the bullet ranges they prefer.
Second, select a bullet weight and design most suited for the game you plan to hunt that can be stabilized by the rifling twist rate of your barrel. Here, again, there are many choices. Most manufacturers, such as Federal Premium, provide a selection guide on their websites to help you zero in on the best ammo for a particular game species. Aside from experience and anecdotal evidence, this is your best starting point.
Rifle/Ammunition Testing

Once you have settled upon the ammo type you need, it’s time to find the load that will deliver the tightest, most consistent groups for your rifle. This is simply testing the rifle’s ability to accurately fire the ammunition type selected. Rifle and ammunition combinations lead to accuracy or inaccuracy—only rarely can fault be laid upon a quality rifle or quality ammunition, in spite of what “armchair experts” may tell you.
To test your rifle/ammunition combination:
1) Stay with the same bullet weight.
2) Purchase different types (brands) of ammunition.
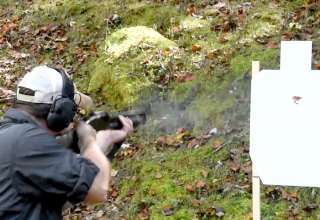
3) Shoot five-shot groups from a solid rest.
4) On the same day, fire each ammunition type on target. Use a new target each time you change ammunition.
5) Label each target according to the load used to produce a group.
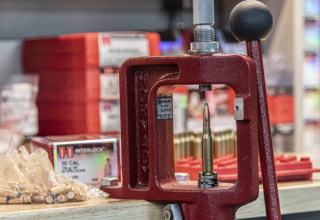
6) Use a dial caliper and measure the outside-to-outside distance between the two holes that are farthest apart and then subtract one bullet diameter. This will give you a center-to-center shot group size. Write this size on the target along with the load information.
7) Save all targets for later evaluation. Keep your targets in a folder or three-ring binder, allowing you to preserve your records and build upon them as you test ammo in the future.
Steps to Improving Rifle Accuracy
Now that you have established the baseline performance of your hunting rifle, the goal is to improve its accuracy. Some improvements are mechanical in nature and some are intended to reduce shooter-induced shot disturbance.
Without question, the most reliable accuracy-enhancer for any rifle is to establish a rock-solid platform. In other words, a stock setup that minimizes or eliminates any movement between the barreled action and the stock. A barreled action is going to move around in a stock if the stock is not rigid and if there is excessive clearance between the barreled action and the stock. In an ideal situation, the action (everything between the barrel chamber and the tang) should be as one unit with the stock, meaning that the action cannot move in the stock under recoil. The barrel, on the other hand should either be free-floated (not touching the stock) or utilize a pressure point to stabilize oscillation. In either case, a solid foundation is a must.
Since most factory stocks are not designed to eliminate all barreled action movement due to the nature of mass production, hunters looking to boost accuracy can opt for a replacement stock that provides a stronger, more rigid foundation in which the barreled action can reside, or they may be able to modify their existing stock by bedding it to the action.

Recently, McMillan Fiberglass Stocks developed a drop-in solution for hunters looking to upgrade their rifle’s performance. Billed as the MC3, these fully-inletted, ready-to-install stocks are made of a new proprietary polymer that allows the stock to be manufactured as a solid piece. As such, they deliver the rigidity needed to minimize barreled action movement.
This is a big change from conventional plastic stocks that require voids and buttressing to prevent warping yet still twist under recoil. Of course, this is undesirable from an accuracy standpoint. If the stock moves, twists, or otherwise allows the barreled action to move before the bullet exits the muzzle, accuracy will suffer. A rigid stock with a well-secured barreled action will prevent this, allowing for more smaller shot groups.
The MC3 stock, being solid polymer, exhibits none of the flex inherent to conventional plastic stocks. What’s more, these stocks come with aluminum pillars installed at the Remington action screw locations. This significantly stiffens the action screw support, allowing the screws to be tightened to a robust 45 inch/pounds. Short of bedding the action, the interface between the stock and barreled action could not be more secure or stable. That’s an instant accuracy improvement for a bolt-on product that requires no additional gunsmithing work.
Another benefit of using an MC3 stock is that it is perfectly inletted from the factory. We’ve installed two versions of the MC3 on two different rifles and both accepted their barreled actions and bottom metal with no additional sanding or scraping required.
Although a drop-in performance stock such as the MC3 will deliver accuracy enhancement right out of the box, shooters can take the foundation buildup one step farther by bedding the action either in the recoil lug abutment area or across the entire action area. For details on this procedure, see the article Long-Range Shooting Foundations in this issue.
Free-Float Barrel or Pressure Point?

Factory barrels often have pressure or contact points between the barrel and the stock. This is to dampen barrel movement and to aid in accuracy. Understand that the major rifle manufacturers have years of experience and reasons for putting that pressure or contact point in place. Testing has shown that most of the time their rifles will perform best with that contact point. The question is, should we remove it? Conventional wisdom says free-floated barrels shoot more accurately. The truth is that you don’t know until you shoot it. If you plan to bed your rifle or just want to see if free-floating the barrel offers an improvement, try this…
1) Inspect rifle’s barrel channel to ensure the barrel contacts the forend. This contact point is usually near or forward of the front sling swivel.
2) Be sure this is the only location where the barrel contacts the stock. If there are other contact points, carefully remove them.

3) Remove the factory pressure point.

4) Using the MTM Gun Cleaning Vice as a solid platform. Slide a dollar bill between the barrel and the stock, all the way back to the receiver. If there are no obstructions, the barrel is now free-floating.
5) Return to range and shoot test groups with the same ammunition as before. Are the results better, worse, or the same? If better, then leave the barrel free-floating. If the groups opened up across the ammunition types used, then you’ll need to reintroduce the pressure point.
5) Take a business card or similar material cut it in half length wise and place it between the barrel and the forend. This “shim” should fit snuggly.
6) Shoot for accuracy with the shim in place. Keep adding a shim as necessary until group size is back to normal (first test) or better.
7) If your rifle needs barrel support at the forend, add an epoxy support pad in place of the shims. Do this during the bedding process, if that is what you plan to do.
Scope and Scope Mounting
Developing a solid rifle foundation is not going to get you too far in the search for increased accuracy if the sighting system is the weak link…literally. Optics quality and performance run the gamut and are often determined by budget or personal preference.

For hunting rifles, we don’t like to get too crazy with the optics. We want good field of view and excellent light transmission, and because most big-game species require quick sight acquisition, we also want a reticle that is uncluttered.
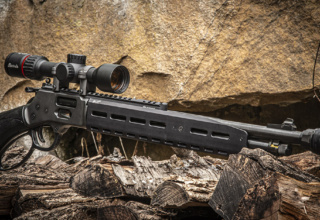
Our choice for this rifle was the new Intercept hunting scope from TRUGLO. With 4-12X magnification and a 44mm objective, this scope delivers all the sighting essentials for all North American hunting pursuits. What we really like about this model is its fine-hair reticle, which gives an exceptionally precise aiming point for long-range targets, and its variable reticle illumination for shooting in poor light. The Intercept is available with a super-clean duplex or a BDC reticle. We selected the latter since the fine subtensions are always there, yet unobtrusive when we don’t need them.
Assuming a quality optic with clear glass and reticles that don’t wander under recoil, the focus necessarily turns to the optic mounting system—specifically, a system that keeps the optic secure under recoil forces. There are several steps to achieve this.
First, simplify the mounting system. This means using only precision, one-piece scope rings mounted directly to the top of the action (when possible) and as low on the action as the optic will allow. For this, we have found no better rings and bases on the market than the one-piece models made by Talley Manufacturing. This design eliminates any joint between the lower ring and base and, when securely mounted and locked into place, cancels out the possibility of the optic moving and losing its zero.

Second, you can utilize a commercially available scope mounting kit, such as the Scope Mounting Combo Kit from Wheeler Engineering. This kit includes 1-inch and 30mm rods/lapping bars, alignment bars, levels, and a torque wrench to successfully align and mount your scope.

Third, use thread-locking compound, a degreasing agent, and a torque wrench to secure all attaching screws. A hunting rifle can take a beating in the field or during transport, so it is imperative that those small 6-48 screws do their job. The only way they can do that is to lock them down tight.
We show another installation method in the article “Long-Range Shooting Foundations” that will guarantee your scope is perfectly aligned and can go nowhere. The basic procedure when using a commercial kit such as the Wheeler Scope Mounting Combo is as follows:

- Thoroughly clean the ring bases, top of the action, base screws, and the base screw holes in the action with denatured alcohol. This is to remove all oils that may prevent good thread-locker adhesion.

- Apply Loctite to the ring base screw threads.

- Snug the base screws and alternate tightening the screws until both are tightened to 20 in/lbs.

- Install the Wheeler alignment bars onto the scope rings and secure to the recommended 20 in/lbs. The points of the bars should align left and right, top and bottom, if the rings are aligned with each other. If one ring mount is lower than the other, special scope mounting shims can be added beneath the lower mount to raise it.
For left-to-right misalignment, there are only three solutions. One is to lap the scope rings with a lapping compound. This effectively wears away the ring surfaces that contribute to the misalignment. A lapping bar provided with the kit is loosely secured in the rings and then the time-consuming process of rotating the bar and applying lapping compound begins. A potential problem with this method is removing too much material from the rings to achieve alignment, which could weaken the ring or cause the top ring to contact the bottom ring before going tight.

- Apply a light coat of powdered rosin to the inside of both halves of the scope rings and loosely install two of the four ring screws to each of the ring caps, (i.e. right side of ring cap, screw is in forward hole; left side of ring cap, screw is in rear hole).

- Adjust the scope’s position in the rings for proper eye relief (at the lowest magnification) and then use the Wheelers scope levels per the instructions to level the scope in relation to the barreled action. Once level, tighten the ring screws to spec, alternately snugging the screws until the proper torque is achieved.
Trigger Upgrade
A precision-engineered trigger does nothing for enhancing rifle accuracy, but it can make a huge difference in promoting shooter accuracy by reducing the possibility of shot disturbance—the time between the start of the trigger’s rearward movement and the moment the bullet exits the muzzle.

Stock triggers, in most production firearms, exhibit relatively long, heavy pulls and not the smoothest travel along the trigger engagement surface. The lack of short, light, and smooth trigger travel and a crisp break can cause the shooter to disturb the shot and miss the intended point-of-aim. Installing a performance aftermarket trigger can eliminate many of these problems, the result being more consistent and predictable trigger releases and tighter groups.
Several manufacturers offer upgrade triggers that are simple drop-ins for most rifle platforms. Timney, Jewell, and Geissele rank among the more popular aftermarket manufacturers for the Remington 700. A good-quality trigger is an investment, but one that will almost certainly deliver results that will make you smile.

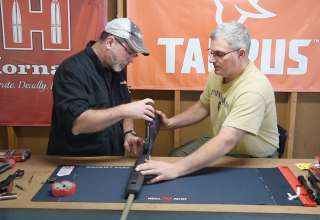
- Remove the front and rear action screws and separate the barreled action from the stock.

- Move the safety selector to the SAFE position.

- Push out the rear trigger pin with a punch and then remove the bolt stop and the bolt stop return spring, noting their orientation to assist in reassembly.

- Tap out the forward trigger pin.

- Installing the new trigger is the reverse of disassembly. Install the forward pin from left to right (captured components on aftermarket triggers). The rear pin is more easily installed right to left so it can capture the bolt stop spring and the bolt stop. The rear pin is longer than the front pin and it has has a chamfer on one end. When installing the rear pin from the right side, the chamfered end goes into the hole.

- To test the new trigger, start by lubricating the bolt with a light grease, such as TW25B, along the cocking ramp and the back of the locking lugs.

- Perform a function check on the trigger, making sure it cocks when actuating the bolt and that the safety is working.

- It is recommended to test any new trigger installation to be sure it will not release the hammer if accidentally bumped. Do this by cocking the trigger, moving the safety to FIRE, and striking the receiver tang with a rubber mallet. The trigger should not release. If it does, adjust according to manufacturer’s instructions.

- Most performance aftermarket triggers are adjustable for pull weight, sear engagement (length of travel between initial trigger pull and firing pin release), and overtravel. Overtravel is really a negligible setting in a hunting rifle—do not adjust this to its absolute minimum,. The factory sear engagement is usually just about right for a hunting rifle, so we don’t suggest altering this setting, either. If you do, be sure it isn’t too short for practical field shooting and that it doesn’t bump-fire. Dedicated prairie dog rigs aside, a pull weight of around 2.5 to 3.5 pounds is usually optimal for hunting medium to large game in cold climates with gloves—not too heavy and not too light. Use a trigger pull scale to get an exact calibration. We settled on around 3 pounds. Refer to the manufacturer instructions and recommendations for making your trigger adjustments.
A Note Regarding Wood Stocks
Although plastic and fiberglass stocks are increasingly mainstream for hunting rifles, wood stocks continue to be popular. To maintain a wood stock’s performance and ensure they don’t contribute to rifle inaccuracy, it is important that they remain sealed from the elements. Raw wood, as is often found beneath butt plates or action/barrel inletting, can easily absorb moisture, damaging the wood and possibly warping it to the detriment of accuracy.

Periodically maintain these areas of the stock by sealing them with Birchwood-Casey Tru-Oil. This will seal any open grain and prevent the wood from drawing in moisture, such as when leaning your rifle against a tree on wet or snowy ground, or when hunting in the rain. Finish off your rifle protection with a light coat of wax on the stock.
The Final Tally
After running our stock Remington 700 through the modifications described here, we went back to the range to see what our work netted us. Our best-performing pre-modification group came from shooting Federal 135 gr. Hybrid Hunter ammunition with a best five-shot group of 1.791 inches at 100 yards. Post-modification, we discovered that TGD Enterprises 130 gr Nosler Ballistic Tip ammunition worked best, with a five-shot group measuring .956 inches at the same distance.

Overall, we reduced the average group size (of all ammo tested) by .570 inches. A good start, and broadening the ammo test pool will likely shrink those numbers even further.
As you can see, there is no simple, one-shot answer to achieving sub-MOA accuracy. Rather, it is a culmination of proven techniques and purposeful testing on the range that delivers the kind of reliable and precise downrange performance we all seek in a hunting rifle. Try these modifications on your favorite hunting rifle and we’ll bet you’ll see the kind of improvements that will put confidence in your next hunt.
Saving Boot Leather

Ammo testing at 100 yards can be physically demanding and an aggravation to fellow public range shooters due to frequent target changes. The solution is a Bullseye Cam from Shooting Made Easy. This is a wireless camera that communicates with a mobile device (phone, tablet, laptop), allowing you to not only see your shots but also to track your shots—even multiple loads on a single target—without ever leaving the bench.

- Build Your Pistol Marksmanship Foundation - June 29, 2021
- Upgrade Your Long Range Rifle the Easy (and Inexpensive) Way - October 22, 2020
- Your Best Survival Choice if it All Goes South - October 13, 2020