Not everyone is all-in on pistol-mounted optics. If you favor the speed and simplicity of open pistol sights, here’s what you need to know to get on target.
by Rob Reaser
Part of our job at Shoot ON is to evaluate the latest in pistol-mounted optics, more generically known as “red dots.” These sights continue to get better every year, with more streamlined and compact models coming out for use on deep-concealment sub-compact and micro-pistols. Most work exceptionally well for personal defense applications, and they are a boon for those who struggle with compromised or declining visual acuity.
Nevertheless, many among our ranks continue to hang with the traditional open, or iron, sight design. And there are good reasons for that, which we have discussed many times. Key among these is fast sight picture acquisition for the practiced shooter and never-fail dependability (no batteries to run down or lenses to break).
The issue we sometimes have with open sights is that they are not always regulated for point-of-aim, point-of-impact performance. In other words, they don’t always help you put the bullet where you are aiming. There are two reasons for this. First, the sights that come from the factory are not always installed in perfect alignment with the barrel bore axis. We’ve seen this many times in handgun testing. Second — and something that too many people simply don’t realize — is that different ammunition loadings exhibit different points-of-impact out of the same gun. For these reasons, it is often necessary to adjust pistol sights.
The problem for many folks comes down to which direction to move the sights (windage and elevation) in order to achieve the desired point-of-aim/point-of-impact and how to go about doing that. These are basic operations that every firearm owner should understand, but not all do.
We present this article to give beginners and experienced shooters alike a better understanding of open handgun sights, how to zero an open sight handgun, and what is involved in upgrading your sight system to something that is more easily adjusted and satisfies your specific needs and shooting style.
Rear Sight Fitment Types
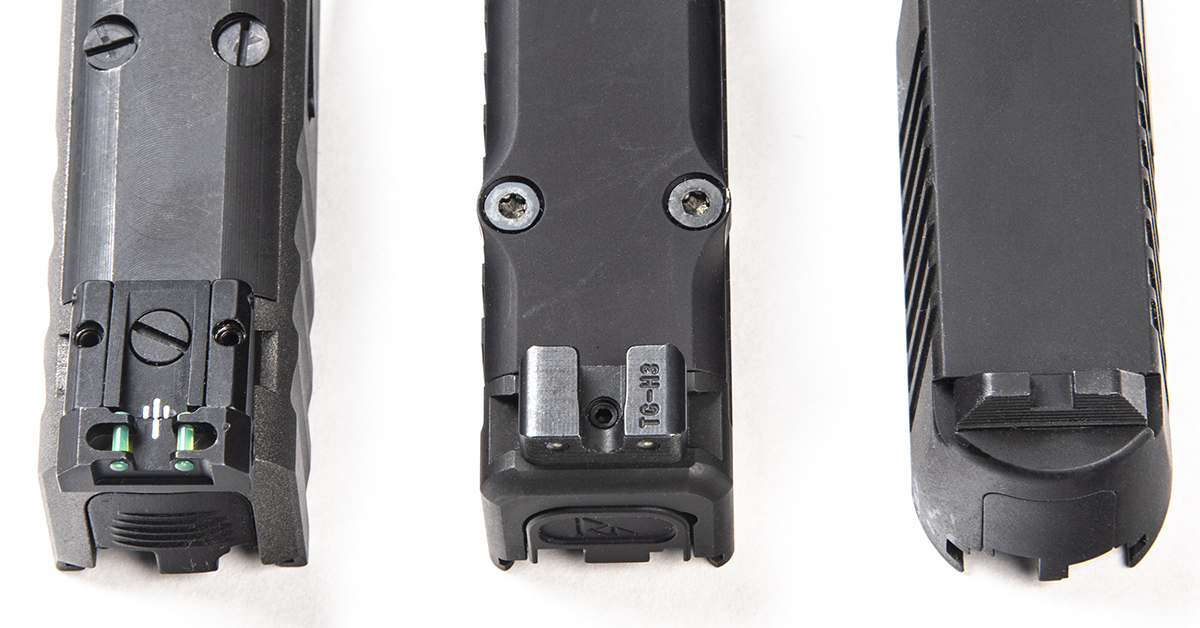
Concerning rear sights, there are generally three different types you will find on factory pistols: independently adjustable, windage adjustable, and drift adjustable. These three types are illustrated in the above photo, moving left to right, respectively.
Independently Adjustable – The independently adjustable rear sight is mounted in the slide’s dovetail slot with an interference fit, or “press fit.” This means the dovetail base of the sight is ever-so-slightly larger than the dovetail slot in the slide. Significant lateral pressure is required to move the sight into the slide, where it is held in place by tension. Once installed, the sight can be independently adjusted up and down (elevation), left and right (windage) without having to move the sight within the slide. This is the easiest sight system to adjust. Unfortunately, it is also the least common type of rear sight you will find on a factory pistol.
Windage Adjustable – Many aftermarket sights and some factory-installed sights (usually sourced from an aftermarket manufacturer) can be easily adjusted for windage. These sights insert into the slide’s dovetail slot, but rather than relying on an interference fit to stay in position, they will use a set screw to apply the necessary pressure to prevent movement. Windage can then be adjusted by loosening the set screw and moving the sight left or right as necessary. An adhesive (thread locking compound) is usually used after the set screw is tightened to prevent movement of the sight once zeroed.
Drift Adjustable – The most common factory fitment type, a drift adjustable sight utilizes the aforementioned interference fit to secure it in the slide dovetail. As with the previously discussed windage adjustable sight, the drift adjustable sight can only be adjusted for windage (not elevation), and this only by using significant pressure to move the sight left or right in the dovetail slot. We distinguish “windage adjustable” from “drift adjustable” due to the ease of the former and the increased difficulty of the latter.
Front Sight Fitment Types
The front sight of a pistol is typically not used to make windage or elevation adjustments. Some front sights with a dovetail fitment (left) can be drifted left or right to make windage adjustments, but since these are smaller than rear sights, with smaller dovetail bases and slots, they are more difficult to move than rear sights. Another reason is that there is no way to adjust a front sight for elevation change except for filing down the top of the sight (bad idea…and that can only raise the point-of-impact, never lower it).
Many front sight fitments follow the Glock design with a slot-and-screw configuration (right). With these, there are no adjustments possible — either for windage or elevation.
Zeroing the Open Sight Pistol
We see all too often in discussions and online comment sections people asking how to zero their pistol: “My gun is shooting to the left. Which way do I move the sights?”
A few decades ago, questions like this were not as common among the shooting community as they are today. That is because the art of open sight shooting has been nearly lost on a generation or two that have grown up relying on optics rather than open sights. Buy, hey…you don’t know what you don’t know.
For starters, the shooter should make sure that it is not the gun that may be causing the unwanted point-of-impact rather than the shooter. There are a host of improper shooting forms that can cause off-target shots with a pistol that has perfectly aligned sights, such as sight alignment, trigger pull, grip, trigger finger placement, support hand positioning, et cetera.
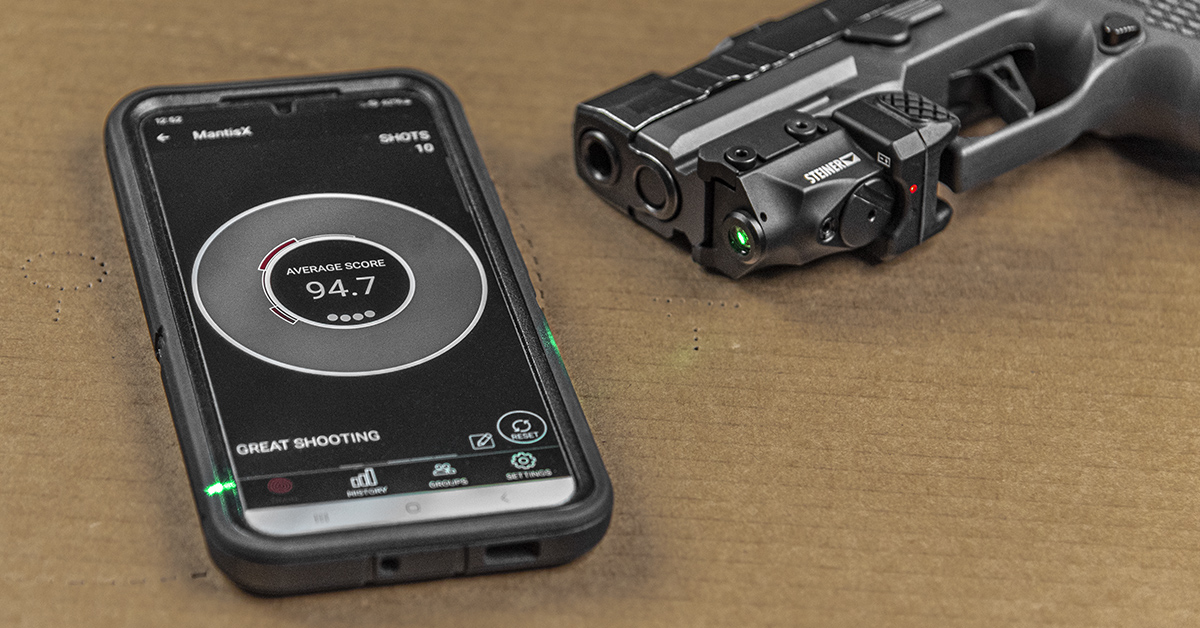
While formal pistol training with a qualified instructor is the best option for ironing out such problems, dry-fire exercises using a feedback system like MantisX offers is an excellent option. Systems like this (shown here with the Steiner Tor-X laser with MantisX integration) provide accurate feedback that identifies shooting form problems and suggests how to solve them.
Assuming you have good form and sight adjustments are necessary to ensure what you’re aiming at is where your bullets strike, here is how to zero your open sights with an understanding of the relationship between sight movement and point-of-impact shift.
Windage
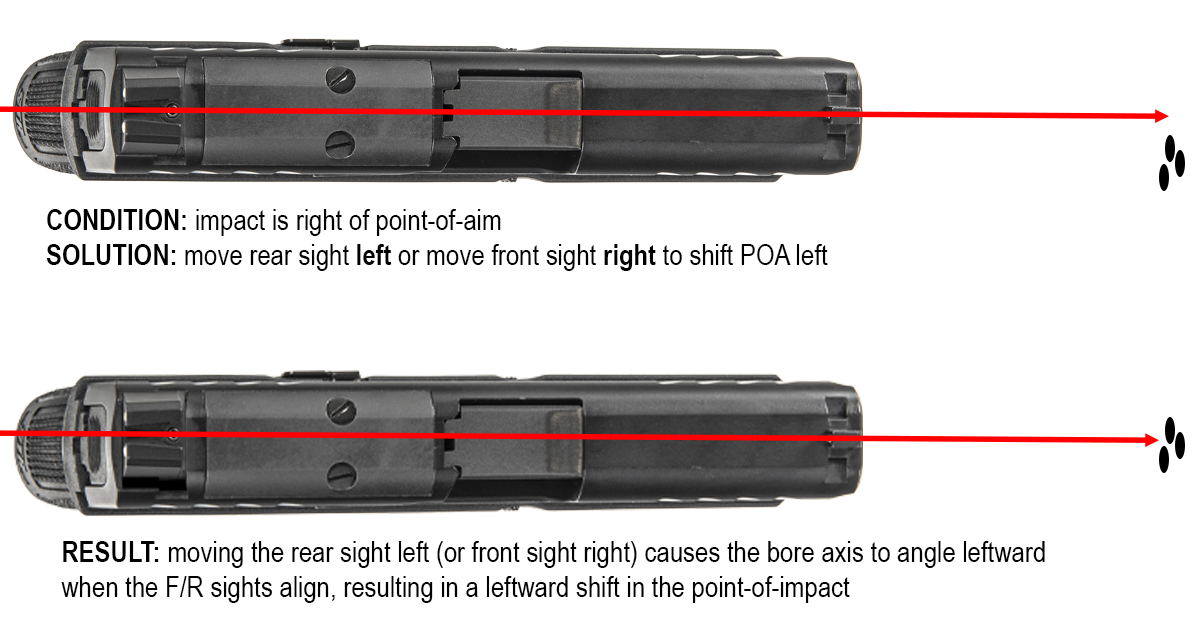
When your bullets are impacting to the right of your target, the solution is to move the rear sight to the left. This adjustment will cause the back of the gun to pivot to the right when the front and rear sights are aligned and thus shift the bore axis to the left and move the point-of-impact to the left.
The shorthand way to remember this is to move the rear sight in the direction you want to move the point-of-impact. Need to move the point-of-impact to the left? Move the rear sight to the left.
Conversely, a leftward shift in the point-of-impact can also be accomplished by moving the front sight. Here, the front sight would need to be moved to the right (opposite that of the rear sight). Since adjustment of the front sight is more difficult than moving the rear sight and is often not even possible, it’s best to stay with adjusting windage with the rear sight.
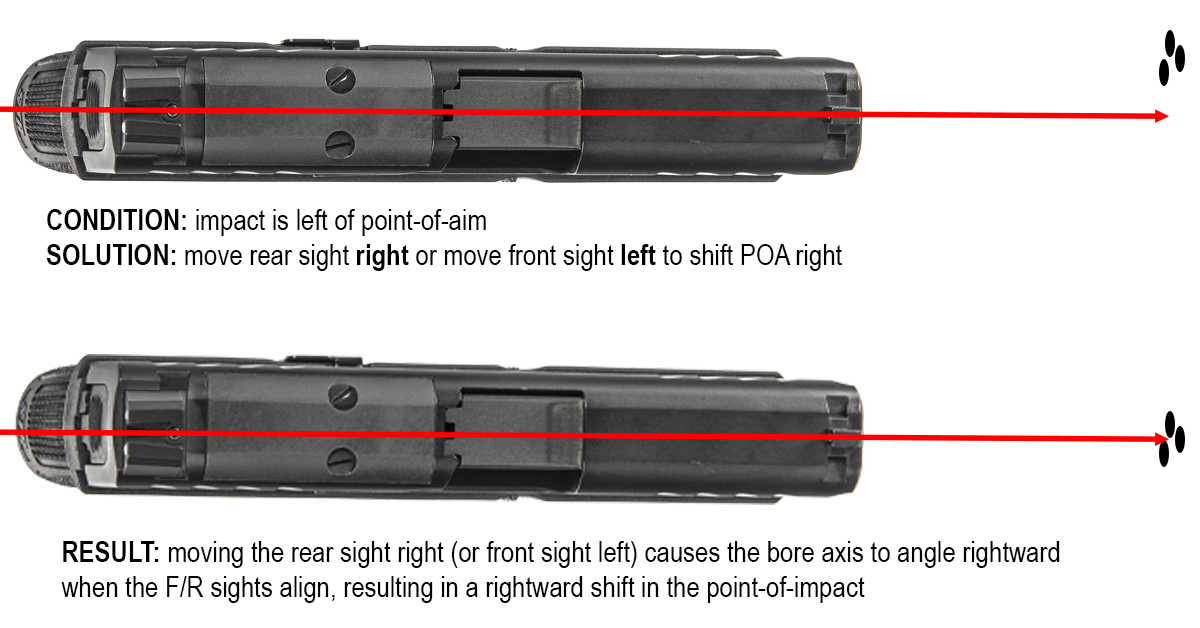
Naturally, the opposite applies should you wish to move the point-of-impact to the right. Moving the rear sight to the right shifts the bore axis to the right when the front and rear sights are aligned. Bullet impact thus shifts to the right.
Elevation (non-adjustable)
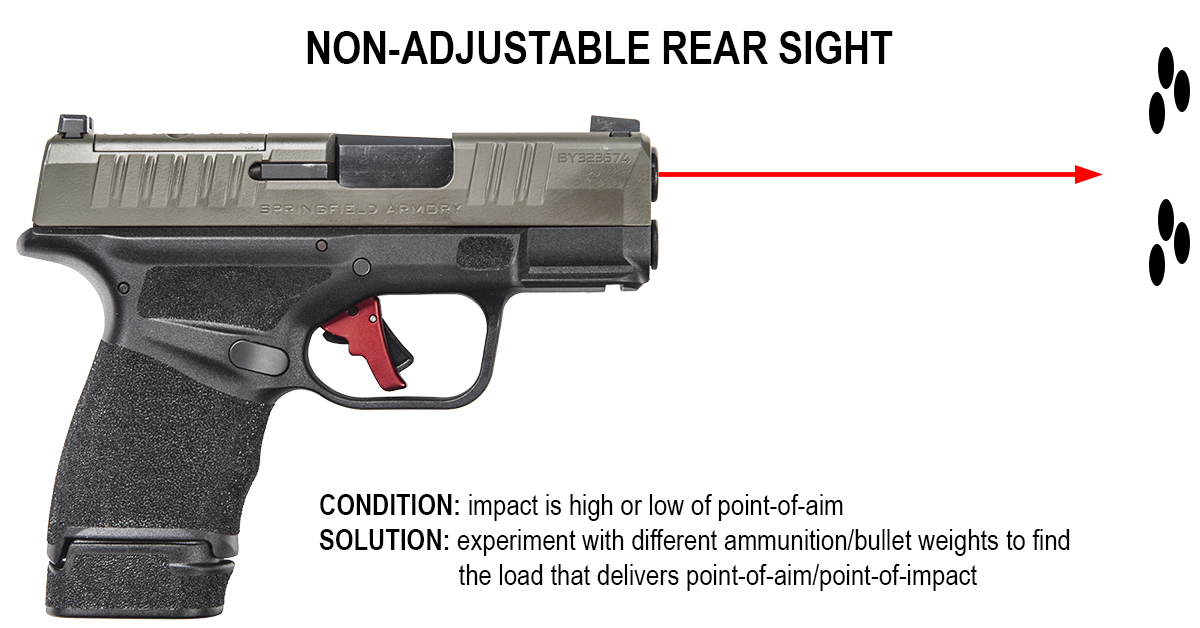
Few are the pistols that come with independently adjustable rear sights from the factory, meaning they can be adjusted for windage and elevation independently. Lacking any means to raise or lower the rear sight (or the front sight, for that matter), there is only one recommended solution. We say “recommended” because it is possible for the shooter to simply adjust their sight alignment (raise or lower the front sight in relation to the rear sight while aiming) or to adjust their sight picture (aiming lower or higher on the target so the point-of-impact hits where you want it to), but neither are a good or recommended solution for a defensive handgun. Implementing such on-the-fly “corrective” solutions adds an additional step to the shooting sequence — one that you probably won’t be able to deploy in the stressful, high-adrenaline state of a gunfight. Such workarounds could get you killed and increase your legal liability should you need to defend yourself in court.
The recommended way to achieve point-of-aim/point-of-impact performance with a pistol that has no means of elevation adjustment (or a pistol with no ability to adjust either elevation or windage) is to experiment with different ammunition loadings.
With only rare exceptions, every load (manufacturer, bullet weight, powder, primer, bullet configuration) is going to shoot differently from every other load out of the same pistol. The difference in point-of-impact may be minor or may be significant, but it is going to be evident.
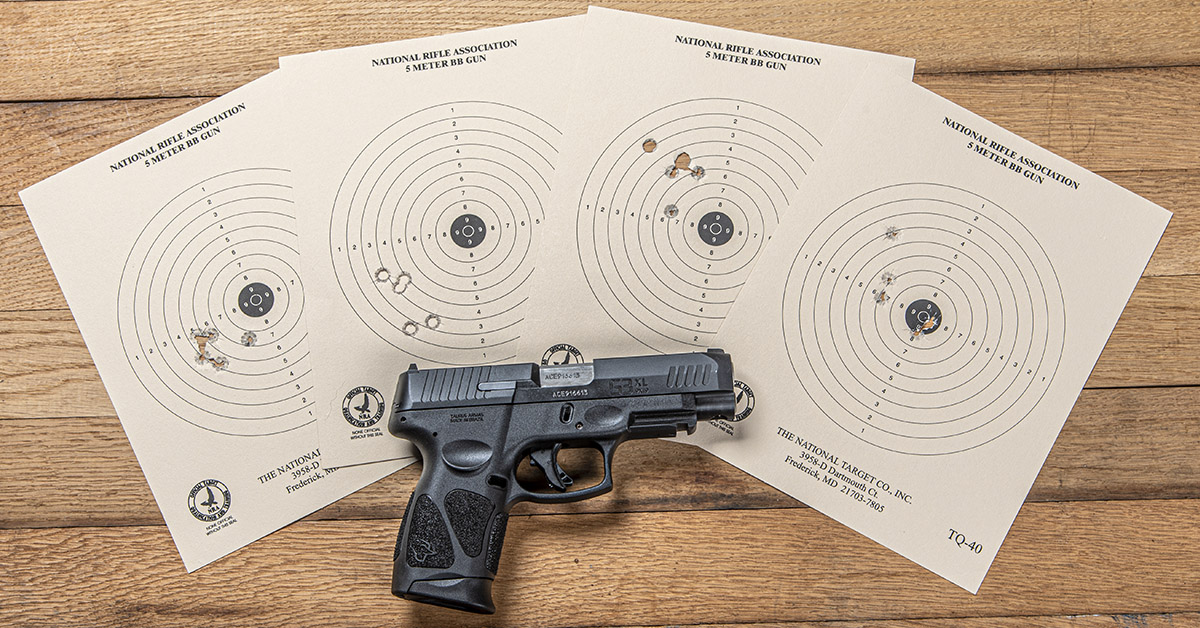
Here is an example of four different loadings shot from the same pistol, same day, same shooter, and the same distance. As you can see, the points-of-impact (as well as the grouping sizes) can vary significantly.
If you are unable to make windage or elevation adjustments with your pistol, the solution is to try various loadings (bullet type and weight) from the same and from different manufacturers until you find the one that puts the bullets where you are aiming.
Elevation (adjustable)
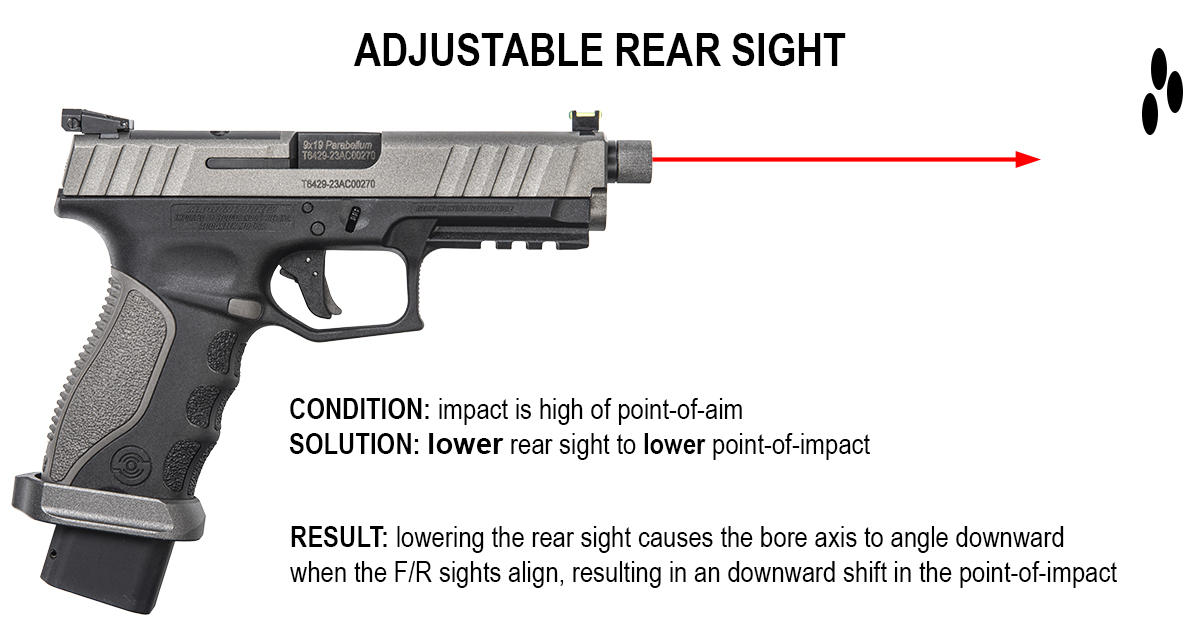
If you are fortunate to have an independently adjustable rear sight on your pistol (like this Stoeger STR-9S Combat model), adjusting the elevation is super easy. If the point-of-impact is high and you need to lower it, simply lower the height of the rear sight. Lowering the rear sight causes the bore axis to shift downward when the front and rear sights come into alignment and thus lower the point-of-impact. Once more, you’re simply moving the rear sight in the direction in which you want to move the point-of-impact.
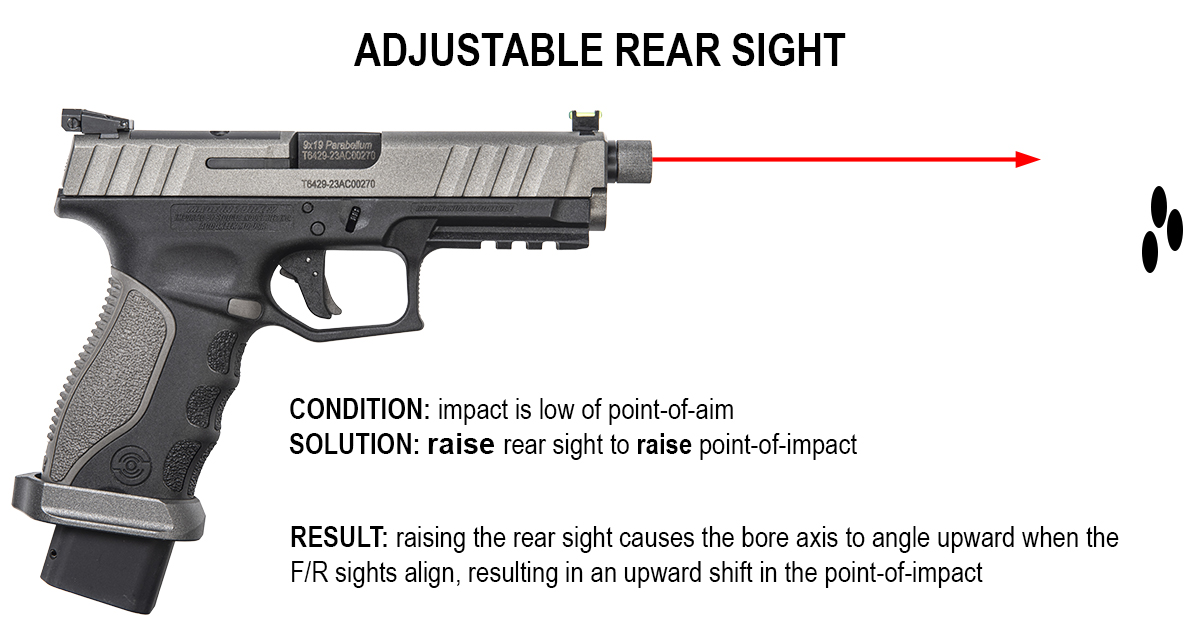
Again, the opposite is true if you want to raise the point-of-impact. To move the point-of-impact up, raise the rear sight.
Tools for Adjusting Sights
Understanding the relationship between sight movement, sight alignment, and point-of-impact is straightforward, although, admittedly, it does make even veteran shooters sometimes question themselves and cause them to think, “Now, which way do I need to move the sight again?” If that is you, don’t feel bad. You are in good company.
With that under our collective belt, the question becomes how to move that rear sight where you want it to go. This is where the challenge usually comes in.
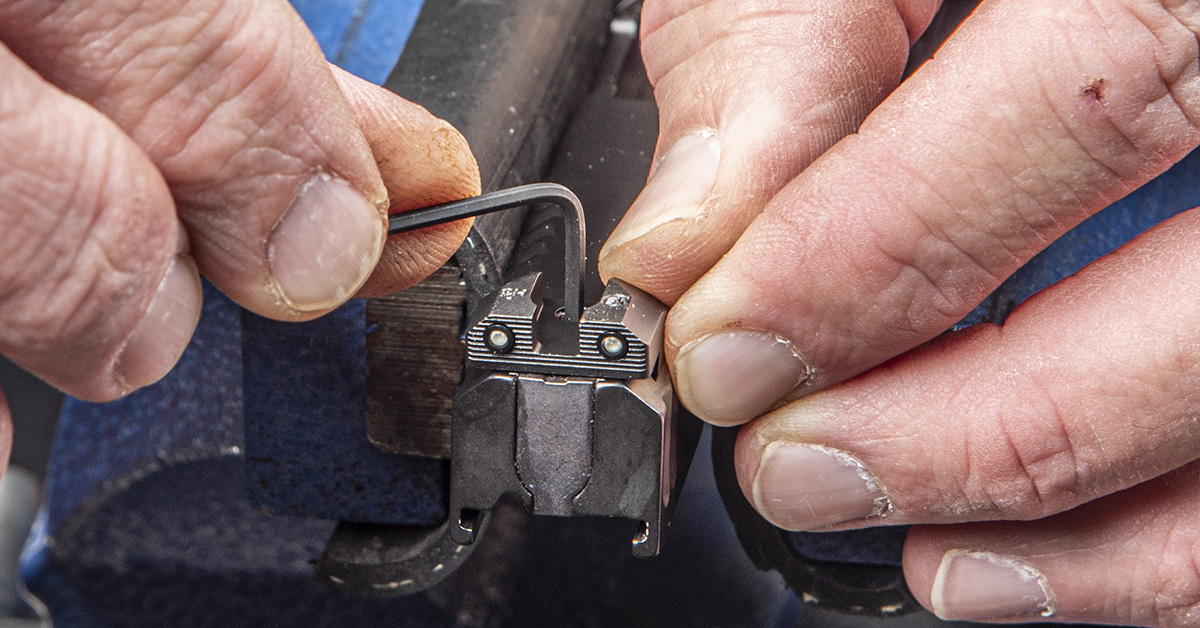
The independently adjustable rear sights are easy enough to move. You just need the correct-size tools to turn the adjustment screws — usually a small hex or Torx wrench, or an appropriate driver bit. It all depends on how the sight is constructed.
For sights that must be drifted left or right in the slide’s dovetail slot, the tools required shift to the “heavyweight division.” Let’s take a look…
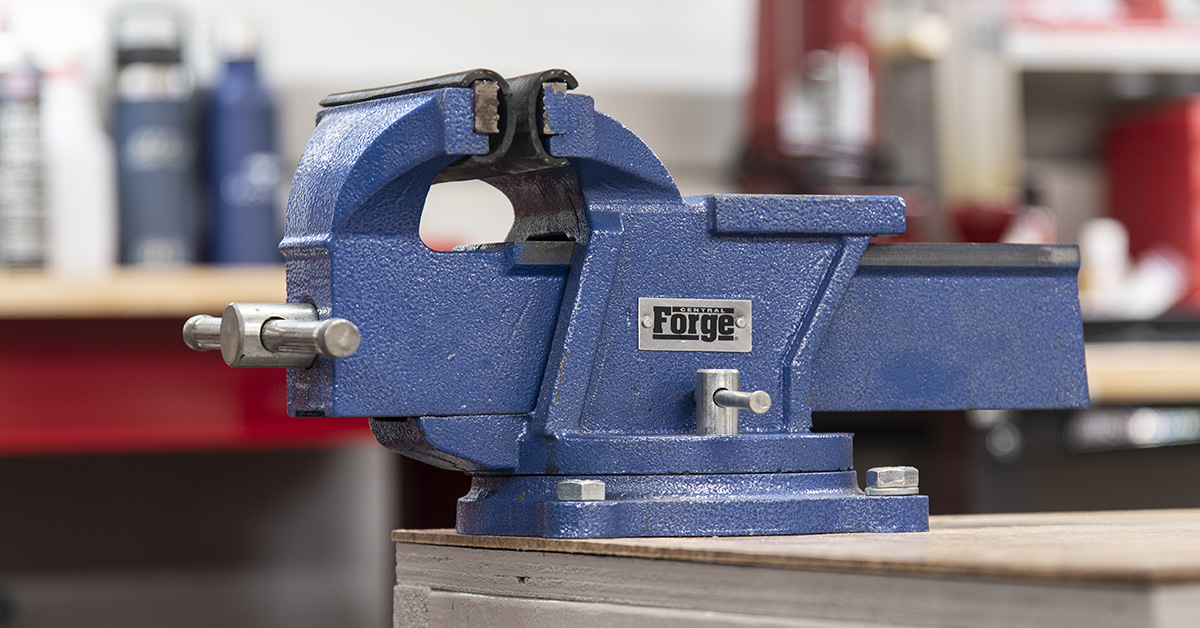
A solid bench-mounted vise is going to be your best friend when you drift a sight with a hammer and punch. You need something that will safely and firmly support the slide while you apply lateral impact to the sight. The more solid the support system the easier it will be for impact shock to move the sight.
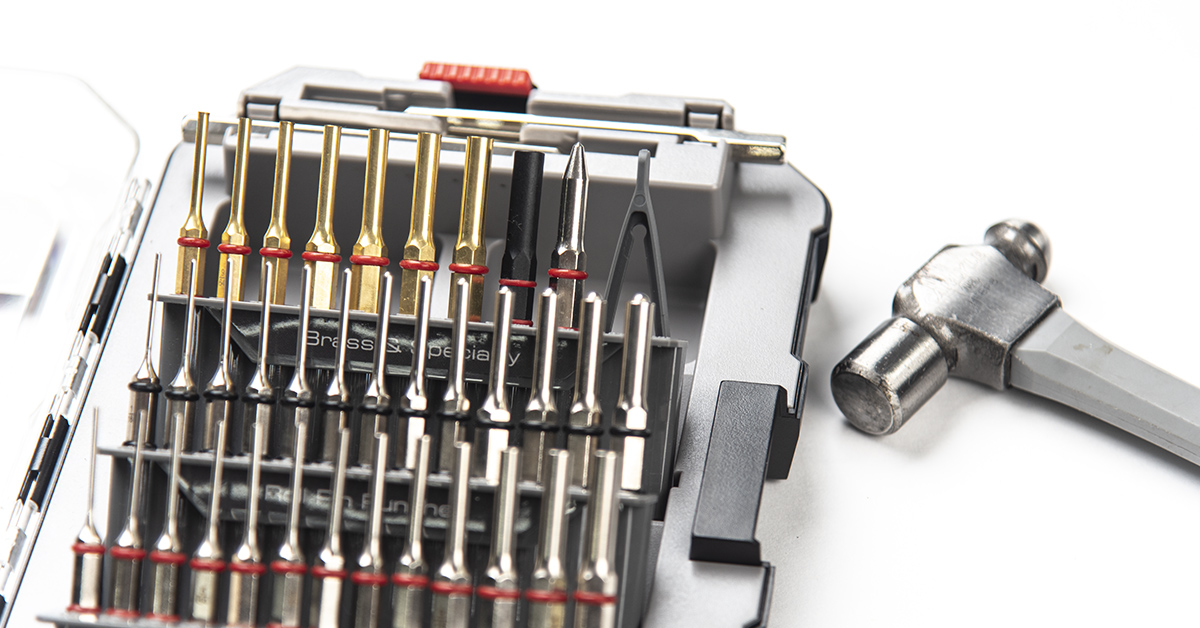
The traditional tools used to drift dovetail sights are brass punches and a suitable-weight hammer. Brass punches are used because brass is softer than the steel slide and steel sight body, so impact from these will not damage the work pieces. Real Avid’s Accu-Punch Master Set offers a range of brass and steel flat-face punches that will give the results you need for most applications.
The hammer must have enough weight (kinetic energy) to strike a controlled blow that can move the sight via the punch. An 8- to 12-ounce hammer works well, providing good impact energy and control.
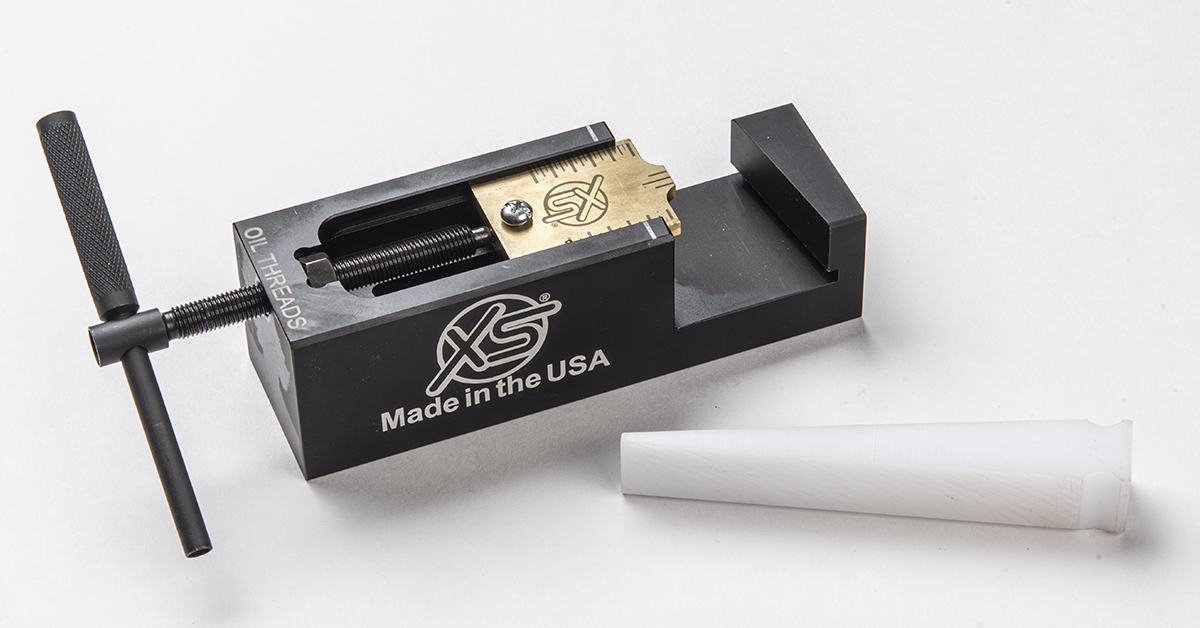
The most control offered for drifting dovetail sights comes from a sight pusher. A sight pusher is a tool that both secures the slide and applies mechanical force to move the sight in the dovetail slot. There are two general classifications of sight pushers. The first is the sight- or model-specific sight pusher designed to work with a particular pistol or pistol series. Seen here is the Inline Sight Pusher Kit for Glock – Gunsmith Series by XS Sights. This tool can be used to install rear sights on Gen 1 through Gen 5 Glocks, including MOS models. XS Sights also makes an Inline Sight Pusher Kit for Taurus pistols.
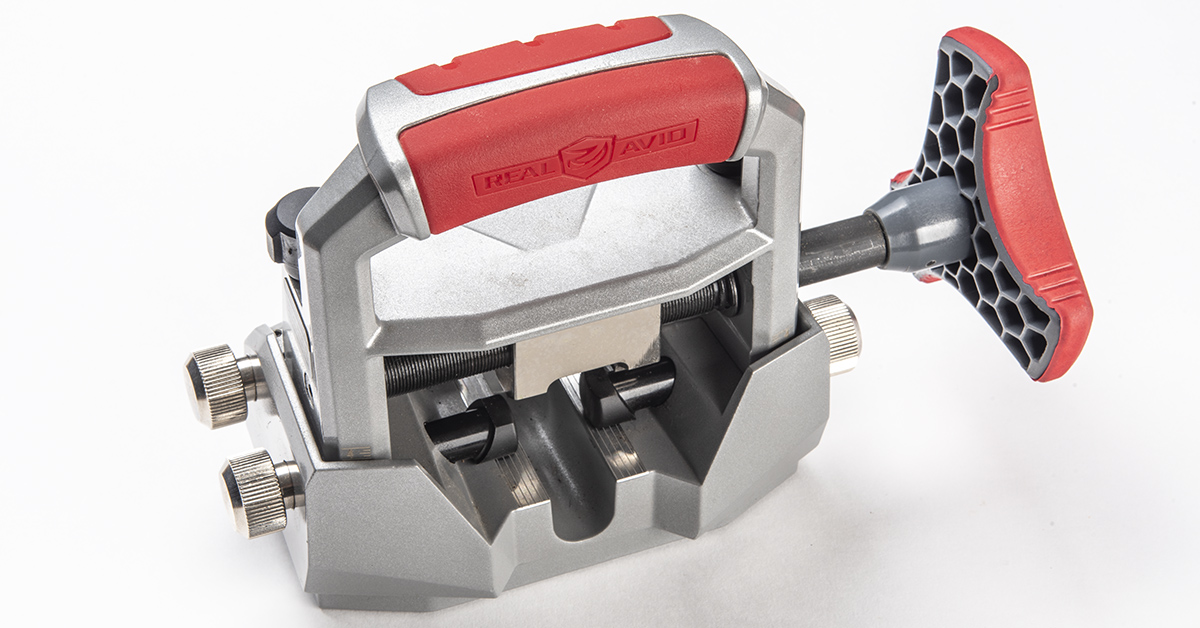
The other option in sight pushers is a universal style designed to work with a wide range of pistol types. This is the Master Sight Pusher from Real Avid, and it is designed to work with most striker-fired pistols as well as 1911 models. While a universal sight pusher requires some setup adjustments to work with the varying gun models, it is a good option if you have several different handgun brands you commonly work with.
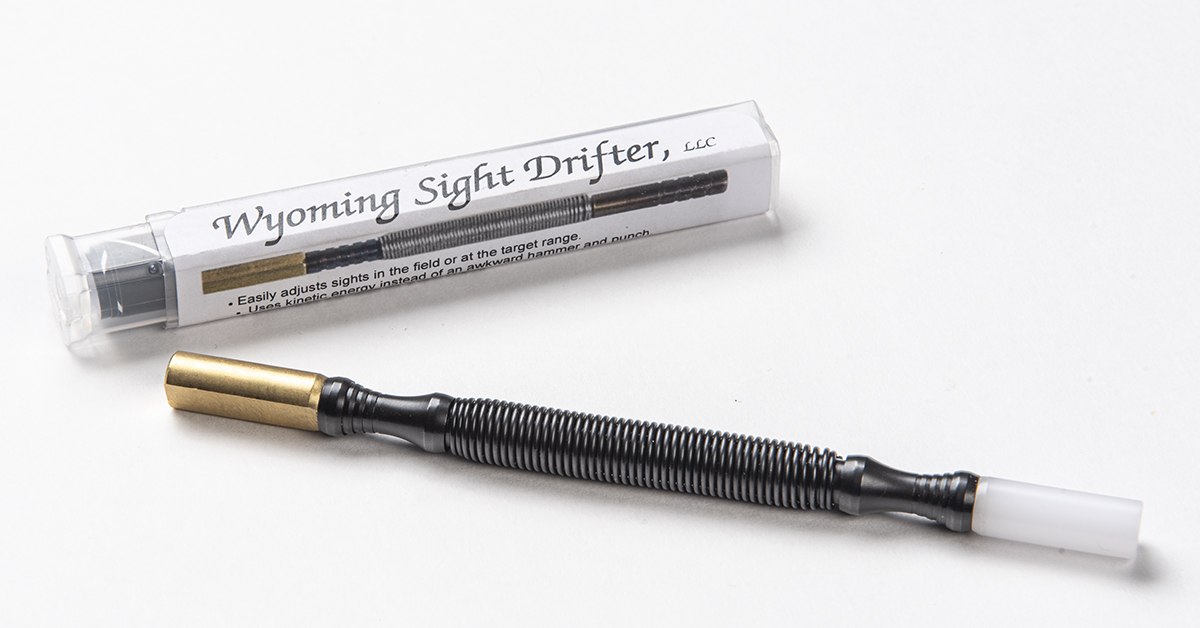
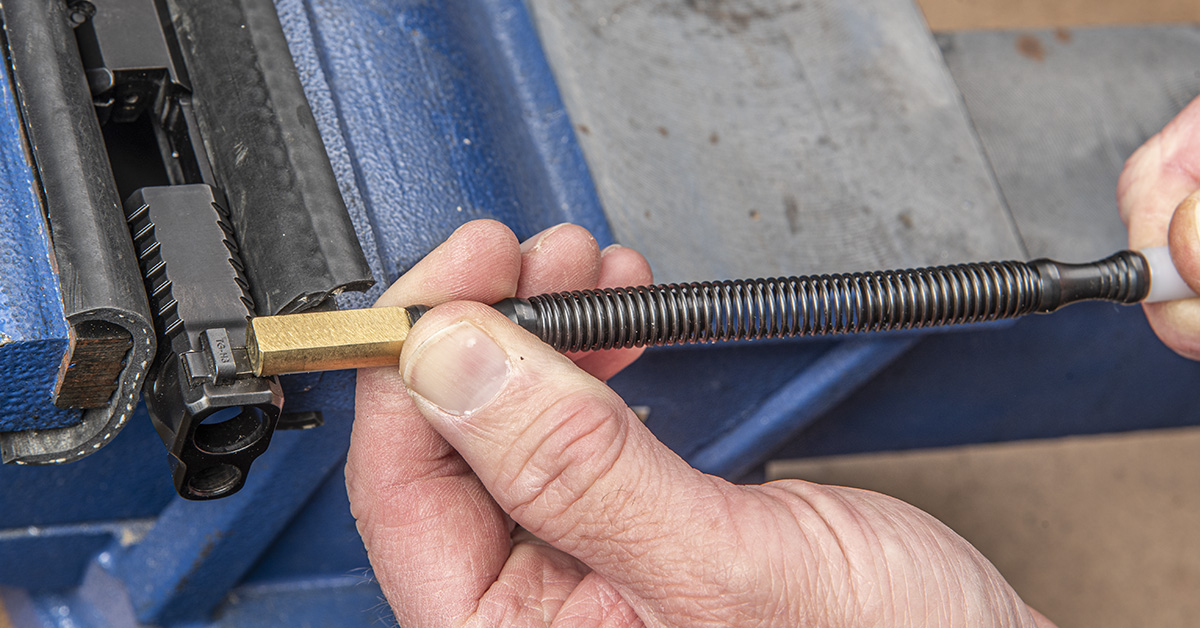
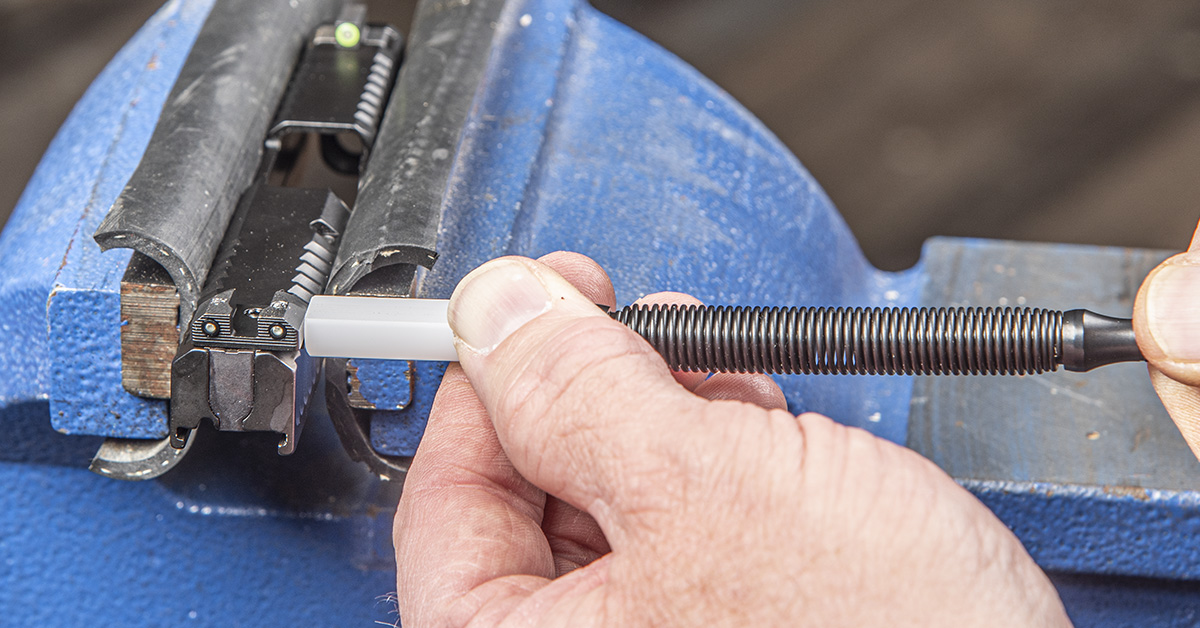
A tool that has recently come to our attention and is poised to change the way we tackle the sight adjustment issue is the Wyoming Sight Drifter. We used this for the first time in developing this article and were absolutely blown away with how well it works.
Andy at Skinner Sights sent us their version (featuring a unique flat on the brass ram) to try out…and just…WOW!
This tool sells for an easy $39 and employs a spring-loaded ram system to create the kinetic energy needed to move sights in a dovetail fitment. We’ll show you how it works further in this article, but you simply place the brass ram against the side of the sight, pull back to load the spring, and release. The tool moves the sight in short increments so you can achieve precise adjustment.
This system is an absolute must-have for the range bag because it is small, inexpensive, highly efficient, and makes it possible to adjust pistol sights at the shooting bench without a vise (assuming you have a clamp or someone with you who can offer a “third hand” to hold the slide). As you will see below, we used it on the bench vise to install XS Sights’ R3D 2.0 system onto a S&W Bodyguard 2.0.
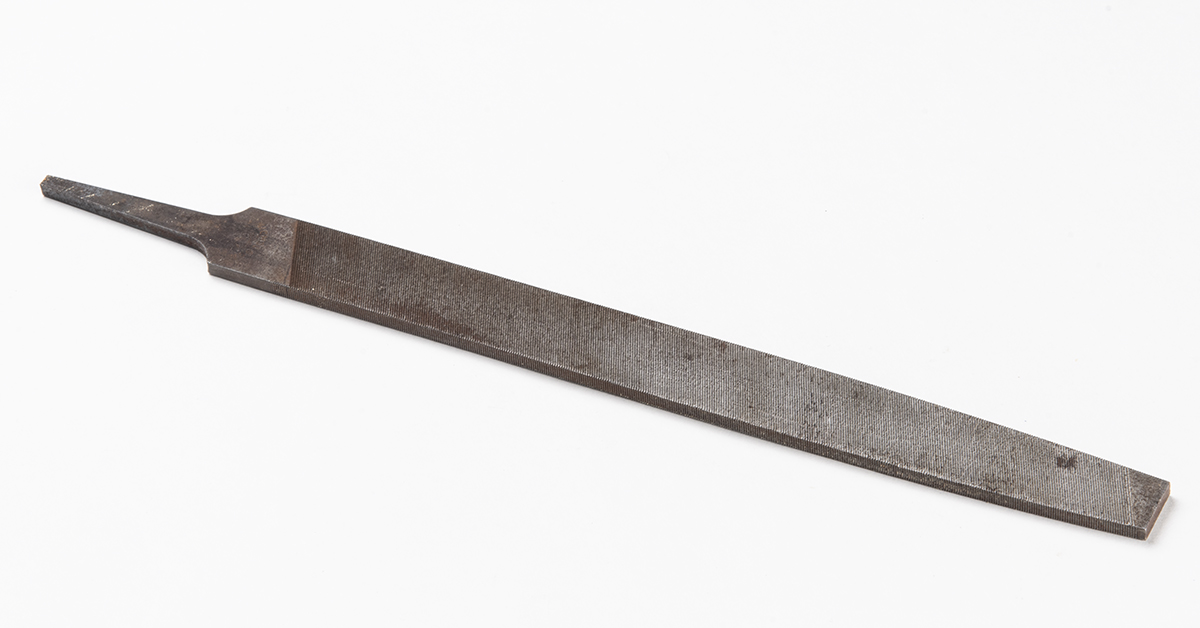
A flat file is another essential tool for installing sights with an interference dovetail fit. This is required to remove slight amounts of material from the bottom of the sight base in order for it to achieve the correct interference fit. We’ll explain more about this later in the article.
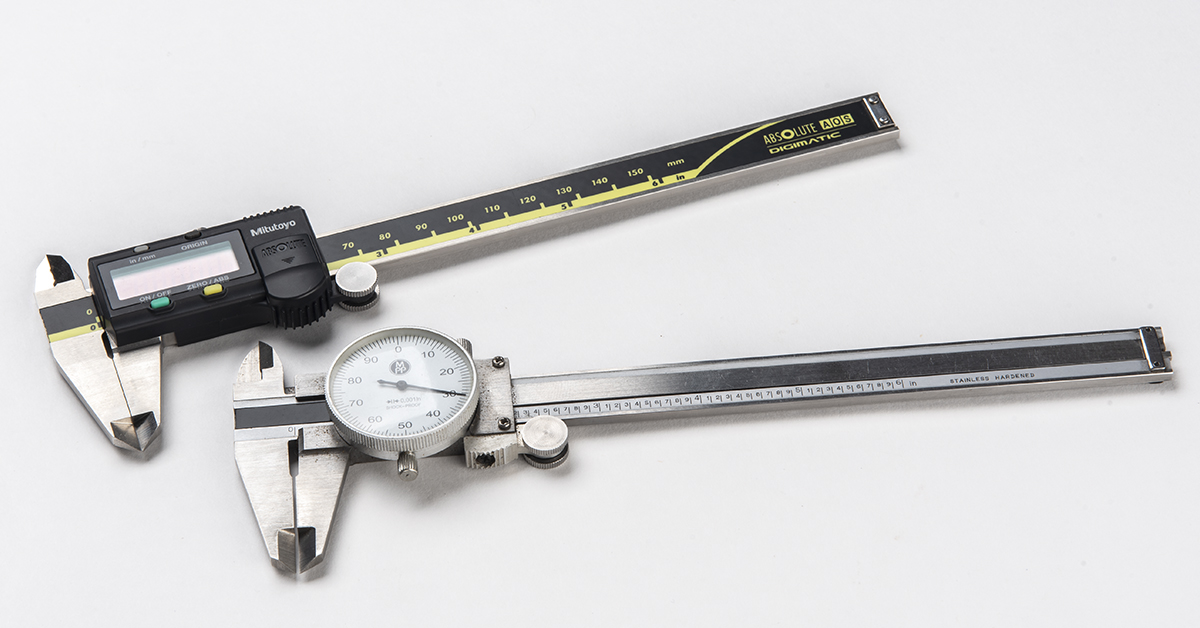
Although not absolutely necessary, we highly recommend the use of a precision caliper (preferably one with a depth gauge feature) when installing a new sight set. Using a caliper to center the sight in the slide ensures you start the sight zeroing process with the sight as close to the barrel bore axis as possible.
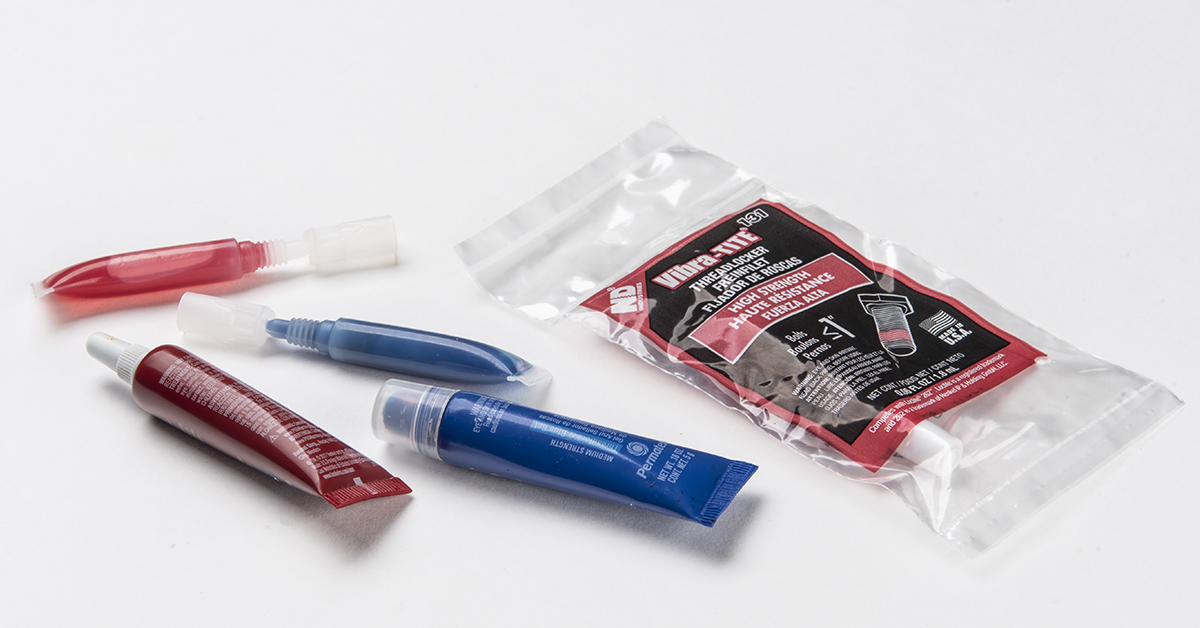
Most aftermarket front sights — those with a slot-and-screw configuration like the Glock — require an adhesive to ensure the sight screw secures the sight to the slide without over torquing the screw. If you over torque the screw, it will likely (more like eventually) shear upon recoil and your sight will fly off, never to be seen again. Adhesive is also applied to windage adjustable aftermarket sights that use a set screw for positioning because the set screw, by itself, will not reliably keep the sight in place with repeated firing.
Installing Aftermarket Sights
(XS Sights R3D 2.0 on S&W Bodyguard 2.0)
A thorough discussion of pistol sight adjustment would not be complete without a detour into the realm of sight swapping. Perhaps you would like to install a sight set that works better for your style of shooting or personal defense needs, or maybe you want a sight set that allows for more refined zeroing than your current setup.
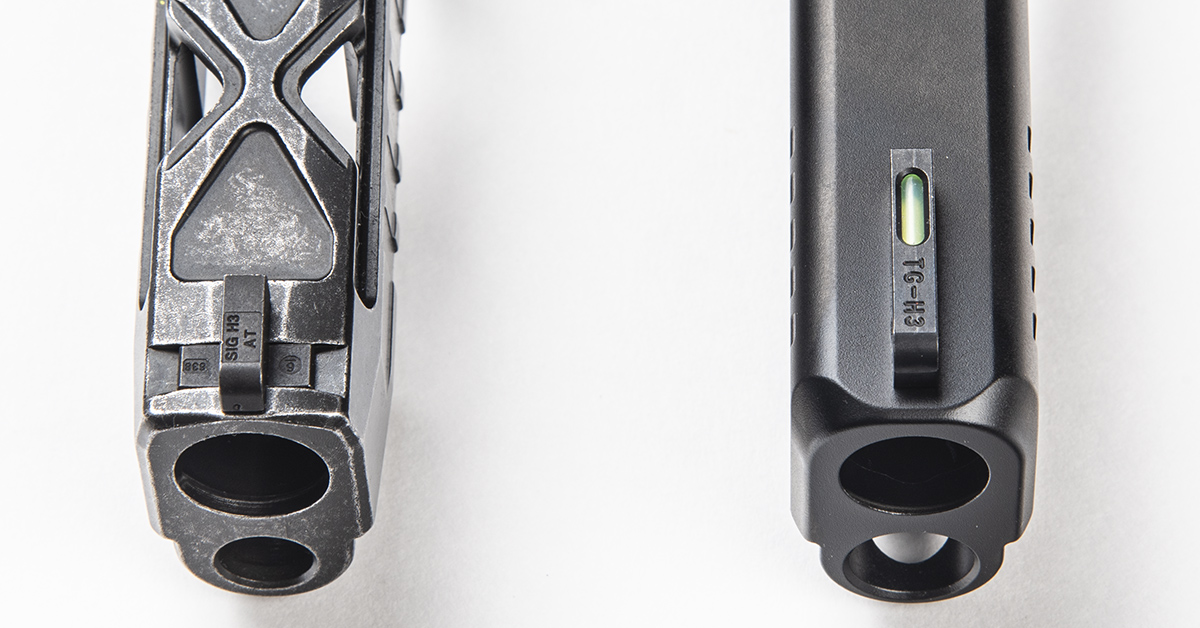
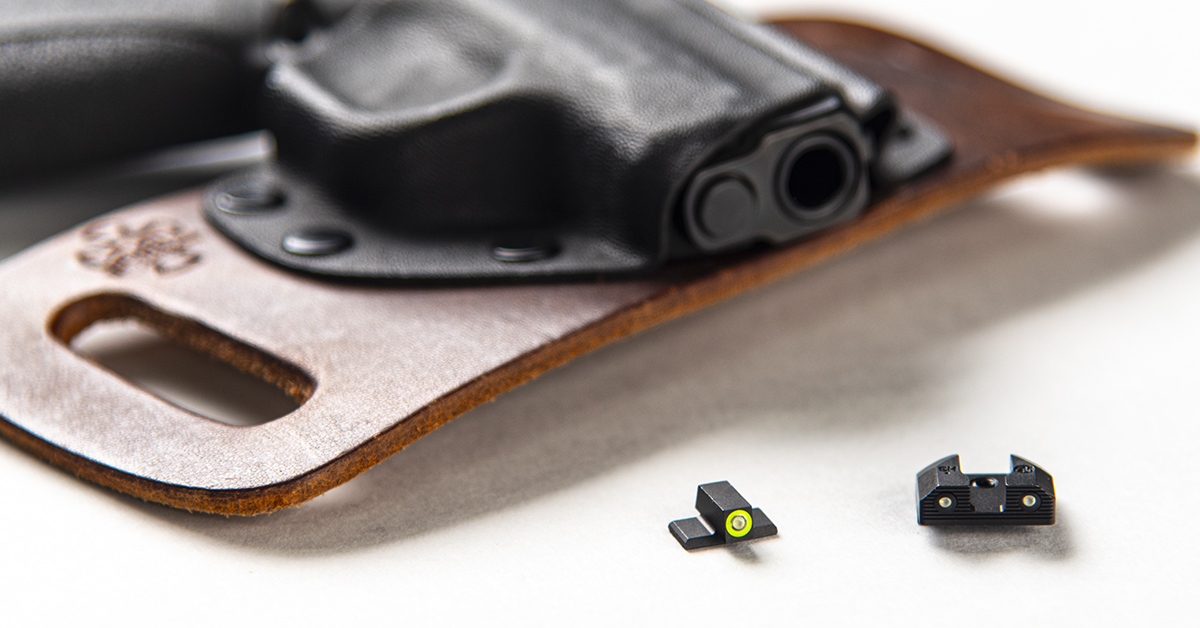
To walk you through the typical sight swap, we chose to illustrate the procedure by installing XS Sights’ newest R3D 2.0 fitment for the relatively new Smith & Wesson Bodyguard 2.0. I’ve been toting the Bodyguard 2.0 for several months as a backup or on occasions that demand more discreet concealment than my EDC 1911 offers. I really like the gun and its exceptional accuracy (although I still cringe somewhat at the .380 chambering). And while the factory sights do well, I’ve come to appreciate the bright, loud-and-proud front sight visibility that characterizes the XS Sights R3D 2.0 system. The large photoluminescent glow ring up front and the front and rear tritium elements make for a fast-acquiring sight picture in any lighting condition.
I also like the fact that the R3D 2.0 rear sight is windage adjustable, with a set screw that offers easy zeroing. When I first acquired the Bodyguard 2.0, the point-of-impact was a good 2-3 inches left of point-of-aim regardless of the ammo I used. I did manage to drift the front sight to achieve POA/POI regulation, but it took a good bit of hammering. The R3D 2.0 handily solves that problem.
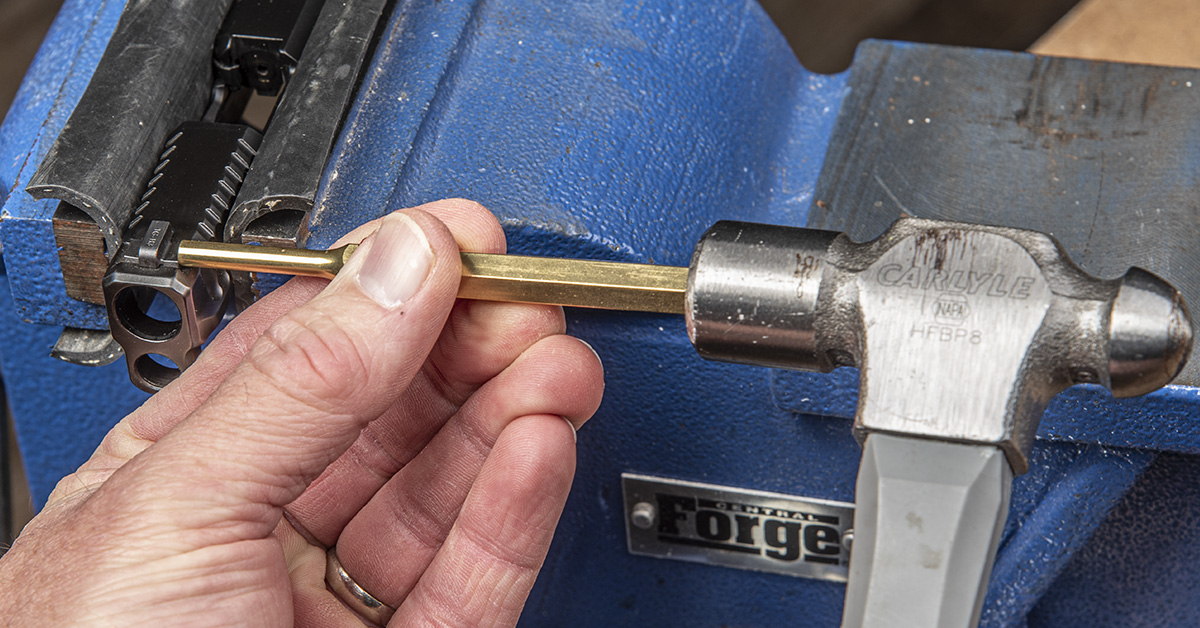
The traditional way to remove or adjust dovetail sights is with a brass punch and hammer. This is done by securing the field-stripped slide in a padded vise (I use split automotive coolant line to pad the jaws) and hammering the sights to the right side of the slide. When using this method, be sure to strike only the base of the sight (the portion in the dovetail slot), not the sight, to prevent shearing or damage.
I decided that it would be a good test of the Wyoming Sight Drifter to use it to remove the front sight. This was the first time I used the tool, and was shocked to see the front sight move at the first strike. Encouraged, I continued to use it to remove the front sight.

The R3D 2.0 front sight is a genuine interference fit, meaning it must be fitted and drifted into the slide with the expected force. XS designs the sight’s dovetail with a slight taper on the right side to allow for a good start into the dovetail slot. The sight should go about halfway into the slot with finger pressure before impact drifting. Most likely it won’t, as was the case with this sight.
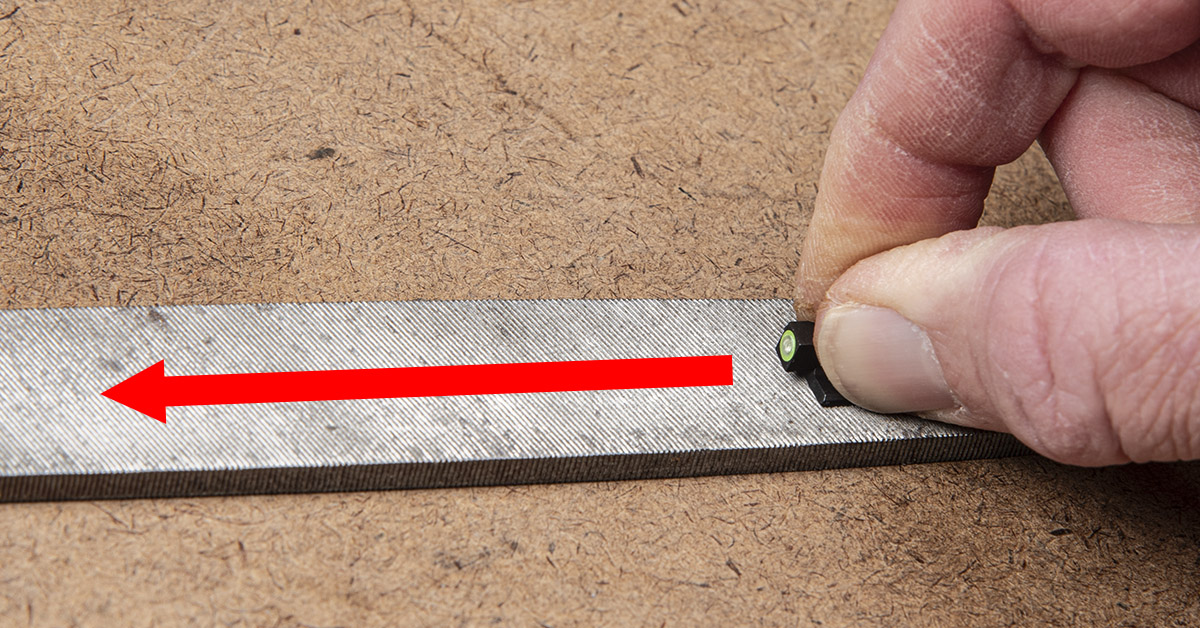
Here is where the flat file comes in. You want to remove the smallest amount of material from the bottom of the sight base so you can push the sight into the dovetail about halfway with finger pressure. To remove the material, place the file on a flat bench and, applying light pressure, slide the sight across the file in a steady, even stroke. At the end of the stroke, rotate the sight 180-degrees and, starting back at the end of the file, make another stroke. Do this a few times and then test-fit the sight in the slide’s dovetail slot.
Be careful not to remove too much material! You need to ensure a solid interference fit in order that the sight stays in position. Go slowly, making a few strokes across the file, and test the fitment. When the sight can be pushed about halfway into the dovetail slot with finger pressure, stop filing.
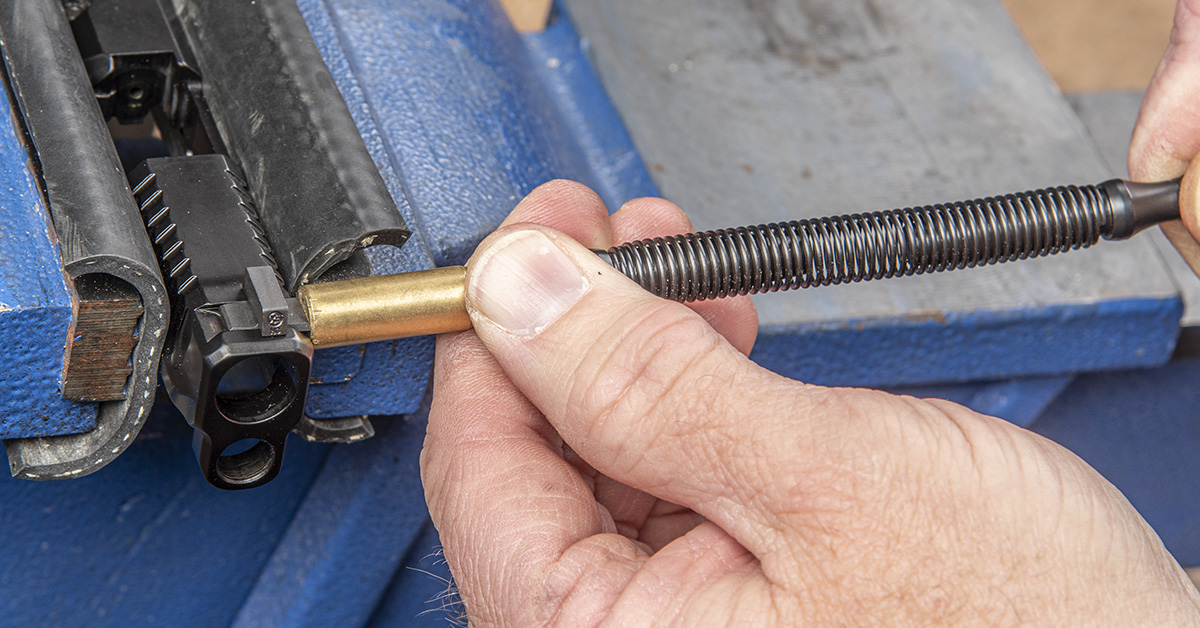
I was able to use the Wyoming Sight Drifter to install the front sight close to the center of the slide, moving it from the left of the slide (shooter’s perspective) to the right per the XS Sights instructions.
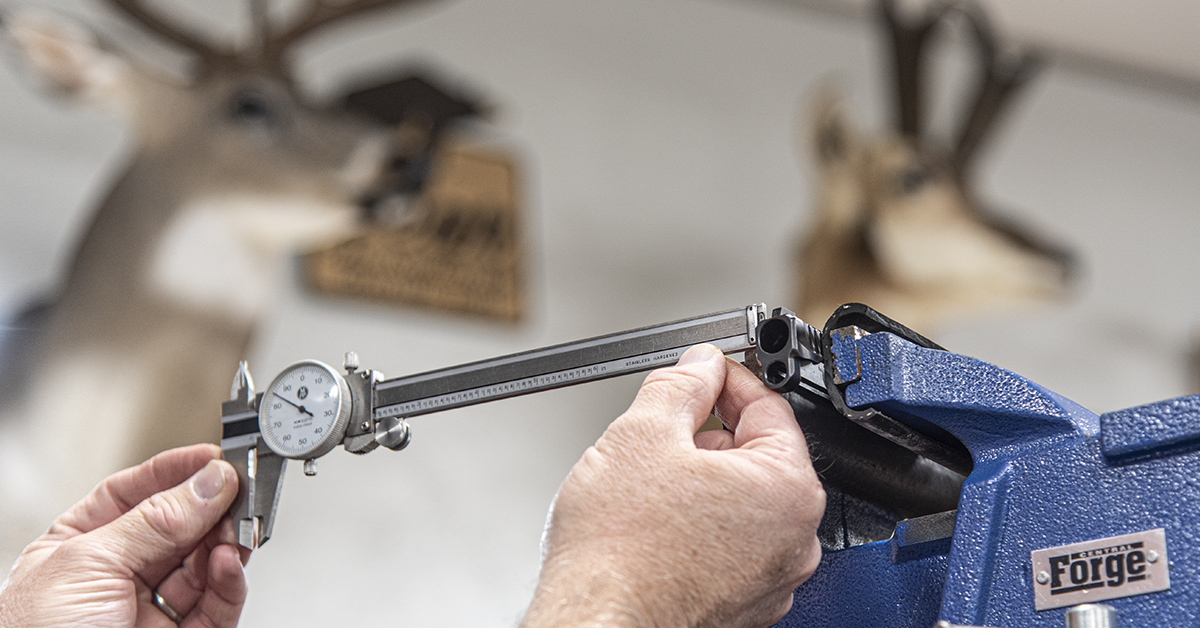
When the sight is just a hair from being centered in the slide, use the caliper’s depth gauge function to check for left/right spacing. The goal is to get the sight centered in the slide without overshooting the mark. If you overshoot the center and must move the sight back, you can weaken the interference fit, which could lead to a loose sight.

The rear sight of my Bodyguard 2.0 had an exceptionally tight interference fit between the slide and the sight. That was why I drifted the front sight of the gun to zero it rather than bang on the rear sight. I started the removal process with the Wyoming Sight Drifter. The sight wouldn’t budge. I then shifted over to the brass punch and hammer. Still nothing, plus the punch face began to deform from the hard blows. With nothing left to do, I grabbed one of the steel punches from the Real Avid Accu-Punch Master Set and went at it.
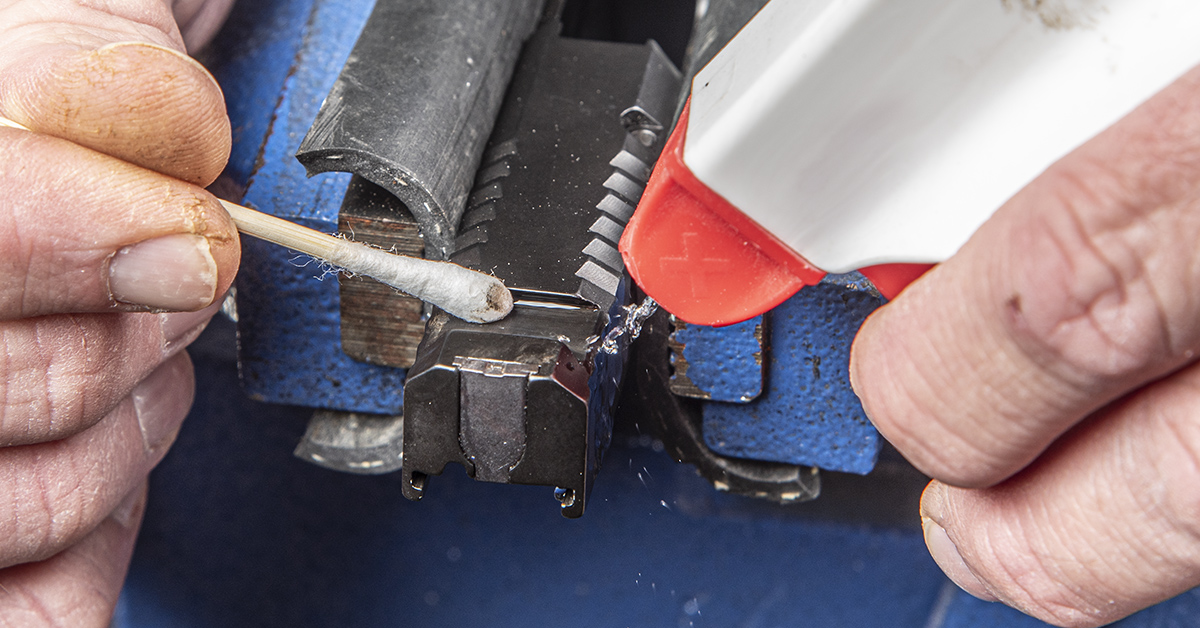
Because the R3D 2.0 rear sight is adjustable courtesy of its set screw, adhesive is required after the zero has been established. To ensure maximum adhesion, it is necessary to remove all oils and grease from the dovetail. Clean the dovetail surface thoroughly with a solvent like denatured alcohol or brake cleaner and a cleaning swab.
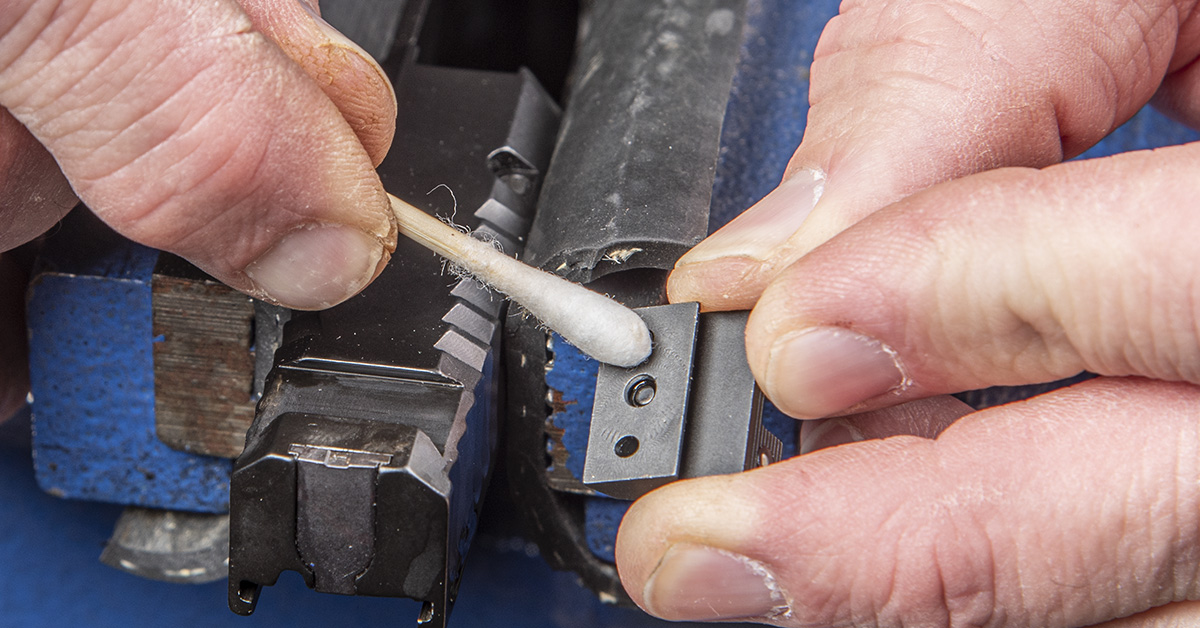
Do the same for the sight base.

The rear sight is a close fit in the dovetail, but not an interference fit. It almost went into place with finger pressure, but not quite.
For the final drift into position, I lightly tapped it with the softer nylon end of the Wyoming Sight Drifter, centering it in the slide.
Once centered, the set screw is snugged to keep the sight in place for zeroing at the range. After the correct windage is established, tighten the set screw and apply the supplied adhesive around the edges of the sight base. Capillary action will draw the adhesive between the sight and slide to form a secure bond. Be sure to wipe away any excess adhesive before it cures.
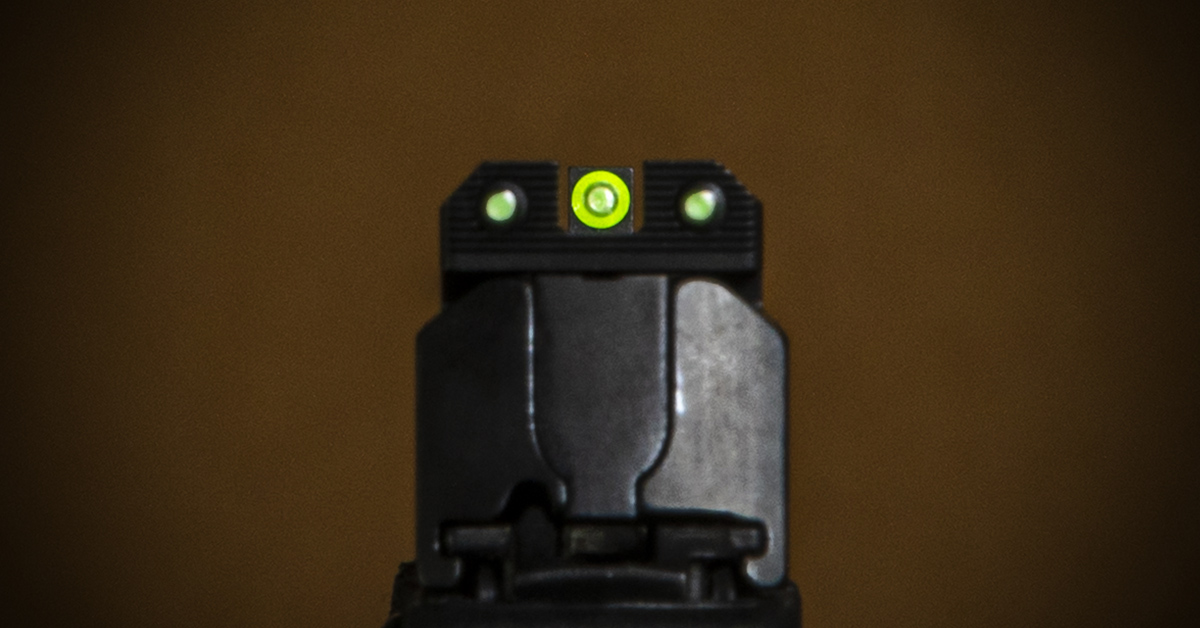
XS Sights’ R3D 2.0 sight set offers an excellent sight picture in low light conditions thanks to its three-dot tritium configuration and bright, photoluminescent ring on the front sight post. In bright light, the ring is prominently visible while the blackout serrations of the rear sight combine with a generous notch to ensure quick notch-and-post alignment. Overall, a worthwhile upgrade to S&W’s outstanding Bodyguard 2.0.
The Ideal Bodyguard 2.0 Holster
Part of the appeal of the Bodyguard 2.0, as we covered in our review last year, is its high concealability factor in a platform that feels and handles much like a larger pistol. The caveat to this is having a good holster. Holster manufacturers seemed a bit slow in providing a fitment for this nifty handgun, but one of the first to deliver a holster solution was Crossbreed Holsters.
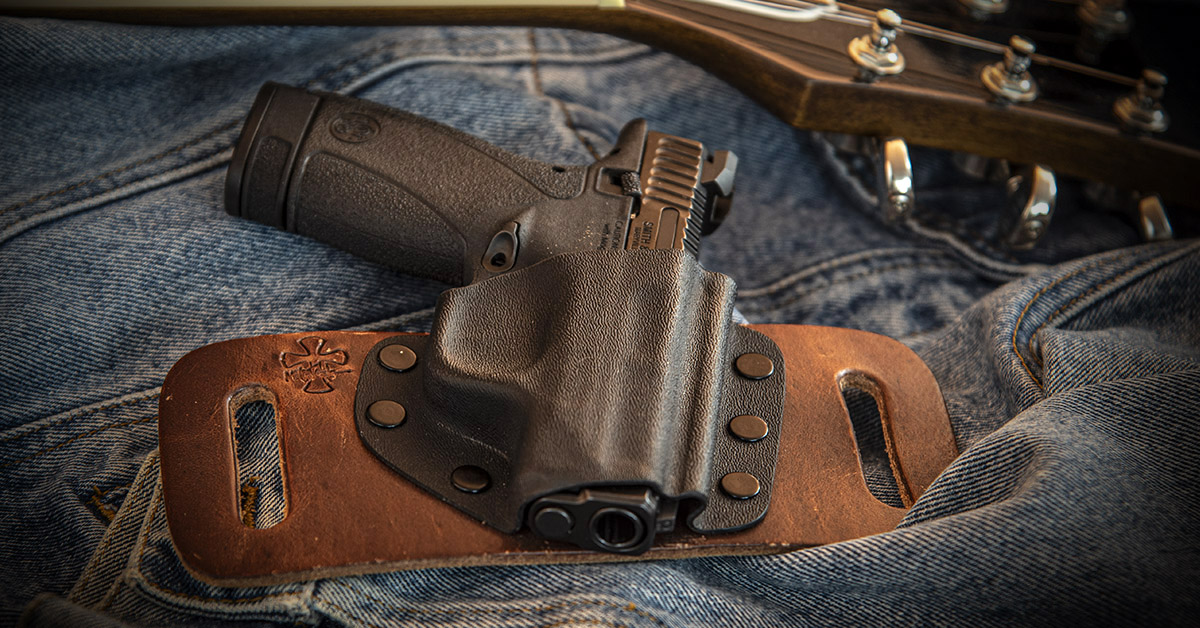
Favoring OWB carry for comfort and quick draw’s sake, I acquired a Crossbreed SnapSlide OWB and a DropSlide OWB for evaluation. Both models wear the Bodyguard 2.0 with maximum comfort and concealment. Once you put it on, you quickly forget it’s even there. My favorite of the two is the SnapSlide seen here. The high-riding cut and forward cant makes the gun disappear beneath a light cover shirt while ensuring an ergonomic position for fast, snappy draws. And if I were to wear it open, the contrasting black Kydex pocket and stylish Founder’s leather backing cut a sharp figure.