One of the best factory sporting rifles ever, the Winchester Model 70 continues to shine almost a century after its introduction. Here, we show you how to service and upgrade this rifle’s operating system.
by Lou Patrick
The Winchester Model 70 made its debut in 1936 and was quite the instant success — so much so that many suggest that it is, or perhaps was, the best factory rifle ever produced. The Model 70 was a well-made rifle of sound design and so liked by its owners that it soon became known as “The Rifleman’s Rifle.”
Winchester and its Model 70 went on to enjoy continued success for the next 28 years. During that time, the rifle received few, if any, changes as apparently none were really needed. Unfortunately, in 1964, Winchester decided to make some changes to the Model 70 that ultimately brought all this success to a crashing end. The changes were so extensive that, in my mind, “The Rifleman’s Rifle” was gone. Perhaps Winchester should have called it a “Model 71.”
It is because of these changes made in 1964 that we get the terminology “pre-64” Model 70. The distinction must be made, as the Model 70 made after 1964 is not the same rifle as its predecessor. So, pre- and post-64 model 70s are different animals…until we get to 2008. After realizing the error of their ways, in 2008, the Model 70 was returned to its pre-64 design. Now, combined with modern manufacturing techniques, it is perhaps better than ever before.
Yes, it gets a little confusing trying to keep up with the changes made to the Model 70. Fortunately, through all these changes, only two different triggers have been used.
Rifles manufactured from 2008 to present use the M.O.A. trigger design. The M.O.A. trigger is readily identifiable from the earlier trigger as all its components are contained within the trigger housing.
Model 70s manufactured before 2008 will use the original trigger design that dates to 1936. The individual components of this trigger mount directly to the receiver. Despite having been in use from 1936 to 2008, this trigger is often referred to as the “pre-64” trigger, thus making the rifle that we are working on in this project…are you ready for this?…a post-64 Model 70 that was made prior to 2008 with a pre-64 trigger.
It’s enough to make my head hurt.
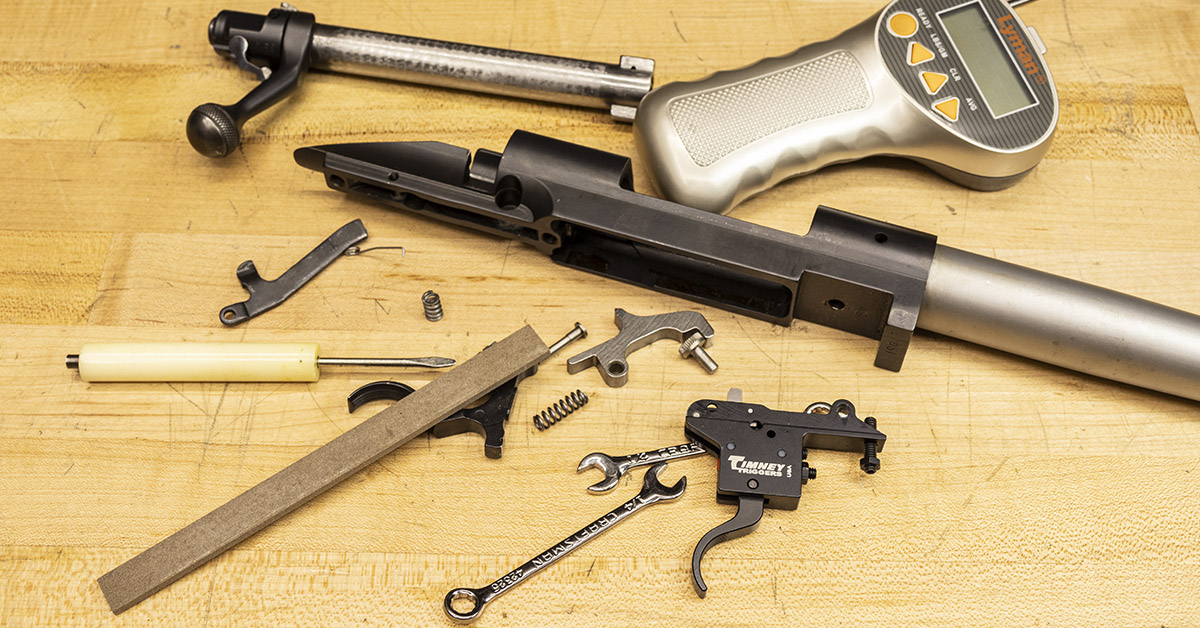
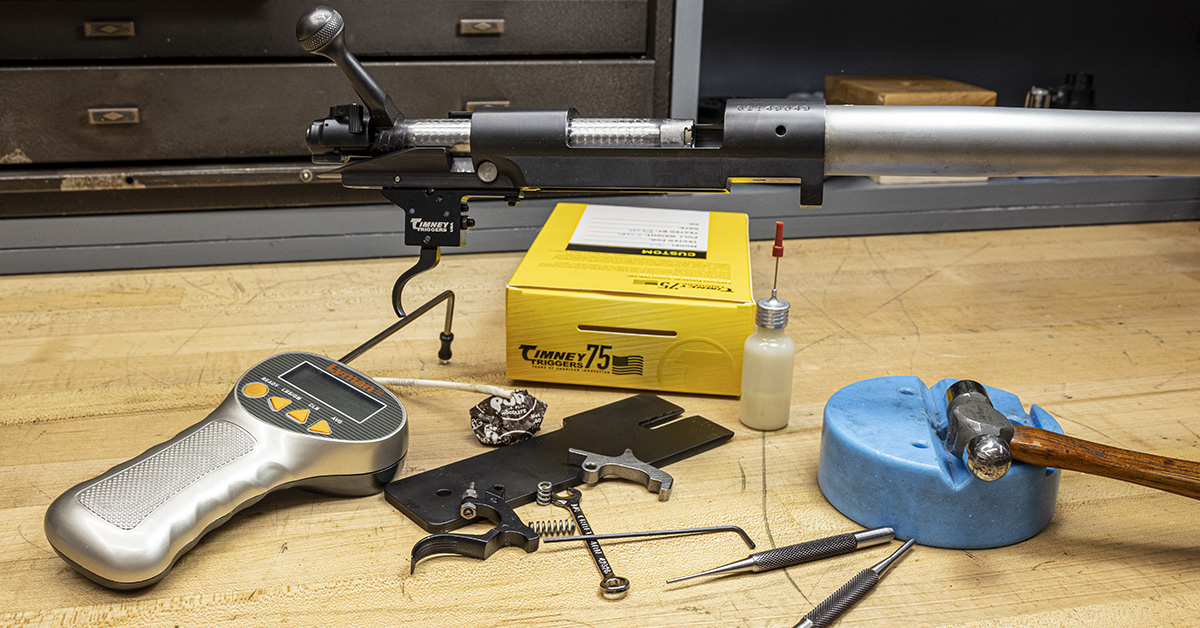
For this project, we will be disassembling a Model 70 trigger and bolt assembly, doing some cleanup work, and installing a new Timney trigger system.
Before beginning any work, always ensure that your rifle is unloaded and that no ammunition is present in the work area.
Trigger Operation and Disassembly
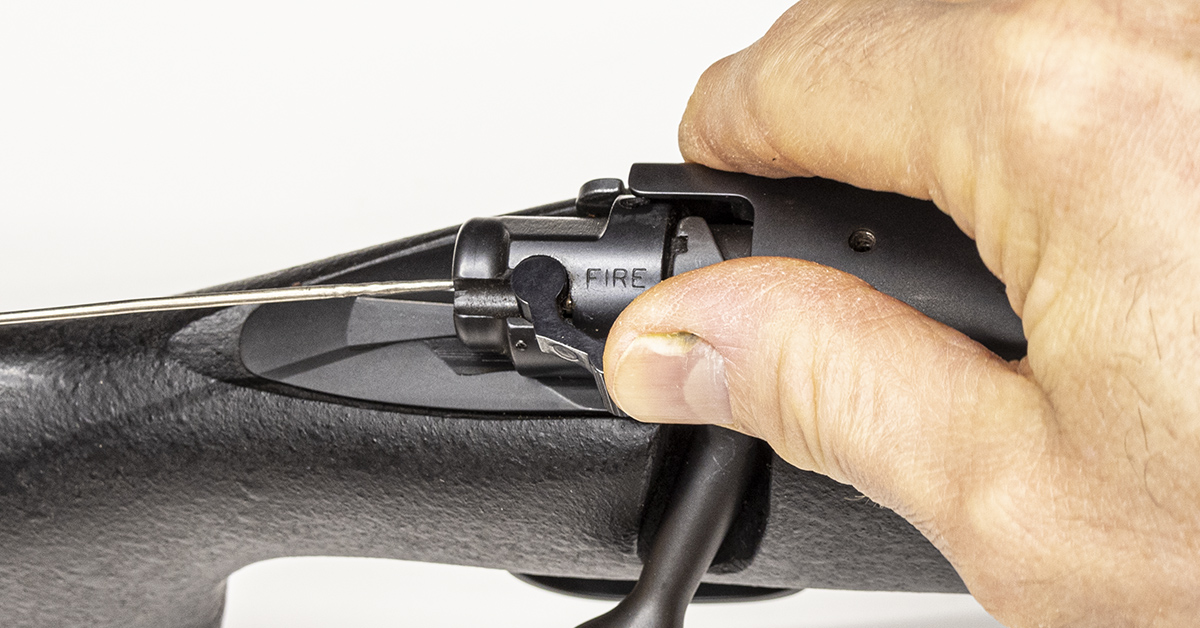
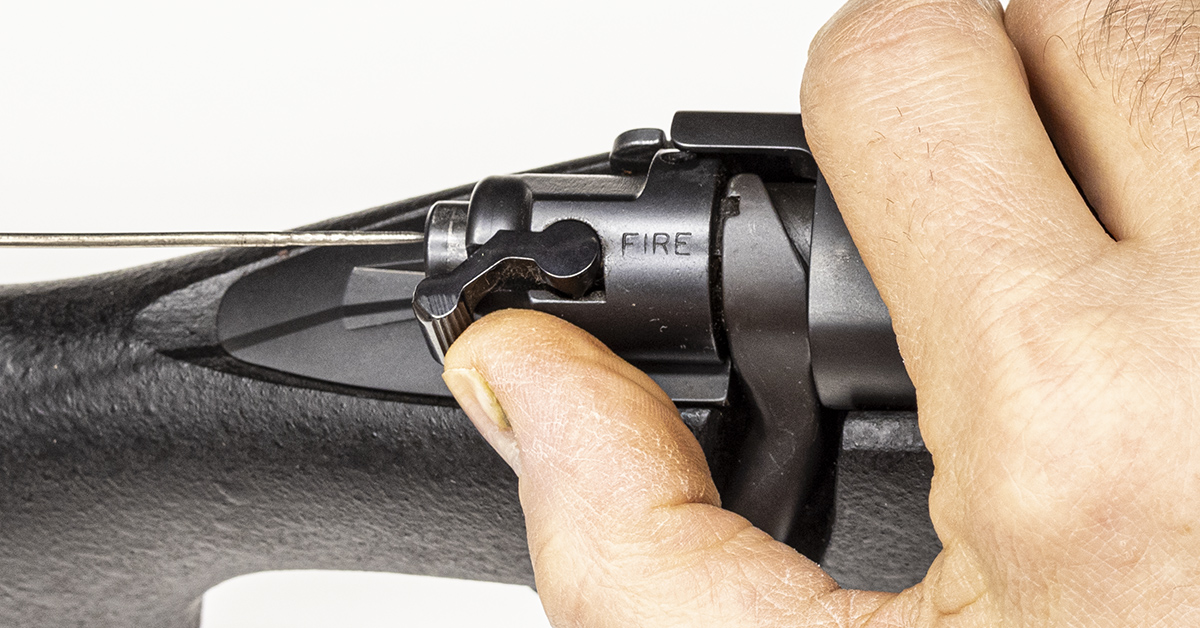
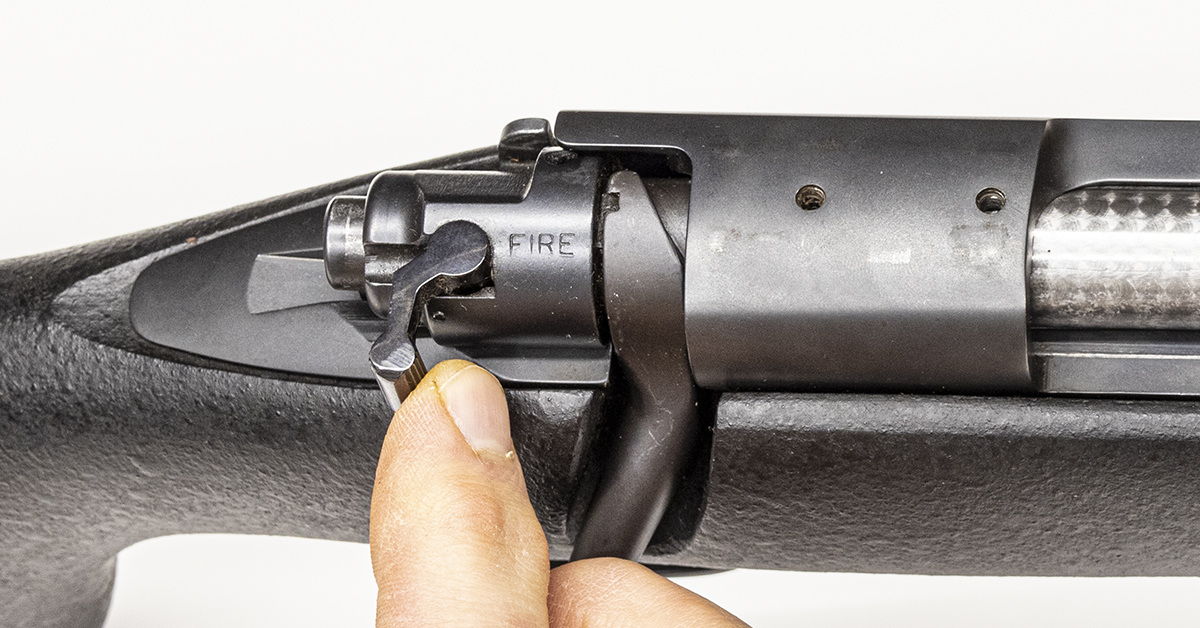
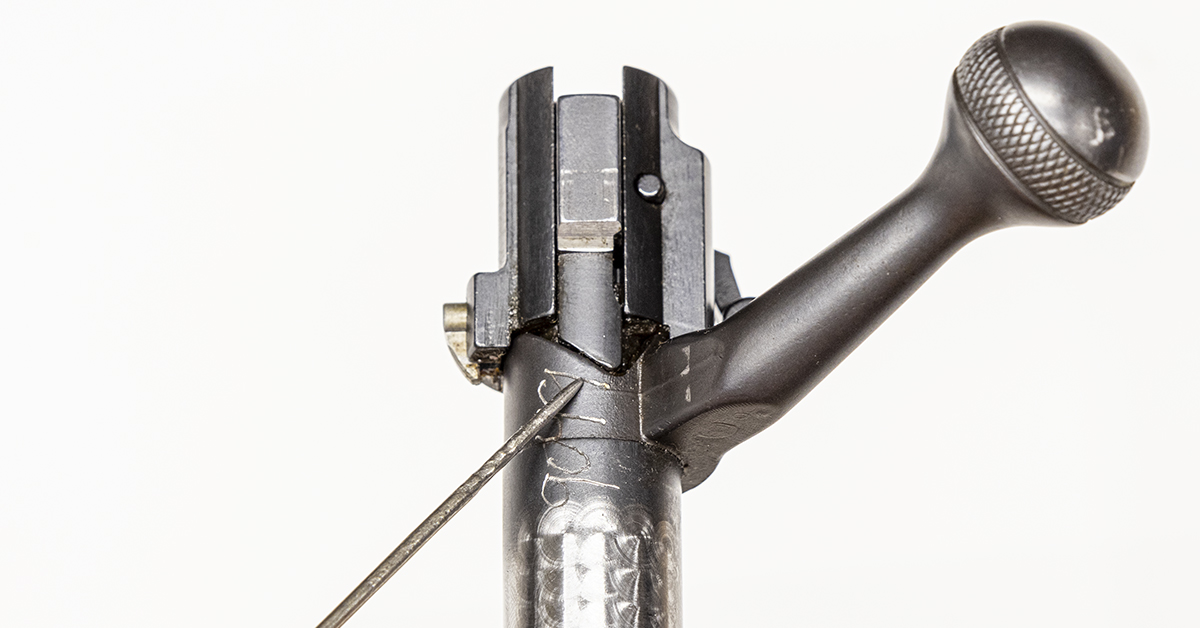
The rifle should be stored unloaded with the firing pin forward on an empty chamber. This will keep the firing pin spring from being at maximum compression for months on end. To accomplish this, place the safety in the forward or fire position and hold the trigger back as you close the bolt on the empty chamber. Looking at the end of the bolt shroud, you can see that the firing pin is forward (note the pointer), indicating that the rifle is not cocked.
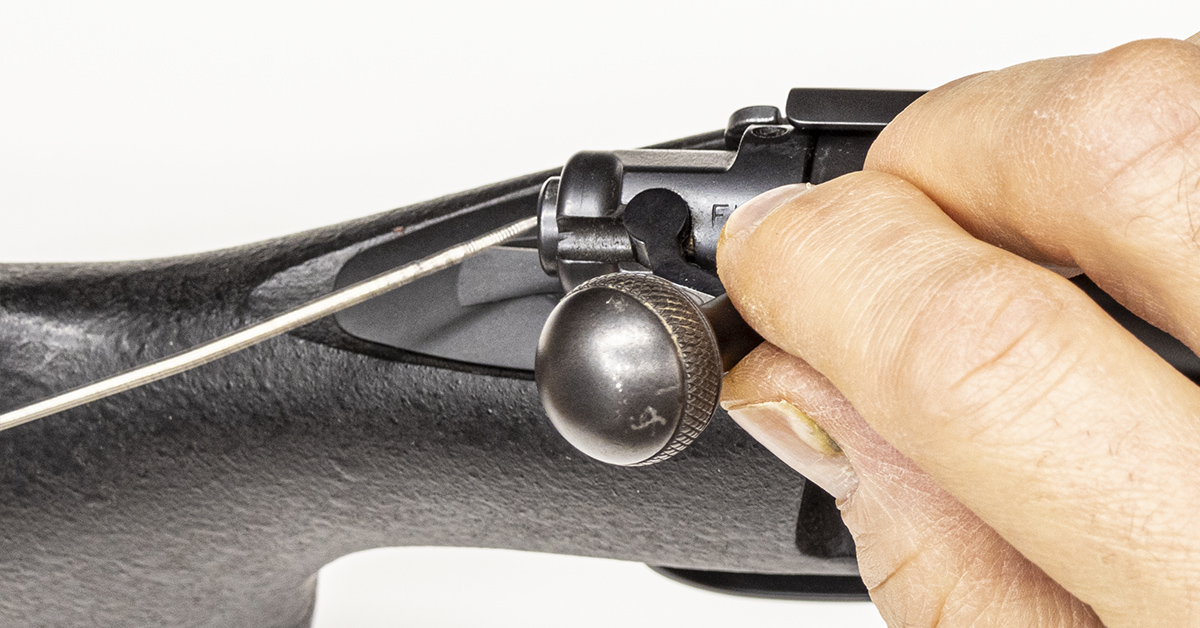
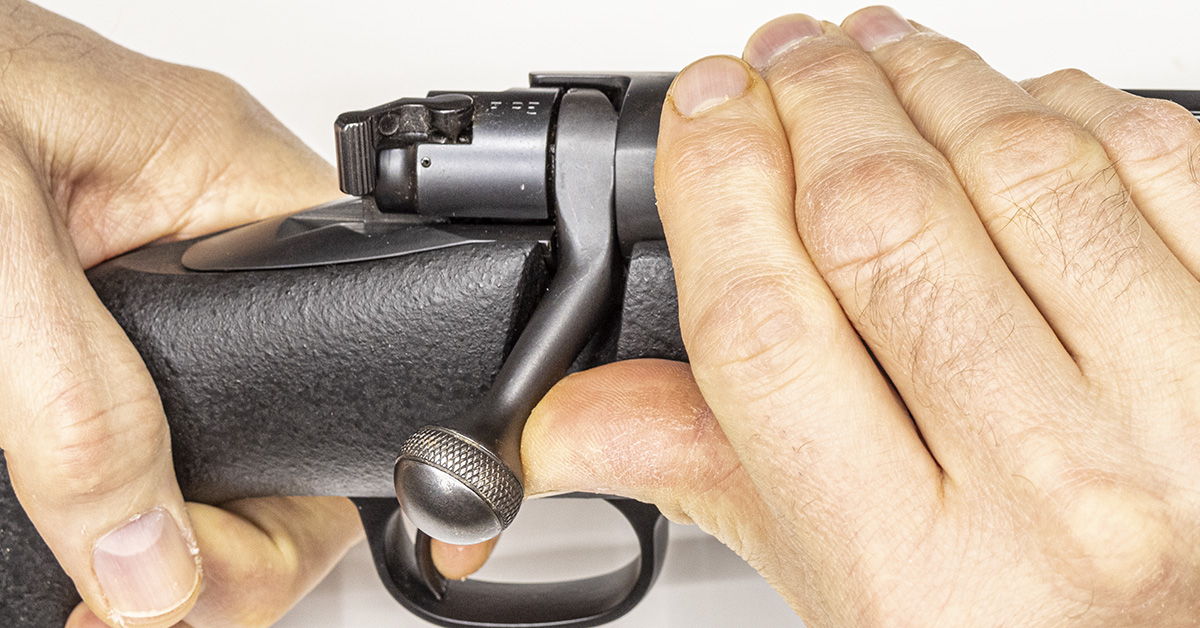
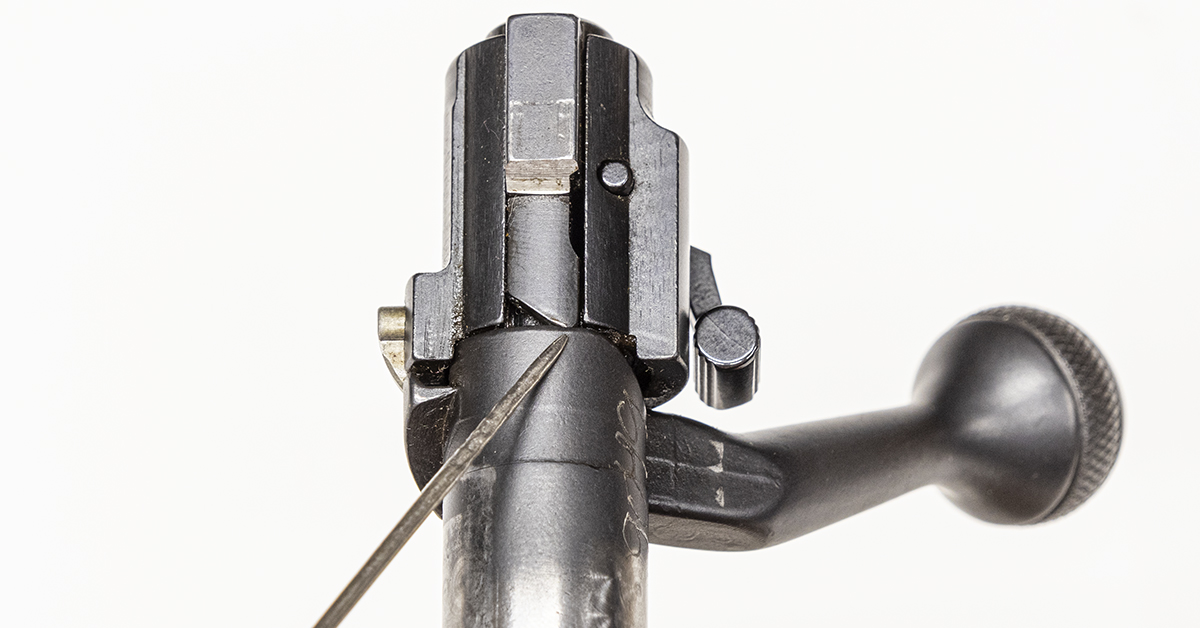
Raise the bolt handle and the cocking piece will move rearward (note the pointer), cocking the rifle.
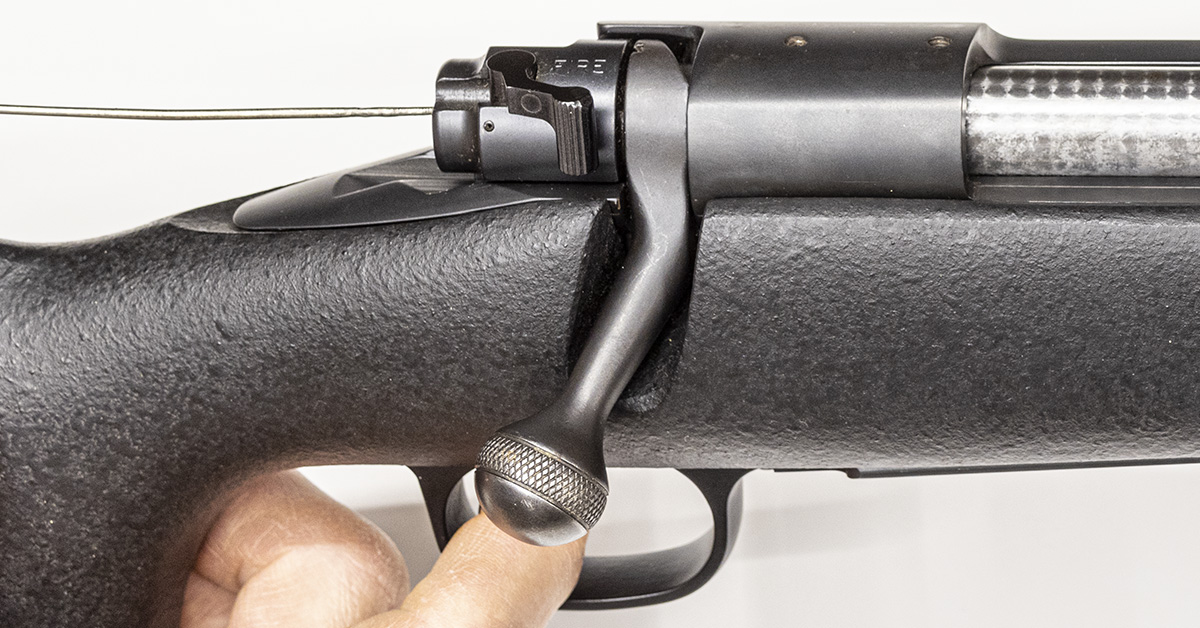
Lower the bolt handle and place the safety in its rearmost position. The Model 70 safety is a three-position safety that blocks firing pin movement when engaged.
In its rearward position, the safety blocks the firing pin and locks the bolt in place. The bolt handle cannot be raised with the safety in this position. The trigger can be moved rearward, although the rifle will not fire.
Move the safety lever forward to its middle position. Squeeze the trigger. It will move rearward, but the rifle will not fire. The bolt handle is now unlocked, allowing manipulation of the bolt. The safety should be in the middle position when unloading the rifle.
Move the safety forward to the fire position. The bolt handle remains unlocked. Squeeze the trigger and the rifle will fire. Before beginning any trigger work on your Model 70, manipulate the safety a few times and develop a good feel of the force required to move the safety lever from one position to another. In particular, from its rearward most position to the middle position, this will become important as work progresses.
Raise and lower the bolt handle. Place the safety lever in its middle position. The safety should be in this position prior to removing the bolt from the rifle.
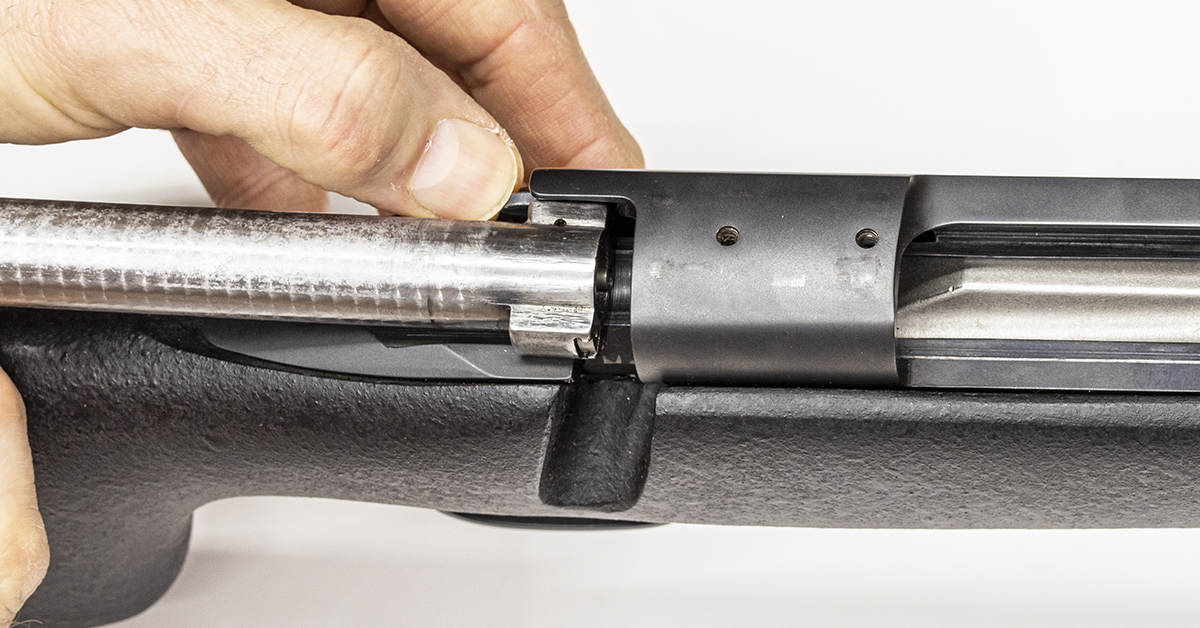
Press down on the bolt release and remove the bolt from the rifle.
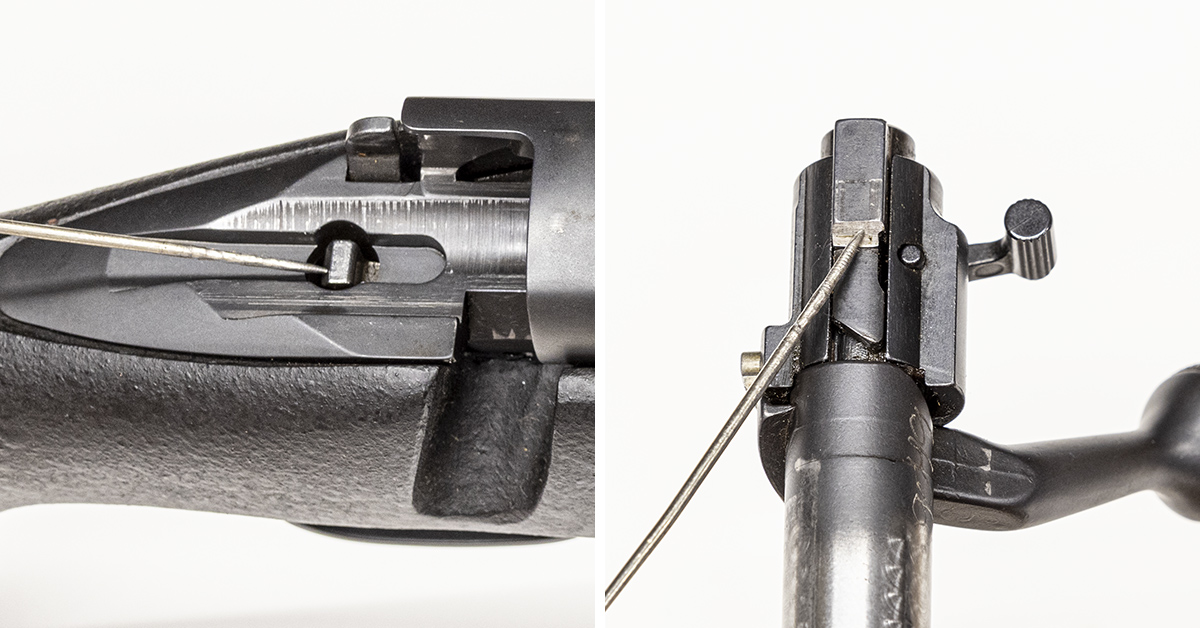
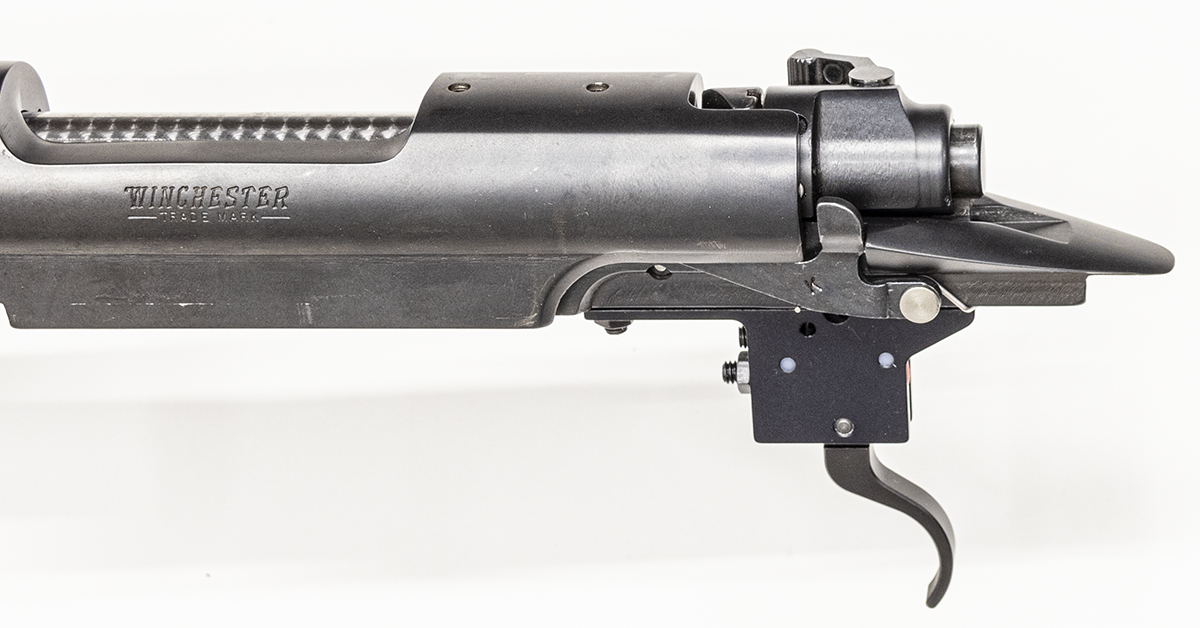
Removing the bolt exposes the sear (left). The rear surface of the sear will contact the forward surface of the cocking piece (right). It is the engagement of these two components that holds the cocking piece, and ultimately the firing pin, rearward in the “cocked” position.
Squeezing the trigger rearward allows the sear to move downward and break its engagement with the cocking piece. Once this engagement is broken, the firing pin will move forward and the rifle will discharge.
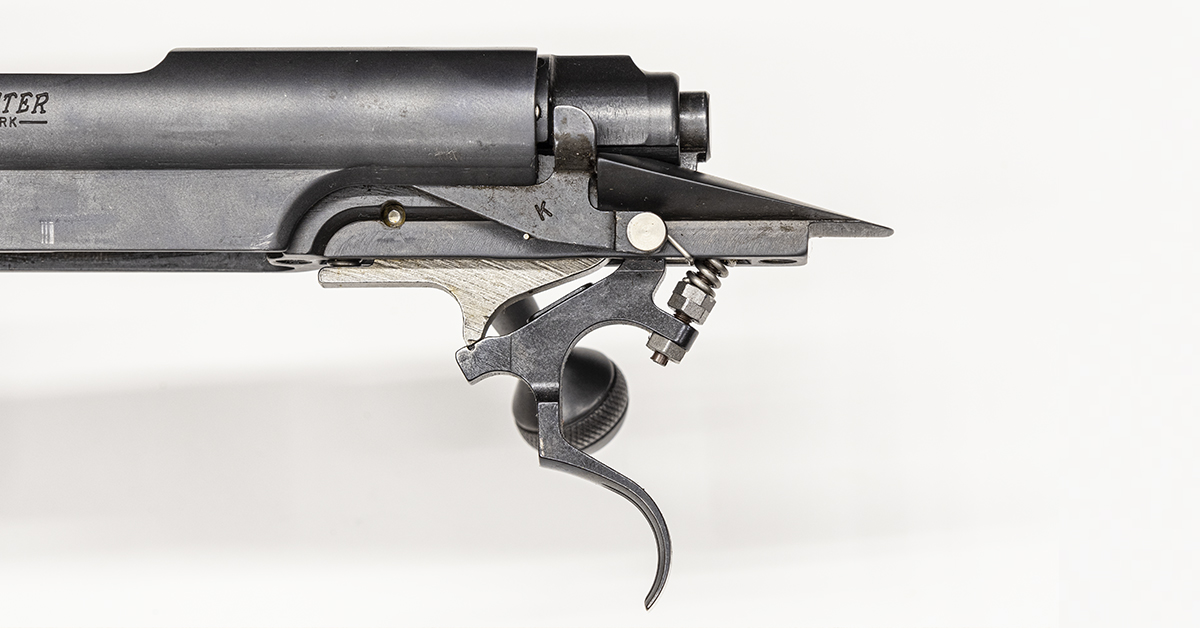
The cocking piece is pictured in its forward fired position. The angled surface in the bolt is the cocking ramp. After firing, when the bolt handle is raised, which rotates the bolt, the cocking ramp will drive the cocking piece rearward into the cocked position.
With the bolt handle raised and the safety in the forward position, the end of the cocking piece will contact the bolt. Unlike the Remington 700 bolt, the Model 70 bolt does not have a notch in this location for the cocking piece to engage. Winchester most likely didn’t see a need for a notch here, as the possible rotation of the bolt shroud is prevented by a lock on the side of the shroud.
The bolt shroud lock is a spring-loaded plunger that locks the bolt shroud to the bolt handle. This prevents unwanted rotation of the bolt shroud when the bolt has been removed from the rifle. The lock is automatically engaged when the bolt is removed from the rifle and automatically disengages when the bolt is in the rifle.

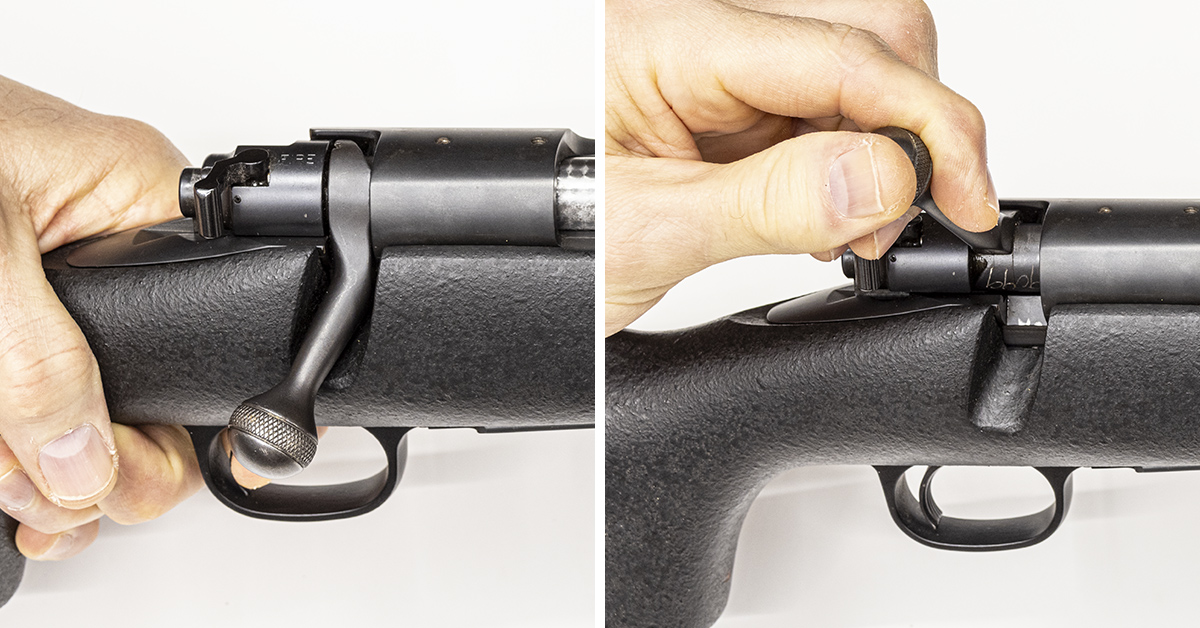
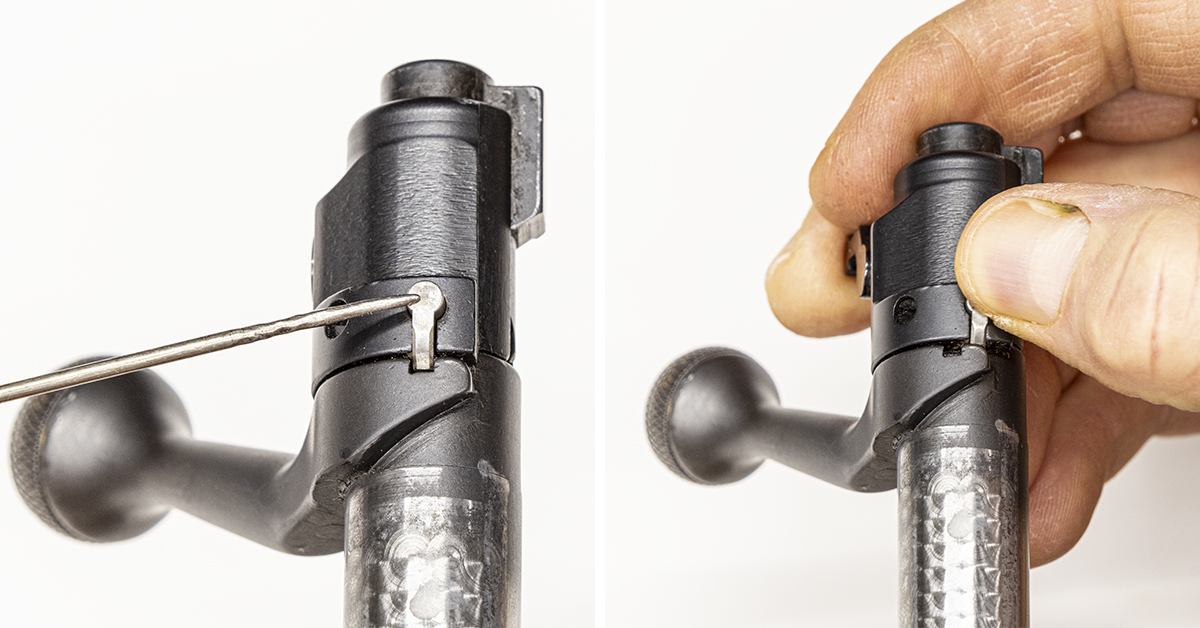
A potential problem exists once the bolt is removed from the rifle with the safety in the forward position. The shroud lock, while effective, is also easily and unintentionally disengaged while working on your firearm. If the safety is in the forward position (left) and the bolt shroud is accidentally rotated, the cocking piece will immediately move forward into the fire position. With the bolt in this configuration, it cannot be reinserted into the rifle, the cocking piece must be pulled rearward and the bolt shroud rotated back to the proper position. While this is not impossible, the firing pin spring is strong, which makes this a bit of an unwanted hassle. To prevent this condition from occurring, make a habit to always place the safety in the middle position (right) prior to removing the bolt. This will hold the firing pin back. If the bolt shroud were to unintentionally rotate, all that is needed is to simply rotate it back into position.
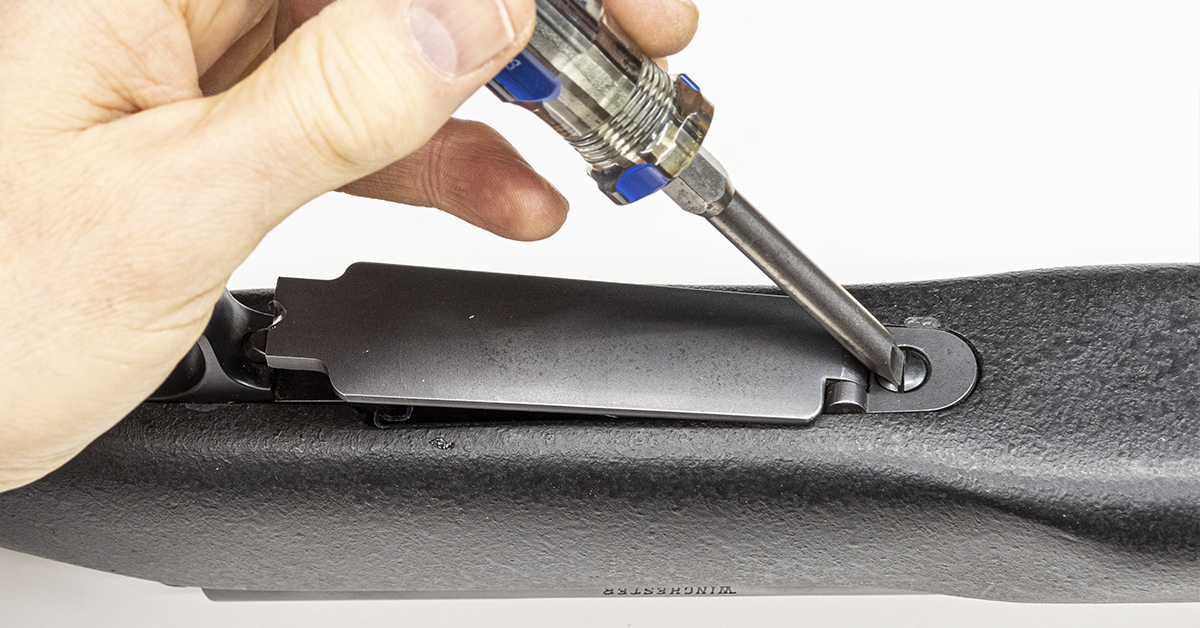
With the bolt removed from the rifle, open the floor plate to relieve spring tension and remove the front action screw.
Remove the floorplate assembly.
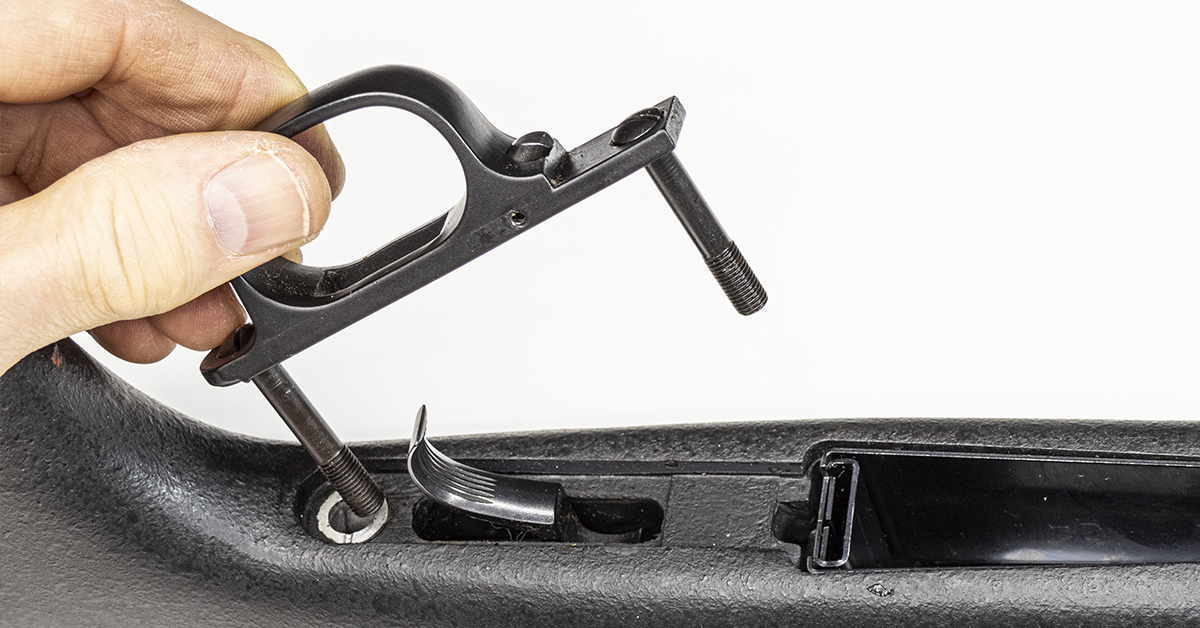
Loosen the two trigger guard screws and remove the trigger guard.
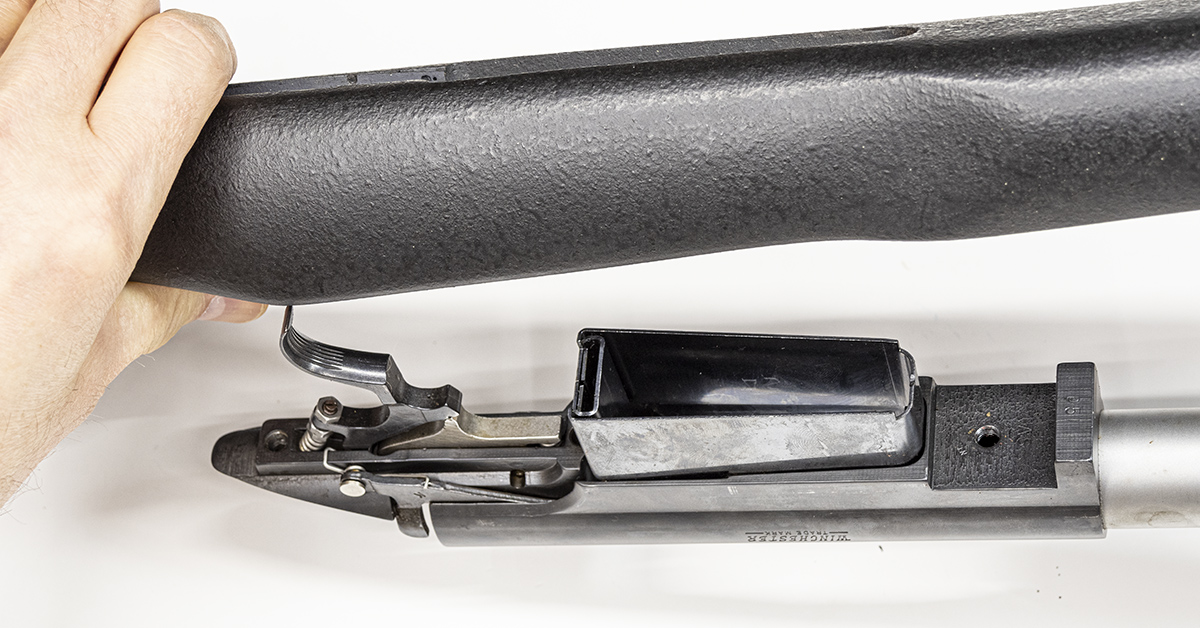
The stock will now separate from the barreled action.

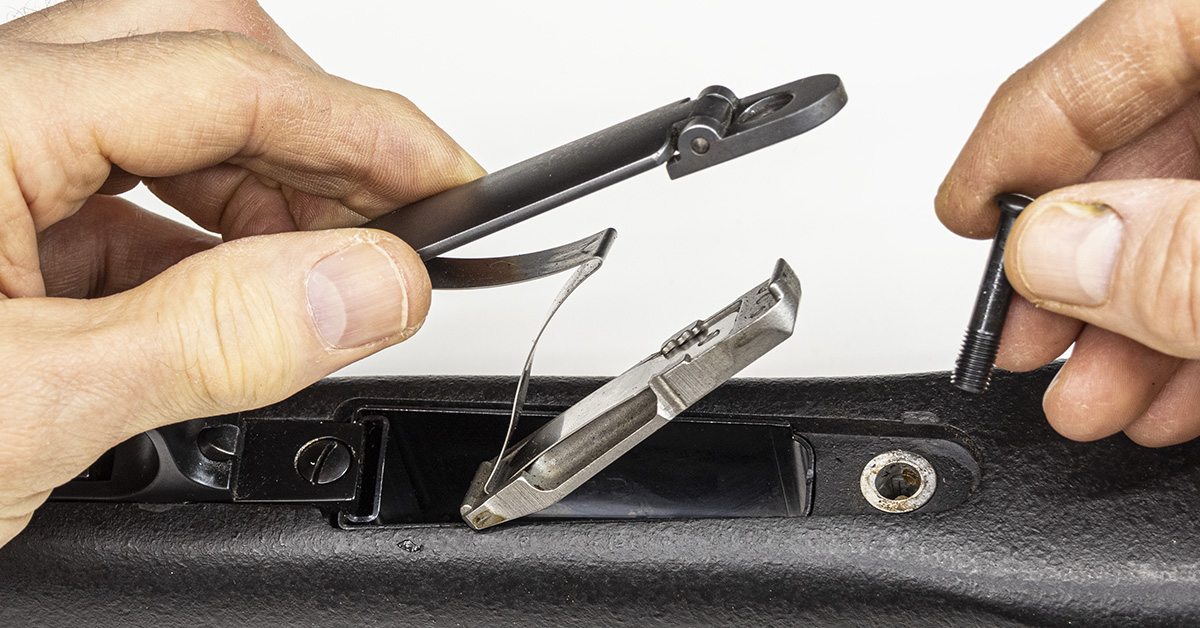
Squeeze in on the rear portion of the magazine box. Lift upward and remove it from the receiver.
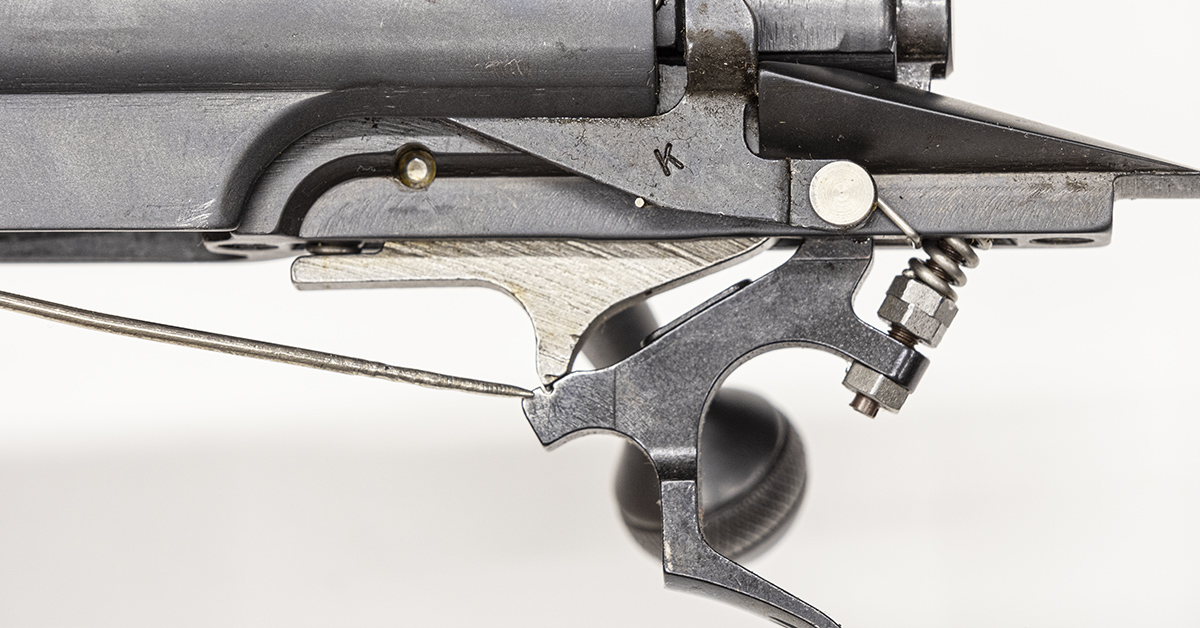
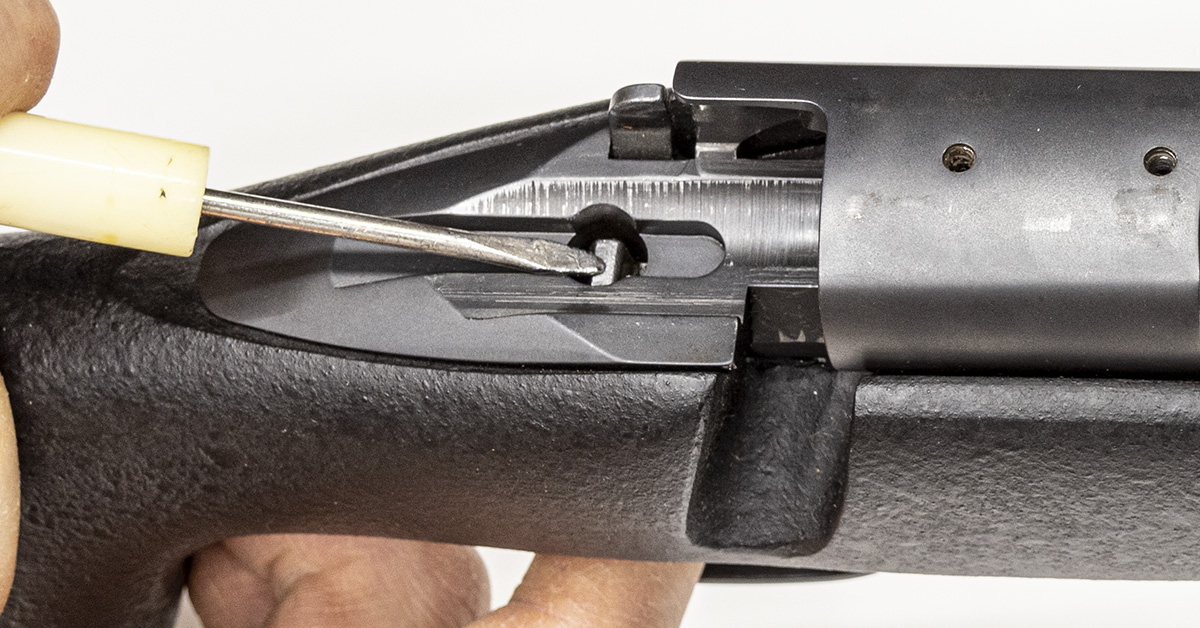
The action is cocked with the safety in the middle position. Look closely at the engagement surface of the sear and trigger. They are not engaged.
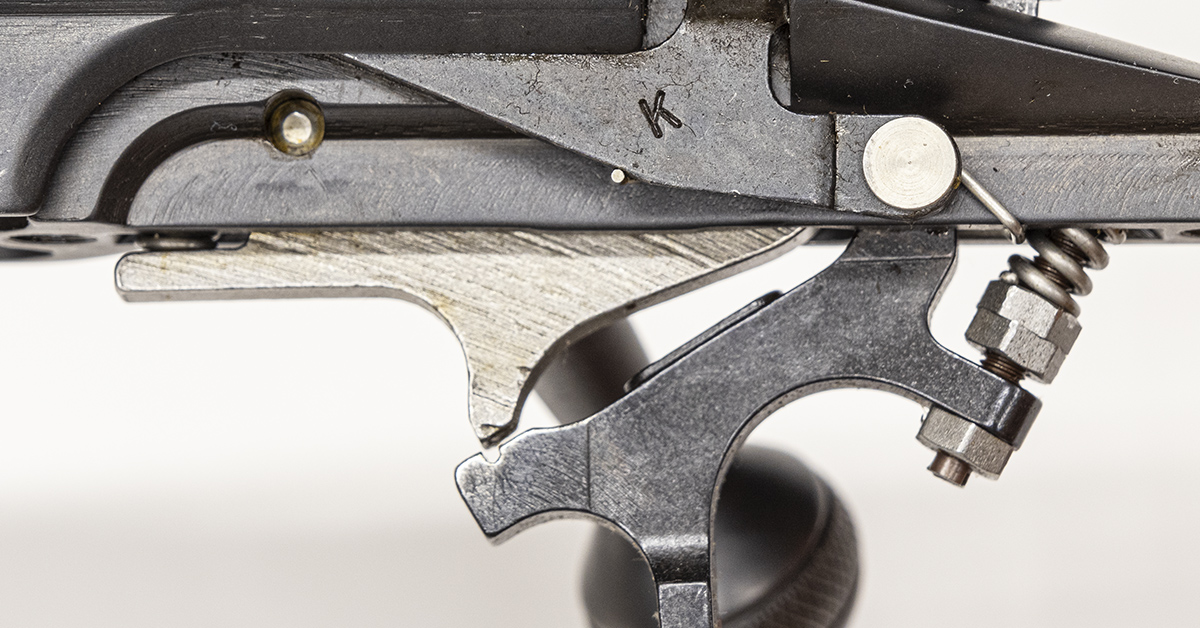
Squeeze the trigger and it will move rearward; however, the rifle will not fire since the Model 70 safety is blocking the movement of the firing pin.
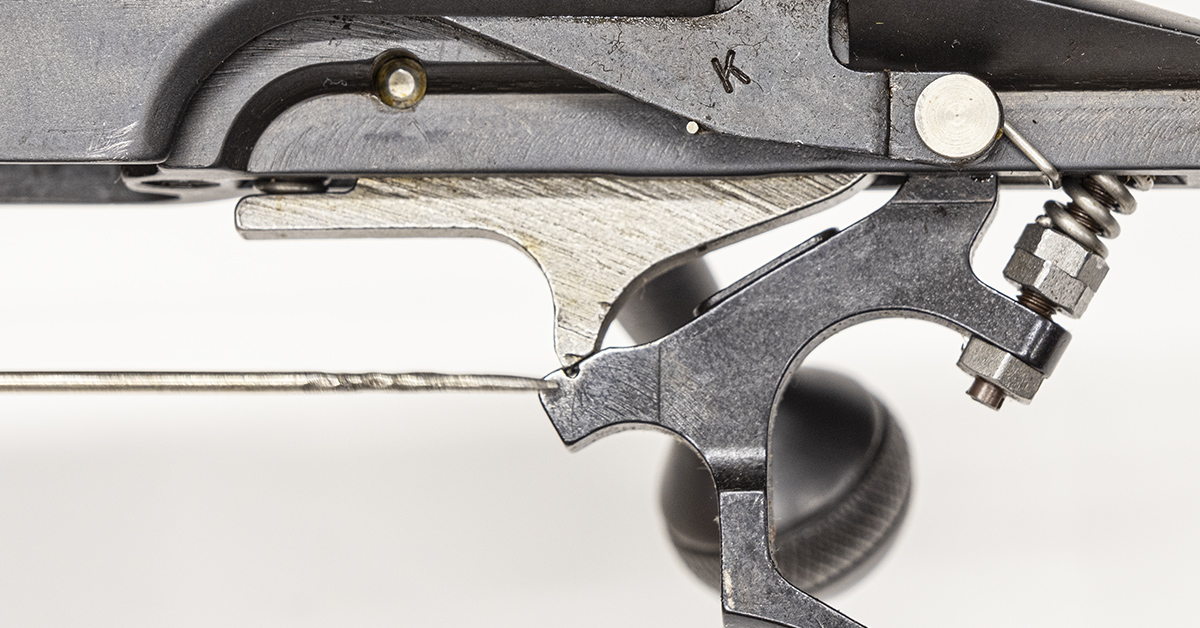
Moving the safety forward into the fire position causes the sear to move slightly downward and engage the trigger. The slight downward motion of the sear is caused by pressure from the firing pin/cocking piece, as this pressure has been transferred from the safety lever to the sear. Continued downward motion of the sear is prevented by the trigger’s engagement surface.
Squeezing the trigger rearward will break its engagement with the sear, allowing the sear to move downward, breaking its engagement with the cocking piece. This allows the cocking piece and firing pin to move forward, causing the rifle to fire.
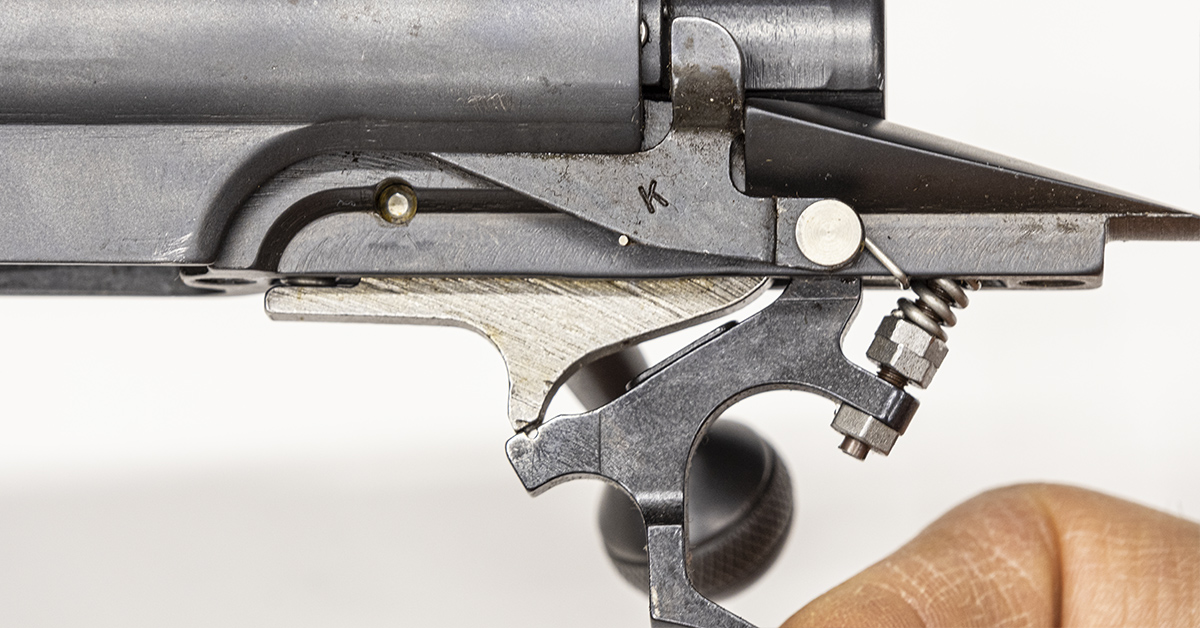
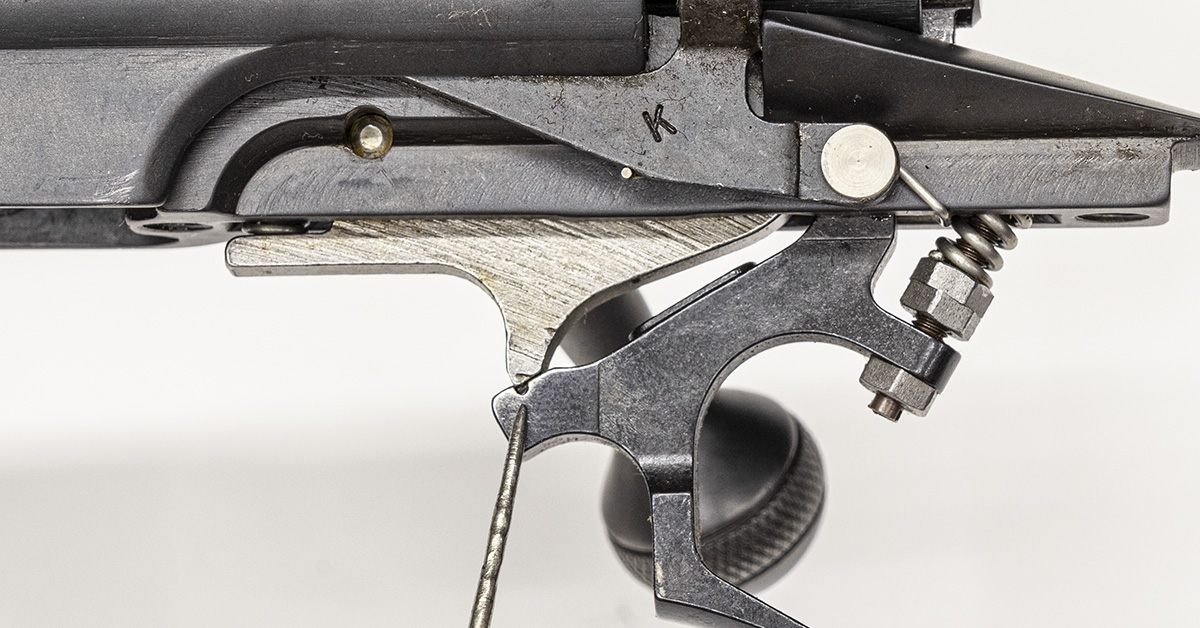
The trigger’s pull weight is controlled by this spring assembly. While pull weight may be adjusted, its adjustment is somewhat limited.
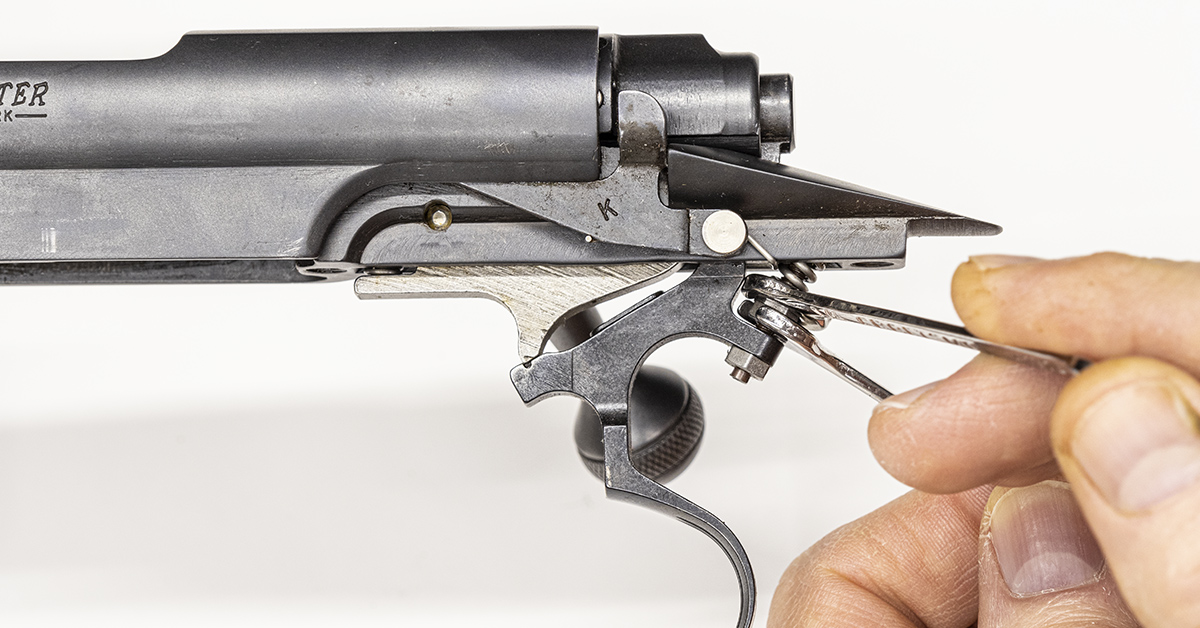
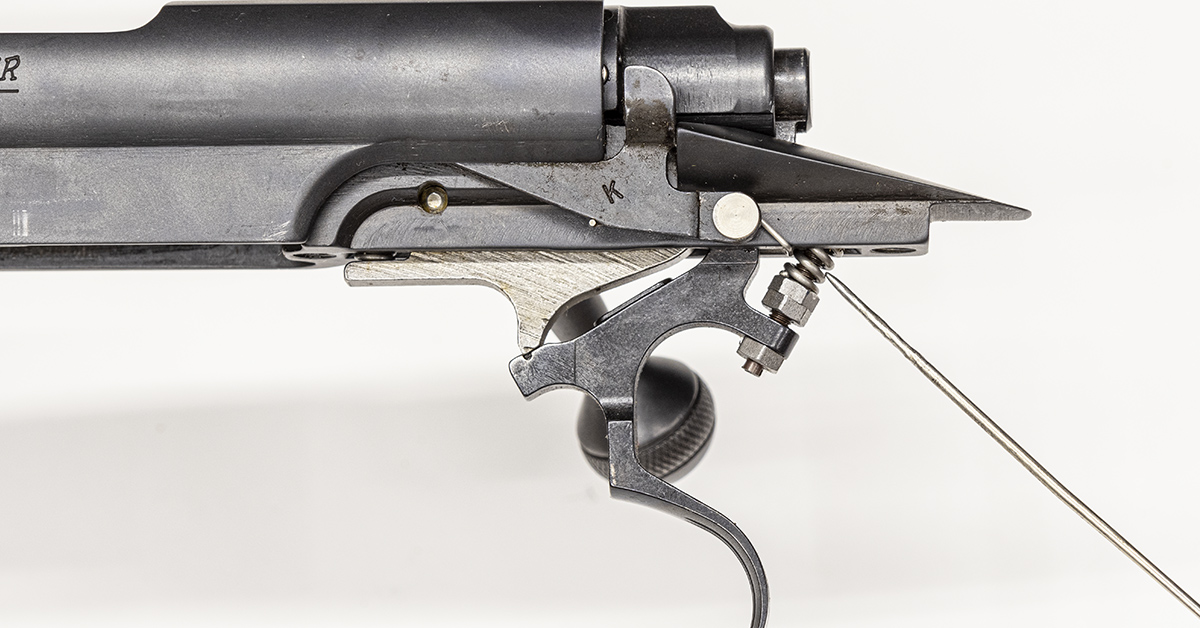
Prior to disassembly of the trigger mechanism, use two ¼-inch wrenches and a small screwdriver to ensure that the adjustment mechanism is tight. This will prevent loss of adjustment during disassembly and cleaning. The best wrenches that I have found for this are the small Craftsman wrenches (part# 9-42319) meant to be used for automotive ignition systems. These wrenches are thin and fit these adjustment nuts perfectly.
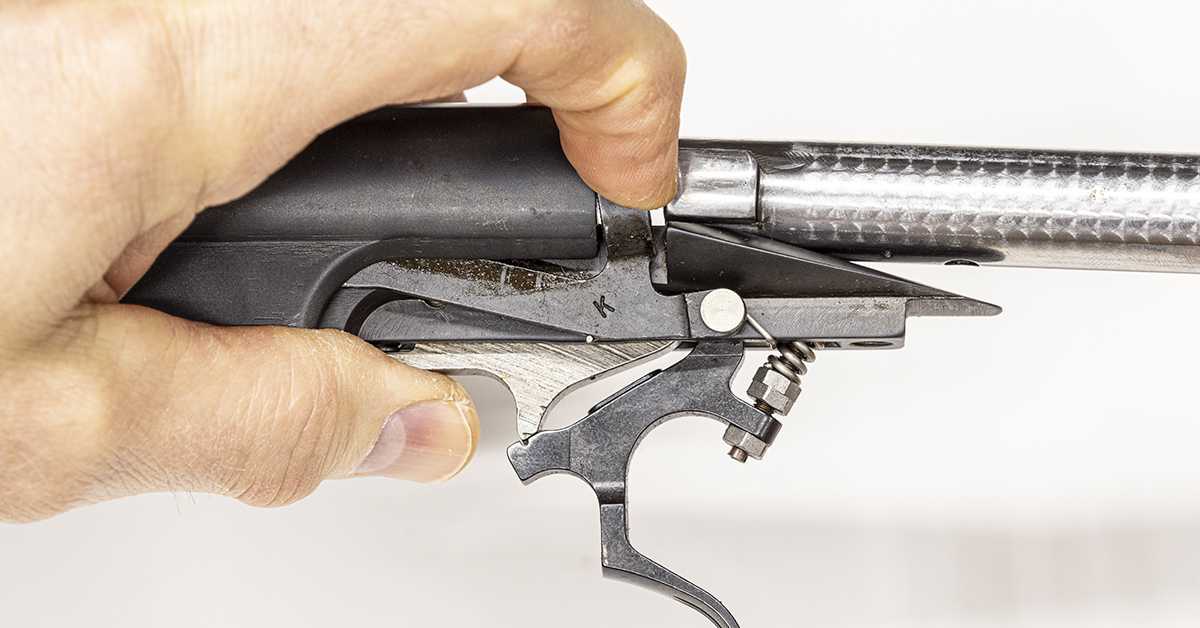
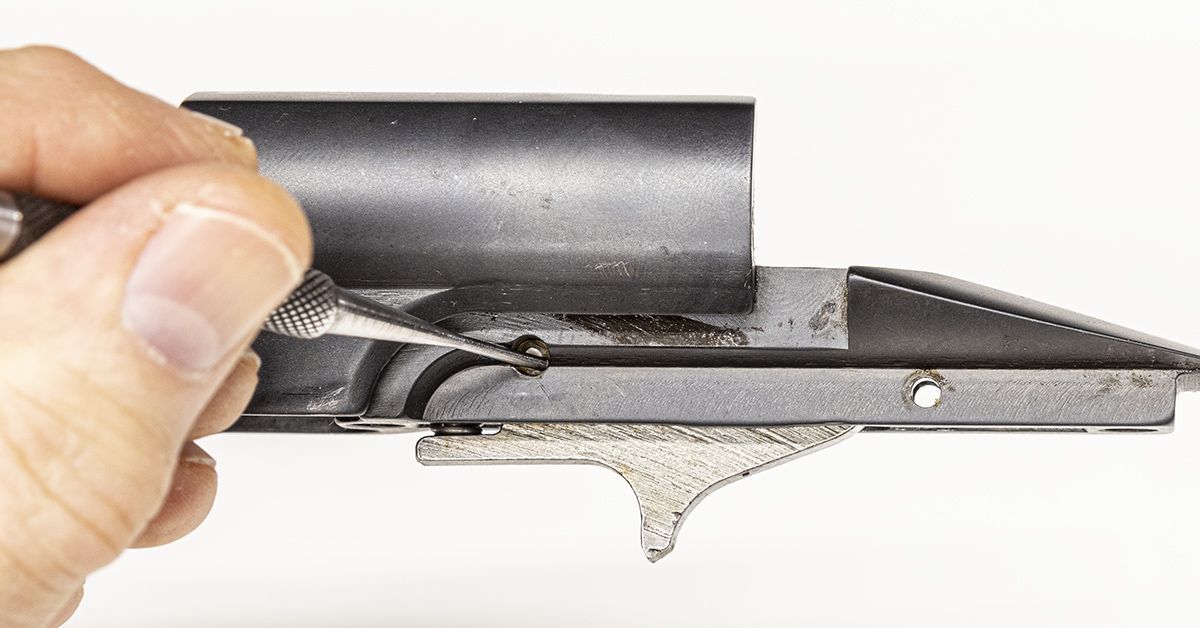
Remove the bolt. Look closely at the orientation of the bolt stop spring. While it may be difficult to see in the pictures, as I work, I am using a vise to hold the barreled action a few inches above the surface of the workbench.

Rotate the receiver. Use a hammer and punch to remove the trigger pin.
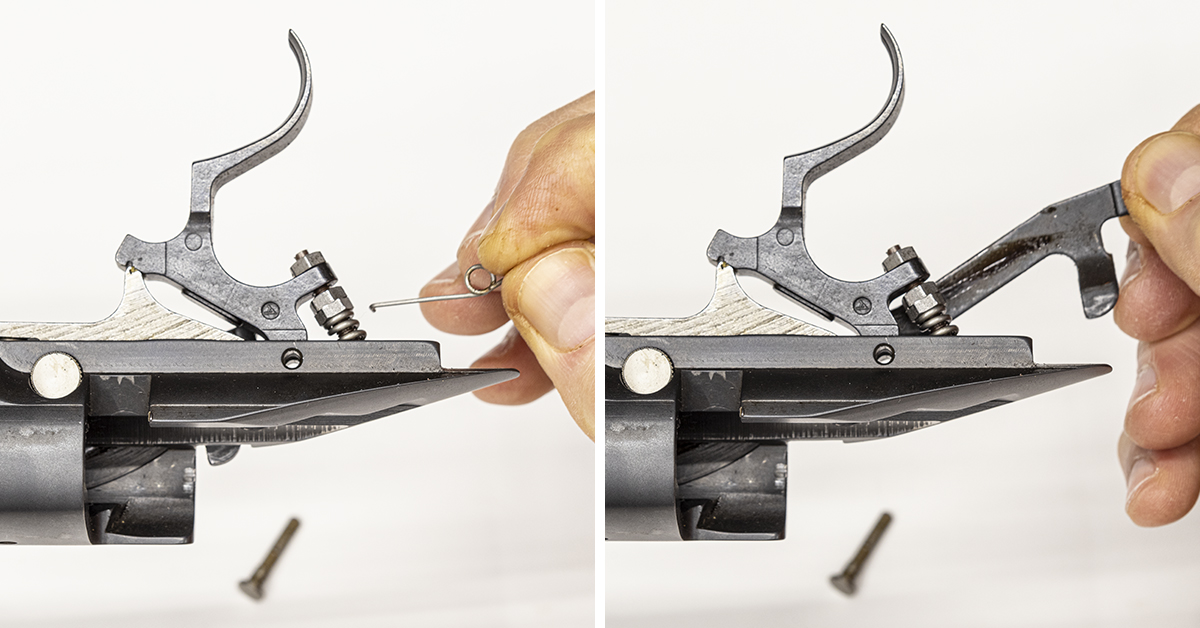
Remove the bolt stop spring and bolt stop.
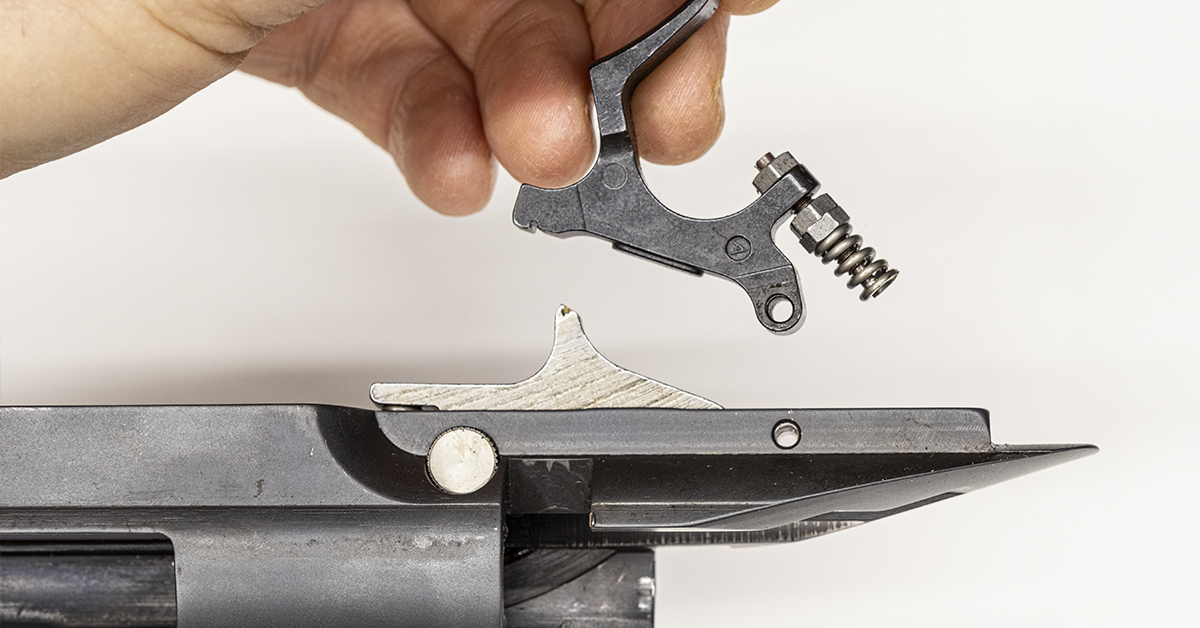
Remove the trigger. The trigger spring can easily fall off its adjustment assembly.
Rotate the receiver. Use a hammer and a punch to remove the sear pin.

Maintain control of the spring tension as you remove the punch.
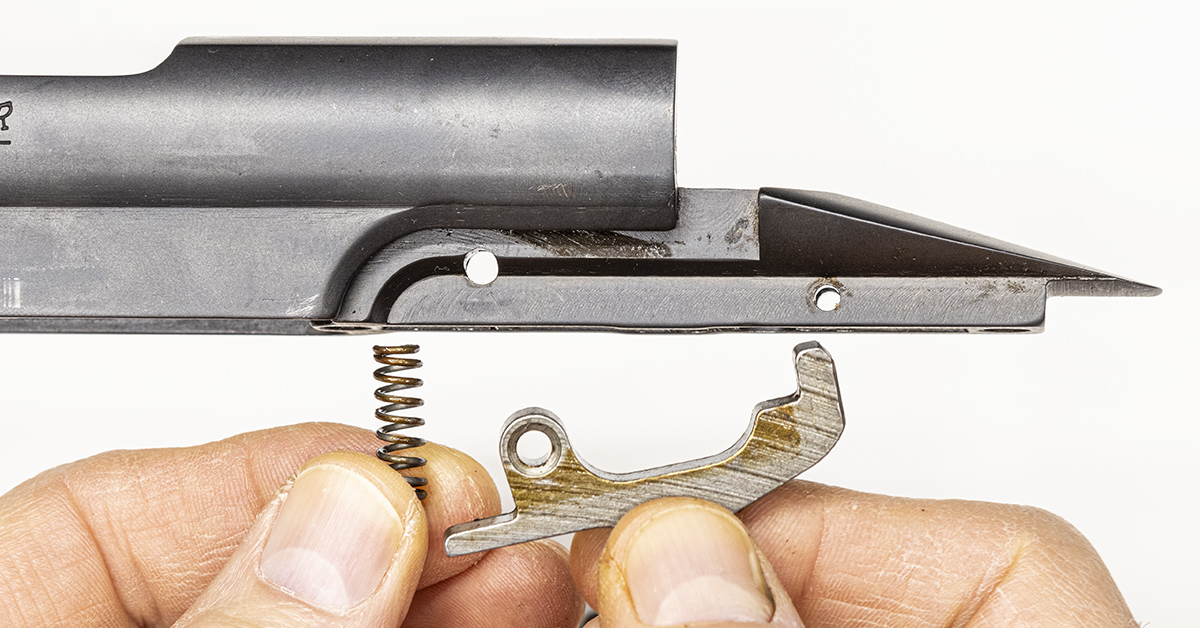
Remove the sear and spring.

The sear pin is splined. When installing this pin, go slowly and ensure that the splines are properly aligned. Using a small brush and bore solvent, clean all the components and the receiver’s mounting surfaces.
Once all the components have been cleaned, installation is simply the reverse of disassembly. Lightly lubricate each part during reassembly. “Lightly” means only a drop or two of oil spread over the part is all that is needed. Properly cleaned and lubricated, your Model 70 trigger will perform as good as new.
But what if you desire a little extra performance from the trigger? Is it advisable to adjust or modify the factory trigger?
The Model 70 trigger does provide for some weight-of-pull adjustment; however, there is no means provided to adjust for sear engagement or over-travel. As with most everything else, when we gain in one area, we lose something in another. In this case, if we lighten the trigger pull, we are also reducing the amount of force exerted on the trigger and sear engagement surface. In my opinion, this is undesirable — especially in a rifle that is to be used afield.
The forward edge of the sear surface (left) is where it contacts the trigger. Looking at this surface (right), you can see machining marks. Drag your thumbnail across this surface and you can feel the imperfection. These imperfections can lead to a gritty feel when squeezing the trigger. Excessive engagement also gives a long, creepy trigger pull.
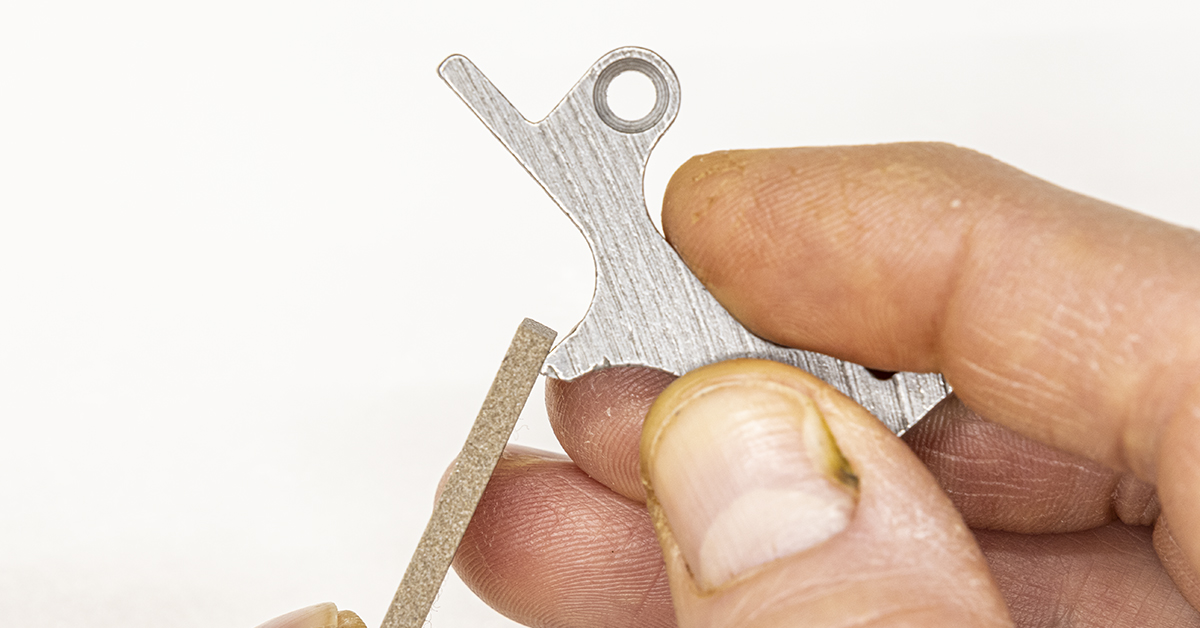
Can these imperfections be polished out with a stone?
A word of caution here, as this may not be as simple as it appears. When polishing, you must maintain the proper engagement angle across the surface of the sear. This can be rather difficult to do by hand. If you unintentionally change this angle too far in one direction, you may end up with a trigger and sear that wants to naturally separate or disengage from one another, resulting in a trigger that is not safe. If the angle were to be changed in the opposite direction, you’ll have a trigger that wants to stay engaged, resulting in a heavier trigger pull than what you had started with.
Considering the risk and effort involved, along with the fact that the trigger is still absent of over-travel and sear engagement adjustability, it makes modifying this trigger an exercise in futility, in my opinion. Perhaps this is why Winchester has moved on to the M.O.A. trigger system, which is found in their current production Model 70s.
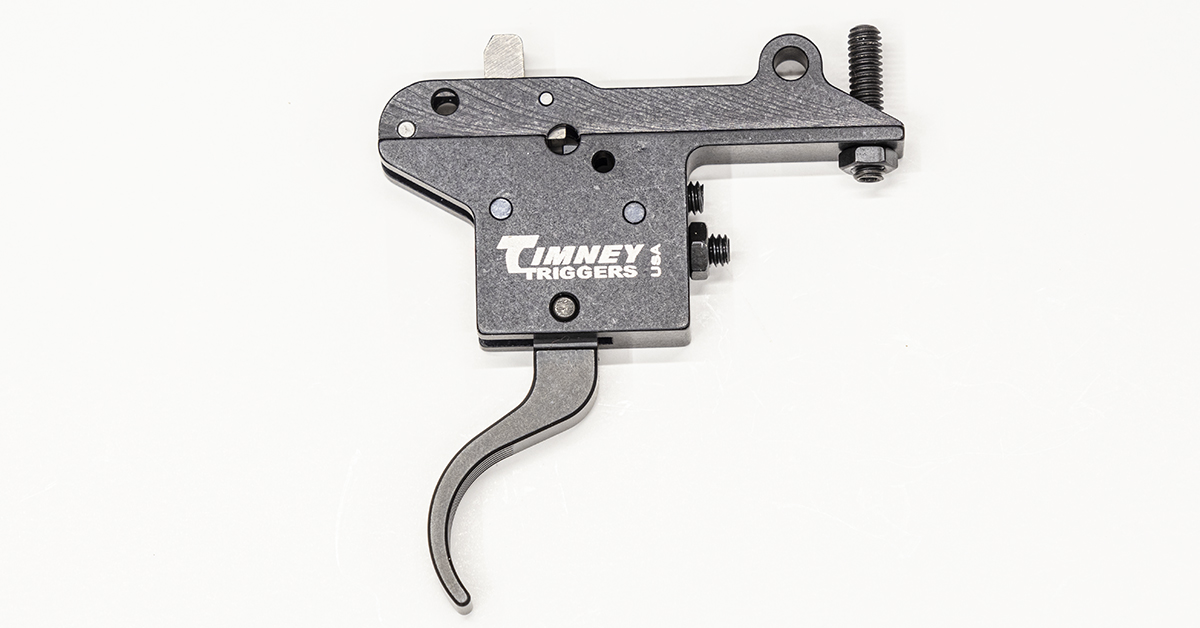
If you desire better performance from the trigger in your Model 70, and I suggest that’s exactly what’s needed — one that has been designed from its very inception to deliver a lighter pull and cleaner break while maintaining safe operation, the Timney Winchester 70 Model 401 does just that. This trigger is fully adjustable, the pull weight can be adjusted safely within a range of 1.5-4 pounds, and it is a direct replacement for Model 70s using the “pre-64” style trigger.
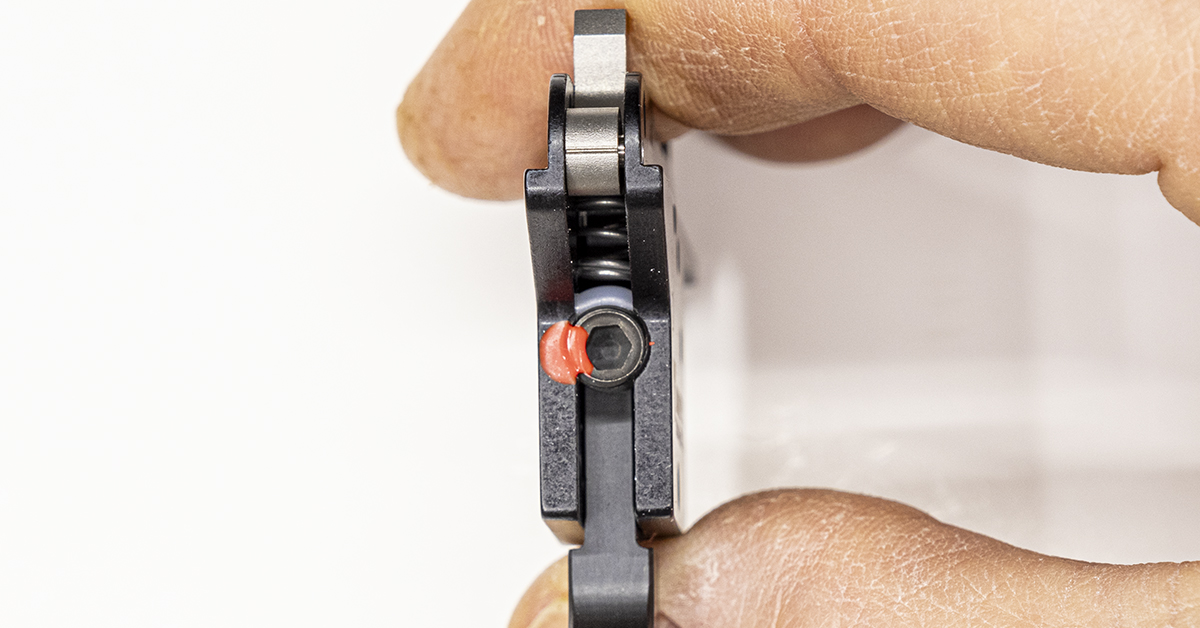
The adjustment screw on the rear of the trigger housing provides a means to adjust the sear engagement. This screw is sealed and is not intended to be adjusted by the consumer.
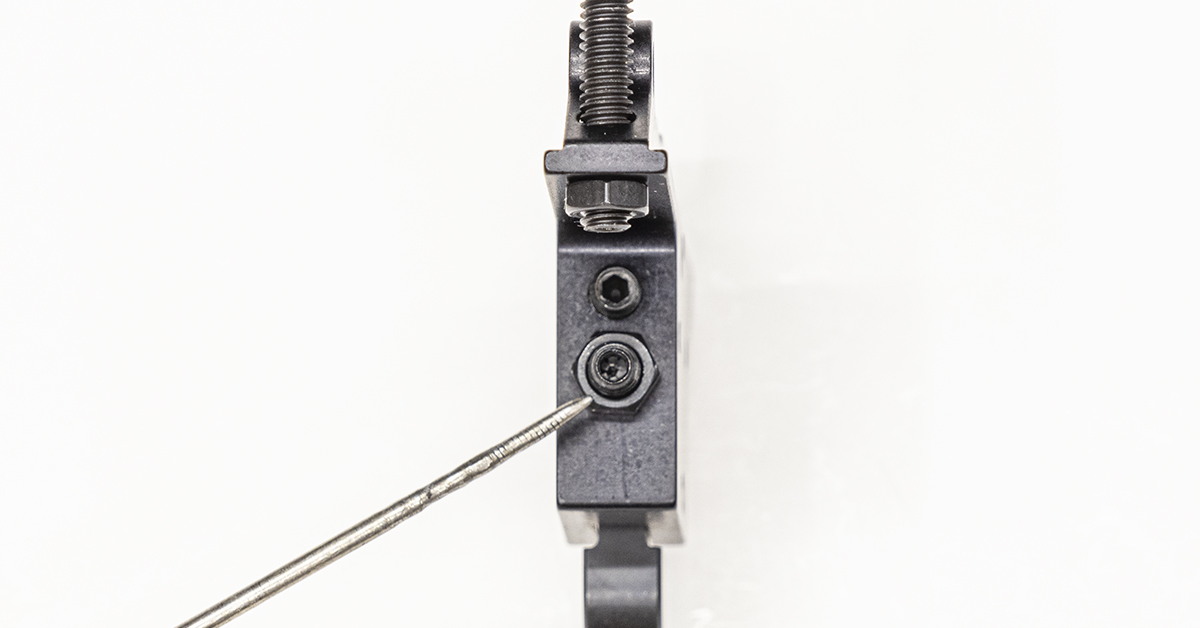
There are two adjustment screws located on the front of the trigger housing. The bottom screw is used to adjust the pull weight, and the top screw is for over-travel adjustment.
Timney Trigger Install
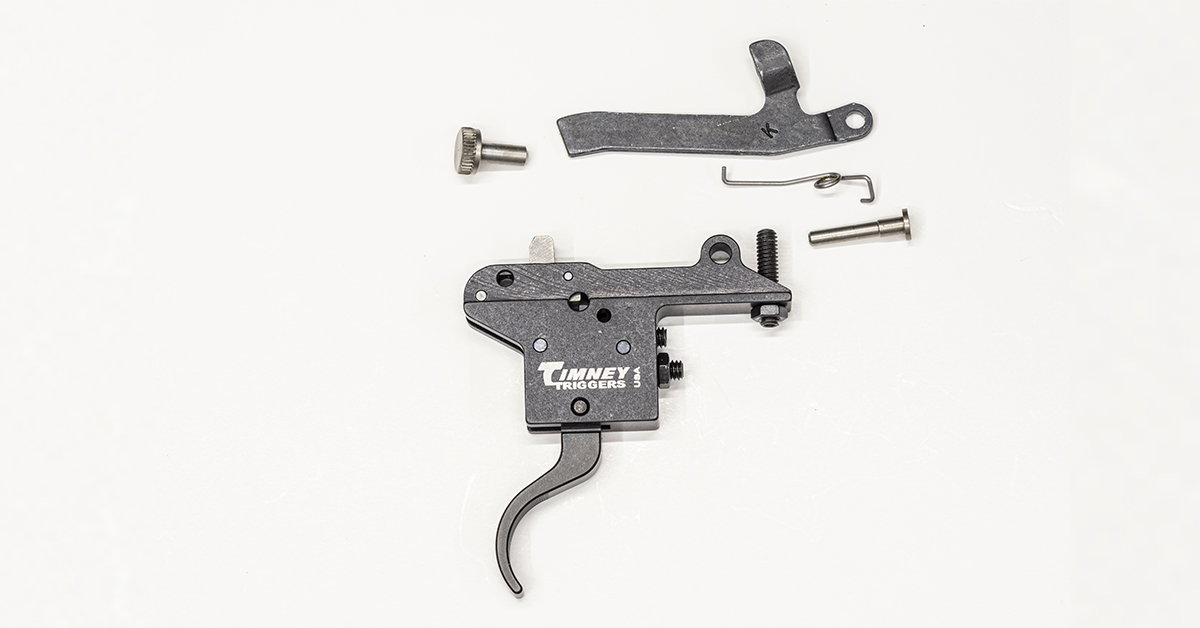
When making the switch to a Timney trigger, you will be installing the parts pictured above.
It’s probably not necessary, but I always begin by backing out the mounting screw, as I want to ensure that it does not interfere with the receiver during installation.
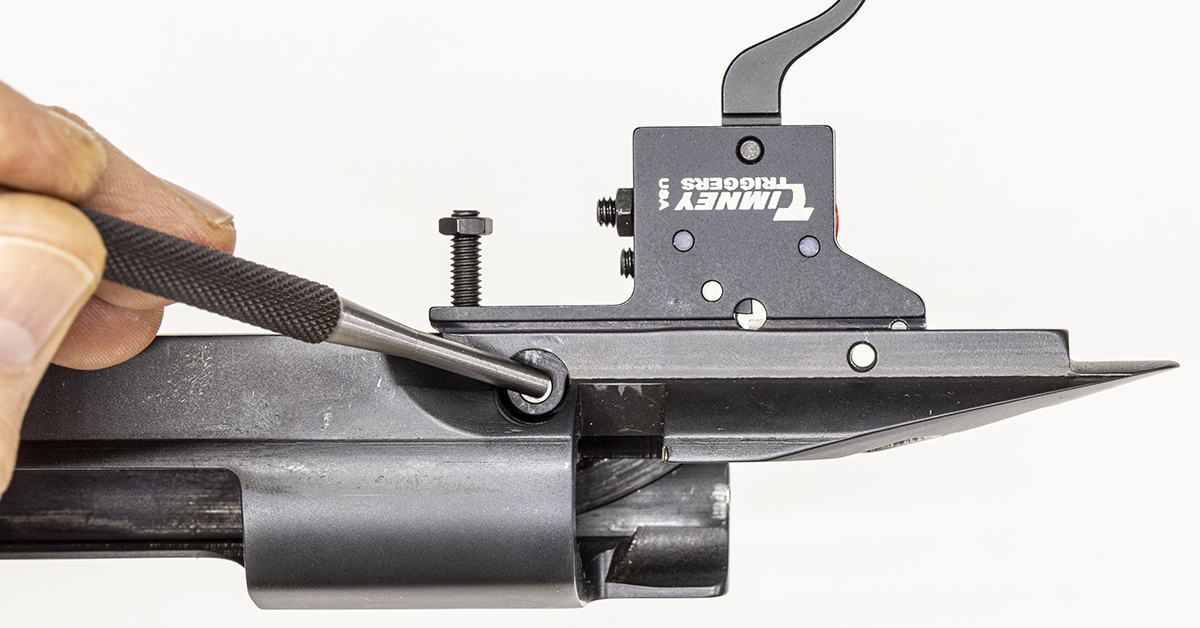
Slide the trigger into the receiver and use a punch to align the front receiver pin hole with the hole in the trigger housing. Install the front (sear) pin.
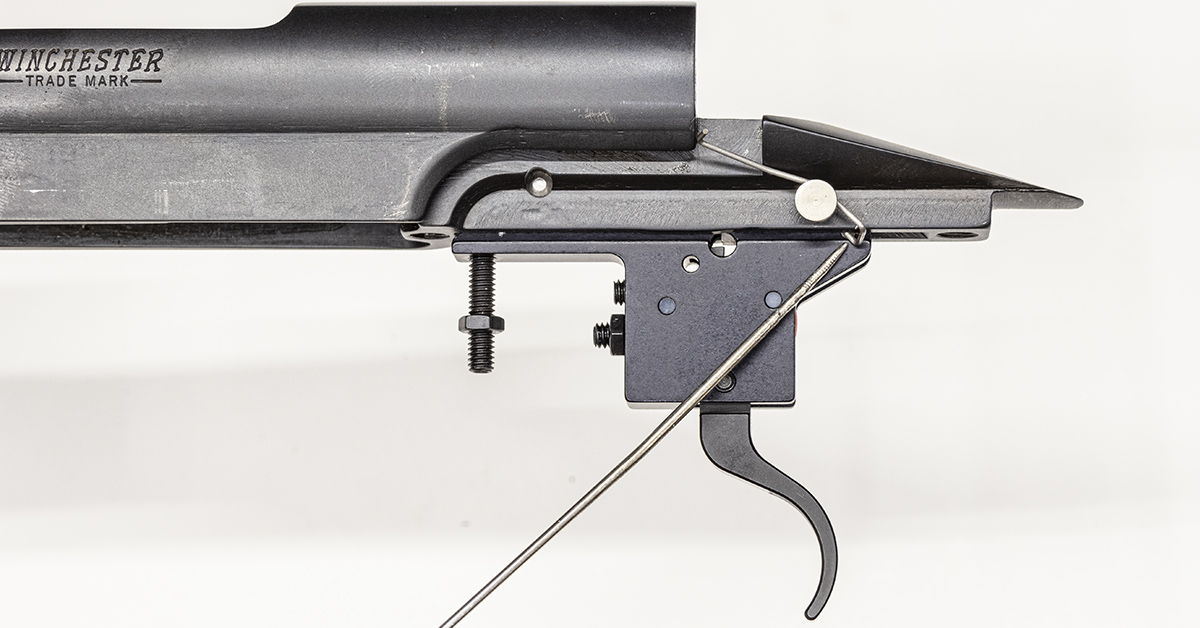
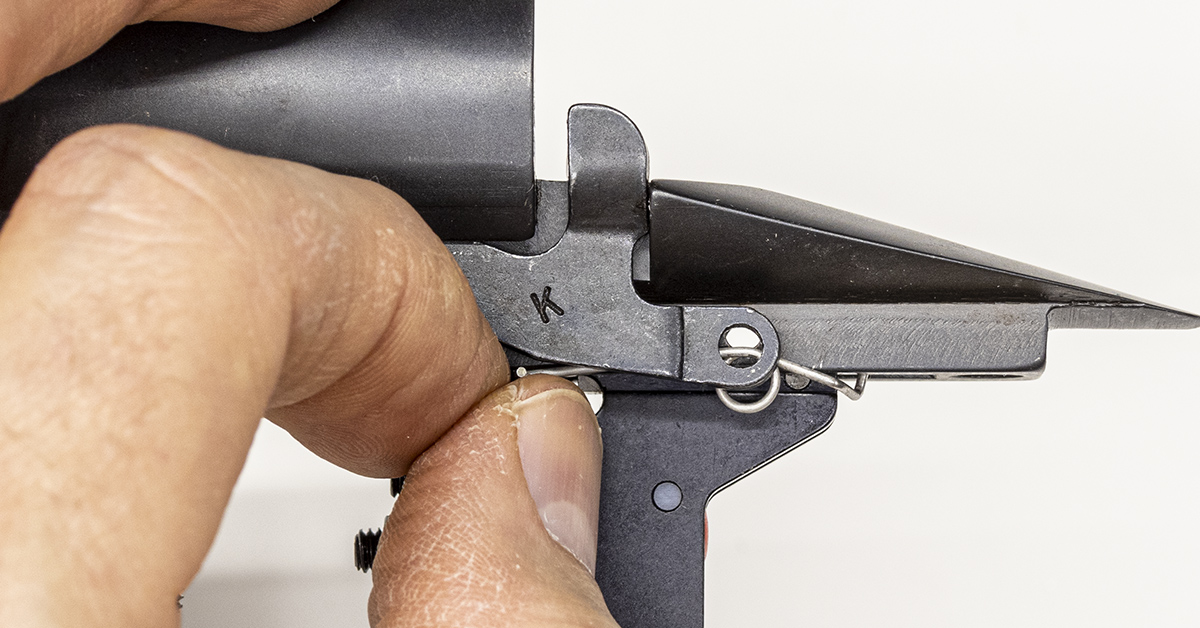
Trial-fit the bolt stop spring. The tail of the bolt stop spring should fit over the receiver and come to rest just behind the trigger housing.
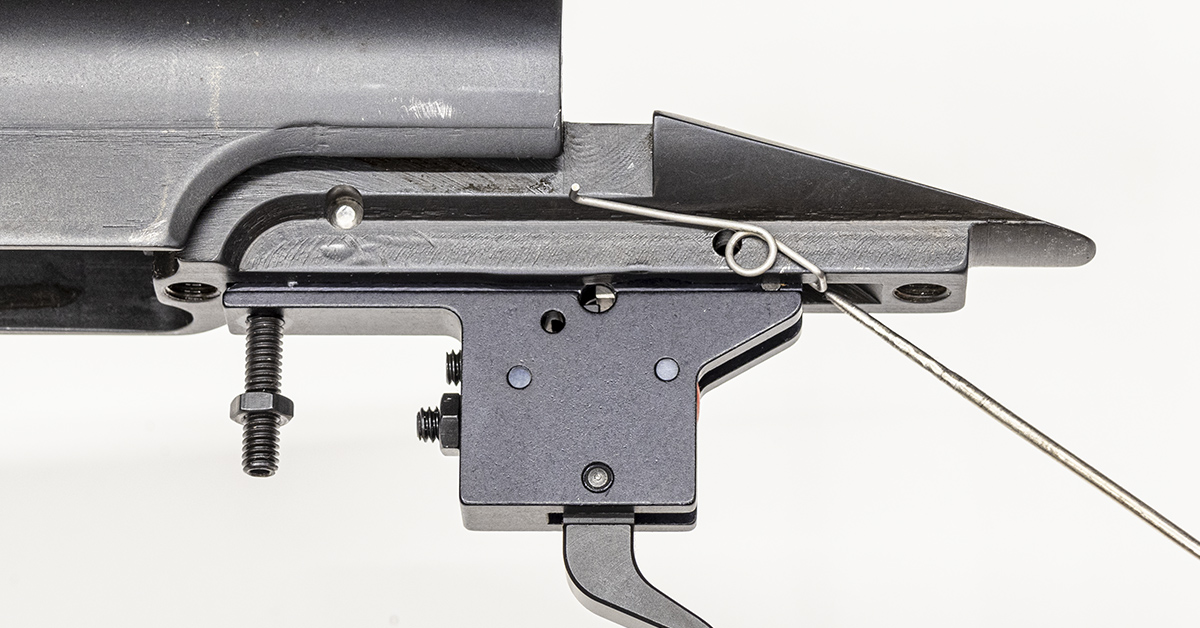
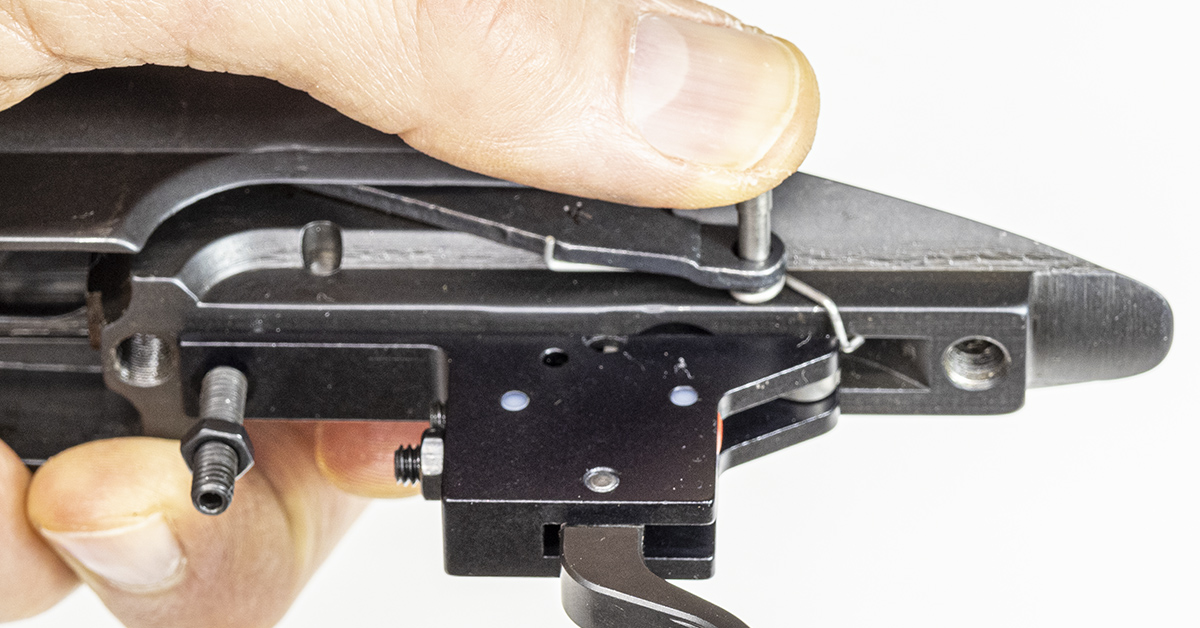
With the pin removed, I moved the spring rearward so that the tail of the spring would rest in its proper location on the receiver. Unfortunately, the hole in the spring will no longer align with the hole in the receiver. The spring must be modified.
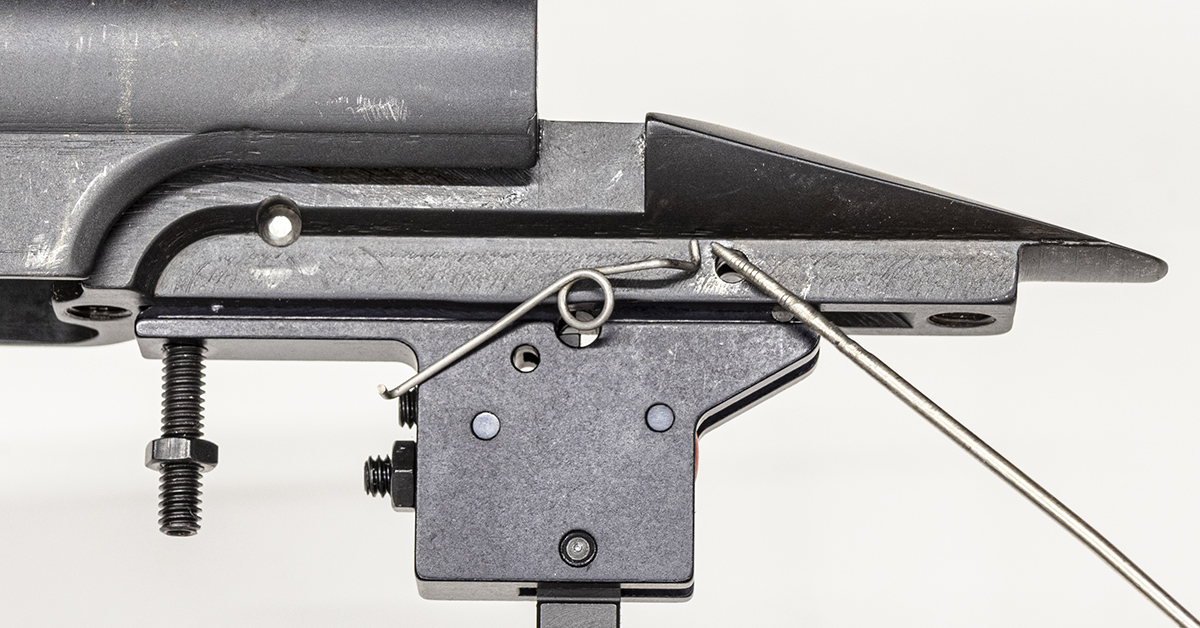
Holding the spring in a pair of pliers, I used another small pair of needle nose pliers and rotated the small tail end of the spring upward. In the picture, the tail end of the spring is now pointing at 12 o’clock. Prior to modification, it would have been pointing more towards 9 o’clock.

I found that after the first modification, the spring needed to be a little longer to gain proper alignment with the pin hole. Using a small pair of pliers, I slightly…very slightly…straightened out the first bend in the spring after the loop.
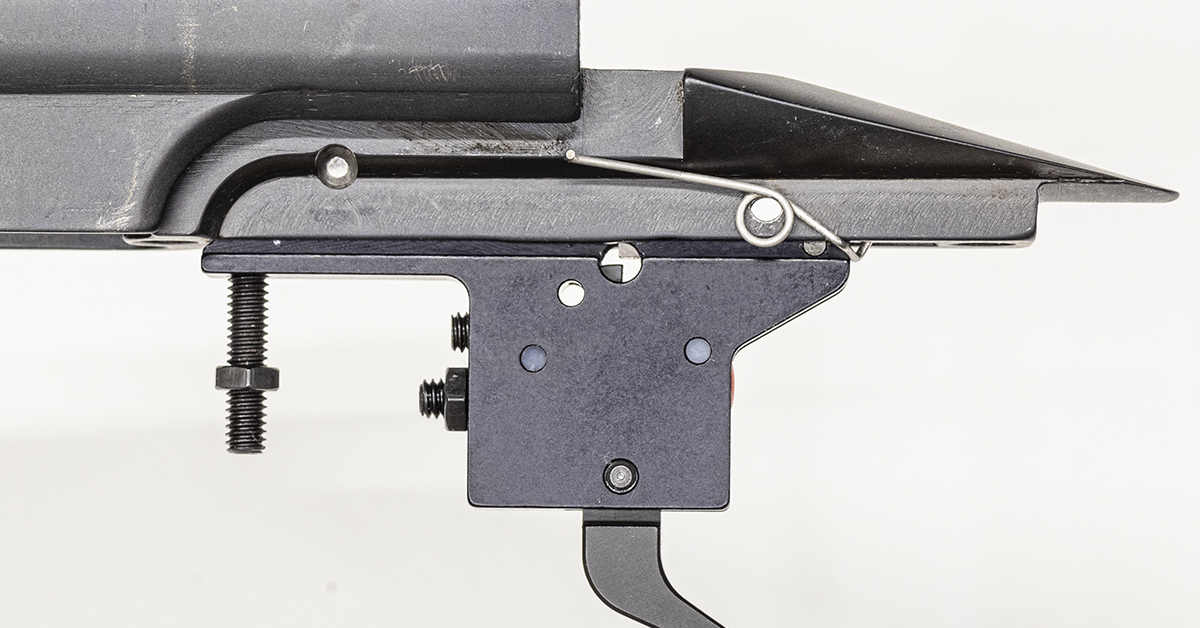
After a couple easy bends to the spring, it now rests properly on the receiver.
Install the bolt stop and bolt stop spring.
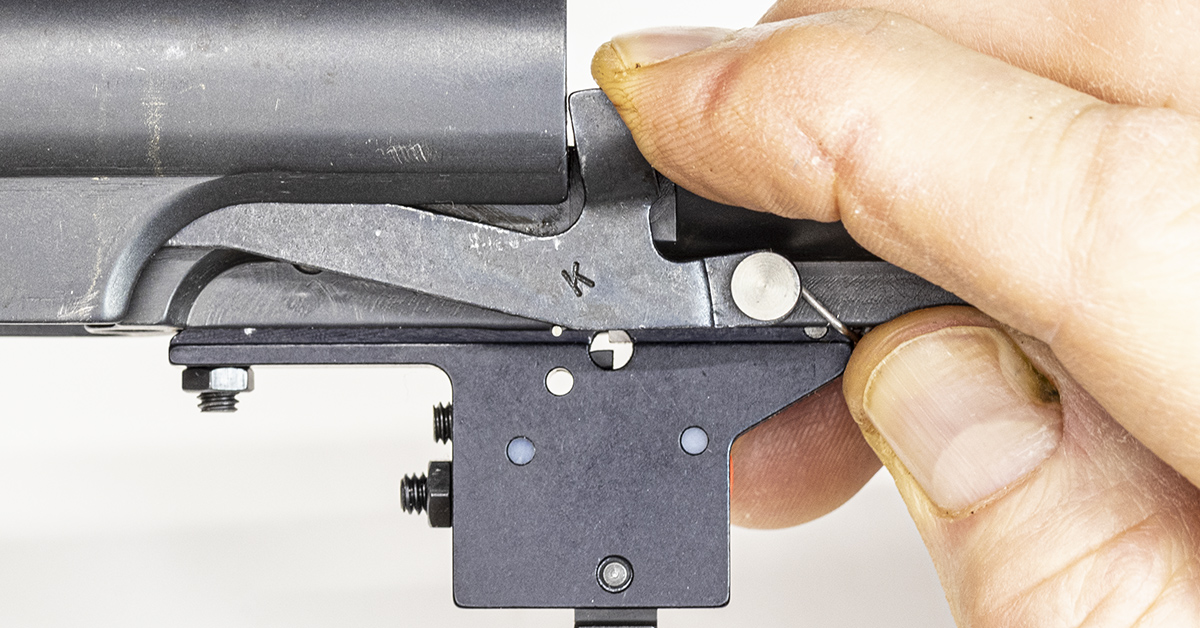
Install the trigger (rear) pin. With everything in proper alignment, the pin should install easily with finger pressure with maybe a light tap or two from a small hammer to get it fully seated. If you find the pin difficult to install, most likely something is out of alignment.
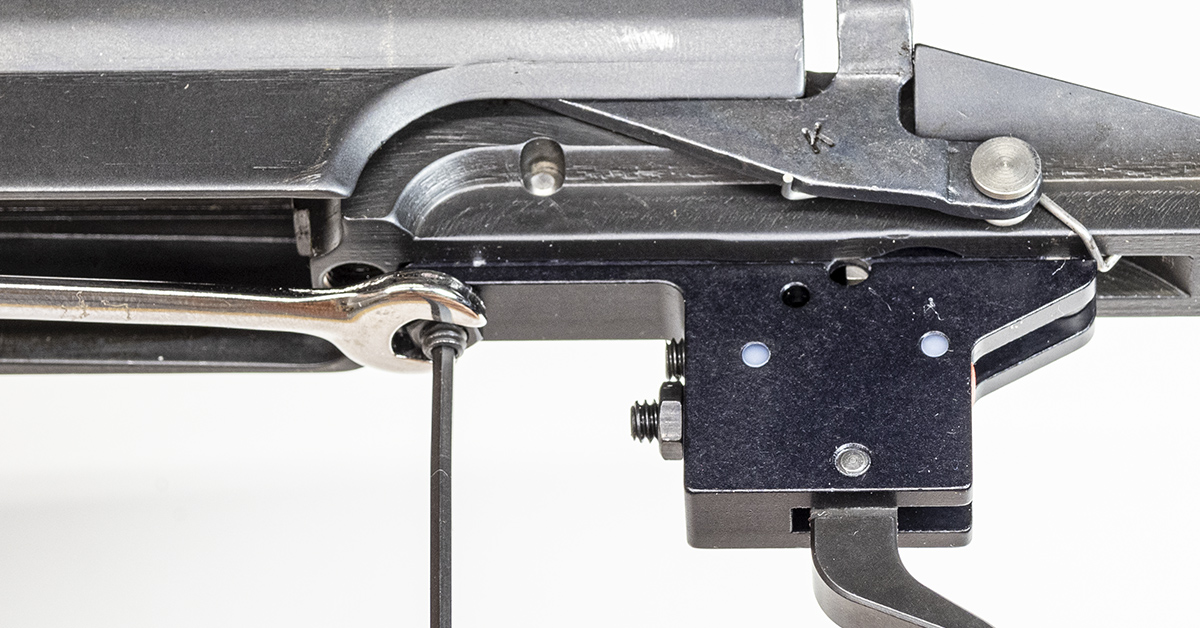
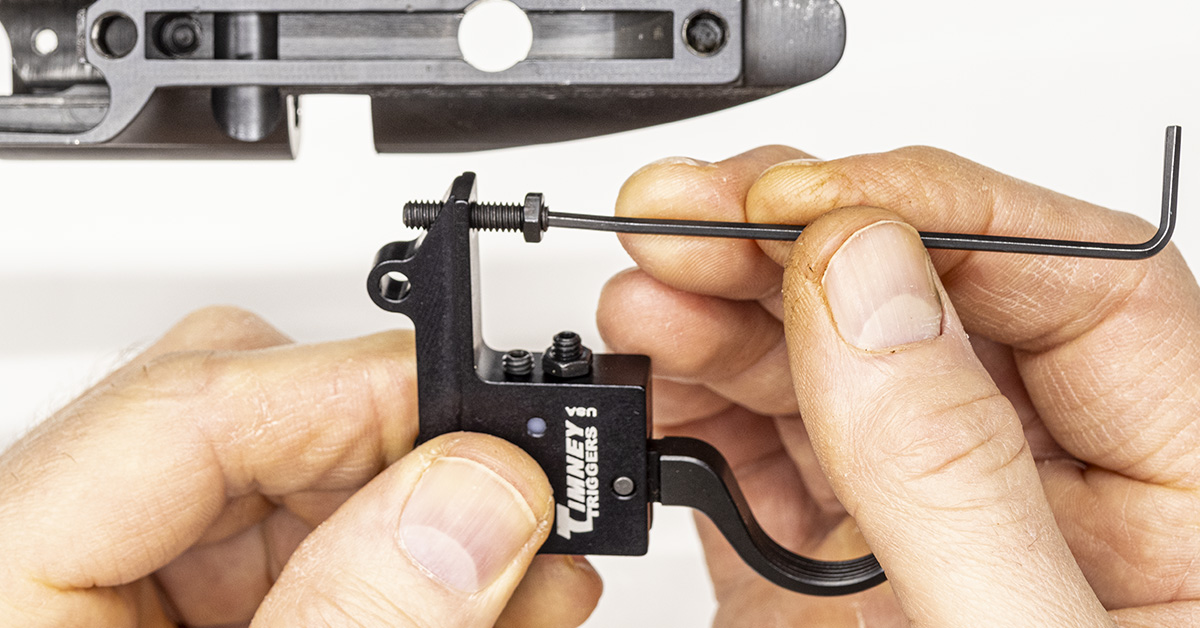
With a 5/64-in. Allen wrench, tighten the mounting screw. Use a ¼-inch wrench to tighten the nut, locking it in place.
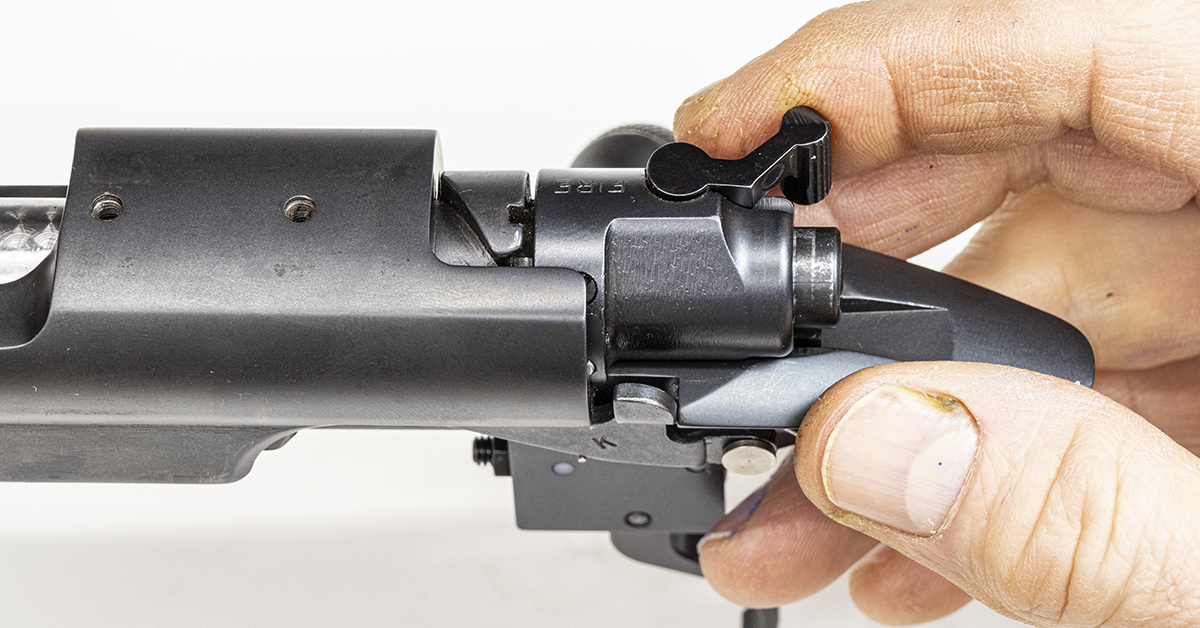
Check the function of the bolt release lever.
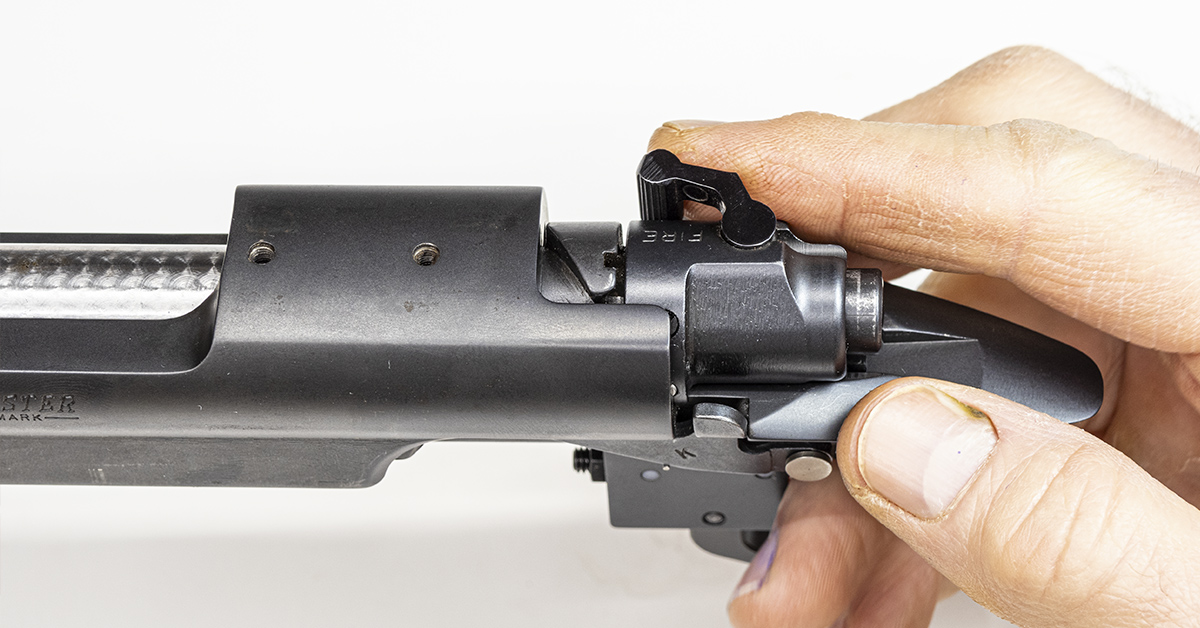
Install the bolt and rotate the bolt handle downward. The rifle is now cocked. Move the safety lever through all three of its positions. You may find that it takes excessive force to move the safety lever. This is why it is important to develop a feel for the safety lever’s proper operation prior to doing any trigger work on a Model 70. The safety on this rifle is somewhat more difficult to operate following the trigger swap. If you find that the safety on your rifle is operating just as it had before, you can continue with checking the safe function of the rifle and reassembly per Timney’s instructions. If your safety is difficult to operate, which isn’t uncommon, in my experience, you will need to make a slight adjustment to the cocking piece as follows.
Adjusting the Operation of the Safety
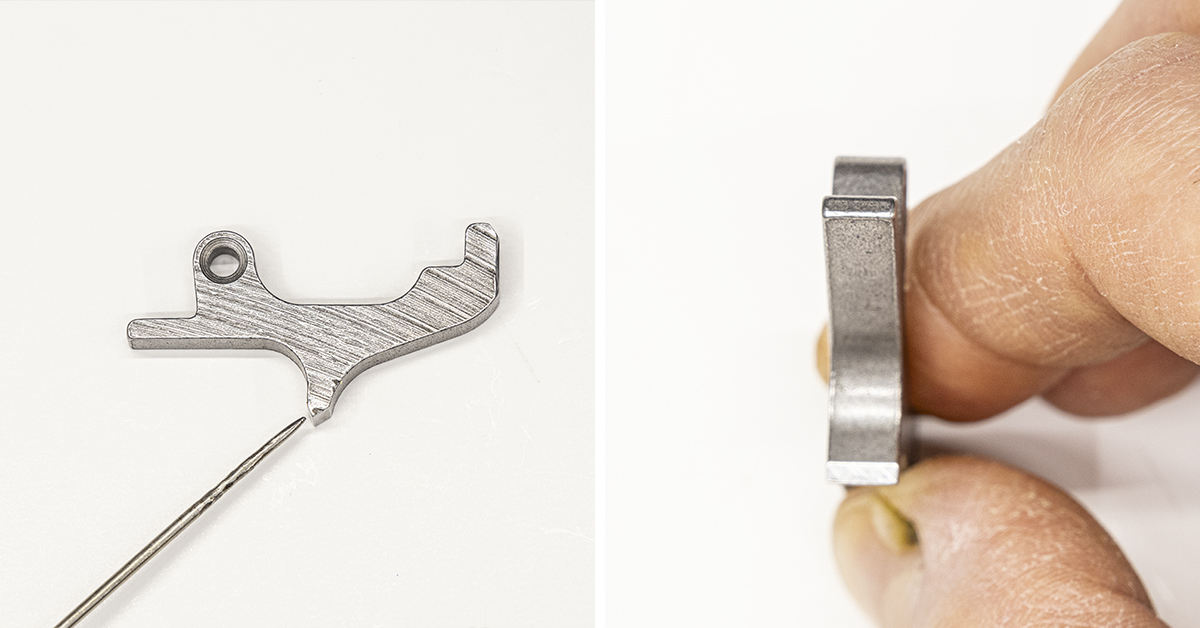
Why is the safety lever difficult to operate? Pictured above is the sear of the Timney trigger. If the new sear is not in the same location as the original sear, it will engage the cocking piece at a different location. This slight change in engagement location will affect how, or more precisely where, the safety lever makes its engagement with the cocking piece/firing pin assembly.
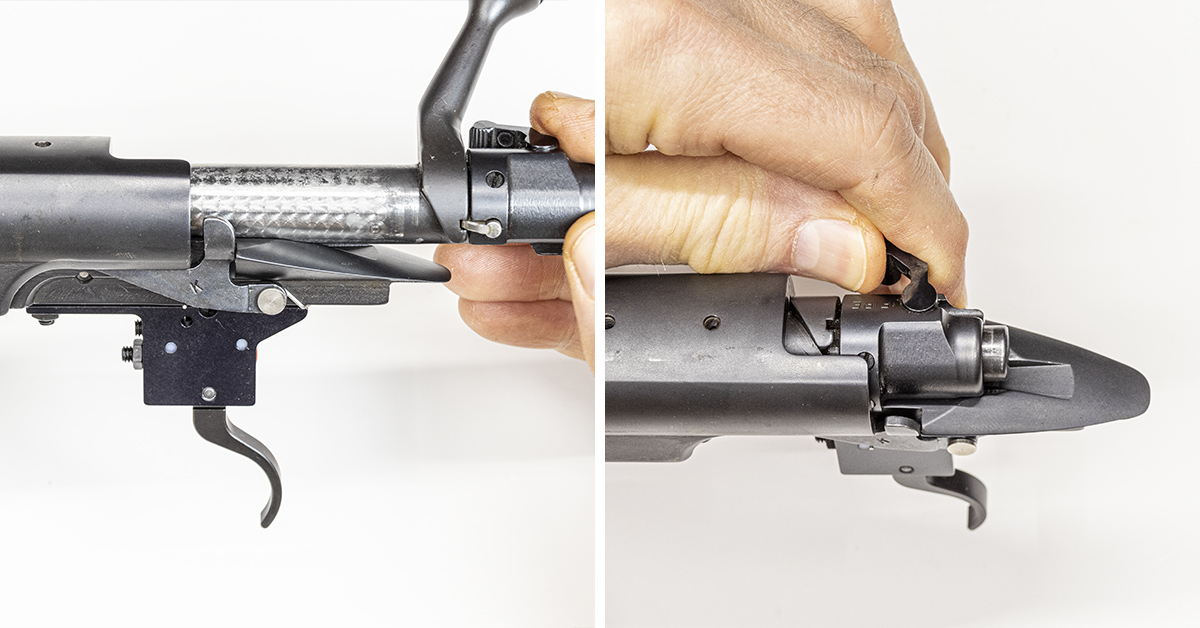
To make the necessary adjustment, the firing pin assembly must be disassembled. With the safety lever in the middle position, push in on the shroud lock and turn the bolt shroud counterclockwise, removing it from the bolt body.

Remove the firing pin assembly from the bolt body. The firing pin assembly of this bolt has been packed with grease, providing us a good example of over lubrication. This is detrimental to the performance of the firearm. Parts should be clean and lightly lubricated.

The firing pin spring is currently compressed, and it is a rather strong spring. It is advisable to wear safety glasses when working on your firearm — especially when disassembling the firing pin assembly. The firing pin spring is held in place by this small C-shaped clip.
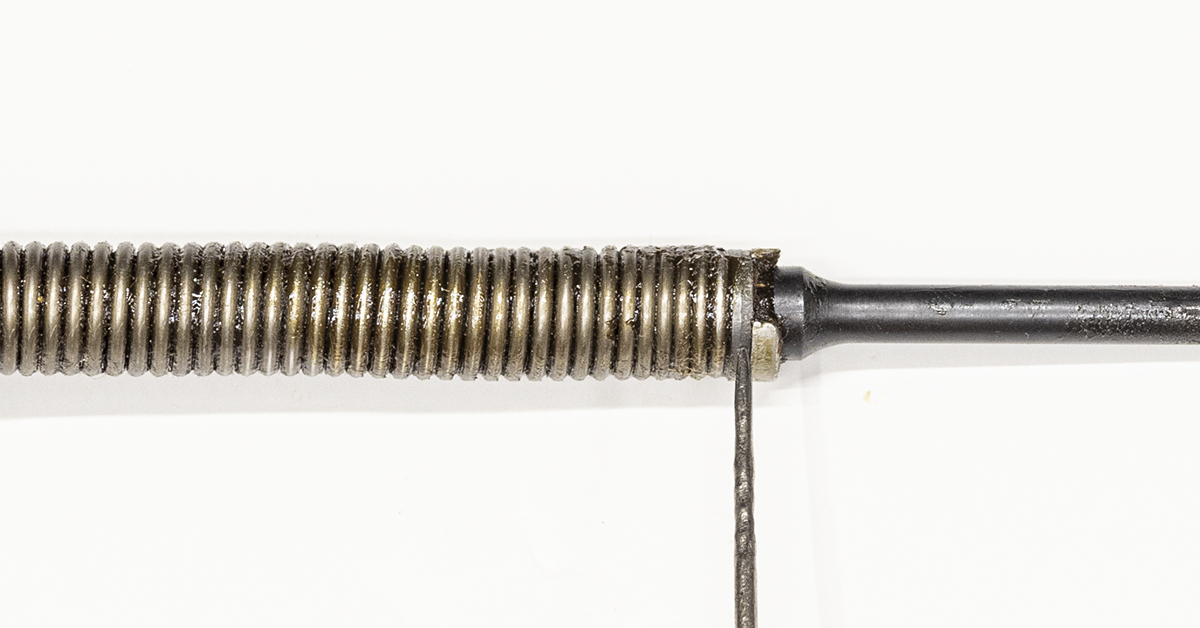
There is a small collar just behind the C-clip. Once the C-clip is removed, the collar can then be slid forward off the firing pin and the spring can then be removed from the firing pin.
To remove the clip, the firing pin spring must be fully compressed. Once the spring is compressed, the clip will easily slide off the firing pin. The difficulty is in compressing the spring and safely maintaining control of it while removing the clip.
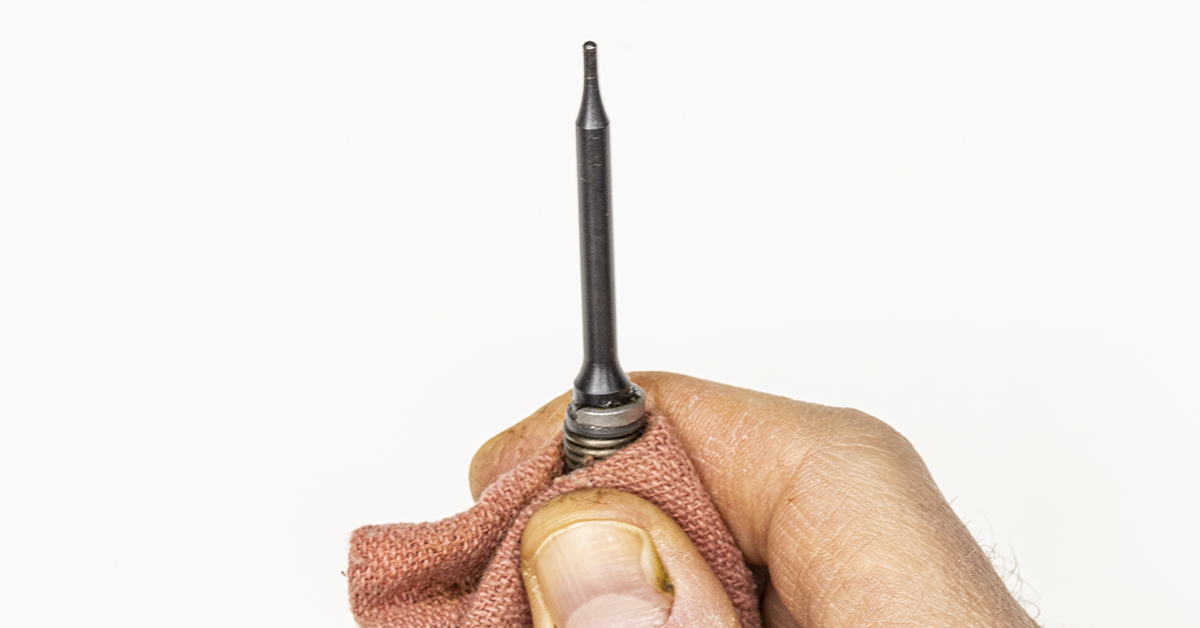
I have successfully done this in the past by simply bracing the firing pin assembly vertically (pin tip up) on the workbench, using a rag to protect my fingers. I pulled downward, compressing the spring with one hand while removing the clip with the other. Although I have used this method successfully several times, I advise against it. After a few close calls, I learned (almost the hard the way) that it is best to use the proper tool when compressing this spring. No matter how tempting it may be to think, “I’m only going to do it once,” my advice and strong recommendation is to use the proper tool for the job.
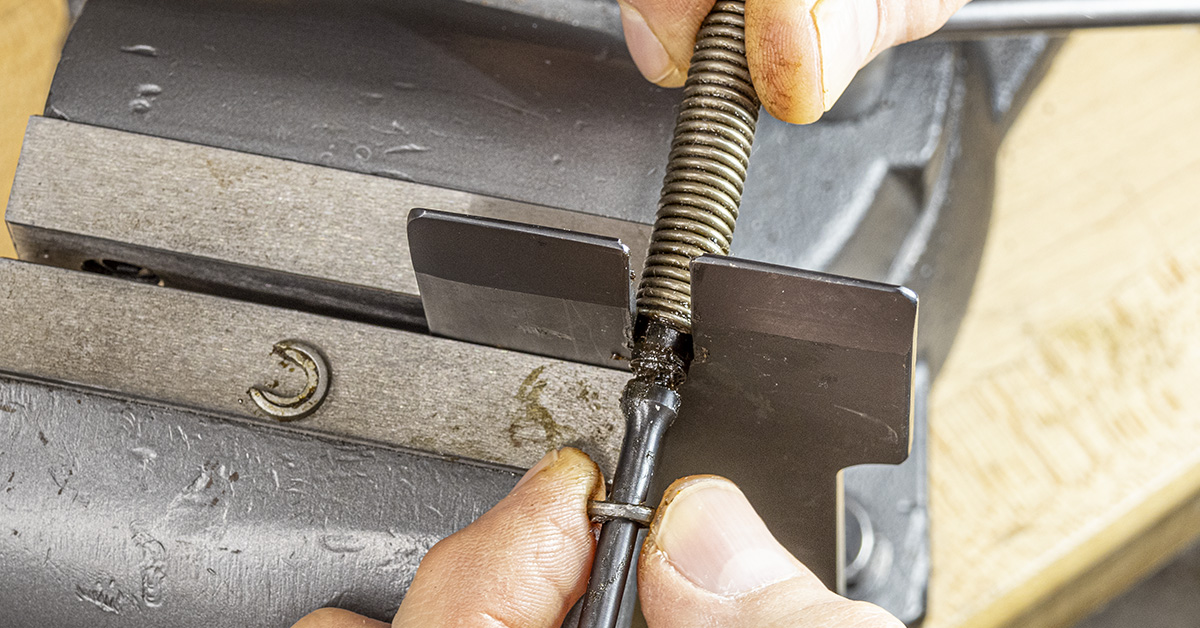
The proper tool makes this a simple and a much safer task. The spring compression tool is held in a bench vise. The firing pin assembly is then inserted into the tool so that the tool is between the collar and the firing pin spring. The firing pin assembly is then pushed forward, compressing the spring. With the spring tension now easily and safely controlled, it is a simple matter to remove the clip and collar.
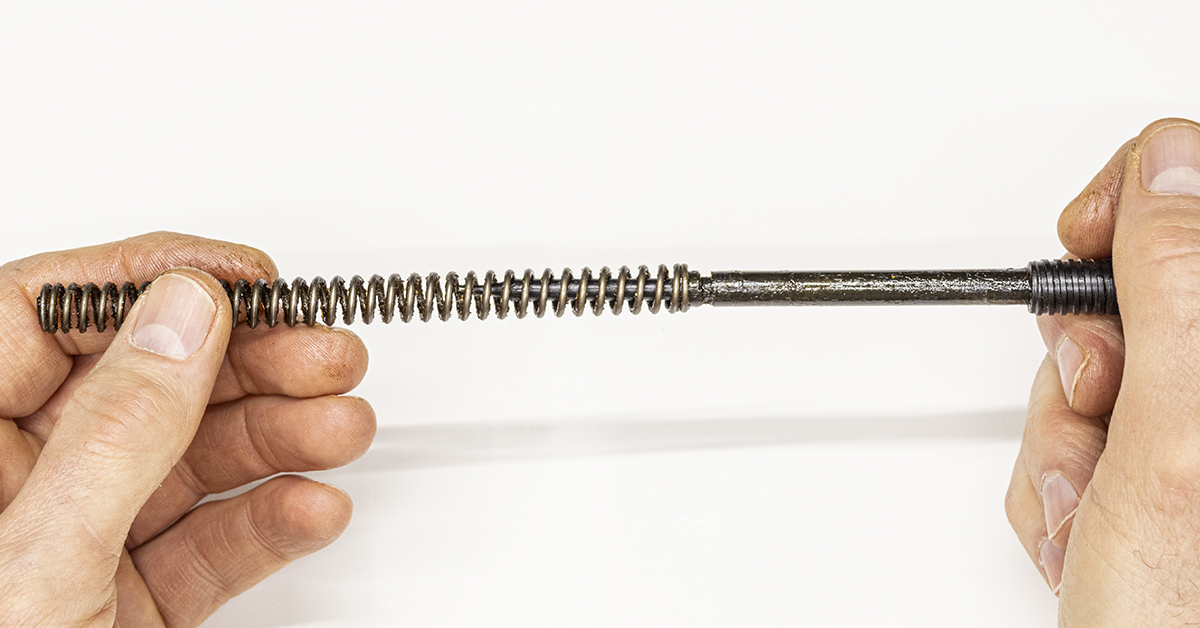
Once the clip and collar are removed, remove the firing pin spring from the firing pin.
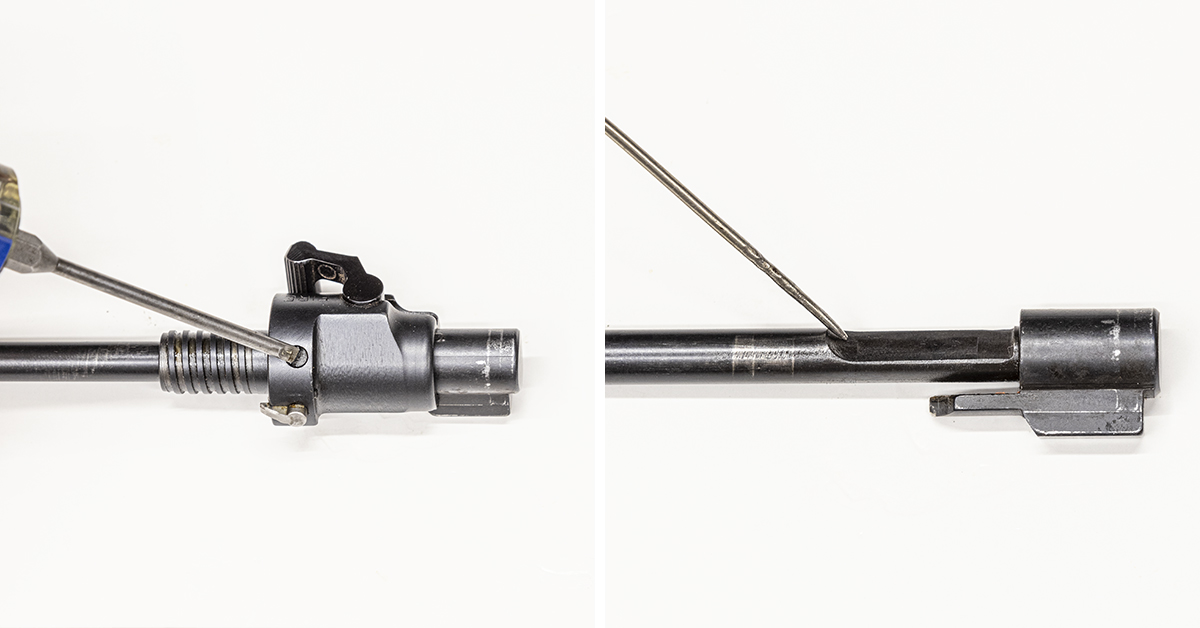
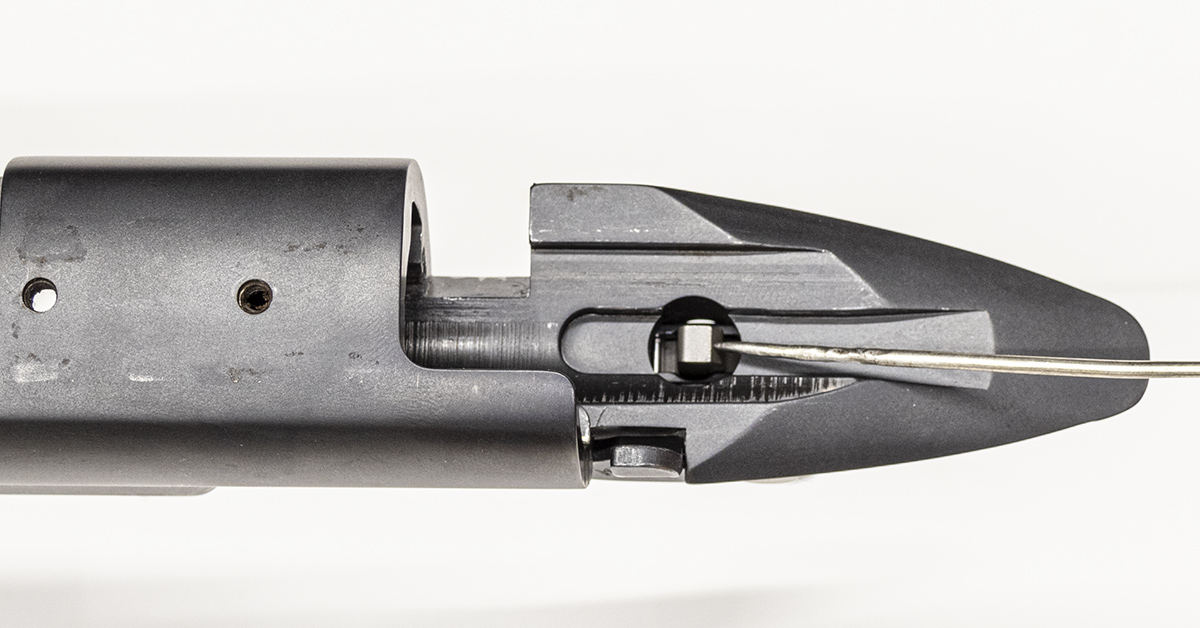
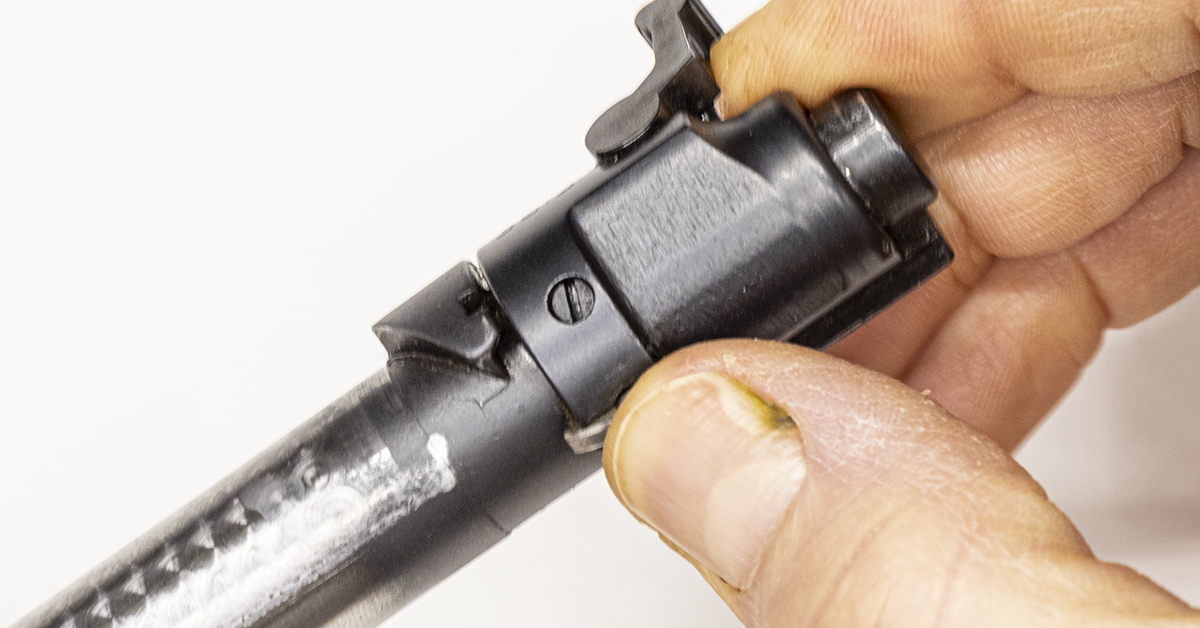
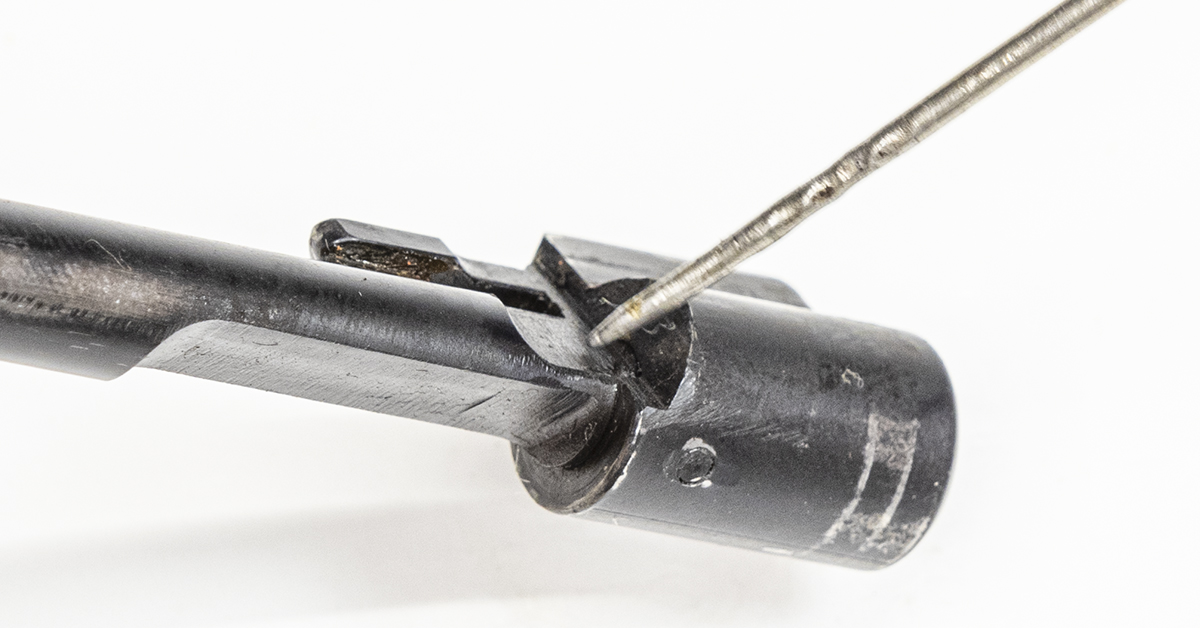
The small screw on the bolt shroud engages a recess machined into the firing pin. Loosen this screw so that it will disengage with its recess in the firing pin.
Slide the bolt shroud forward and off the firing pin.
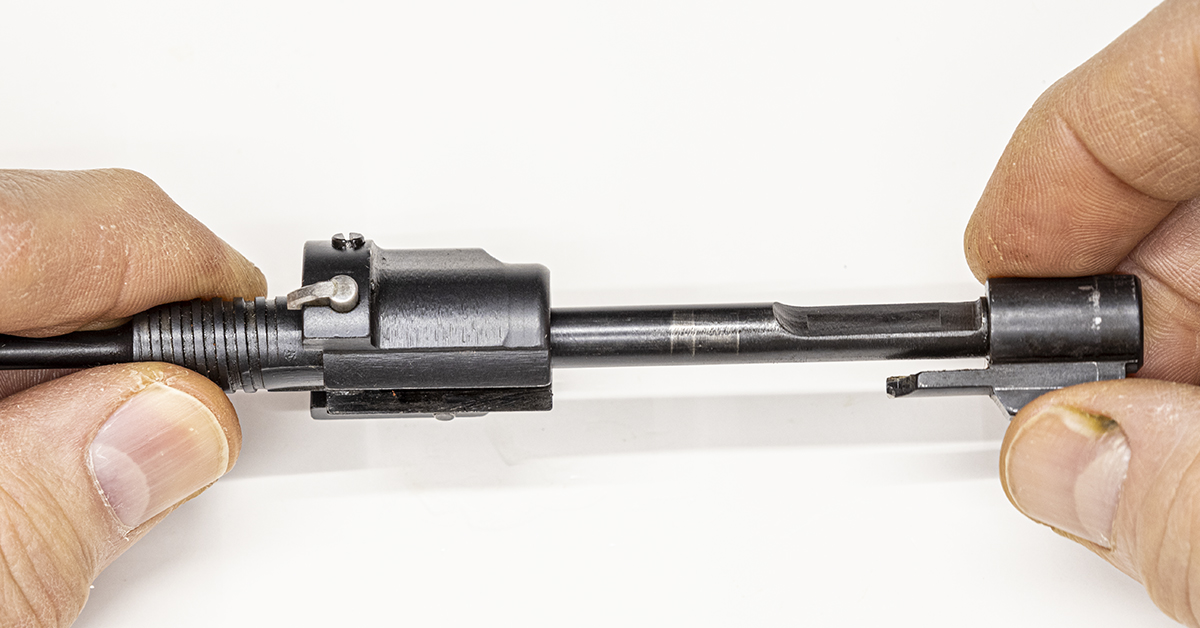
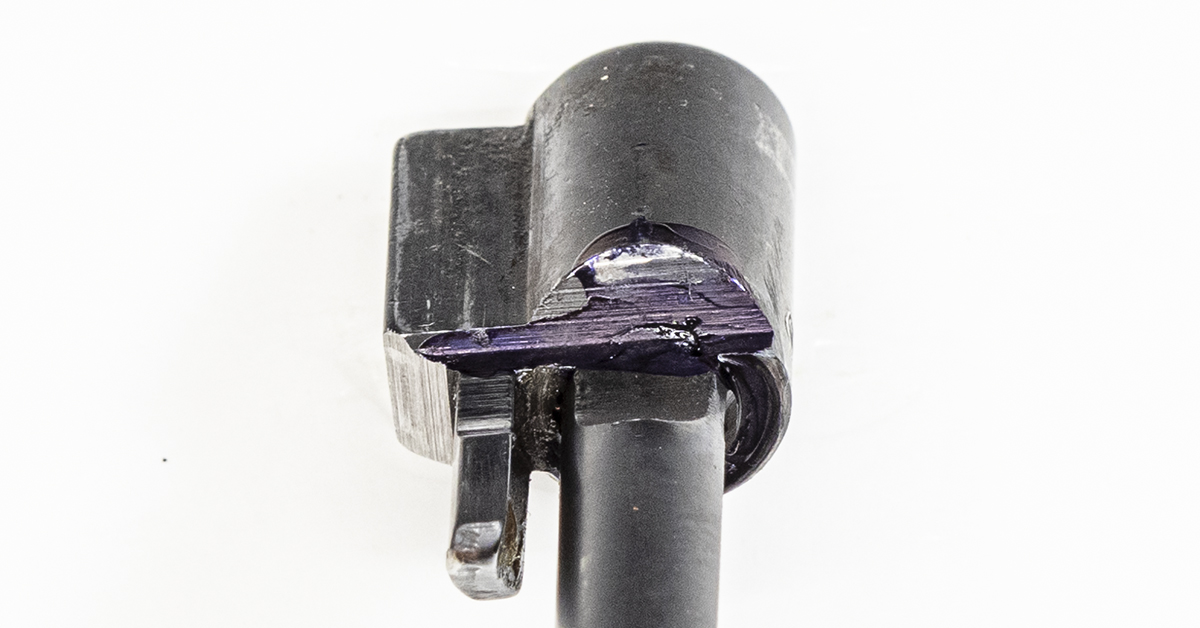
The machined recess on the side of the firing pin is where the safety engages the firing pin. The rear portion of this radius, which includes part of the cocking piece, is now slightly interfering with the operation of the safety lever. All that is required to remedy this problem is a little adjustment with a file.
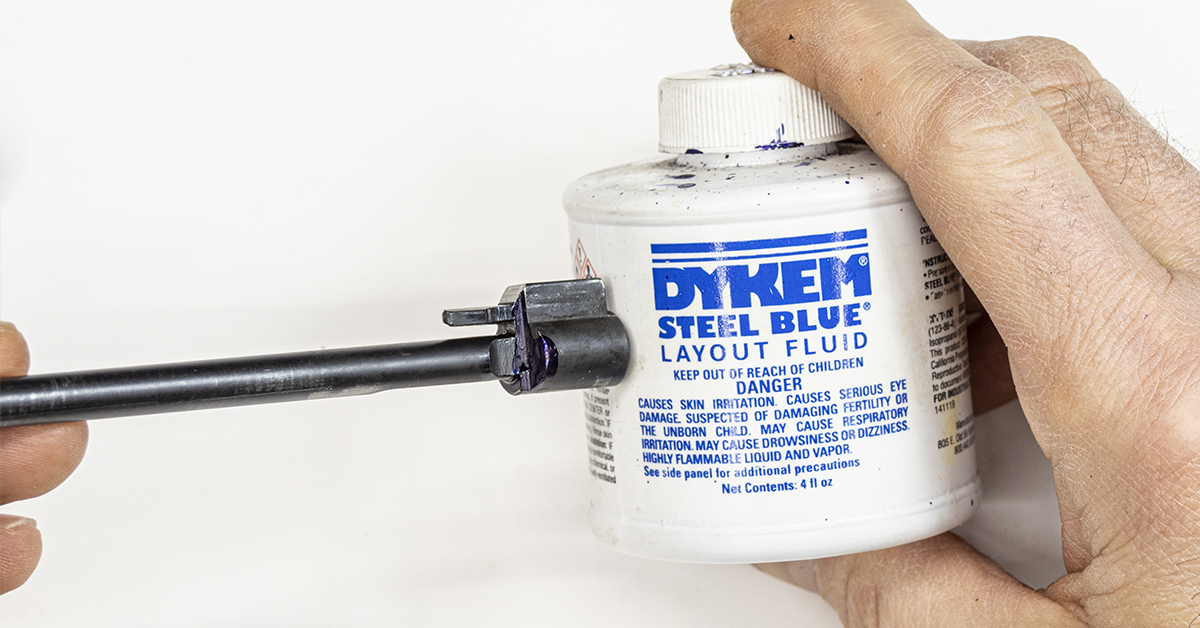
I use Dykem steel blue to lightly coat the forward portion of that radius. Colored finger polish would also work. The key is to use a light coat.
Once the Dykem is dry, the bolt is reassembled and inserted into the receiver. Operate the safety lever several times.
Disassemble the bolt and look for evidence of the safety lever marking the Dykem. This is where the safety lever contacts the cocking piece/firing pin assembly.
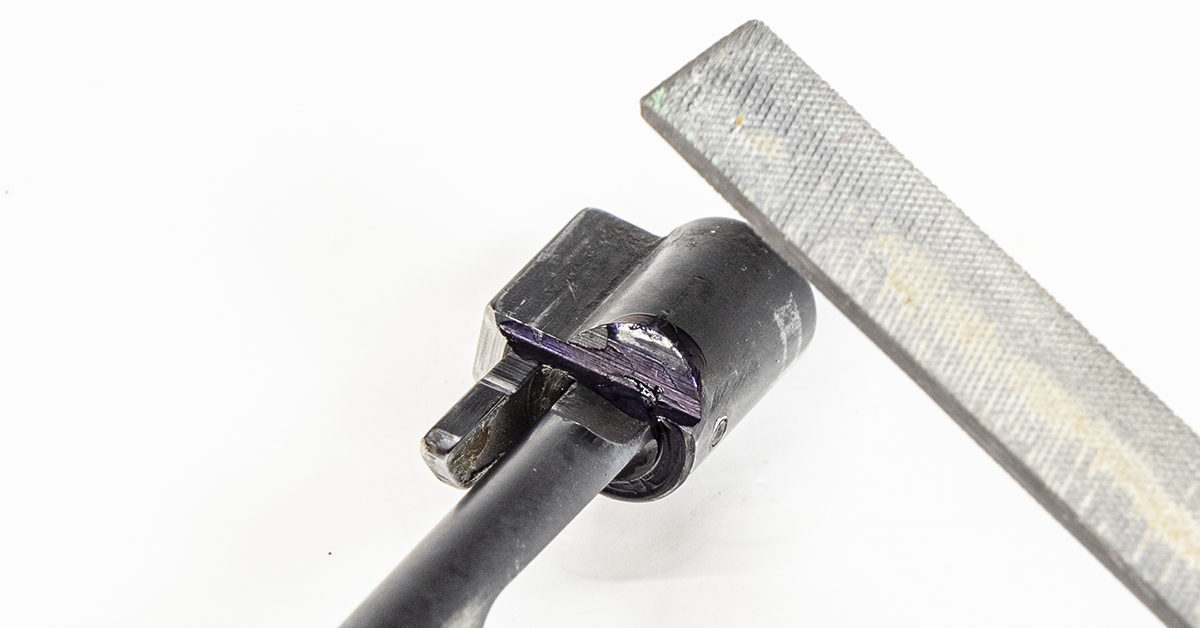
Use a small file and remove a little material from this contact point. It is important to work slowly and carefully here so that you maintain the original shape as you work. Just a few passes of the file may be all that is required. If too much material is removed, you’ll need to replace the cocking piece. Once filing is complete, apply another light coat of Dykem blue.
Reassemble the bolt and insert it into the receiver. Check the operation of the safety. If the safety is still difficult to operate, you will simply repeat this procedure until it functions properly. Patience is the ESSENTIAL ingredient here. You simply don’t know how much material must be removed to gain proper function, nor do you know how much material is removed with each pass of the file. When the safety is functioning properly, disassemble the bolt. The Dykem blue is easily removed with denatured alcohol. Ensure that all traces of metal particles from the filing operation have been removed, and then lubricate each component and reassemble the bolt.
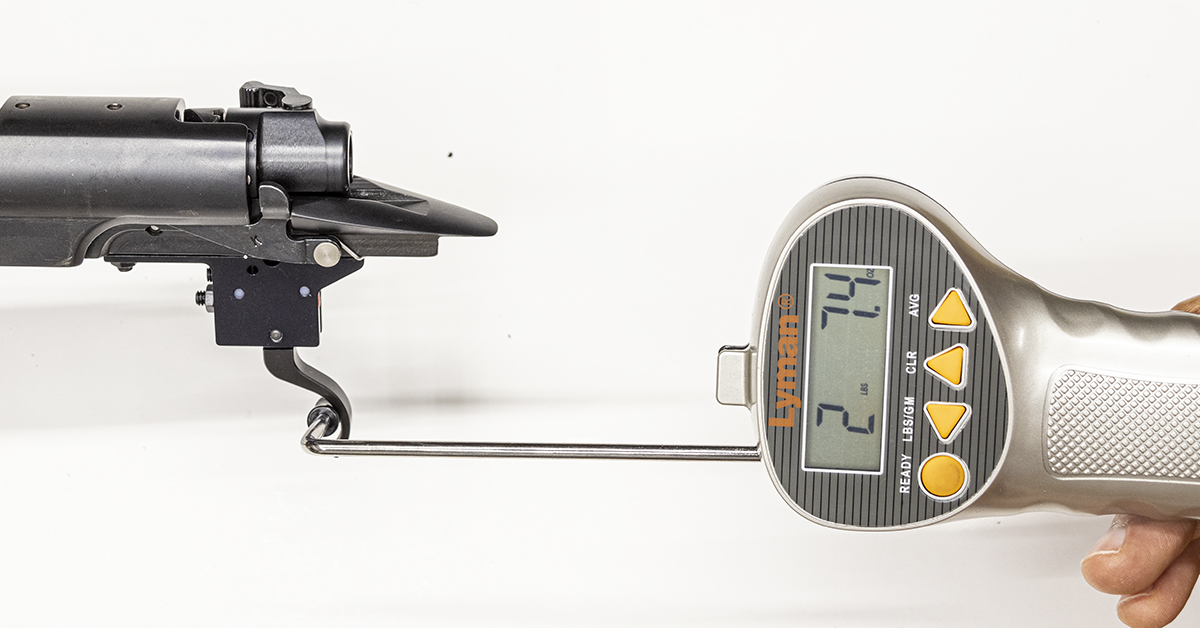
The trigger arrived from Timney with a creep-free 2.5-lb. pull with no perceptible overtravel. With 2.5 pounds being my preference for a hunting rifle, I found no need for further adjustment. This trigger was good-to-go right out of the box.
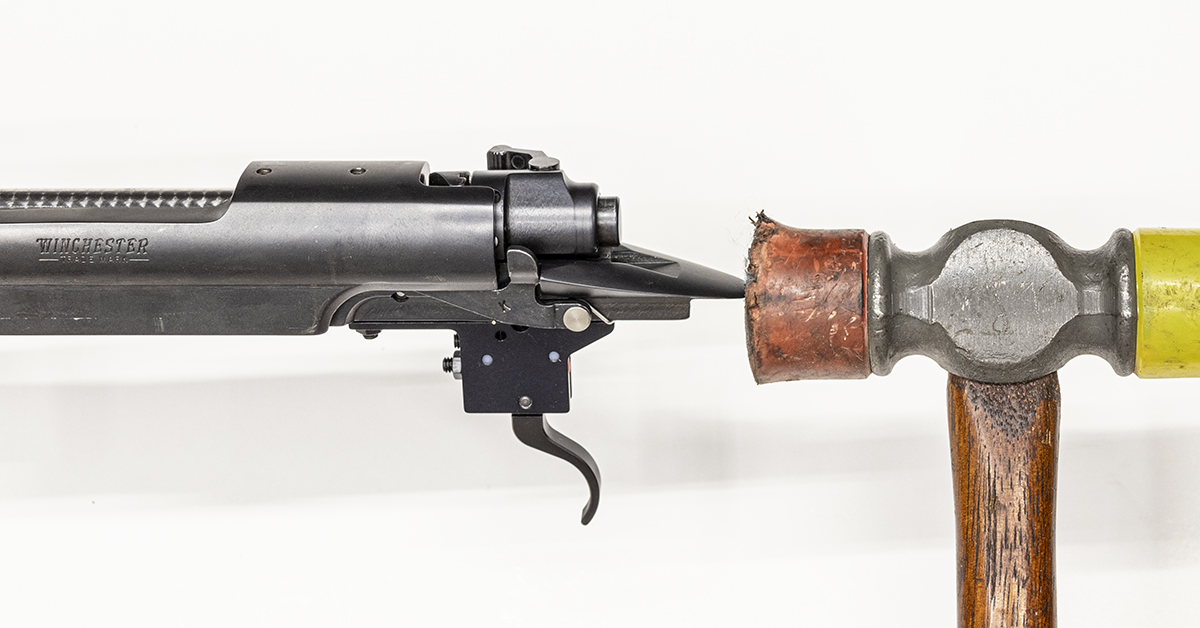
As a final safety precaution, secure the barrel in a padded bench vise with the action cocked and the safety in the fire position. Strike the rear of the receiver with a rubber mallet. Use a moderate blow. You’re not trying to hit it as hard as possible. It is also important for this strike to be straight and in line with the receiver. Striking the receiver in this fashion should not cause the firing pin to release and go forward. If the firing pin were to be released, this could be an indication of insufficient sear engagement. Rather than trying to adjust the sear engagement screw (since it is sealed from the factory), it is best to contact Timney.
Upgrading the trigger performance for your Model 70 couldn’t be easier. Whether your rifle has the “pre-64” style trigger or the newer M.O.A. trigger, Timney has it covered with high-quality, easy-to-replace triggers that far exceed the performance and adjustability of the original factory triggers.
As a bonus, you’ll get a free Tootsie Pop!