With its lighter pull, faster operation, and ease of installation, upgrading your Ruger RXM with Timney’s Alpha Competition Replacement Trigger is a no-brainer
by Rob Reaser
It’s tough for manufacturers to make much of a splash when introducing a new model into the saturated 9mm polymer striker-fired category. It’s even harder to do so when said new gun is a near clone of a firearm that birthed the breed 40 years prior. Nevertheless, Ruger has done a credible job of putting legs under its new RXM semi-auto, which the company introduced in late 2024. A collaboration between the storied gun manufacturer and the polymer accessory whizzes at Magpul Industries, the Ruger RXM is the hottest 9mm to hit the market this year, and its approachable sub-$500 price makes it all the more appealing.
Another manufacturer that stays ahead of the curve is Timney Triggers. When enough of the company’s customers raise their hands to request a better trigger system for whatever platform they fancy, Timney’s engineering aces jump to it.

Several years ago, Timney came out with their Alpha Competition performance trigger for the Glock. Being that the Ruger RXM is only a pebble flick away from the Glock in terms of mechanical design, it made sense for Timney to cook up a version of the company’s Alpha Competition trigger for the RXM, or Alpha RXM for short.
What’s the Diff?
The natural question to ask is, “What makes the Alpha RXM better than the factory Ruger trigger?”
For starters, Timney makes it. That may sound like a flippant answer, but not to anyone who has upgraded their factory triggers with Timney units. Determined engineering, exhaustive testing, plus advanced materials and innovative manufacturing techniques form the foundation for Timney’s renowned trigger performance. And it shows — at least in all the Timney triggers we’ve used over the years. We’ve come to expect better sear performance, improvement in overall feel and function, as well as reliability. These are critical elements when the goal is to dial out shooter-induced shot disturbance. That, really, is what a premium trigger is all about.
It is often difficult to quantify trigger performance. We often explain that a trigger has a crisp sear break, a short reset, promotes a controlled, straightline pull, or other desirable characteristics. Well, we wanted to try and validate all this as objectively as possible so you could see exactly how the Alpha RXM trigger gives the shooter an edge over the stock trigger.
By the Numbers
To start, let’s look at the pull weights of both trigger systems. This includes the first-stage take-up pull weight and the second-stage pull weight that breaks the sear engagement.

I began this test by establishing the pull weight of the RXM’s factory trigger. Ten pulls with a Lyman digital scale revealed an average of 4 lbs., 11.1 oz. This was the weight straight out of the box with the gun having never been fired.
After installing Timney’s Alpha RMX trigger, the same test revealed a pull weight of 2 lbs., 15.5 oz. Timney touts a 3 lb. pull weight, so these results were right on the mark.
I also wanted to try and test the initial, first-stage pull weight — the travel effort of the at-rest trigger until it hits “the wall.” I say try because this is a difficult test to perform with any accuracy, so take it for what it’s worth. Again, going on a 10-pull average, the factory trigger exhibited a take-up weight of around 2 lbs., 2.6 oz. The Alpha RXM trigger came in at around 15.7 oz.
Summing it up, the Alpha RXM pull weight is notably lighter across the full length of trigger travel than the factory trigger, yet there is still ample resistance, keeping it suitable for high-adrenaline defensive work.

Another measure of difference between the two triggers that has an influence on performance is the travel distance between trigger events. Here, I measured the take-up travel (at-rest trigger position to the wall) and the reset travel (trigger pulled fully rearward to the reset). The results…
RXM Stock Trigger
- First stage travel: 0.150 in.
- Reset travel: 0.250 in
Alpha RXM
- First stage travel: 0.142 in.
- Reset travel: 0.233 in.
In both measurements, the Alpha RXM exhibited shorter travel distances, and this is a good thing for most shooters as reduced travel length of the trigger between these events make for faster operation.
But Does it Make a Difference?
Enhancing a shooter’s accuracy potential, or marksmanship, is all about minimizing shot disturbance, and as experienced shooters know, there is a pile of nuances that influence this. Most folks will evaluate accuracy by putting bullets on paper and measuring group sizes. That, in my opinion, does not cut it when comparing the relative performance of pistol triggers because unless you are an expert-level shooter with everything dialed-in just right, an objective assessment is not possible.
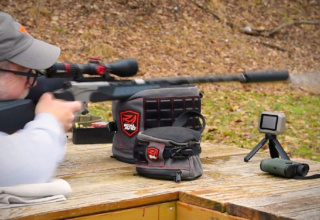
On the other hand, the Mantis X10 Elite dry-fire training system can objectively evaluate shot disturbance with mind-blowing precision, enabling shooters to identify problems and course correct. For comparing one trigger’s performance to another, it can’t be beat.

I keep a piece of notebook paper with a big, black circle taped to the far end of my shop wall for dry-fire practice. After installing the Mantis X onto the RXM’s accessory rail, I took aim and recorded the first 20 “shots fired” with gun through the Mantis X app on my phone.
The score came in at an even 92.00 out of 100 with the RXM in its factory-new configuration. The system noted that the biggest problem I was having involved uneven finger pressure on the trigger shoe, resulting from incorrect placement of the trigger finger.
After installing the Alpha RXM trigger, I repeated the test with another 20-shot dry-fire session. This time, my score jumped to 94.35 — an increase of 2.35 points. I was still having an issue with my trigger finger placement, but I’ll chock that up to unfamiliarity with the gun as this was my first time handling the RXM.

Again, take it as you wish, but for me, this objective evaluation indicates that the overall design of Timney’s Alpha RXM trigger delivers reduced shot disturbance compared to the factory trigger system, resulting in what would be on a paper target improved point-of-aim, point-of-impact performance. I’ll verify that when I take the gun to the live-fire range.
Installing the Alpha RXM Trigger
Swapping out the factory trigger for Timney’s Alpha RXM is a simple process that is easily accomplished on any flat work surface with a single tool — at least in theory. Yes, it is an easy operation, and the only tool-work involves using a 3/32 punch to push out three pins; however, I discovered that the close tolerances of two of those pins required them to be tapped out with a punch and hammer, for which you should also use a bench block. So, figure on a 3/32 flat-faced punch, small hammer, and a bench block to perform this operation. For the tools, I used Real Avid’s Accu-Punch Hammer & Punches along with their Smart Bench Block.

Begin by removing the magazine and ensuring the pistol is clear of ammunition, then remove the slide assembly per the owner’s manual.
The RXM is a different critter than the Glock pistols it is patterned on in large part because the RXM uses a removable Fire Control Insert (FCI) to house the trigger assembly. This is the feature that allows the RXM to accommodate different Magpul grips.

Drive out the locking block pin.

Use the punch to depress the slide lock spring and slide the slide lock out of the grip.

For better control, I used a larger punch to push out the takedown pin (from right to left). This is another part that required the use of a hammer and punch, but I’m showing it here, supported in a vise, for illustration purposes.

Once the takedown pin is removed, lift the front of the FCI and then pull it out of the grip.

The disassembled FCI and grip assemblies. If you want to simply swap the grip on your RXM, the preceding steps are what is required. You would also need to remove the takedown and slide lock springs and transfer them to the new grip.

Push out the trigger pivot pin.

With the trigger pivot pin removed, lift out the locking block…

…followed by the slide stop lever.

Carefully spread the FCI frame and lift the trigger assembly out of the FCI. To do this, you will need to spread the sides far enough apart so that the two studs on the trigger mechanism housing can disengage from their locating holes in the FCI frame.

The disassembled FCI.

Remove the trigger/trigger bar assembly from the trigger housing. This is done by rotating the cruciform out of its slot on the left side of the housing. Note that the trigger spring connects the trigger bar to the housing.

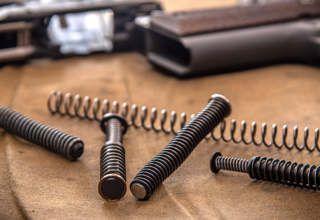
Remove the trigger spring from the trigger housing.

The new Alpha RXM sear housing simply drops into the trigger housing.

Be sure to push the sear housing all the way into the trigger housing so that the tops of the two components are flush with each other.

Position the Alpha RXM trigger bar on the trigger housing as shown…

…and place the assembly into its position within the FCI frame. Again, you will need to spread the arms apart enough to secure the trigger housing studs in their respective FCI frame holes. Timney suggests inserting the first stud into the small hole, followed by the second stud into the oblong hole.

The correctly installed trigger housing/trigger bar/trigger assembly.

Timney provides two different trigger return springs — one light (gray) and one heavy (red). Install one leg of the spring through the small hole behind the trigger pivot pin boss as shown, then position the spring coils over the boss and secure it in place.

Pull the top arm of the return spring back toward the trigger housing and drop the locking block into position on the FCI frame.

Line up the trigger pivot pin holes and insert the pivot pin halfway, pushing the pin right to left.

Return the slide stop lever to its position along the left side of the FCI frame, aligning its hole with the trigger pivot pin hole. Once in position, center the pivot pin in the FCI frame.

The reassembled FCI.

Reinstall the FCI into the grip. Place the back of the FCI into the back of the grip as shown, then slightly pull back on the trigger shoe while lowering the front of the FCI into the frame.

Reinstall the takedown pin from left to right. By rotating the pin, you should be able to install it by hand without having to use a hammer and punch. The bevels on the takedown pin allow the pin to “ramp over” the takedown spring. The takedown spring is what secures the pin in the grip.

Depress the slide lock spring and reinstall the slide lock lever, making sure the notched side of the lever is oriented down.

Reinstall the locking block pin. Once more, close tolerances required this pin to be tapped into place with a hammer.

This completes the Alpha RXM trigger installation.

Before wrapping up, check to ensure the trigger safety is working. Do this by grasping the sides of the trigger shoe and pushing the trigger rearward. The safety lever should prevent the trigger from moving backwards.

Finally, reinstall the slide assembly and perform a function check, making sure the trigger safety is fully functional and that the trigger reset is working.

Given its $99.99 MSRP, Timney’s Alpha Competition Replacement Trigger for the Ruger RXM is a worthwhile upgrade, as our testing numbers proved. The pull weight is lighter, the trigger movement shorter, and the installation process is about as easy as it gets.