We want to start this article on the right foot and set the scene for what is to follow…
A defensive shotgun is a tool. It’s not a mantle-piece or a delicate work of art. It’s not an heirloom or something with which to wow the chaps down at the Birds & Bourbon skeet club.
It’s a hammer, plain and simple, and when you build a hammer, you want to build it to hit, to take some hits, and to keep on hitting. That means starting with a rock-solid foundation and adding carefully selected parts that function in the situations for which the shotgun is being built.
This is well-trod ground for some defense professionals—not so much for those lured by the siren call of tacticool gadgetry. We’re going to leave the tacticool stuff out and focus on upgrades that make real-world sense, tell you why they make sense, and show you how to install them in a way that won’t fail you.
Mossberg 500 Persuader

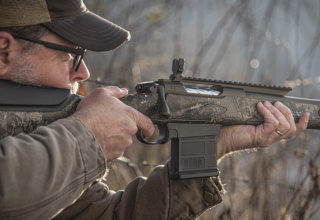
In mapping out our ultimate defensive shotgun, we had a couple known-quantity platforms to choose from, one of them being the Mossberg 500 pump action. It’s seen plenty of duty in the law enforcement arena and there are thousands of them in homes across the country. So, it’s a good place to start if you want to transform that shotgun you’ve had in the closet for many years or if you want to start fresh. We decided to start fresh for this article with a 500 model that already came with the shortest legal barrel we could buy…the Mossberg 500 12-gauge Persuader. With its 18.5-inch barrel, cylinder bore, synthetic forend and stock, and an included pistol grip kit, the Persuader is an ideal defensive shotgun platform.
When selecting a defensive shotgun, you’ll want to consider ammo and its repercussions (more precisely, its recoil). A 12-gauge generates a lot of boom and will certainly get the job done, especially if longer-range terminal performance is important to you. In home environments, or for the handling convenience of smaller-frame shooters, a 20-gauge may be the better option. Either, though, will take care of business in close-quarter environments.
We chose the 12-gauge simply because we can handle it and we can’t shake that “more is better” mindset.
Rock River Arms Operator CAR Stock and Hogue Rubber Pistol Grip

There’s nothing wrong with fixed buttstocks on defensive shotguns, especially if you run out of ammo and need to start swinging. A collapsible stock, however, allows you to select from six different buttstock positions to help achieve a comfortable reach on the forend so you can more easily manipulate the action. For large-frame shooters, this usually isn’t an issue. Smaller-frame shooters, on the other hand, can certainly benefit from a customized fit.
We selected the Rock River Arms Operator CAR stock. It is collapsible to six positions to fit any shooter size, and when fully collapsed, it can stow more easily in a vehicle. We also like the rubber butt pad to help mitigate the recoil hit, and the wide comb makes for a comfortable and positive cheek weld.
This collapsible stock, of course, necessitates a pistol grip, and that’s a plus in our book. A pistol grip makes it easier to shoot from the hip position, if necessary, while managing sharp recoil a bit better than if you were holding the wrist of a conventional fixed stock. Some people simply find a pistol grip more comfortable when operating long guns. The Hogue Rubber Pistol Grip from Rock River Arms is about as good as they come. The no-slip rubber covering is always welcome, and the finger grooves promote good weapon retention and proper hand placement.
Mesa Tactical LEO Telescoping Stock Adapter

Converting a conventional stock to an adjustable stock and pistol grip setup requires a stock adapter, and from our experience, no one does this better than Mesa Tactical. Their LEO Telescoping Stock Adapter is machined from solid aluminum and installs onto the back of the shotgun receiver. Once installed, it will accept an AR receiver extension tube, allowing you to add an adjustable AR stock of your choice and an AR pistol grip. Integrated into the adapter is a slot to accept a sleeve for ambidextrous QD sling swivel mounting.
XS Sights Ghost Ring and Banded Tritium Sight Set

There are many ways to go with tactical shotgun sighting systems. There is the standard front bead, a fiber-optic or tritium front sight, front and rear sights, and numerous red dot-style optics. Personal preference usually wins the day, but that is often tempered by the style of shotgun you have.
For simplicity, durability, reliability, and any-environment-suitability, we knew that a ghost ring rear sight with a tritium front night sight was the way to go—especially with our plain barrel (non-ribbed) 500 Persuader. To get there, XS Sights’ Ghost ring and Banded Tritium sight set was the clear choice.
A ghost ring is simply an aperture-style rear sight that, when viewed down the barrel, presents a blurred ring that the eye naturally wants to align around the front sight. Sighting is quick and intuitive, which is what you want in a defensive firearm. The XS Sight version has a low profile, so it won’t easily snag on clothing or bump against objects.
For the front sight, the XS Sight features a band that clamps around the barrel. To that band secures a standard dot tritium front sight blade. This setup makes installation onto a round barrel quite simple (versus some front sights that require soldering, drilling and tapping the barrel, epoxying, or other installation modifications). Some people, though, don’t like the idea of a clamp-style sight because they worry it may get bumped and move out of alignment. That depends on how well you install it, and we’ll show you the foolproof way to do that later in this article. In fact, with our way of mounting this sight, not only will it stay put, it will allow us to use a front sight system that integrates a shroud design to better protect the front blade.
Mesa Tactical SureShell Polymer Carrier

No defensive shotgun is complete without easy access to reloads. Again, we tapped Mesa Tactical because their SureShell Polymer Carriers are proven quantities. Designed to mount to the receiver using existing screw and pin holes, the installation is easy and the product is rock-solid, consisting of a glass-filled polymer carrier and rugged aluminum plate mounting bracket.
Mossberg Tactical Tri-Rail Forend
Since home defense is usually a nighttime affair, a tactical light is a must-have. Mounting that light, however, requires something to mount it to. Mossberg’s Tactical Tri-Rail Forend fits the bill, allowing you to forego clamping a mount to your barrel or magazine extension tube. With three Picatinny rails, you can mount your light in the location that best suits you. One of the things we really like about having the rail on the forend is that your hand is already in place to turn it on. If your light has a pressure switch, you can mount the switch so that you never have to move your hand position to operate the light. That’s keeping things efficient.
TRUGLO Laser/Light Combo
Rounding out our must-have list for a defensive shotgun is a weapon-mounted light. It’s useful for the obvious reason, of course, but it also keeps your hands on the shotgun and in operational readiness. It’s also, by itself, a defense layer because a bright LED directed into the eyes of an intruder is going to hurt, disrupt their ability to see, and give you a brief moment to get control of the situation.
A good weapon light should be small, though, to minimize weight and profile. A good choice is the Tru•Point Laser/Light Combo from TRUGLO. The laser can be used as an auxiliary or primary aiming device, but it is the Tru•Point’s compact size, interchangeable back plates for ambidextrous use, and included remote pressure switch that we feel is exactly what you want in a shotgun-mounted light.
Now that we’ve run through the cast of characters, let’s get the installation show started…
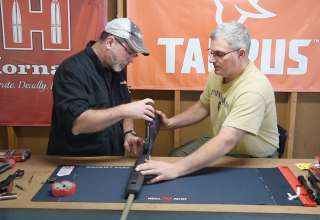
Stock and Pistol Grip Installation

- When removing the screws from a soft rubber buttpad, be sure to use a solid-piece screwdriver, not a driver bit. The rubber may pull the bit out of the driver and you’ll have a heck of a time getting it out of the pad. Put a light coat of grease on the screwdriver shank to help it slide easily into the rubber butt pad. The Mossberg stock secures to the receiver with a long hex-head bolt, so use a 1/2-inch socket and extension to remove it.

- As mentioned earlier, a defensive shotgun is built for one purpose only, and “delicate” is not part of our vocabulary in this type of build. It is intended to stay together under the most austere conditions, and that means ALL attaching hardware should be secured with a thread-locking compound. To do that, all grease and oil must be removed. Saturate the components to be thread-locked with denatured alcohol and wipe down thoroughly, making sure you go deep into the threads.

- Insert the grip screw into the RRA pistol grip and support it on the bench with a screwdriver. This allows you to generously coat the threads with blue Loctite without making a mess inside the grip.

- After placing the pocket nut into its slot in the Mesa Tactical stock adapter, start the grip onto the adapter (it may be a tight fit) and secure into place. The grip screw will draw the grip onto the adapter.

- The stock adapter uses a double-headed flush cup that installs cross-ways into the adapter. This is the QD mount for ambidextrous sling mounting. Degrease the flush cup threads, mounting screw threads, add Loctite to the screw threads, and install into the adapter with the supplied hex key.

- Degrease the shotgun receiver screw threads and the supplied receiver screw. Insert the receiver screw through the back of the adapter, position the adapter against the receiver, and secure. Mesa Tactical recommends installing the screw at 20 ft/lbs of torque for the Mossberg 500, but hand-tight will do the job.

- Before installing the receiver extension tube from the Rock River Arms Operator CAR buttstock kit, degrease the extension tube threads and the stock adapter threads. Apply a coat of anti-seize to the stock adapter threads to prevent galling. Next, replace the standard receiver end plate that came with the buttstock kit and install the Mesa Tactical “claw” end plate with the claws pointing toward the receiver. Rotate the castle nut to the back of the receiver extension threads and screw the extension into the receiver to the point where it is in as far as possible while still allowing the end plate claws to align with the adapter alignment tab, as seen here. Once in its final position, apply Loctite to the exposed threads.

- Tighten the castle nut into place with an AR castle nut wrench, such as this one integrated into the Real Avid Armorer’s Master Wrench.

- There are two small slots on the receiver side of the castle nut. These are used to stake the receiver end plate to prevent the castle nut from backing out. To stake these, place a center punch against the receiver end plate opposite the castle nut staking slot and strike the punch with a hammer. The idea is to push a small amount of end plate metal into the two castle nut slots so that the castle nut cannot rotate.

- The buttstock can now be installed onto the receiver extension tube.
Shell Holder Installation

- With the barrel removed, remove the factory ejector screw. Degrease the receiver screw hole along with the new ejector screw supplied with the Mesa Tactical shotshell holder kit. Apply Loctite to the ejector screw threads and install the screw.

- Turn the shotgun over and install the ejector screw nut, aligning the nut flats parallel with the receiver, as shown. This nut will not be tight, but that is the way it is designed to be installed.

- You’ll need to trim the self-adhering rubber backing to fit the carrier. Afterwards, wipe the carrier with denatured alcohol and install the backing.

- Place the shell holder onto the receiver, aligning the forward keyhole slot with the supplied Chicago screw assembly nut, and then slide forward to align the back of the holder with the trigger housing pin. We found the best method to install the shell holder male Chicago screw is using it to displace the trigger housing pin. After degreasing and installing the washer onto the Chicago screw, align the screw on top of the trigger pin and tap it into the receiver with the receiver supported on a bench block.

- Turn the shotgun over and pull the trigger pin out of the receiver. You may need to wrap the pin with some cloth or rubber and use a pair of pliers to remove it without damage. Next, degrease and apply Loctite to the female screw/pin before screwing it into place.
Forend Replacement

- Replacing the Mossberg 500 forend requires a special wrench to engage the two slots in the forend nut. If you intend to do this type of work more than once, a proper wrench is a worthwhile investment. If not, you can try to spin-drift the nut off the action slide tube bar using a brass drift or punch (to prevent damaging the nut) and hammer. Catch one of the nut slots with the edge of the brass drift and tap counter-clockwise to unthread the nut. Once the nut is removed, pull the forend off the tube.

- The forend has a lip around its inner circumference that the nut collar slides over. When installing the nut, be sure the lip and collar engage correctly. If it does not, stop and correct the problem before screwing on the nut.
Sight Installation

- Follow the instructions supplied by XS Sights for assembling the rear sight aperture and Picatinny rail mount assembly. Next, remove the factory screws along the top of the receiver and test-fit the sight assembly onto the shotgun. Select the rail mounting screws that provide the longest thread reach without protruding into the receiver and interfering with the bolt. Once the assembly fits without interference, remove the assembly and degrease all screws, screw holes, and the bottom of the Picatinny rail.

- Shims (supplied with the XS Sights kit) are required for the front sight and are dependent upon the barrel outside diameter. Measure the barrel diameter with a caliper and select the appropriate shim combination per the supplied instructions. We removed the front sight bead for initial test-fit purposes, but it is not necessary for you to do so.

- Our front bead ultimately interfered with the front sight, so we removed the bead with a flat file and then installed the front sight clamp onto the barrel. We aligned ours .25 inches from the end of the barrel for a little “bump security.”

- Place tape along the back side of the sight clamp and wrap around the barrel.

- Test-fit the sight assembly using the appropriate shim count and supplied hardware. Everything should fit after having filed off the bead sight. Now, remove the sight assembly and clamp from the barrel.

- Although the clamp does a good job of securing the sight to the barrel, there are two things to consider. First, this is a tactical shotgun build and we want brute force strength at all possible points. Second, some barrels (like ours) are tapered, yet the clamp dimension is parallel, making full metal-to-metal contact a sketchy proposition. The no-fail solution is to bed the sight clamp to the barrel with JB Weld. (Yep, you read that correctly.) The first step in that process is to scuff the inner surface of the clamp to give the adhesive something substantive to cling to. A Dremel fitted with an appropriately-sized grinding stone will do the job nicely. You only need to scuff enough to remove the finish, as seen here.

- Use a wire brush to scuff the bottom of the Picatinny rail and along the top of the receiver.

- Here’s the step that will make some folks a bit squeamish, but trust us…it will be alright. To give the JB Weld a more positive surface to adhere to, it is advisable to knurl the barrel surface immediately beneath the sight clamp. The XS Sight instructions advise a thread-locking compound only, but with both the barrel and the clamp contact surfaces smooth-finished, and with some barrels having a tapered contour, we prefer extra security.
Using a knurling tool, take a few rotations around the barrel, staying within the area to be covered by the sight clamp. This process will make slight ridges and valleys in the barrel, which will provide an exceptional, zero-gap adhesion surface for the JB Weld and make an optimal form-fit joint that will pretty much ensure the sight is not going anywhere—even when struck by hard blows. And that’s what you want in a tactical firearm.

- At this point, the front and rear sight assemblies should be ready for their final installation. Diligently clean all metal-to-metal contact surfaces with denatured alcohol, including all screw threads and holes. Once you mix the JB Weld, the clock starts ticking, so be ready to work quickly and efficiently. If you want to make the JB Weld seam invisible on blued or black anodized metal, add a touch of black dye when you mix it up. We used dye from a box of Acraglas we had on-hand.

- Apply the mixed JB Weld to the areas of the receiver and the rear sight mount that you previously scuffed. Spread it evenly and not too thick. You want an ample amount to fill all gaps and crevices in your work piece and leave no air pockets. Solid adhesion filler means a stronger joint. Be careful, however, not to get any into the threaded holes.

- Apply Loctite to the rear sight mounting screw threads and install them into their respective holes in the mount only. DO NOT install the mount onto the receiver first! With the screws in the mount, align the mount over the receiver and align the screw holes. Place a slot-head screwdriver onto the first screw in preparation for turning, and then carefully lower the mount toward the receiver but not onto it. The idea is to hold up on the mount while starting all screws into their receiver holes before the mount contacts the receiver. This prevents the JB Weld from flowing into the receiver holes. Once the screws are started into the receiver, continue to lift up on the mount while alternately tightening the screws until the mount is fully seated and the screws are tight.

- A popsicle stick, cut square, is an ideal tool to remove the bulk of the excess JB Weld. Place the corner of the stick against the seams as you wipe for best results.

- Next, spray WD-40 onto a shop towel and wipe all seams and the surrounding metal. WD-40 is an excellent solution for cleaning up JB Weld. Immediately afterwards, saturate a Q-tip with WD-40 and clean the seams once again, pushing the cotton end into the seam as you wipe. Finish the cleaning process with a final wipe-down of WD-40 with a shop towel.

- As with the rear sight assembly, apply JB Weld to the barrel knurling and to the inside of the sight clamp. Fit the clamp into its position on the barrel.

- Before clamping the front sight, ensure it is aligned vertically on the barrel. Do this by placing a level across the rear sight mount and leveling the shotgun. Move the level to the front sight and adjust the sight as needed to make it level. Double-check your work in case the shotgun shifted.

- With the sight clamp in place, alternately tighten the screw assemblies until solidly snug and then recheck the front sight’s vertical alignment. This is necessary because the sight can shift as the clamp tightens around the barrel. If this occurs, loosen the screws, adjust as needed, and retighten.

- With the front sight assembly in its final position, do a quick clean-up of the excess JB Weld. Next, remove one front sight nut (leave the other screw/nut tight), apply Loctite to the threads, reinstall the nut, and then re-tighten. Repeat for the other screw/nut. Finish cleaning the excess JB Weld using the previously described steps to complete the sight installation.
- Build Your Pistol Marksmanship Foundation - June 29, 2021
- Upgrade Your Long Range Rifle the Easy (and Inexpensive) Way - October 22, 2020
- Your Best Survival Choice if it All Goes South - October 13, 2020