Once a novelty, AR-platform pistols are now the reasonable solution for home defense or when “getting home” is your goal
by Rob Reaser
I admit that I have, historically, looked upon AR-platform pistols with less than serious consideration. To be brutally honest, I thought them little more than range gadgets and novelties.
Those prejudices began to turn when ammo cross-compatibility came into the picture — specifically, the development of 9mm AR pistols and conversion kits. The ability to shoot the same ammo in an AR pistol as in a carry handgun (often with magazine compatibility as well) made a much stronger case for this pint-sized peculiarity. In a situation where the barbarians are literally storming your back door or in a bug-out condition, having one ammunition that can feed two distinct firearm platforms just makes good sense.
The tipping point for validating the AR pistol as a defensive weapon for myself and many others was the introduction of the Pistol Stabilizing Brace® pioneered by Alex Bosco of SB Tactical.
In the early days of AR pistols, manufacturers fitted their firearms with “pistol buffer tubes” — simply featureless AR receiver extension tubes to which a buttstock could not be mounted. This feature negated the firearm from being classified as a short-barrel rifle and certified it as a pistol in the eyes of the ATF. These pistols, however, proved to be seriously unwieldy and awkward to shoot, hence they were never taken all that seriously by defense-minded shooters. SB Tactical’s arm brace, though, delivered much-needed ergonomics to the AR pistol, allowing shooters to find assorted (and legal) means of deploying these firearms accurately.

Today, a properly outfitted AR pistol is not only a wholly viable option for personal defense, it’s a choice platform in many situations:
On-the-Go Protection – We all like the concept of a “truck gun.” In the days of yore, a truck gun usually meant a saddle-worn rimfire rifle or a beat-up break-action shotgun that rode behind the seat. It was mostly considered a varmint piece, and you didn’t really care if it took a few hits.
Now, things are a lot more serious. We have violent riots across the country, limited mostly to dense metro areas, but how far they will spread is uncertain. Take a wrong turn or accidently drive into a rioting mob and suddenly your concealed carry pistol develops a case of the nervous sweats. Here is where the easily portable, highly maneuverable, and high firepower potential of an AR pistol shines. You get the idea.
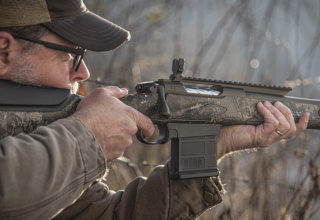
Home Protection – AR pistols are, by design, close-range defensive weapons. They are easier to wield in a home environment than a carbine yet have the capacity for longer engagement distances.
Bugging Out – If you need to scoot, an AR pistol is highly portable, and if you build one small enough, you can probably stow it in or on your backpack.
Given the chaos of the times and the conditions we may possibly find ourselves in, an AR pistol with an intelligently designed and robust arm brace is on the must-have list in our book.

A couple months ago, I cooked up a recipe for the optimal on-the-move, on-the-road, defend-the-home, get-out-of-Dodge AR-platform firearm. It started with the notion that a good pistol arm brace is the key…one that is adjustable, highly ergonomic, offers a good cheek weld (yes, you can do that), and allows the pistol to be shot accurately across the working range of the cartridge. The hands-down choice was the SB Tactical SBA4. It is exceptionally ergonomic, is adjustable, and it installs on MILSPEC carbine receiver extension tubes.
The second key ingredient was a short, backpack-size barrel chambered in .300 Blackout. The .300 BLK offers the kind of ballistic performance that is right in line with the kind of close-quarter to mid-range engagement for which this firearm is intended. Here, we went with a Faxon 7.5-inch Gunner profile barrel in .300 BLK. It uses a combination government and pencil profile that better distributes weight back toward the receiver, making it optimal for an AR pistol platform.

The third major ingredient was the sighting system. For that, XS Sight’s Flip-Up Sights marched to the head of the pack. While many will argue that a red dot is the way to go for an AR pistol platform, we wanted an absolute no-fail sight that could withstand the hard knocks of a true go-anywhere defense weapon. The key to this sight system loops back, again, to the SB Tactical arm brace and its ability to provide a solid aiming solution for the shooter. Another advantage to this sight is its dual-aperture (for working both CQB and mid-range distances) and its tritium stripe front post. Whether in full light or murky darkness, the front sight is easily visible…no batteries required. To reiterate, this is an exceptionally durable sight that won’t fail.
From there, the recipe included standard AR components. Nothing fancy needed or desired. We had several AR components lying around from past projects…many of which had unknown pedigrees. For everything else, we went to Rock River Arms.
One of the benefits of the AR platform is that you can build a firearm of most any flavor from parts scratched from various manufacturers and suppliers. When we started this build, parts were already getting scarce and delivery times were measured in weeks to months. Our advice to you…put together your wish list now and start buying parts from wherever you can get them, because we are not optimistic that this situation is going to improve over the next six months — maybe longer. If you want to build an AR pistol, BUY YOUR ARM BRACE NOW! We don’t know which way the political winds are going to blow in this country, but it’s a safe bet that if the anti-2A crowd gets into power, pistol arm braces will likely be near the top of their list of banned items. Repeat…buy now.
The good news for those who have never built an AR-platform firearm — either a rifle, carbine, or a pistol — is that the process is straightforward and made easier if you have the right tools at hand. For that, we recommend the AR15 Armorer’s Master Kit from Real Avid. Housed in a clamshell-style case, the Armorer’s Master Kit has everything in it you need to build an AR the right way.
To see how it all goes together, follow along as we take our hodgepodge of parts and build our ultimate defense AR-15 pistol in .300 Blackout. The steps outlined here present a detailed overview of building any AR with a low-profile gas block. If you need more nuances or discussion along the way, check out some of our other AR build content here, here, here, here, and here.
Lower Receiver Assembly

Start with a clean work bench, parts organized, and the necessary tools and supplies. Keep your associated parts in sub-groups to prevent losing them or getting confused as to what goes where.

Start with the mag release installation. Place the mag release spring and lever into the receiver and screw on the mag release button.

Push in on the button and rotate the lever. The objective is to screw the lever into the release button until the threaded end of the lever is flush with the button.

Begin installation of the bolt stop release by starting the roll pin into the receiver boss. The Real Avid Smart Bench Block will support the receiver upright, making this process a cinch. We recommend taping the side of the receiver to prevent accidental marring from the hammer.

Install the bolt stop spring and detent into the receiver.

Use a roll pin punch to tap the roll pin into place, securing the lever. Manipulate the lever to ensure it pivots freely in the receiver and does not bind.

The Real Avid AR15 Armorer’s Master Kit comes with this nifty pivot pin installation tool. Just follow the simple directions supplied in the kit.

For this build, we decided to go with a MILSPEC trigger group. Nothing fancy needed. Refer to this article for a deep dive into how an AR trigger system works and for lubrication points.

The trigger drops into the bottom of the receiver with the spring legs pointing forward as shown.

Lightly lubricate the trigger pin before installing. A punch can be used as a “slave pin” to achieve hole alignment and to guide the pin into place.

This is a good time to install the safety selector lever. If you are installing an aftermarket trigger, these sometimes require the safety selector lever to be installed prior to installing the hammer.

With the selector lever in the fire position, install the hammer assembly in this orientation. The legs of the hammer spring point toward the rear and sit atop the trigger pin. Compressing the springs to align the trigger pin holes is the biggest challenge for first-timers.

Again, use a punch to help align the hammer pin holes and guide the pin into place.

Perform a quick function check of the trigger assembly to make sure everything is working properly. Be sure not to let the hammer strike the receiver or the receiver may be damaged. Use your finger to stop the hammer from falling onto the receiver.

The trigger guard will have a spring detent on the front end. Insert it into place as shown.

Place the receiver into the Smart Block and install the roll pin at the rear of the trigger guard. Here, we are installing a winter trigger guard.

Before installing the grip, you must install the safety selector detent into the receiver with the detent spring going into its recess in the pistol grip.

Apply a drop of blue Loctite to the grip screw.

Without dislocating the safety lever detent and spring, position the grip onto the receiver and tighten the grip screw.

For optimal working convenience, set the receiver in the Real Avid Smart Fit lower vise block included in the armorer kit and install in a bench vise. Begin the receiver extension tube installation by inserting the takedown pin detent followed by the detent spring.

Install the buffer retaining spring and detent into its slot in the receiver.

Apply a thin coat of molybdenum grease to the receiver threads.

With the castle nut and lower receiver endplate installed on the receiver extension tube (the tube threads should be cleaned with denatured alcohol), screw the tube into the receiver until it stops against the buffer detent. Next, push down on the detent and continue to screw on the extension tube until it just touches or is just shy of touching the detent nub. The detent should be captured by the tube but be free to move up and down on the detent spring without binding. If you are using a carbine-style buffer tube with adjustment slots, the slots should be at the 6 o’clock position.

Position the safety lever detent spring in front of the end plate so that the plate pushes the spring into the receiver.

Position the plate flush against the receiver and hold it in place. Apply blue Loctite to the receiver threads and then hand-tighten the castle nut against the end plate.

Torque the castle nut to 40 in/lbs per the US Army and Marine Corps Technical Manuals. Torquing to 5 ft/lbs on the Real Avid torque wrench is sufficient. The military Technical Manuals recommend staking the castle nut in two places across from the notches in the locking nut. Do this if you do not apply Loctite to the threads.

After lightly lubricating the buffer spring and buffer, insert both into the receiver extension tube, pushing the buffer in until it is captured by the detent.

Follow the arm brace or stock manufacturer’s recommendations for installation.
Upper Receiver Assembly

As with the lower receiver group, inventory and organize all components for the upper receiver.

The first step is to ensure the barrel and bolt combination fall within the specified headspace dimension for the firearm you are building. This requires the use of GO and NO-GO gauges specific to your firearm’s chamber. Go here for a more detailed description of gauging headspace. Note that the bolt must first be disassembled before gauging headspace.

The Real Avid Master Bench Block has a slick solution for disassembling and reassembling the bolt ejector. After gauging headspace, reinstall the ejector and extractor assemblies.

Installing the dust cover onto the upper receiver is simple. The challenge for first-timers is twisting the cover spring one revolution while inserting the dust cover rod. Note that the short end of the spring is on the left, spring tail up and pressing against the receiver.

If your receiver incorporates a forward assist, insert the forward assist spring and plunger into the receiver. The flat portion of the plunger arm should face the pin hole. Depress the plunger and place the receiver into the Master Bench Block. The block is designed to keep the plunger depressed, clearing the way for the roll pin to be tapped into place.

Moving to the gas block and gas tube, insert the tube into the block with the curved side of the tube positioned up, as shown. Align the gas tube retaining pin hole with the hole in the gas block.

Locate a suitable position to secure the gas assembly on the Master Bench Block (this will vary with the design of your gas block) and secure with the supplied roll pin. A roll pin punch is needed to correctly seat the pin.

The Real Avid Lug-Lok Upper Vice Block is handy for working on the upper receiver assembly. Install the barrel into the receiver (making sure the alignment pin on the barrel extension is securely seated in the alignment notch of the receiver) and slide the assembly onto the Lug-Lock. The locking lugs will engage the Lug-Lock to prevent rotation.

Apply molybdenum grease to the receiver threads.

Follow your handguard manufacturer’s instructions for details on installing the barrel nut, as these tend to be proprietary to the handguard design. Hand-tighten the nut and then torque to 30 ft/lbs. Not using the torque wrench, loosen the nut and torque again to 30 ft/lbs. Once more, loosen the nut and then torque to between 30 and 80 ft/lbs. This final torque variance allows for clearance of the gas tube into the receiver, depending on the style of barrel nut you are using. For most aftermarket, free-float handguards, there usually are no alignment issues.

With the barrel nut secured, install the gas block/gas tube assembly onto the barrel. The gas tube goes into the top hole in the receiver.

With the gas block/gas tube perfectly aligned with the top of the barrel, secure the gas block per the manufacturer’s recommendations. Most aftermarket low-profile gas blocks utilize set screws. These should be cleaned and a drop of blue Loctite applied to the threads before installation.

AR flash hider crush washers are recessed on one side and flat on the other. Install the crush washer with the flat side placed against the barrel shoulder. The cupped side should face the flash hider. Hand-tighten the flash hider onto the muzzle threads.

Using the armorer’s and torque wrenches, torque the flash hider to 15-20 ft/lbs. For standard A2 flash hiders, be sure to clock the unslotted portion of the flash hider at the 6 o’clock position.

Install the handguard per the manufacturer’s recommendations.

Install your sight system of choice. We opted for a the flip-up sights from XS Sights, with the CSAT A2 dual aperture rear and tritium stripe front post. This completes the firearm assembly. Before shooting the firearm, be sure to perform a complete function check.