With a roundup of carefully selected precision aftermarket parts, you can build a custom .22LR in no time flat
by Rob Reaser
One of the great aspects of the modern AR-15 is that firearms enthusiasts and do-it-yourself fans can build these rifles in almost any flavor imaginable. This is possible thanks to a large and extremely vibrant aftermarket industry that supports the AR platform with variations on practically ever component that makes up America’s favorite firearm.
What truly powers the do-it-yourself AR movement, though, is the AR design itself. Assembling an AR is a straightforward procedure that can be done with minimal tools and no prior experience so long as you have proper guidance. The same applies to America’s beloved rimfire rifle platform…the Ruger 10/22.

Like the AR-15, the 10/22 is supported with a deep bench of aftermarket components that allow you to build your own from sourced parts. Upgrade barrels, receivers, and triggers have been available for many years for shooters looking to extract the last millimeter of on-target precision from this already accurate firearm. There are also a handful of companies who make chassis systems for the 10/22—some being traditional monolithic stocks made of wood, polymer, or fiberglass and others being machined from aluminum billet to accept AR-style furniture and accessories.

Of the latter chassis type, Rival Arms is the latest company to offer 10/22 fans a foundation to build their own custom rimfire in the always popular .22 LR. Rival Arms has made a huge splash in the DIY aftermarket over the last couple of years with their premium upgrade components for GLOCK, Sig, and S&W pistols, and now their efforts have expanded into the rifle segment with a precision billet aluminum chassis for the 10/22 and the Remington 700.
What we like about this approach is that the chassis is designed to accept AR buttstocks and grips, and the forend is machined for M-LOK compatibility, meaning you can add forward accessories developed for that popular mounting system. Given the wide selection of AR furniture to meet specific shooter needs and applications, building a 10/22 based on an AR component-compatible chassis further expands the customizing options.

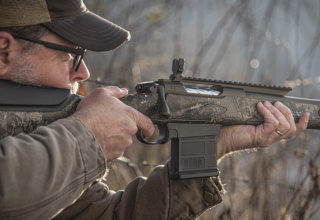
A good example of the AR-compatible advantage is selecting a stock that offers a custom fit. For our project, we looked to Rock River Arms’ 6-position RRA Marksman stock. This designated marksman-style stock provides not only gross 6-position length-of-pull adjustment but also fine LOP adjustment so you can get exactly the fit you need. Similarly, the cheek riser is dial-adjusted to ensure proper eye alignment with the optic. Since the RRA Marksman exhibits an exceptionally neat and trim profile, it’s ideal for a short, lightweight rifle platform like the 10/22.

The 10/22 is one of those uncommon firearm platforms where the aftermarket serves up everything you need to build your own rifle from scratch. While the factory Ruger 10/22 is found to be highly accurate right out of the box, there is always room for improvement, and that’s where companies like Tactical Solutions come in. TacSol specializes in 10/22 barrels and receivers, including bolt assemblies. The company’s angle is making accurate, lightweight barrels.
TacSol 10/22 barrels feature a chromoly barrel core sleeved in 6061-T machined aluminum with a .920 target contour profile and fluting for further weight reduction and heat dissipation. Other features include a target crown and 1/2×28 muzzle threading for suppressor use and a near-seamless thread protector.

This barrel pairs nicely with TacSol’s X-Ring VR Receiver, which is also machined from 6061-T aluminum and features an integrated Picatinny top rail for optic mounting. A couple of things we really like about this system, aside from the precision machining, is that the included bolt utilizes a dual guide rod/spring assembly (versus the single guide rod/spring of the Ruger factory 10/22 bolt) for improved bolt stability and smooth cycling and a rear cleaning port (a steel plug you can remove that allows you to run a cleaning rod through the breech end instead of the muzzle end). Also, the bolt provides right- or left-side positioning of the charging handle.
When color-matched (several anodized colors are available), the TacSol barrel and receiver combination hits the right aesthetic note for any custom build.
While the Ruger 10/22 has a grand reputation for accuracy, the stock trigger system has an equally grand reputation for delivering less-than-polished performance. Long and crunky trigger operation are undesirable attributes in any firearm, but especially so in shorter, lighter weight platforms. That’s where Timney Triggers comes in.

Timney has built a solid reputation over the company’s 74-year history for producing precision triggers—starting with post-WWII battle rifles and then conventional bolt-action rifles like the Remington 700 and the AR-15. Today, Timney makes several replacement triggers for the 10/22, including our pick—the Calvin Elite.

The Calvin Elite is a drop-in replacement for the factory trigger but is much more than that. As you would expect from a precision trigger, this unit exhibits no creep and provides a crisp break. The factory pull weight is a delicious 1.5-2 pounds. In keeping with its “custom firearm” mission, the Calvin Elite comes with four different trigger shoes to fit any shooter style. They are easy to swap and are further adjustable for length-of-pull, cast, and height. This model also comes with Timney’s own extended mag release, allowing you to drop the mag with a flick of the trigger finger.

The Picatinny rail atop the TacSol receiver opens the door to a broad range of optic choices for the custom 10/22 builder, so whatever your mission or shooting style—from reflex red dots to long-range BDC reticle scopes—this system will accommodate. Our intent with this rifle build was to build a 100-meter target shooter that could take occasional forays into the squirrel woods, so for optimal dual-purpose use, we selected the Burris Fullfield IV. It’s a basic scope with a proven track record and, with 2.5-10x magnification, is exactly what we need for everything from close-in squirrel and varmint action to prone or bench shooting at distant 10-rings. The pocket-friendly $203 MSRP only helps sweeten the deal.

If you’ve put together your own AR, building a 10/22-style rifle from components will be a breeze. Should this be your first attempt at building any firearm, the 10/22 platform is a good first step. Tool requirements are minimal. A good Allen driver bit set (check out Real Avid’s Smart Drive 90) and a punch and hammer set (Accu-Punch Hammer & Punches) will get the job done. A bench-mounted vice will come in handy, and there are a few supplies that we’ll talk about in the following how-to section.
Ready to get started? Let’s go!
Building a Custom 10/22

Step one is to ensure you have all parts necessary before you begin the build process. The next step is to ensure proper fitment of all parts. Our dry run of the receiver-to-chassis fitment revealed a perfect, low-tolerance fit. Ditto for the trigger-to-receiver fitment. Here, we simply dropped the receiver into the chassis and made sure the action screw and hole were in proper alignment.

The TacSol X-Ring VR receiver comes with an exploded view and detailed instructions, which are helpful if this is your first time deep-diving the 10/22. Begin by removing the bolt assembly from the receiver. The included instructions will walk you through this simple process.

TacSol mentions that some material may need to be removed from the barrel shank to fit into the receiver. We found that to be true.

Tight tolerances and precision machining combine with the anodizing process to make it necessary to remove the anodizing from the barrel shank and possibly a minor amount of aluminum. The objective is to decrease the shank diameter only enough to allow full insertion of the barrel shank into the receiver while maintaining a snug fit.

TacSol recommends using 200- to 300-grit abrasive paper to take down the barrel shank and achieve a proper fit in the receiver. We started with 220 wet/dry paper to work through the anodizing and then switched to 320 to further work down the surface. This is a process where you must work in small increments, clean the residue from the shank, apply a light coat of lubricant (we used mineral oil), and test-fit to the receiver. It’s important to maintain even removal of material from the barrel shank and not to remove any more than is necessary. Repeat this process as needed until the barrel can move into the receiver with a snug fit. NOTE: do not remove material from the receiver!

Once we achieved an “almost there” fit of the barrel shank into the receiver, we mixed up a thick paste of baking soda and mineral oil to provide the final polish.

The baking soda/mineral oil paste was applied to the barrel shank and then the receiver was started onto the shank. We rotated the receiver around the shank while applying light forward pressure, continuing the process until the receiver fully seated against the barrel shoulder. This process effectively polishes the barrel shank, providing a smooth and more even contact surface between the barrel shank and receiver.

After cleaning all polishing media from the receiver and barrel shank, the barrel shank is lightly lubricated and seated into the receiver. The trick here is to align the barrel as precisely as can be vertical to the receiver. This is necessary to ensure solid and even engagement of the V-block that secures the barrel to the receiver.

With the barrel vertically oriented with the receiver, install the V-block and tighten the barrel mounting screws in small, alternating increments to 18- to 24-inch pounds.

With the barreled action complete, the assembly can now be checked to ensure the bolt and barrel combination meets SAAMI headspace requirements. Checking headspace dimension must be done with a stripped bolt. Start by removing the firing pin assembly, which is secured by a pin. Simply push the pin out while maintaining control of the spring-loaded firing pin, then remove the firing pin and spring.

Next, remove the extractor and extractor plunger and spring. Use a small punch to push back on the plunger and remove the extractor from the bolt. Be careful to maintain control of the plunger, as it is under significant spring pressure. Once the extractor has been removed, cover the plunger channel with a finger and slowly allow the plunger and spring assembly to move forward and out of the bolt.

The disassembled bolt group.

Headspace dimension is checked using caliber-specific GO and NO-GO gauges. Gauging this dimension is important to ensure the bolt and barrel combination is within safe operating tolerances. Use denatured alcohol and a clean, lint-free shop towel to remove any oils, dust, and debris from the gauges, the breech face, the front of the bolt, and the back of the barrel.

Insert the stripped bolt into the receiver and insert the NO-GO gauge into the chamber.

Push the bolt all the way forward until it stops. The breech face should stop against the back of the NO-GO gauge, indicating that the headspace is within the maximum allowed tolerance. There should be a visible gap between the front of the bolt and the back of the barrel (as indicated here), meaning the bolt will not close on the NO-GO gauge. If the bolt would have “closed” on the NO-GO gauge (front of the bolt against the back of the barrel), the bolt and barrel combination would have excessive headspace dimension and would not be safe to operate.

Next, remove the NO-GO gauge and insert the GO gauge. Push the bolt as far forward as possible. The front of the bolt should contact the back of the barrel (as indicated here). This means the bolt “closes” on the GO gauge and indicates that the headspace dimension is within the minimum allowed tolerance and is safe to fire.

With headspace dimension determined to be within specification, reassemble the bolt in the reverse of disassembly. The instructions provided with the X-RING VR receiver details this procedure. Begin by installing the firing pin/spring assembly, the extractor/extractor plunger and spring assembly, and then the guide rod and spring assemblies.

Using two paper clips or a couple appropriately sized punches, compress and lock the guide rod and spring assemblies in the bolt and place the bolt in the receiver. We have found the TacSol bolt assembly to be much easier to install than the factory 10/22 bolt.

Reinstall the cleaning port plug.

Reinstall the bolt buffer.

Reinstall the charging handle.

At this point, check the alignment of the extractor claw with the extractor claw slot in the back of the barrel. Open and close the bolt and observe that the extractor claw inserts into the extractor claw slot without impacting the sides of the slot. Obstruction here can lead to improper function or damage the extractor claw.

With the hammer in the cocked position, install the trigger assembly into the receiver as shown. It should fit into place, with the front and rear pin holes aligning perfectly with the pin holes in the receiver.

Push the front and rear trigger pins into place. Even with the close-tolerance fit, you should be able to insert these pins with finger pressure.

With the trigger installed, check the trigger function, ensuring that the safety, reset, and fire positions are working properly.

The barreled action and trigger assembly can now be installed into the chassis. Being mindful of the crossbolt safety position (center it in the trigger housing), carefully insert the assembly into the chassis, paying attention to any interference. Be sure not to force the two together. If you encounter resistance, STOP and analyze the problem.

Quality aftermarket components are typically made to exacting tolerances to fit the original factory platform. To the aftermarket manufacturers’ credit, they sometimes do their job so well that tolerance stacking can become an issue when fitting precision parts together from different manufacturers. While our dry run revealed the TacSol receiver fit the Rival Arms chassis like a glove, and the Timney Trigger fit the TacSol receiver perfectly, when all three were combined, we encountered a couple points of interference. The first point of interference is indicated by the arrows. This slope on the trigger housing (left) interfered with the chassis at these points (right). This required minor filing of material from both the chassis and the trigger body.

The next points of contact were at these two locations on the front of the receiver. Again, this wasn’t a problem with the receiver or the chassis, but when all combined with the trigger, there was not enough maneuvering clearance to properly seat the barreled action into the chassis. Careful filing of these two corners relieved the clearance issue. We covered the bare aluminum with black permanent marker (even though it is hidden when installed) and it was good to go.

Once we relieved the interference points, the barreled action dropped right into place, allowing the action screw to be installed and everything snugged together.

The Rival Arms 10/22 chassis features a set screw to help secure the AR stock buffer tube. Screw this out until the top of the screw is below the buffer tube threads.

If you plan to use a locking adhesive to secure the buffer tube in the chassis, clean the buffer tube threads and the lock ring threads with denatured alcohol to remove any oils or grease.

Apply a small amount of blue Locktite to the buffer tube threads.

Screw the tube into the chassis, leaving enough room to thread the lock ring against the chassis.

With the buffer tube aligned vertically in the chassis, tighten the set screw. The set screw engages the slot in the bottom of the buffer tube threads to prevent the tube from rotating.

Apply a thin layer of blue Loctite to the exposed threads behind the chassis and use an AR armorer’s wrench to torque to 40 in/lbs.

Take your pick of AR grips to finish off the rifle build. We find Rock River Arms’ Hogue Rubber Grip hard to beat.

Next up, optic installation.

The Rival Arms 10/22 chassis is threaded to accept a sling swivel stud or you can install an M-LOK compatible mount for a sling swivel or bipod. For this build, we chose to install TRUGLO’s Tac-Pod Carbon Pro bipod. This bipod is lightweight, adjustable, easy to position, and is available in three mount styles…Picatinny, M-LOK, and conventional sling swivel stud.

As you can see, building your own custom 10/22-style rifle is not that difficult or time-consuming when working with quality components. Give it a try and you’ll probably discover that it will become the first of many DIY gun builds you’ll want to do.