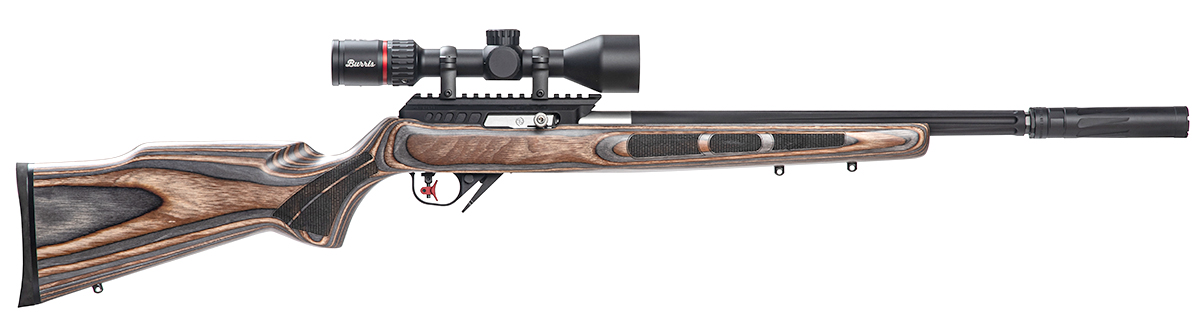
Ready to spice up your plinking and critter hunting game? A DIY precision 10/22 may be the way to go.
by Rob Reaser
It all started innocently enough.
Our friends at Dead Air Silencers had worked with the folks at Ruger to develop a couple of new suppressors for Ruger’s rimfire and .30-caliber models. These suppressors, which debuted this spring, included the RXD 22Ti and RXD 30Ti. Both suppressors are built using Dead Air’s advanced 3D manufacturing techniques from hard-use titanium.
Yep…we had to get our hands on that for a try. And so, we did.
But rather than drop this sleek suppressor onto a factory rifle, being Shoot ON, we had to do something different. In other words, we wanted to build, not buy, the host for this new suppressor — a “custom” rifle, so to speak, from components of our choice and flavor. For that, we cast our eye toward the 10/22 and the aftermarket that supports this long-lived platform.
The 10/22 sits in the same realm as many other firearms that can be built using select parts from the aftermarket segment. It’s no different than AR-15s, 1911s, 700 bolt-actions, Glock clones, and so on. What I find appealing about the 10/22 platform is that it is inexpensive to operate — using .22LR ammunition — for high-volume range days, is well-suited for basic marksmanship practice, has no equal in the plinking department, and it is useful for a broad range of small-game hunting adventures and general pest control.
The darker side of building a DIY 10/22 is that it is downright addictive. What I mean is that a custom gun keeps calling you in the search for ever smaller group sizes. The gun presents you with a challenge, and you can’t help but to boldly pick up the gauntlet.
You see, there is a lot of tweaking that can be done to the 10/22 to squeeze out the last ounce of accuracy, and there is a lot of ammunition to test in the process. The search for small groups is a game unto itself — one that dedicated shooters find impossible to resist.
We cover that side of the equation in Part 2, with video documentation of the hunt for sub-half-inch performance at 50 yards. Be sure to check it out.
For this phase of the project, though, we are going to cover the first half of the equation, which is to build the gun and highlight the components we selected. If you have never done this before, you’re in a good place here because we’ll take you through the step-by-step process. It is not at all difficult to build your own 10/22 from components, but we’ll cover all the details to give you the confidence to do it yourself.
Let’s go…
The Heart of it All
Success or failure in building a precision rimfire (or pretty much any firearm) comes down to the quality of the barrel and the receiver/bolt assembly. Slack in these components spells frustration and possibly failure to achieve your goal.

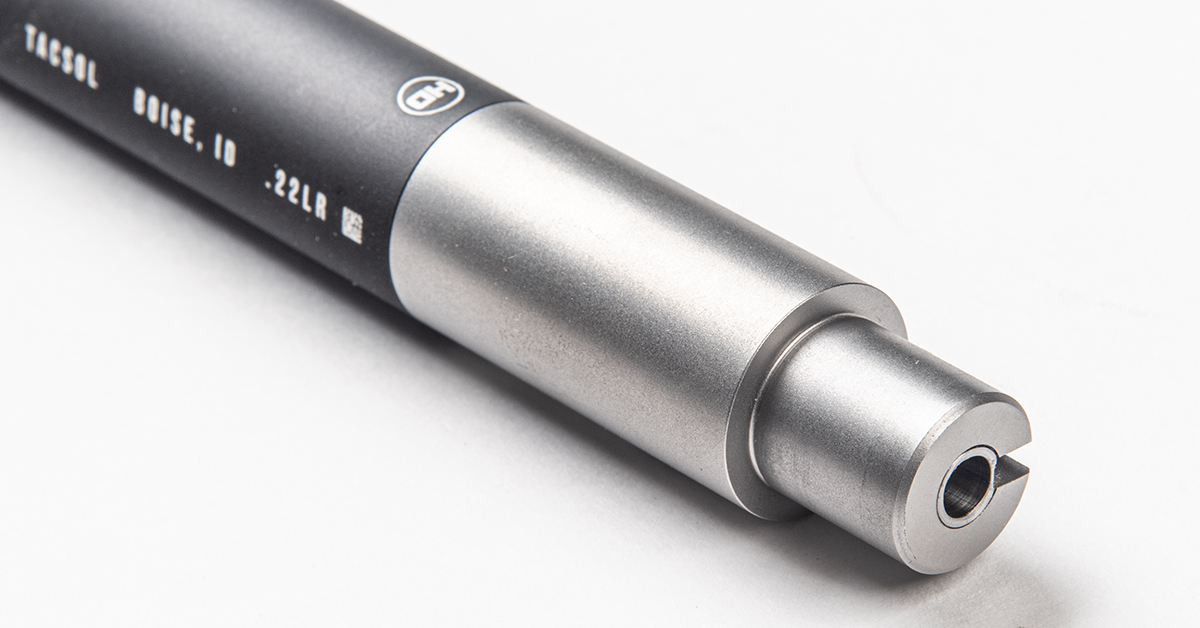
For this build, we tapped the crew at Tactical Solutions out of Boise, Idaho. Tactical Solutions has been at the 10/22 game for some time, and they are one of the leading manufacturers of precision 10/22 components.
The barrel we chose is the X-Ring Performance HD model. This is quite an interesting barrel and rather complex in its construction, being made for high-volume competition shooting. It is “heavy duty” but not heavy in terms of weight. At its core is a chromoly steel liner surrounded by a beefy aluminum shroud featuring unique tapered fluting along the forward two-thirds of the bull barrel. Barrel diameter is 0.920 inches and the twist rate is 1:16.
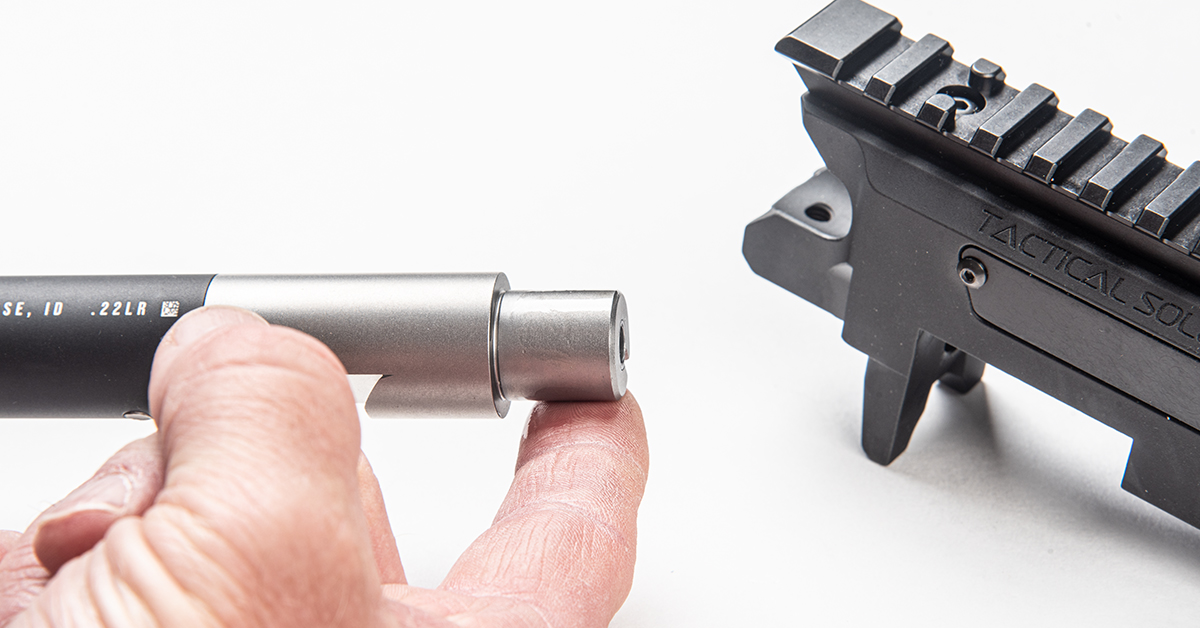
The barrel interfaces the receiver via a 416 stainless steel shank and a machined V-notch to accept the barrel block. This design allows the X-Ring Performance HD barrel to work with factory Ruger 10/22 receivers should you wish work up your custom rifle in piecemeal fashion.
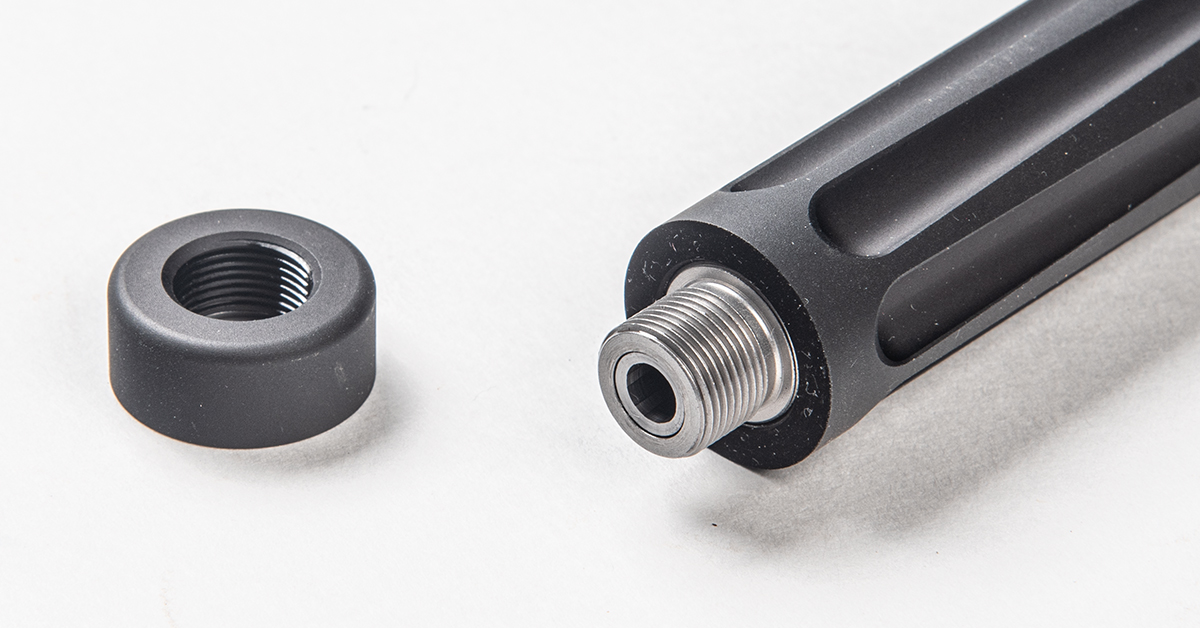
At the opposite end, we see Tactical Solutions’ thorough attention to detail and consideration for the modern shooter. A hardened stainless steel threaded muzzle insert is bonded to the barrel assembly. This is a huge benefit for those utilizing a suppressor since the steel 1/2×28 threads are more robust than what you would find with conventional aluminum shroud threading. Furthermore, the muzzle boasts an 11-degree target crown, and the barrel comes with a thread protector should you wish to run the gun suppressor-free.
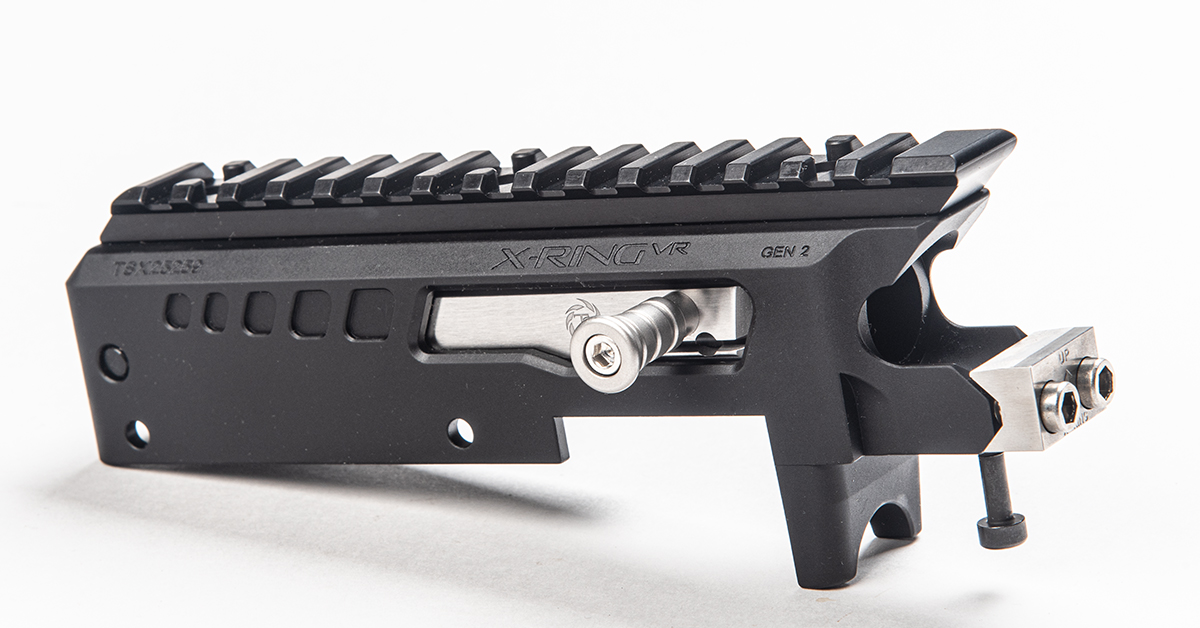
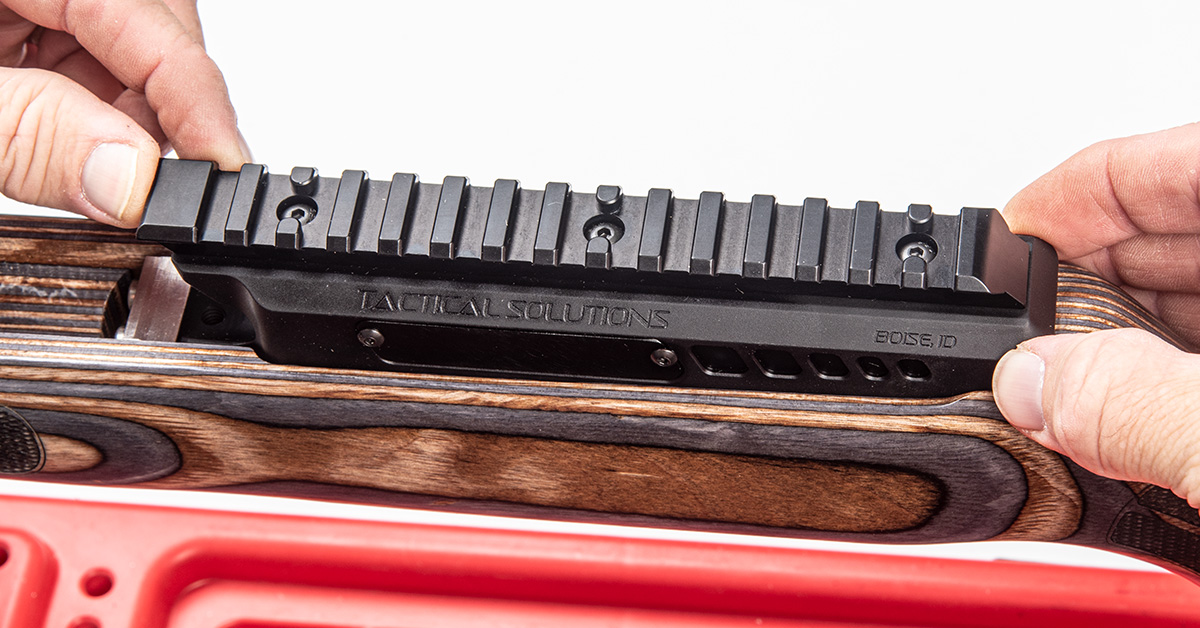
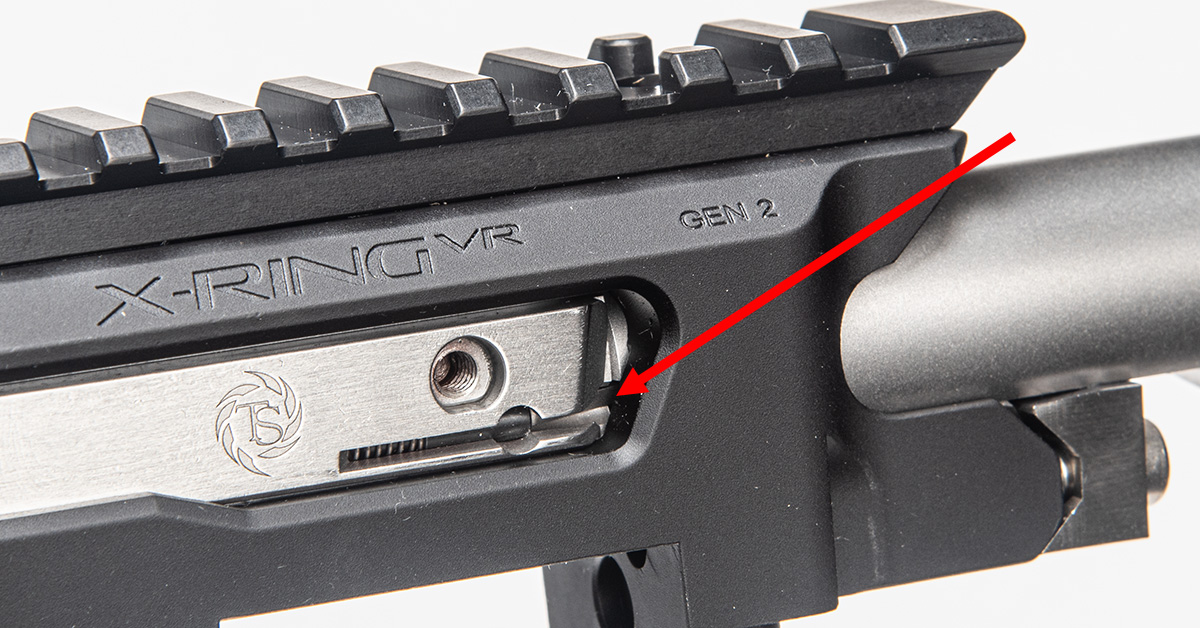
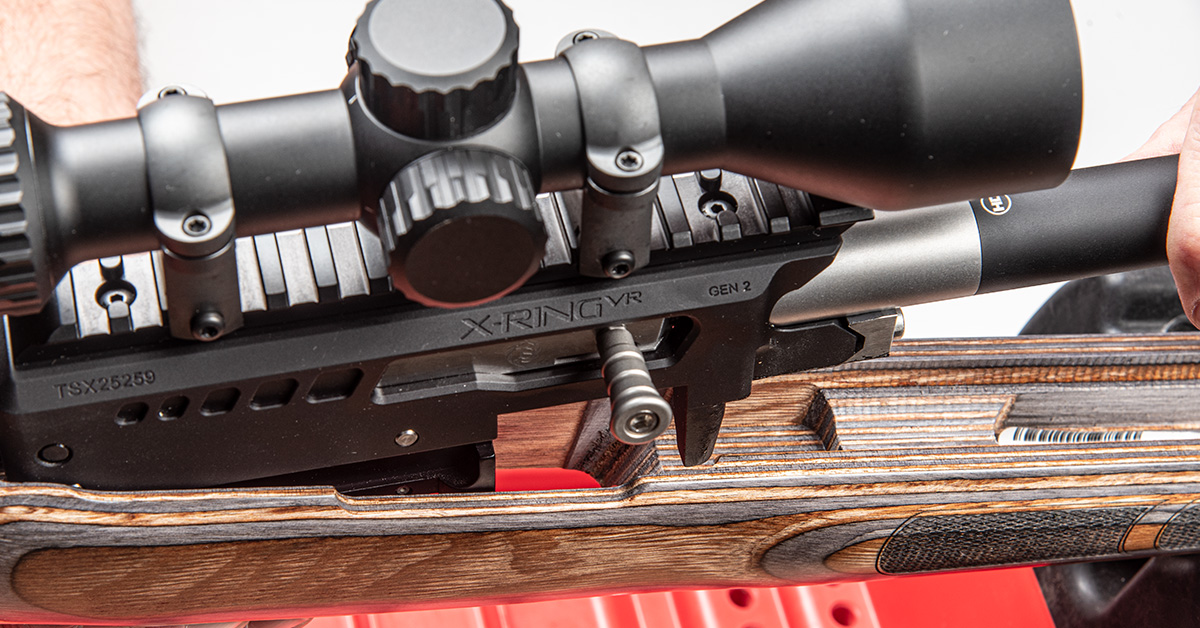
Recently, Tactical Solutions introduced the second generation of the company’s X-Ring VR receiver, and it is notably different from the previous design. Aside from some minor aesthetic changes, there are some noteworthy differences. First, the Picatinny rail is no longer machined into the receiver, so there is now some flexibility in the optic mounting configuration. Second, the bolt handle has been redesigned. It’s a tad shorter than the previous version, with ribbing cuts and a more pronounced end flare that, combined, makes for more positive operation.
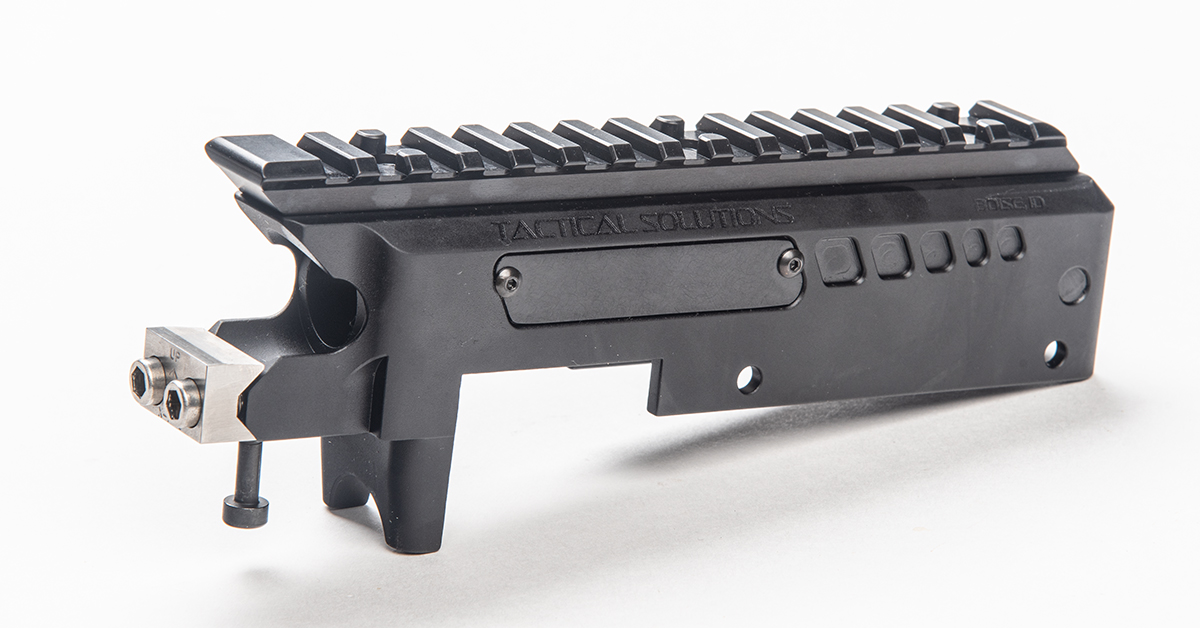
Third, the company added a cover plate for the “off-side” bolt handle port of the ambidextrous receiver. The original port did not have a cover, so this is a plus for shooters who intend to build a hunting 10/22. The port cover will prevent debris from entering the action and possibly interfering with the cycle of operation.
One thing I really like about the X-Ring VR receivers is that they come with a cleaning port in the back. This allows you to clean the barrel from the breech end after removing the bolt — something you should do whenever possible.
Operational Control
As we have said repeatedly, good guns are made better with a good trigger. Those of you who have experience with factory 10/22 triggers know that the OE Ruger trigger falls short of the mark. So, not willing to suffer a so-so trigger to inhibit our rifle’s accuracy potential, we went to our friends at Timney Triggers for a solution.
Enter the Timney Two-Stage Calvin Elite replacement trigger for the 10/22. I’ve used this trigger for other 10/22 projects in the past and absolutely love it for its crisp performance and excellent ergonomics.
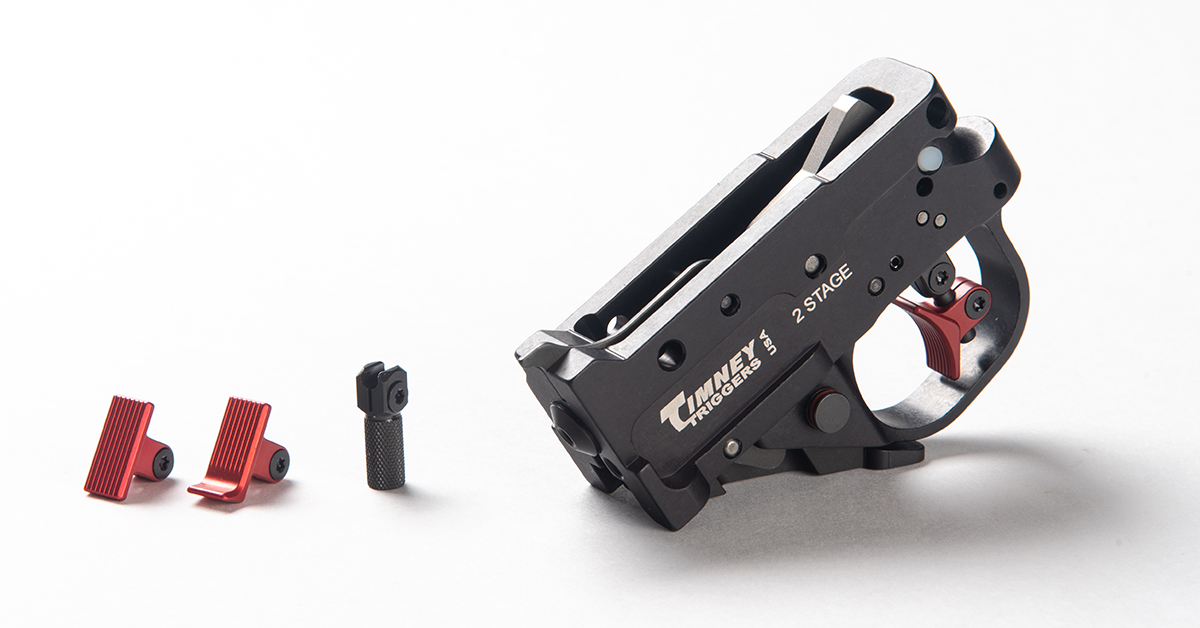
This is a complete, drop-in trigger assembly that will fit any 10/22-pattern receiver. The two-stage operation features an 8-oz. first-stage take-up and a 1-lb. second stage to release the sear.
Furthermore, the trigger is adjustable and customizable. Four trigger shoes are included: curved, flat, flat hooked, and knurled post. You can select the one that provides the best feel and ergonomic compatibility, and, except for the knurled post, you can adjust the position of the shoe on the trigger shoe post to achieve optimal finger placement.
Another aspect of the Calvin Elite I like is the repositioned magazine release lever. Instead of the lever being way forward of the trigger guard, as with the factory trigger system, the Timney unit places the lever alongside the front of the trigger guard. With the flick of a finger, you can release the magazine. Timney offers the release lever in two styles: straight and extended with a curve. I like the straight model seen here because I’m less likely to accidentally move it and lose my magazine in the field.
The Foundation
So far, all these components can fit any 10/22 factory stock. A DIY custom, though, demands a custom stock — something that appeals to your own tastes and the gun’s intended application. One easy answer to the “What stock?” question comes from Boyds Gunstocks.
Boyds makes most of their stocks from super-rigid, highly stylish laminated hardwood. This type of construction is massively stiffer than conventional polymer stocks, and even solid hardwood stocks in some cases. This is important because any flex you have in a stock can deteriorate accuracy. Granted, this is not a huge deal with low-recoil rimfire platforms like the 10/22, but every little bit helps.
Further, the stocks come CNC-inletted for precise fitment of the receiver.
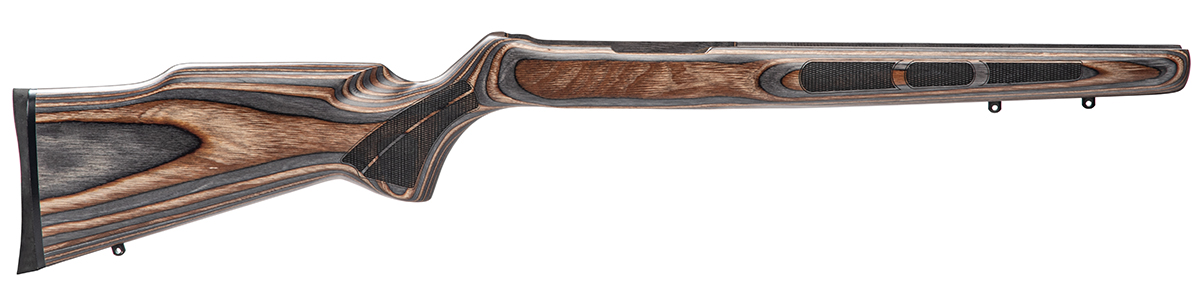
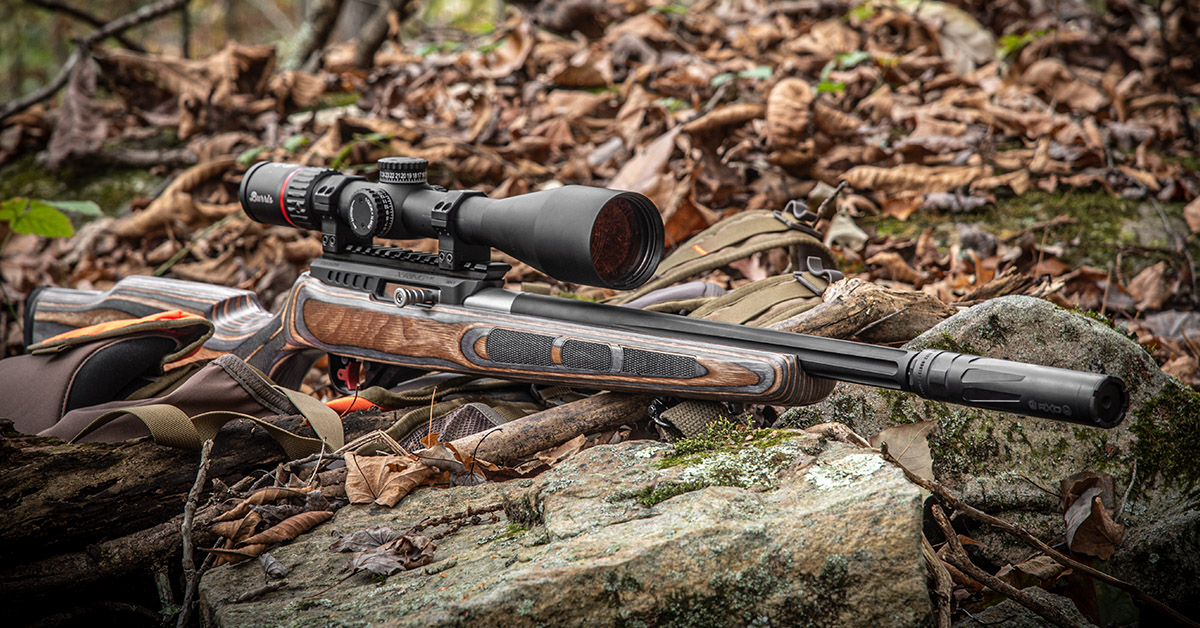
For this project, I selected Boyds’ Rimfire Hunter stock. I liked the classic profile, and the elevated cheek rest would help align my eye behind the scope with a solid cheek weld — another important factor in the hunt for accuracy. The barrel channel is sized to free-float a 0.920 barrel.
After selecting the stock type, it’s all about personalization. Boyds offers their laminated hardwood in 16 different color pallets. You can also get some models like the Rimfire Hunter in solid hardwood, including walnut and maple. Other options offered are finish, length-of-pull, recoil pad, and assorted laser engraving.
What I have come to appreciate with Boyds stocks, in addition to their strength and aesthetics, is that they offer drop-in compatibility with your barreled action. Yes, there are times when variations in firearm manufacturer dimensions demand some slight fitment on the installer’s end, but on the whole, the barreled actions drop right into place.
Easy.
The Stealth Factor
As mentioned, the impetus for this entire project was to try out the new RXD 22Ti suppressor developed by Dead Air in collaboration with Ruger. Why? Because our testing of Dead Air’s next-generation Sandman X and the new Mojave 45 suppressors delivered favorable results in the sound performance and weight departments.
Both suppressors, as with the RXD 22Ti, are built on Dead Air’s advanced Triskelion gas management system. This is a finely engineered baffling and flow design that is made possible only through additive manufacturing, otherwise known as 3D printing.
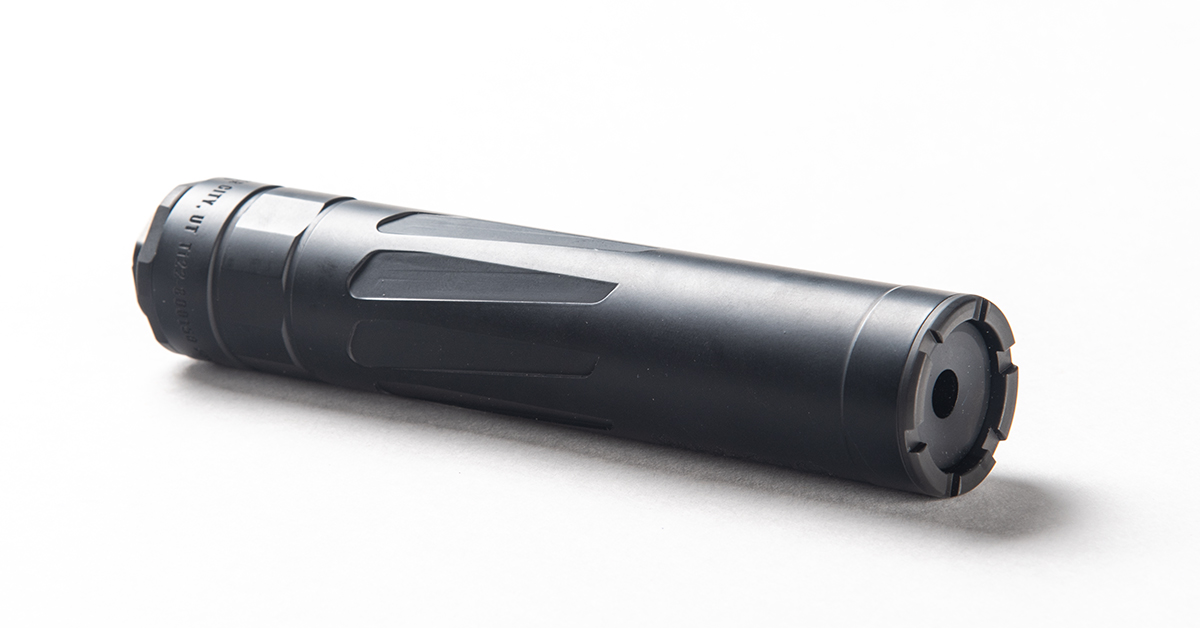
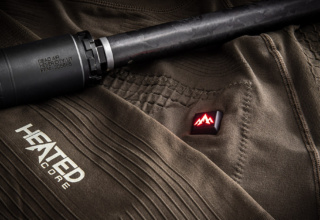
The RXD 22Ti core is DMLS printed from titanium, as is the Mojave 45, so it is exceptionally lightweight and tough. Weight comes in at a scant 5.6 oz., making it perfect for a featherweight, minimal-length-barrel rifle like the 10/22. Diameter is a slim 1.1 inches, and overall weight is 5.6 ounces with the mount included. Overall length is 5.6 inches.
Nice and tidy.
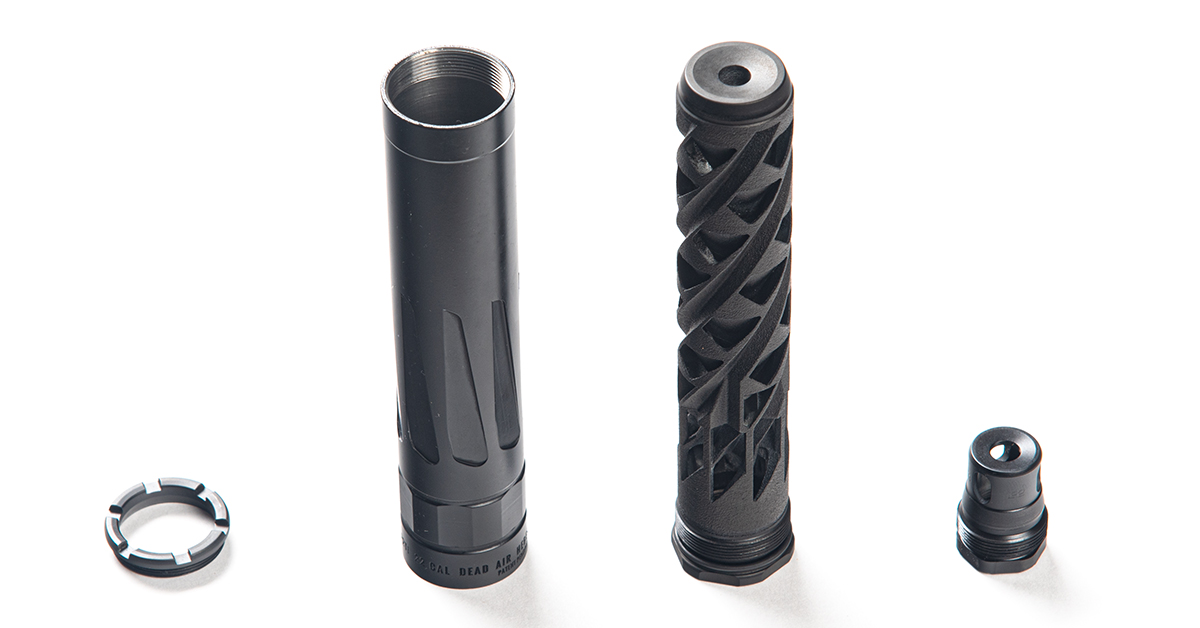
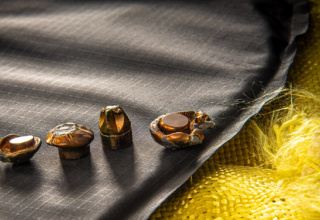
The suppressor system is comprised of four parts. The main tube is made of titanium, as is the baffle core, which is 3D printed as a single piece. Also made of titanium is the front cap ring.
Included with the RXD 22Ti is Dead Air’s new XRF muzzle brake. This is a tapered mounting system developed by Dead Air specifically for rimfire applications. One of the cool things about this brake/mount system is that it is supposed to help capture particles before they enter the suppressor.
Overall, this is a quality suppression system with excellent sound mitigation and easy adaptation to rimfires sporting 1/2-28 and M1x1 threaded muzzles. It is also easy to disassemble and clean, and the short length and light weight make it ideal for the rimfire hunter. And with an MSRP of only $499, how can you pass it up?
Eyes On
Precision shooting demands a good optic system. Since this is to be top-shelf squirrel rifle, I needed an optic that would balance field performance with platform size. The easy choice was the all-new Burris Fullfield 2.5-10×42 riflescope.
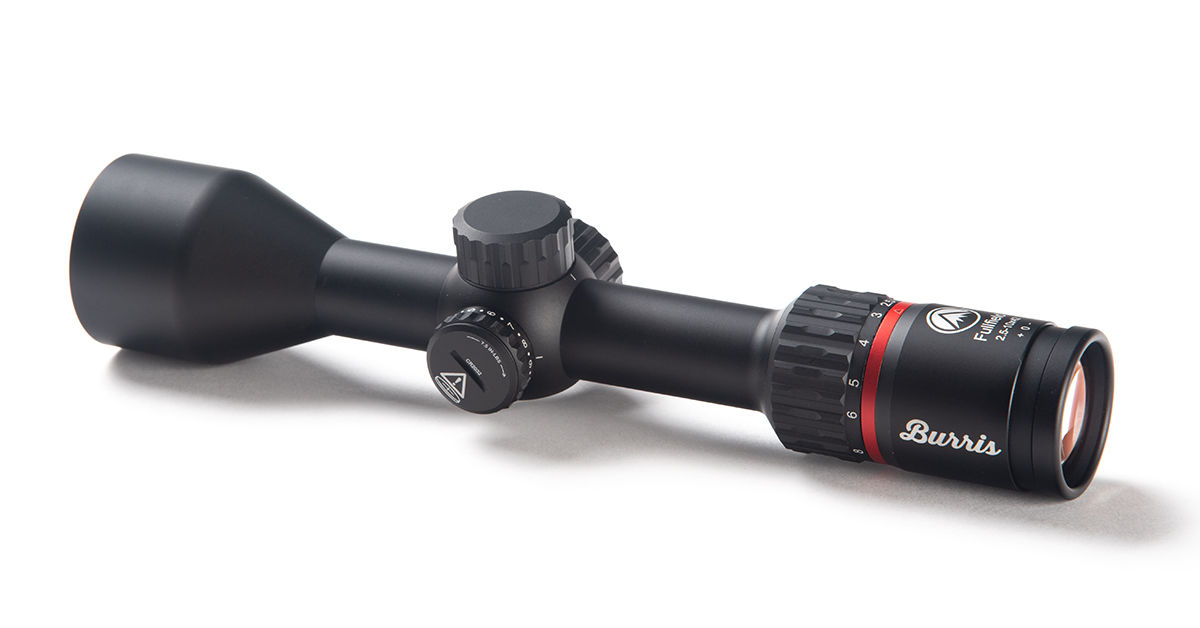
At 10.8 inches long, this Fullfield is right-sized for a 10/22 that will be doing most of its work in a mixed hardwood forest environment. The low end of the magnification range will be optimal for ground-hopping squirrels at close distance while the high magnification will be critical for locating those evasive bushytails hiding in the tall hickories.
Another plus for this scope is the illuminated Ballistic E3 reticle. This setup offers a fine aiming point for precision shooting and is a good choice for a rear focal plane scope. During early morning and late evening hunts, the illumination adjustment will provide a good aiming solution for the ambient light conditions.
With that said, the 2.5-10×42 scope is what I will be putting on this rifle for hunting. For testing (and some of the environmental photos seen here), I used the Burris Fullfield 6-24×50 riflescope. The reason? This scope has side focus/parallax adjustment whereas the 2.5-10×42 scope is non-adjustable for parallax-free at 100 yards. I wanted to ensure that parallax would not be a factor in the testing phase of this project (given the 35- and 50-yard distances at which I would be shooting). With the 6-24×50 model, I could dial-out any parallax and remove that variable from the equation.
And that wraps up the equipment selection for this ultimate squirrel gun build. If you want to see what’s involved should you wish to build your own, read on…
Assembling a DIY Precision 10/22
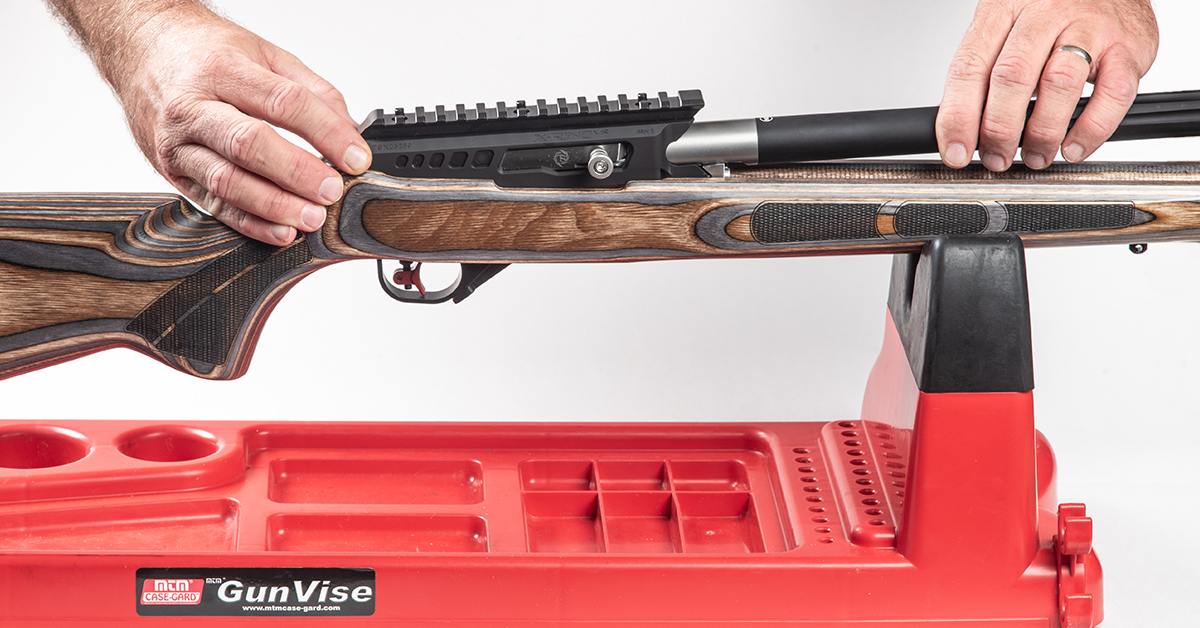
Tools needed for this project are minimal. Real Avid has the hex bits, in/lb torque wrench, and punches (optional in most cases) that I used. A workpiece support is also essential. For that, I heartily recommend MTM-Case Gard’s Gun Vise. The Gun Vise is a simple gun cradle with a locking lever for the stock. It performs well for most long gun work, such as cleaning, scope mounting, or…building that perfect custom 10/22. With its light weight, you can take it anywhere you have a flat surface to work on.
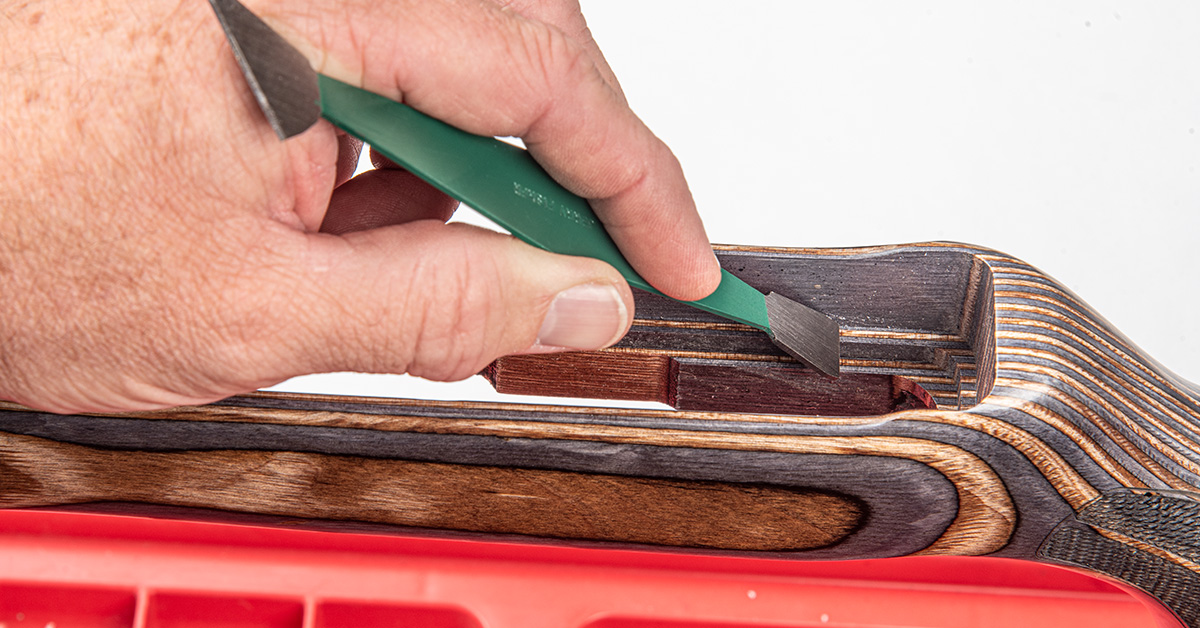
I always begin by smoothing out any end-grain burrs that may have raised up during the stock’s finishing process. A stock scraper, like this one from Jerry Fisher, is the best tool to use for this. Remove any burrs and irregularities from the inletted surface by carefully pulling the scraper toward you. Don’t remove any more material than is necessary and be sure to keep the edge of the scraper flat to the wood.
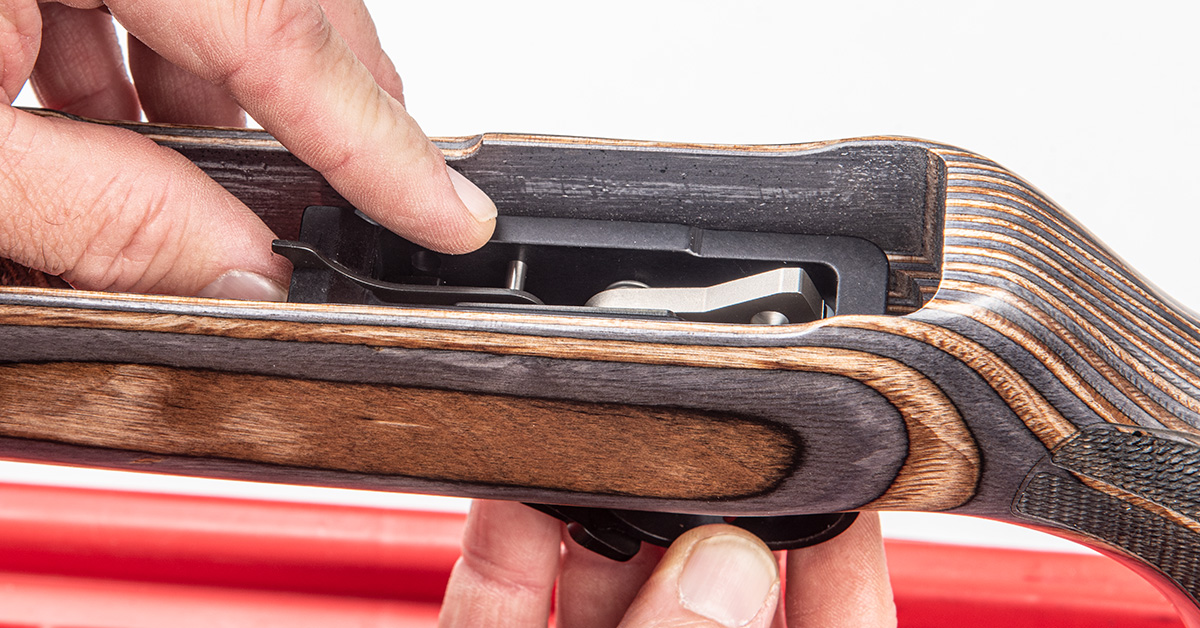
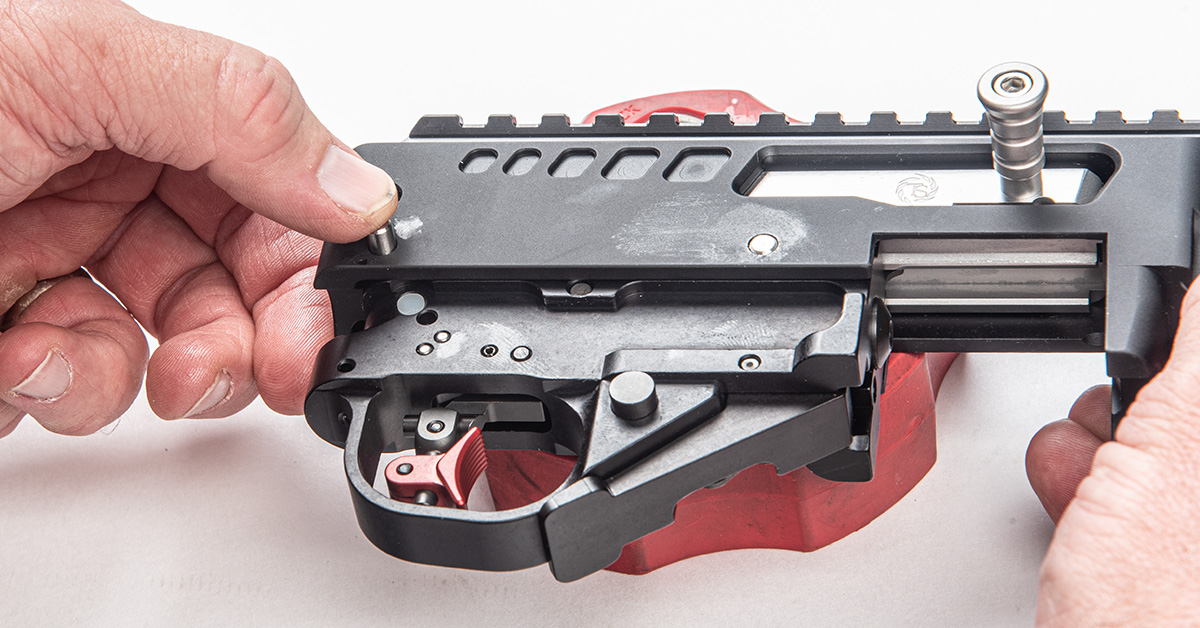
With all burrs removed, begin by test-fitting the trigger box, making sure it fits and that there are no obstructions.
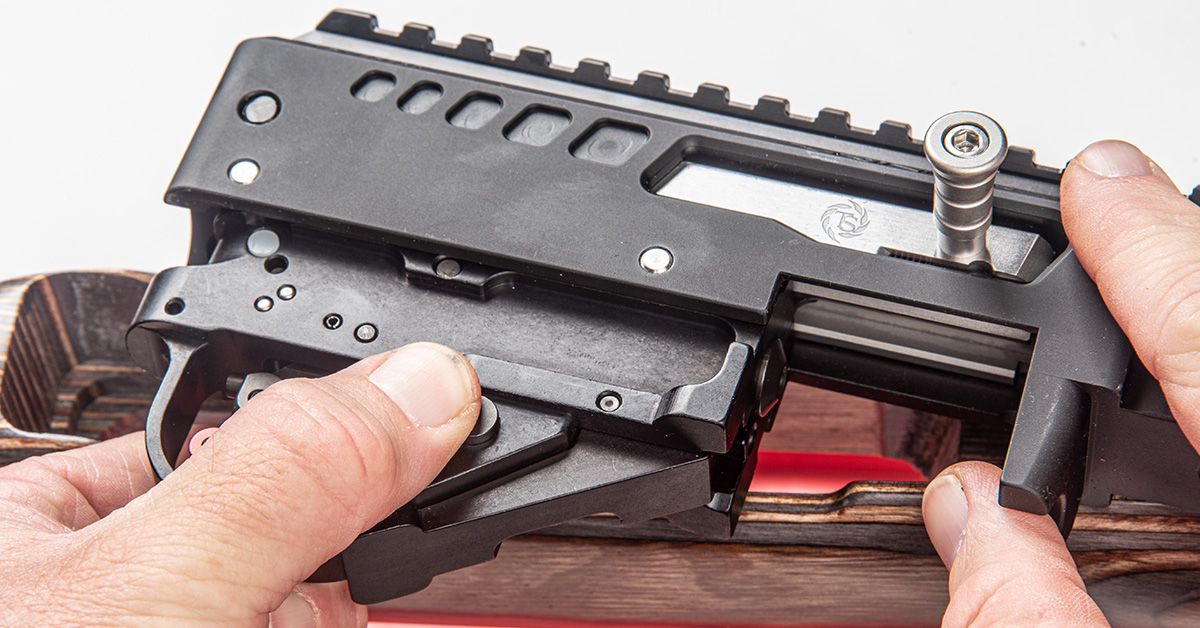
Do the same for the receiver.
The X-Ring VR receiver assembly comes with the bolt pre-installed. While it is not essential, I recommend removing the bolt for the barrel installation. Start by removing the bolt handle with a hex driver.
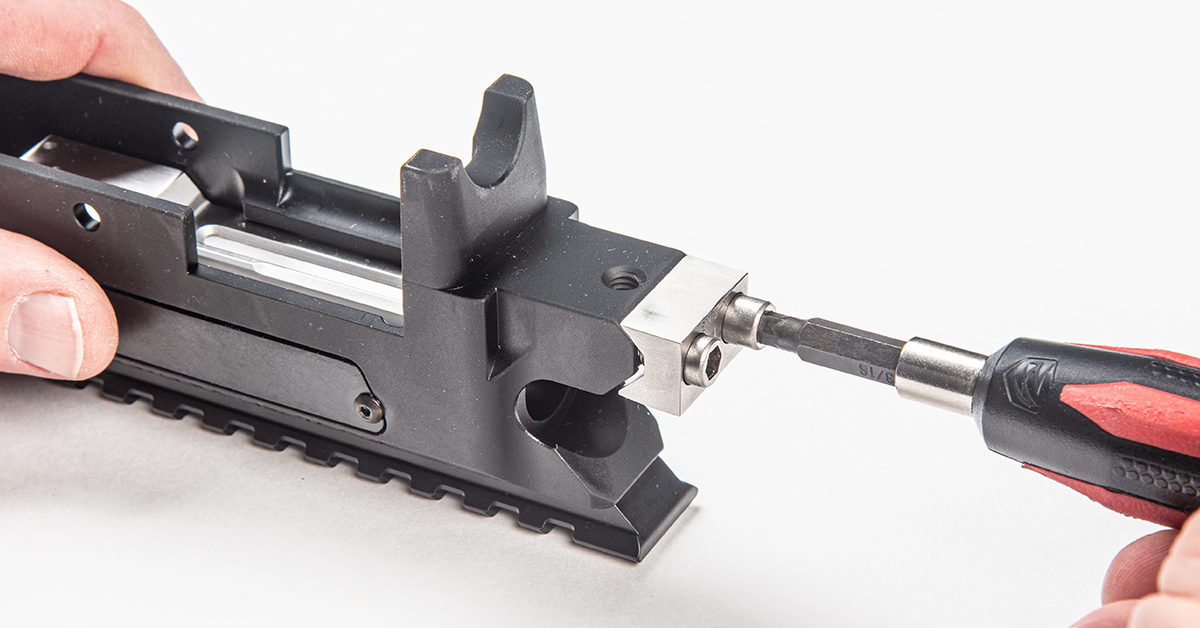
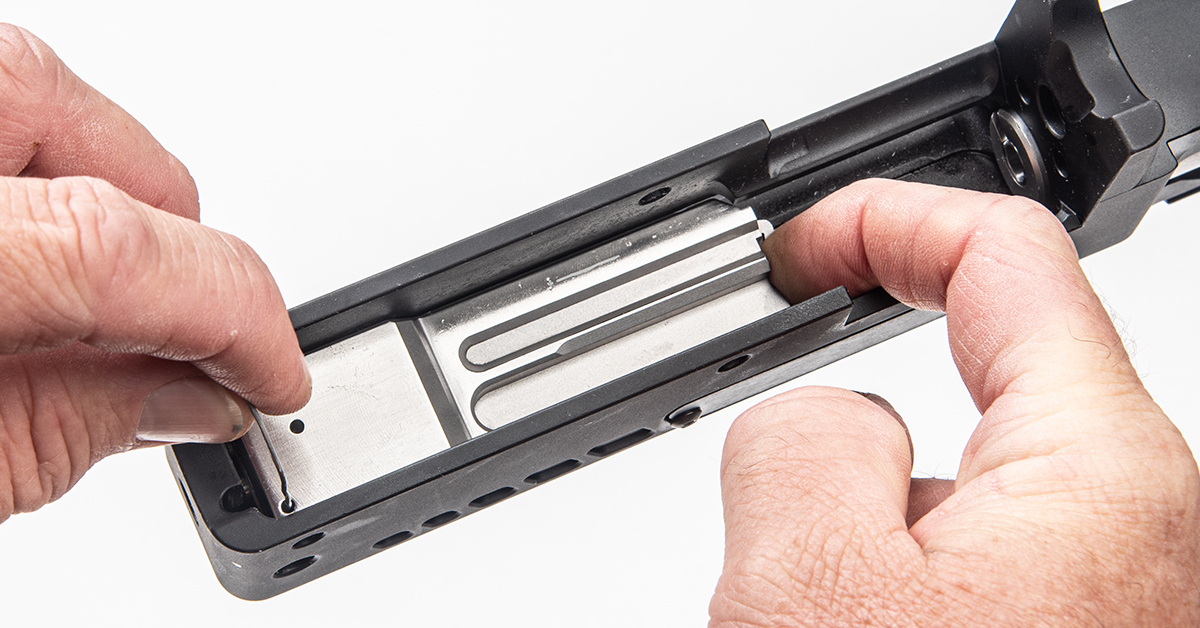
Remove the V-block from the front of the receiver.
Push or tap out the bolt buffer.
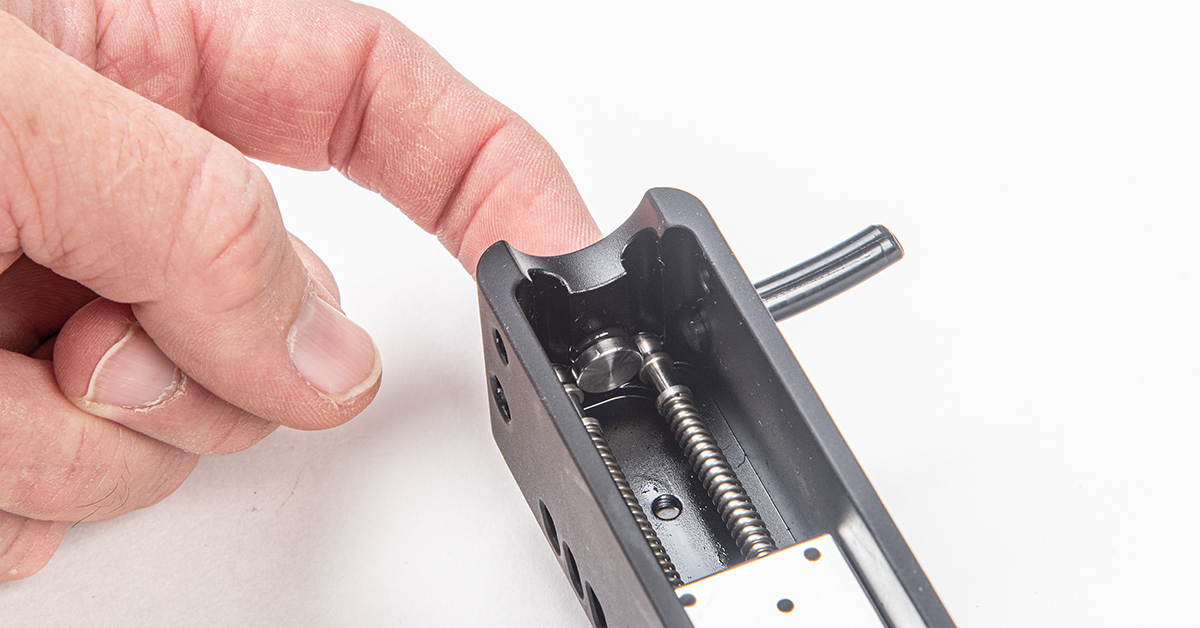
Push in on the cleaning access plug at the back of the receiver and remove the plug.
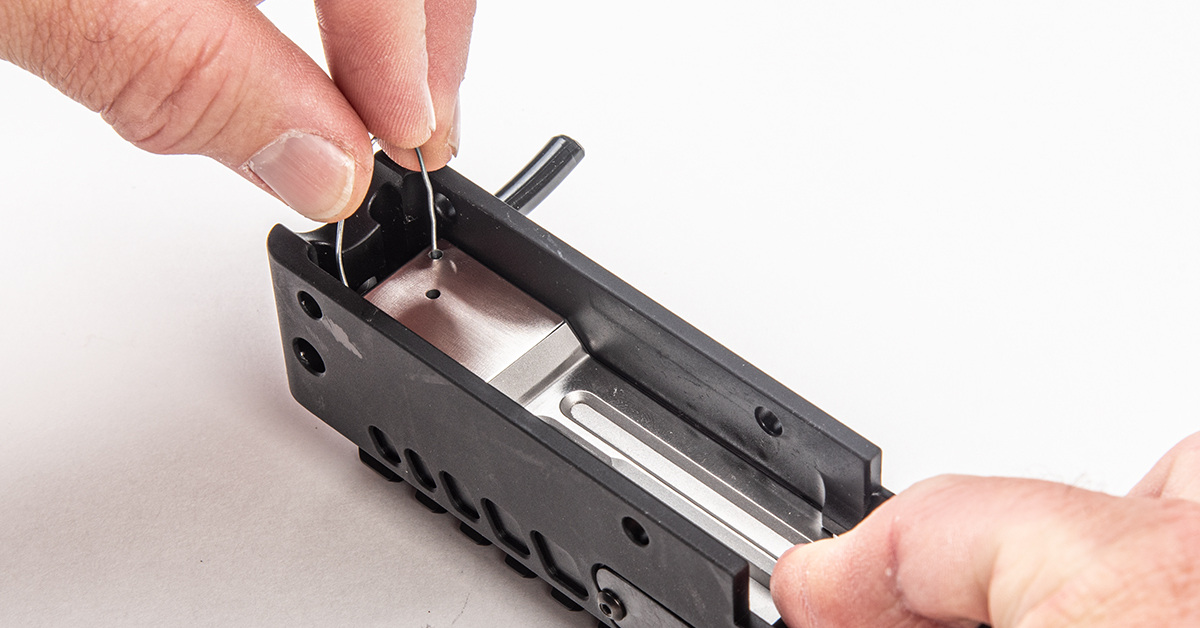
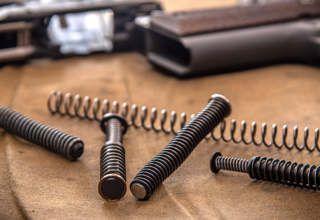
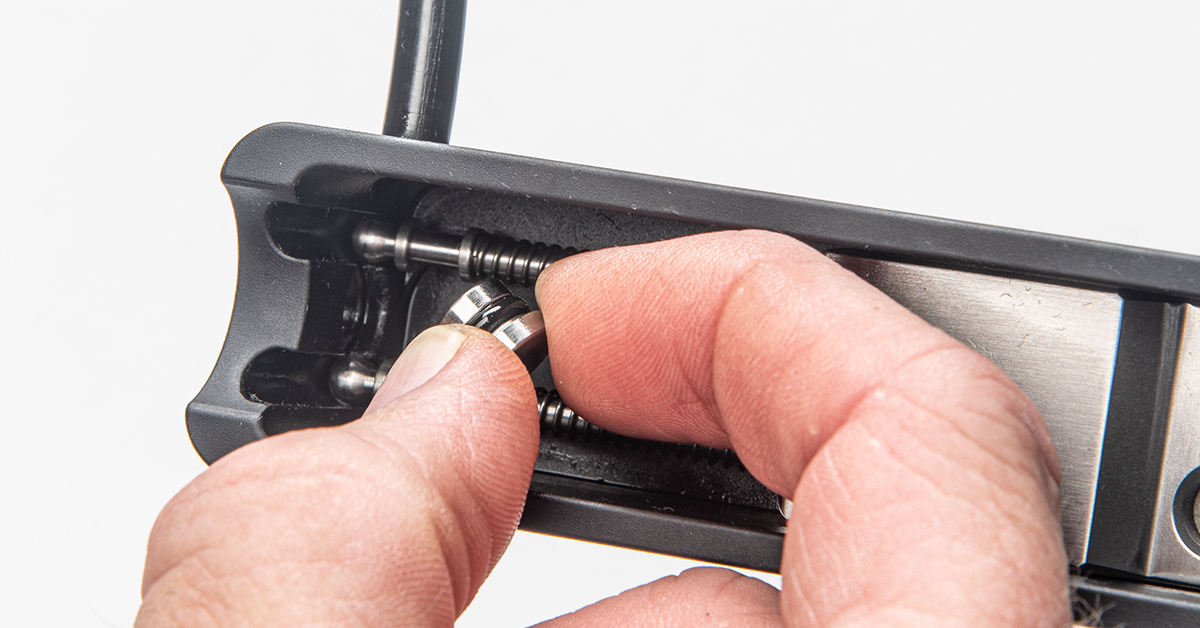
The Tactical Solutions bolt uses dual recoil rod and spring assemblies. Removing the bolt requires pushing the bolt to the rear of the receiver and capturing the recoil rods and springs in their compressed position. To do this, I use a paperclip that has been straightened and then bent into a horseshoe shape. The ends are then inserted fully into the two holes in the back of the receiver.

With the recoil rods and springs captured, the bolt can be removed from the receiver by tilting the back of the bolt and then working the assembly out the bottom of the receiver.
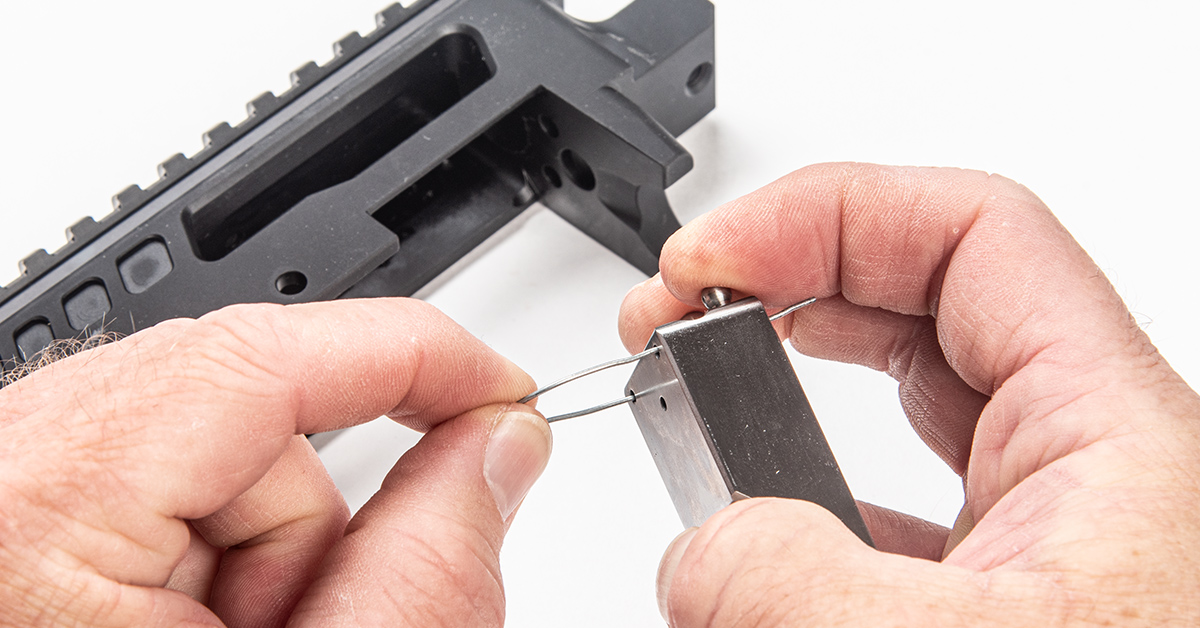
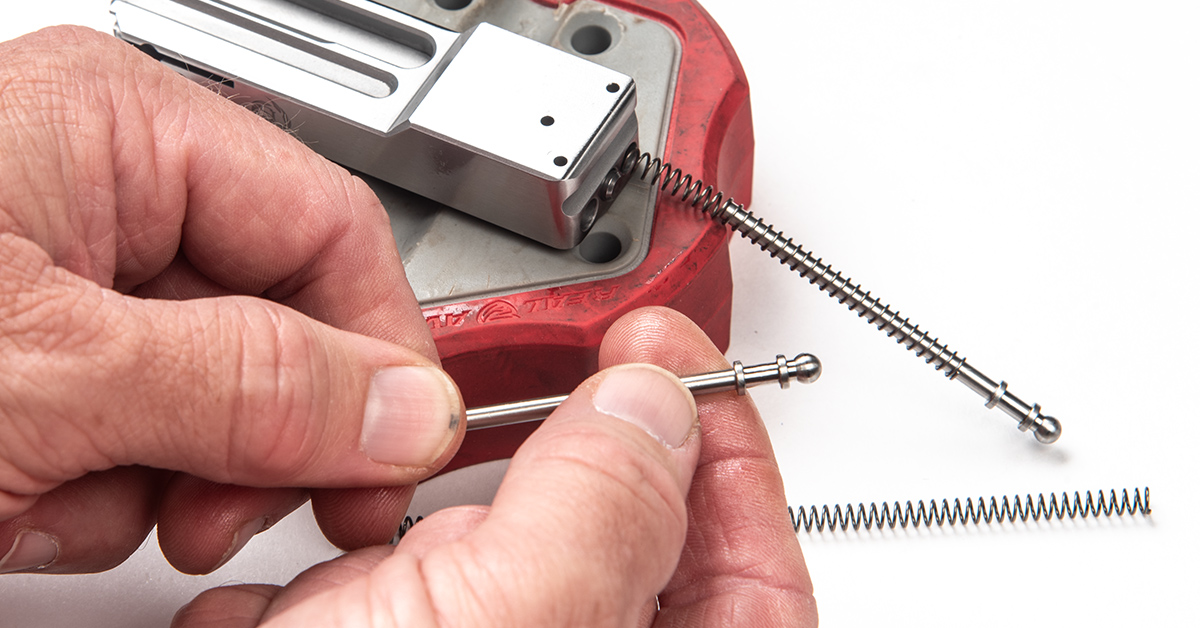
To remove the recoil rods and springs, compress them and remove the modified paperclip. Be careful to maintain control of the rods and springs. These are under pressure and can easily shoot out of the bolt if you are not careful. Always wear eye protection when performing this procedure.
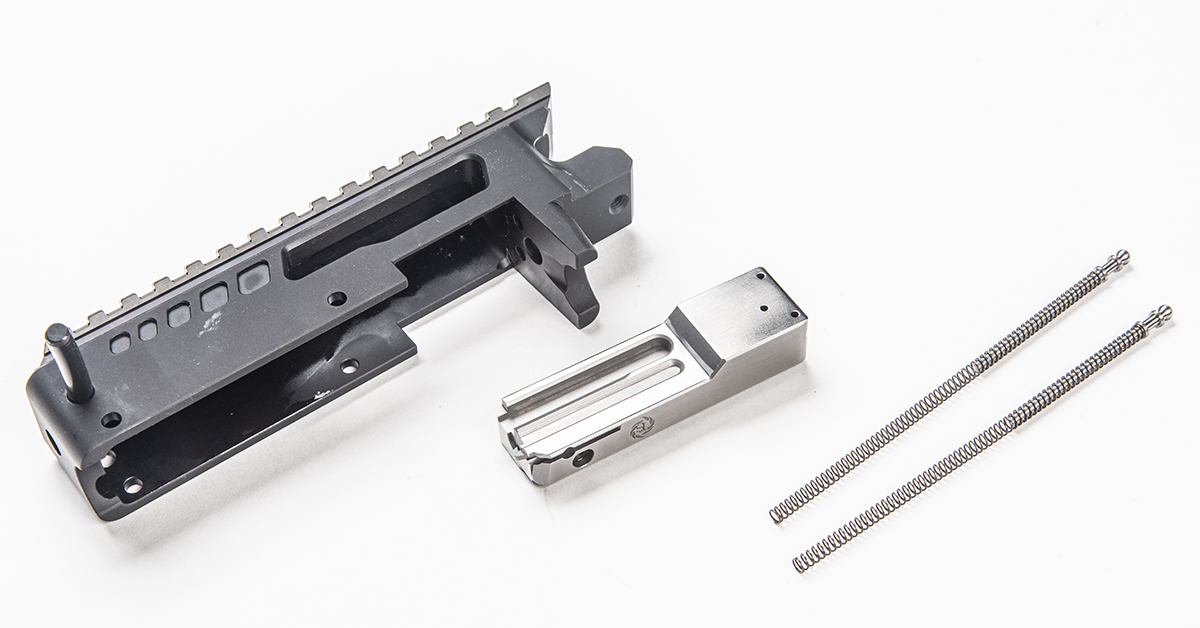
The disassembled receiver and bolt assembly.
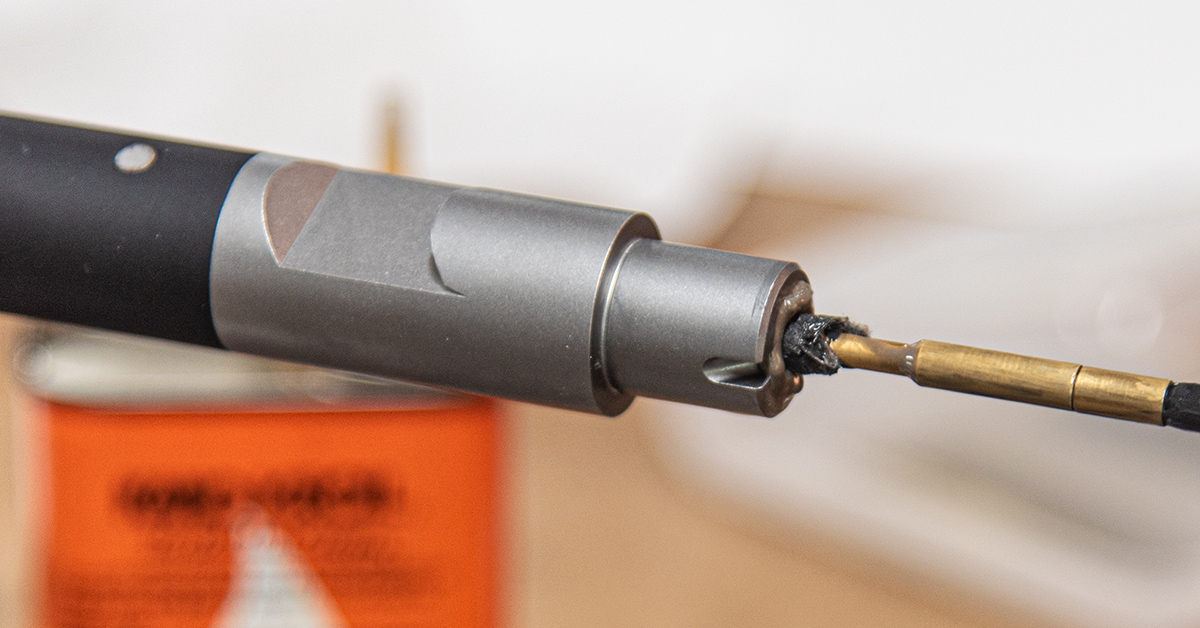
With a new barrel, I like to give it a cleaning and light bore polishing prior to installation. After cleaning with a patched jag and brush, I saturated the bore with Kroil and let it set for a few minutes. Next, I saturated a patch with non-embedding JB Bore Cleaning Compound and ran it back-and-forth through the bore about ten times. Lastly, the bore was cleaned to remove all the cleaning compound.
When using Tactical Solutions’ receiver and barrel combination, the barrel shank should go into the receiver with little to no play — a testimony to the company’s close machining tolerances. In some cases, or in the case of installing this barrel into another manufacturer’s receiver, it may be necessary to remove a slight amount of material around the shank circumference. Tactical Solutions’ instructions detail how to do this. My combination fit perfectly as it came out of the box.
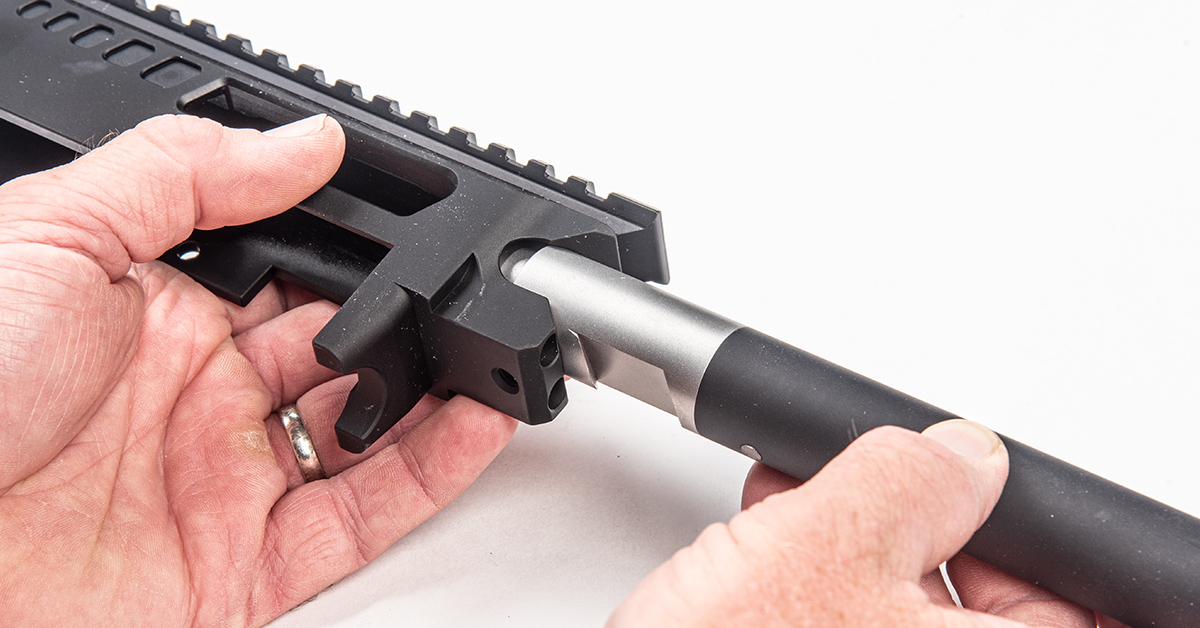
Once you’ve determined proper fitment, lightly lubricate the circumference of the barrel shank and insert the barrel into the receiver. The V-notch in the shank will be oriented to the bottom of the receiver.
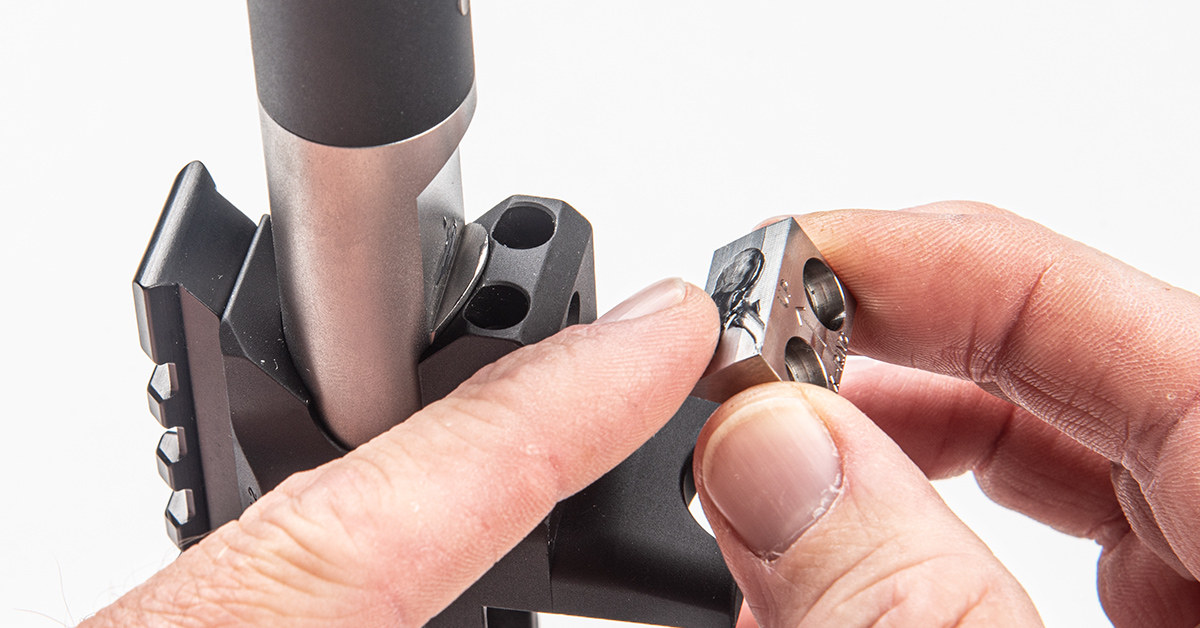
Apply a light grease coat to the mating surfaces of the V-block and the V-notch. Note the orientation of the barrel in the receiver as well as that of the V-block. A directional arrow indicates which end of the V-block is up.
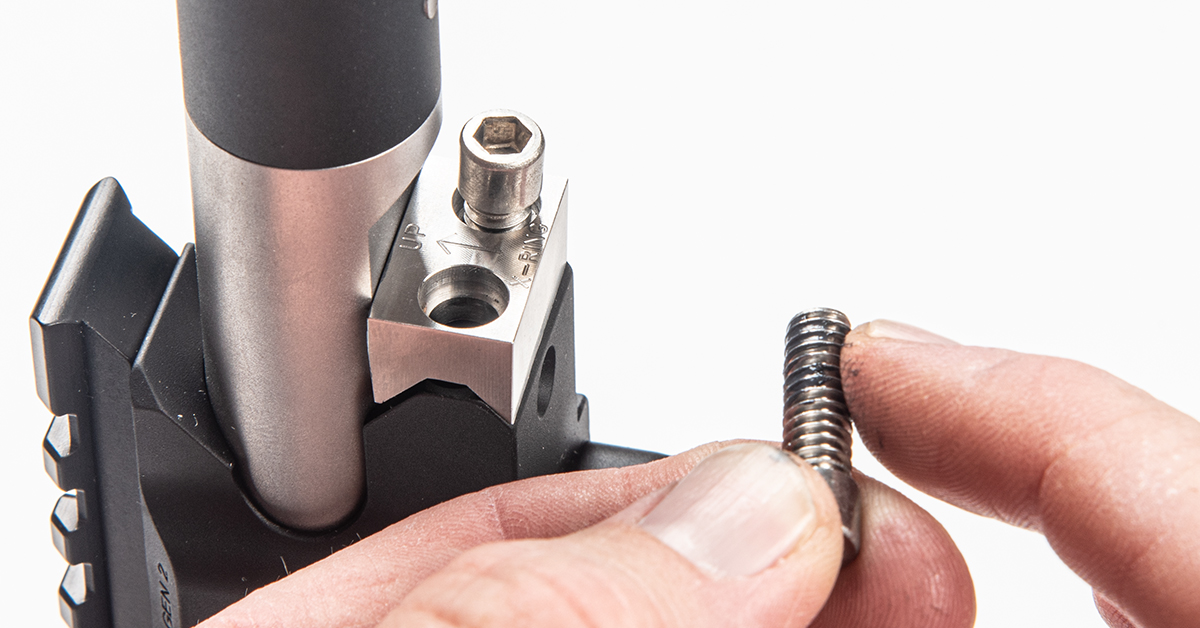
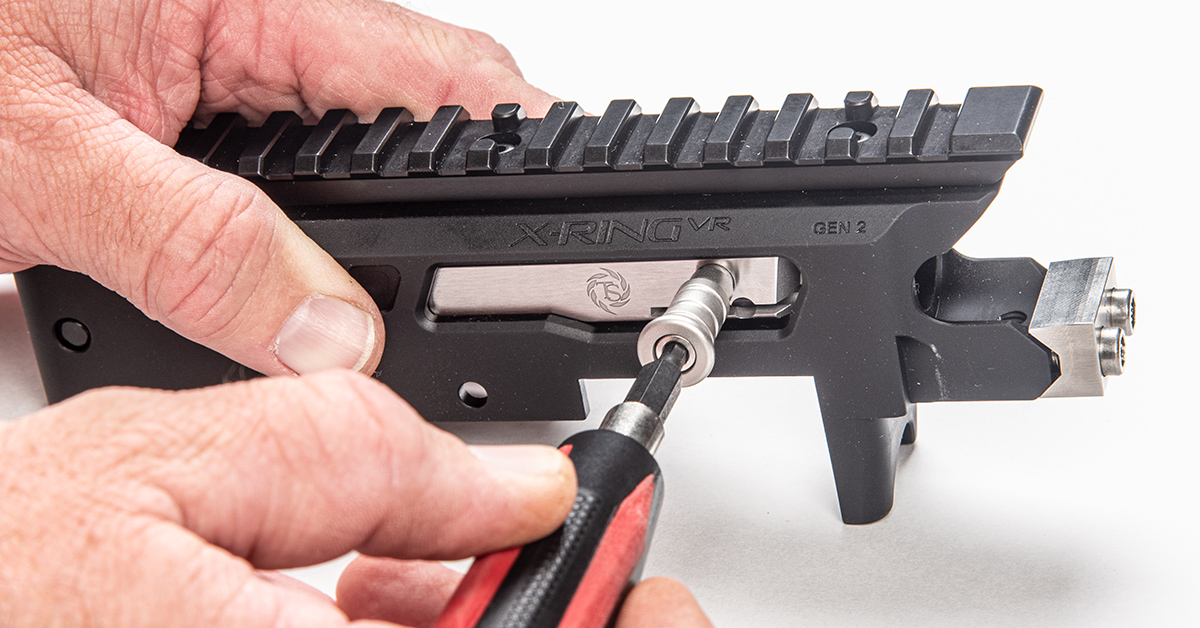
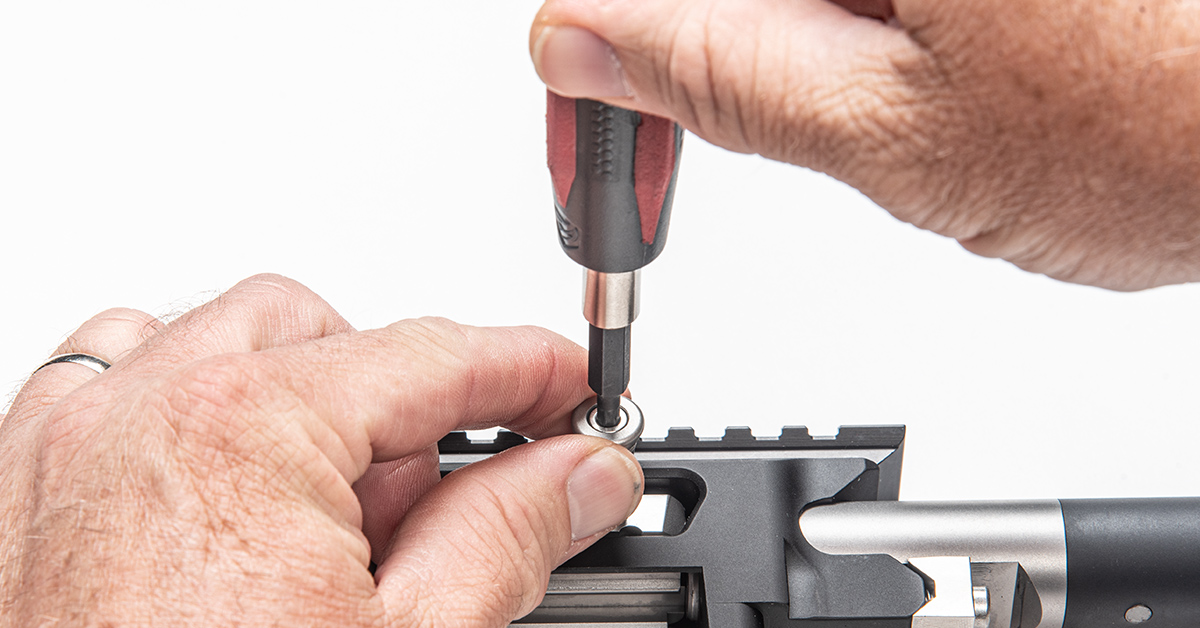
Install the V-block onto the receiver and barrel shank, making sure to align all flats parallel to one another. Apply a light amount of grease to the V-block screws and install them finger tight.
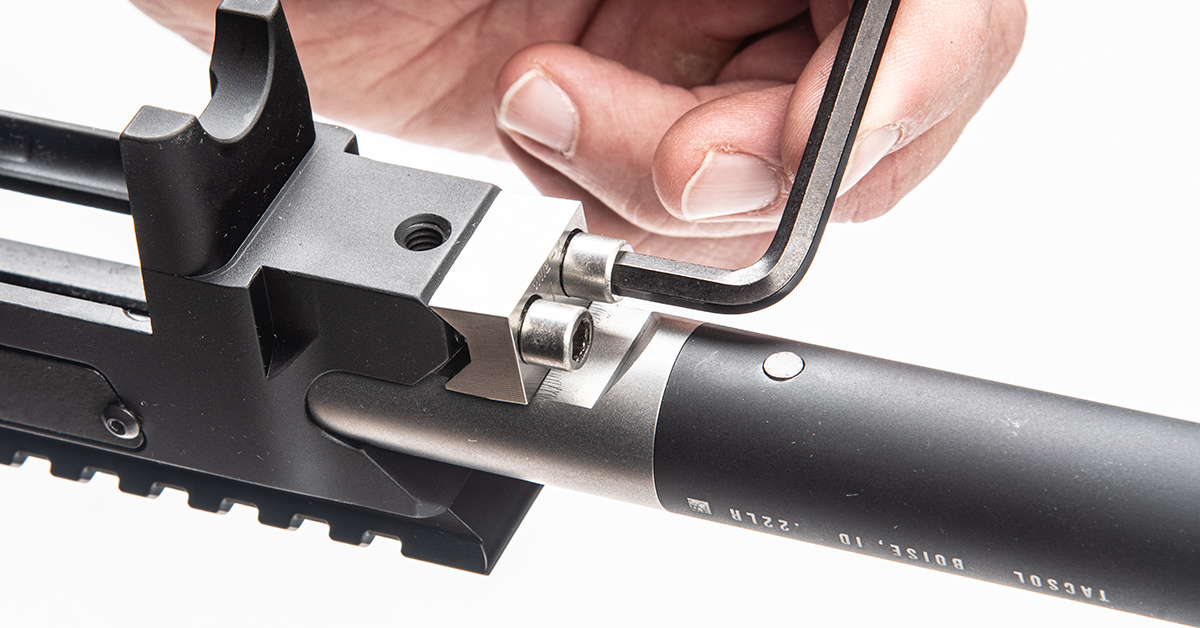
Slowly alternate tightening the screws to ensure even clamping of the barrel to the receiver. Tactical Solutions recommends tightening the screws hand tight with a hex wrench, or snugging them to 18-24 in/lbs.
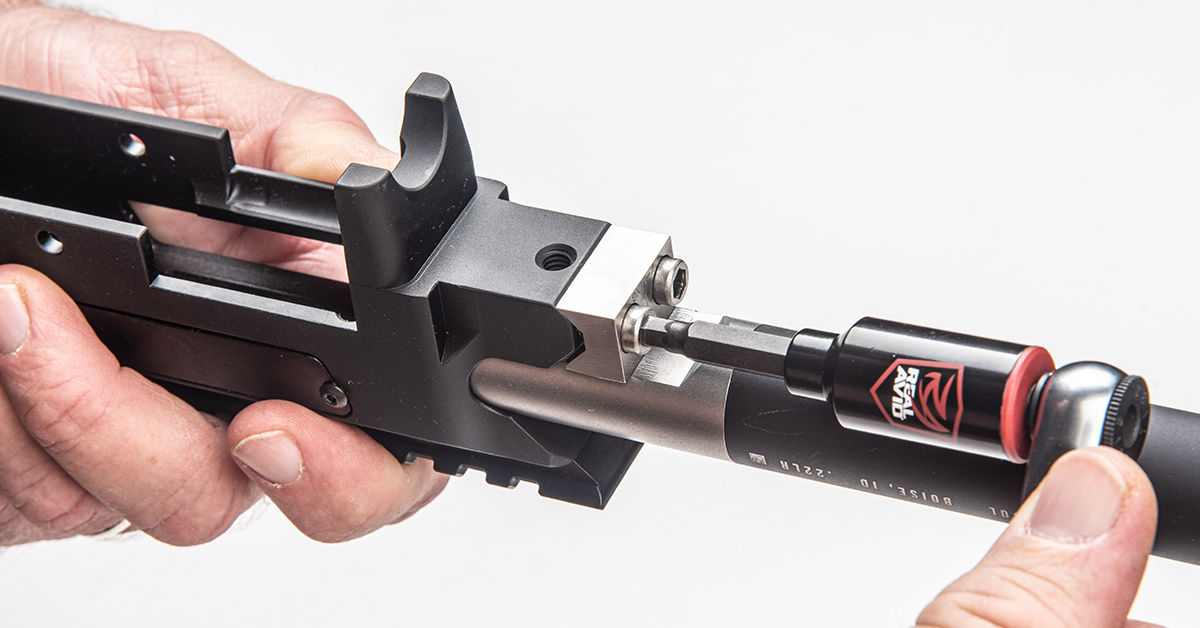
I used Real Avid’s Smart-Torq Fixed Limiter & X3 Driver Kit to set the torque at 20 in/lbs.
To prepare the bolt for reassembly, it is wise to lightly lubricate the recoil rods and springs before inserting them into the bolt.
After recapturing the recoil rods and springs in the bolt, the bolt installation is simply the reverse of the removal. Once the bolt is in place, push back on the bolt face, remove the paperclip, and slowly allow the bolt to move forward.
With the bolt closed, check to make sure that the extractor claw is oriented in the middle of the extractor claw groove in the barrel shank. If it is not, or the extractor claw is touching the shank, you will need to slightly adjust the barrel position.
Reinstall the clean-out plug in the back of the receiver.
Tap or push the bolt buffer into place.
Reinstall the bolt handle.
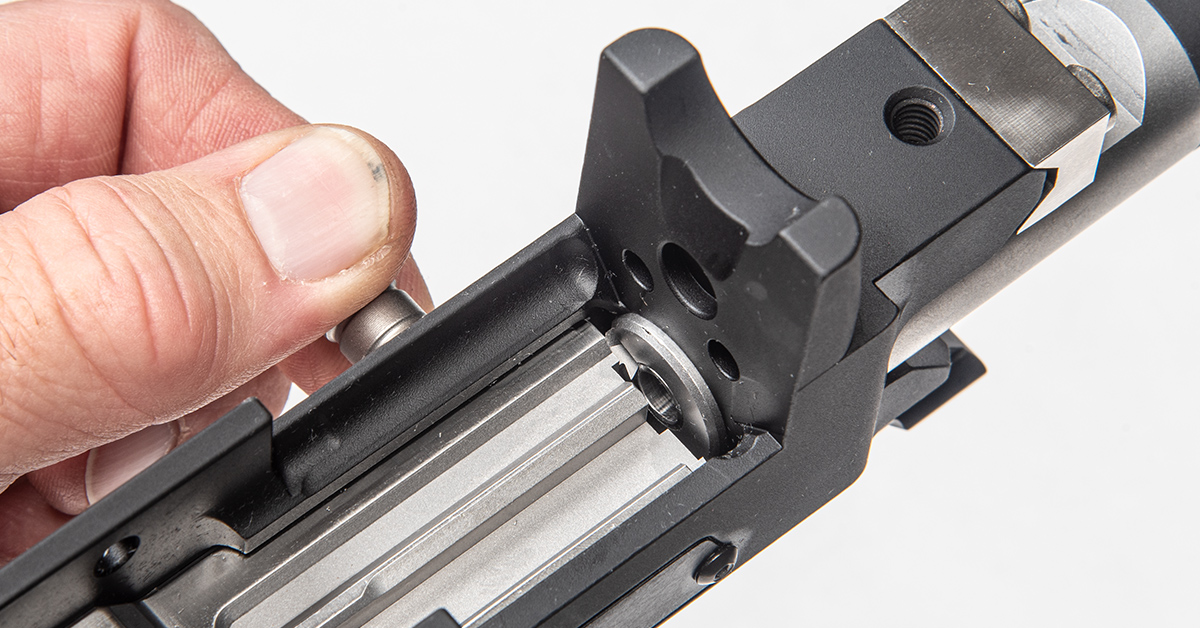
It doesn’t hurt to double-check that the extractor claw is correctly entering the barrel shank slot.
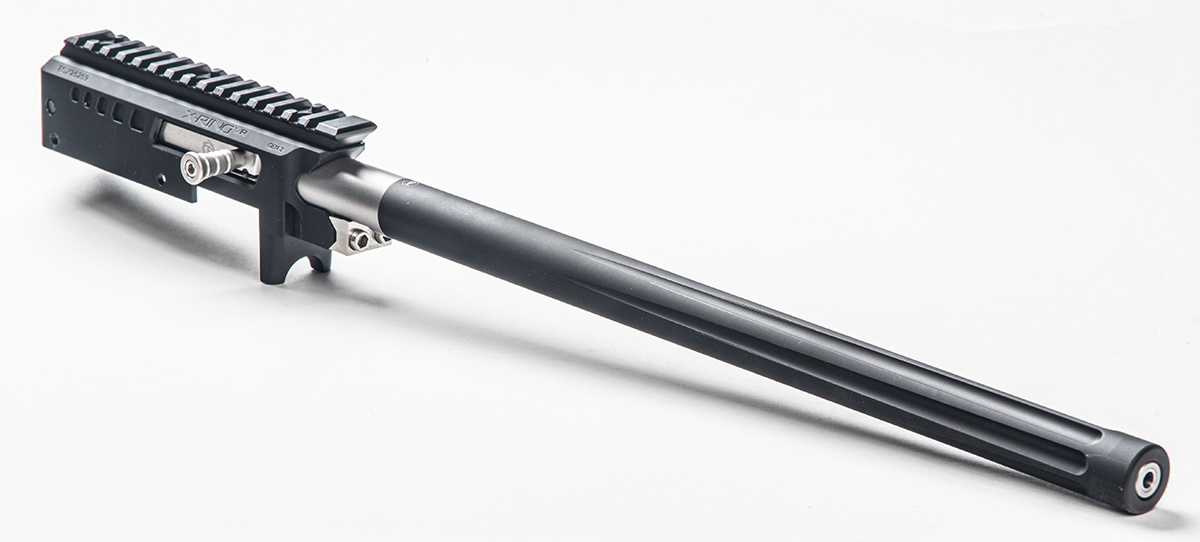
The barreled action assembly is now complete.
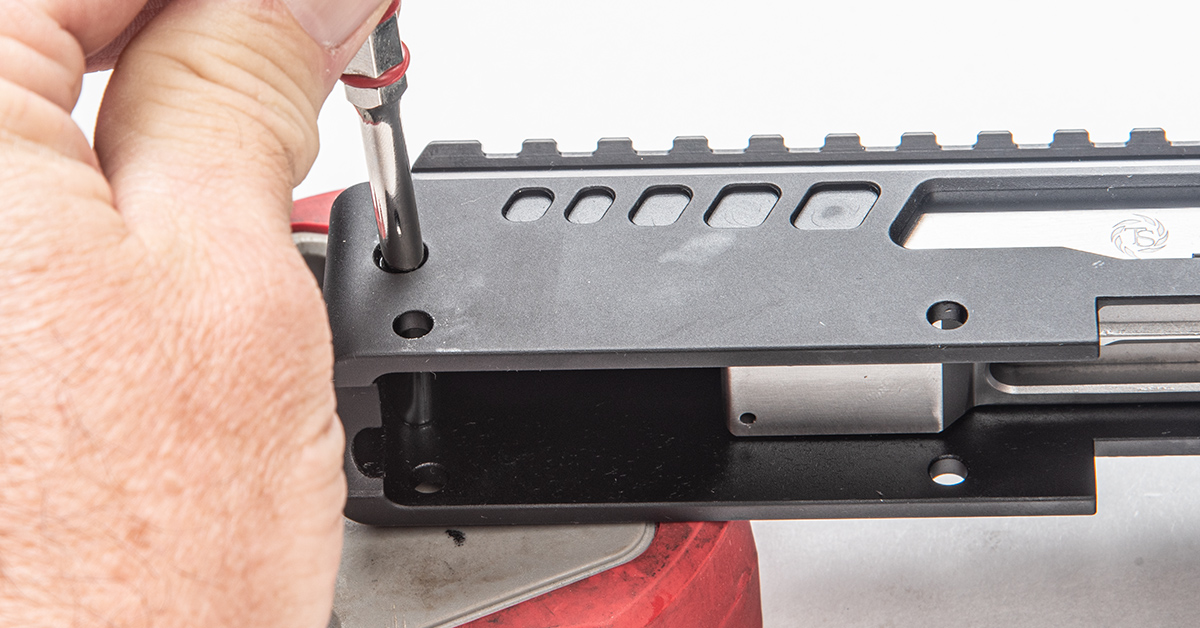
The Timney trigger installs into the bottom of the receiver and is secured in place with two pins. Insert the trigger and install the pins. These should go in with only finger pressure.
To install the assembly into the stock, you need to move the crossbolt safety to the halfway position in the trigger housing. This will allow the safety to clearance the stock inletting as the barreled action is moved into place.
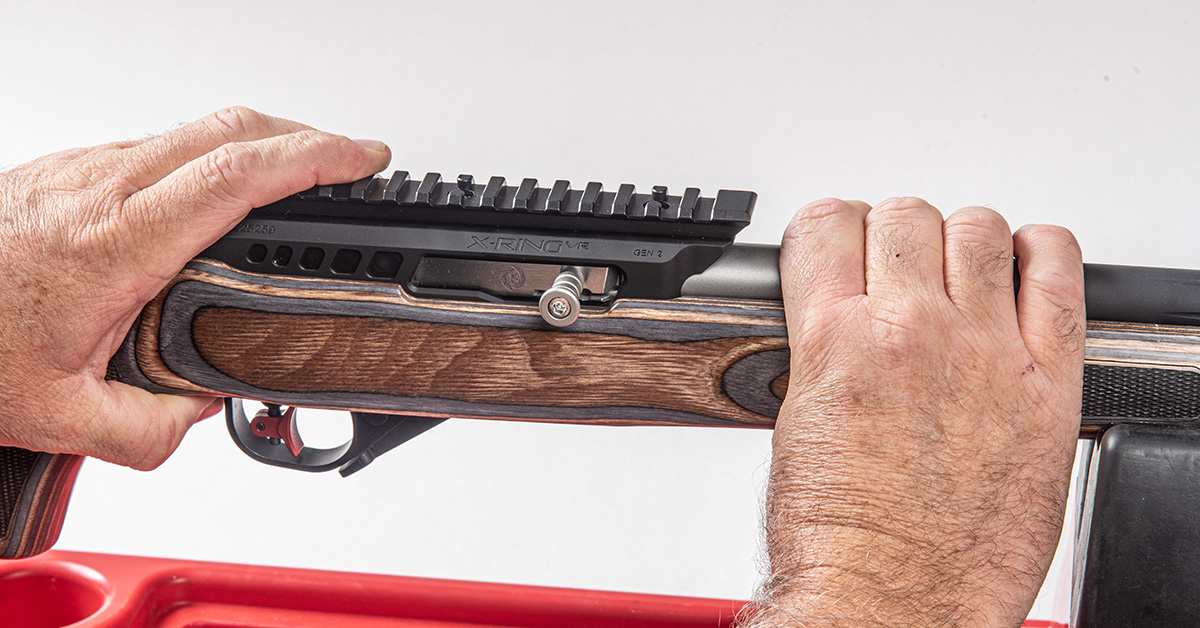
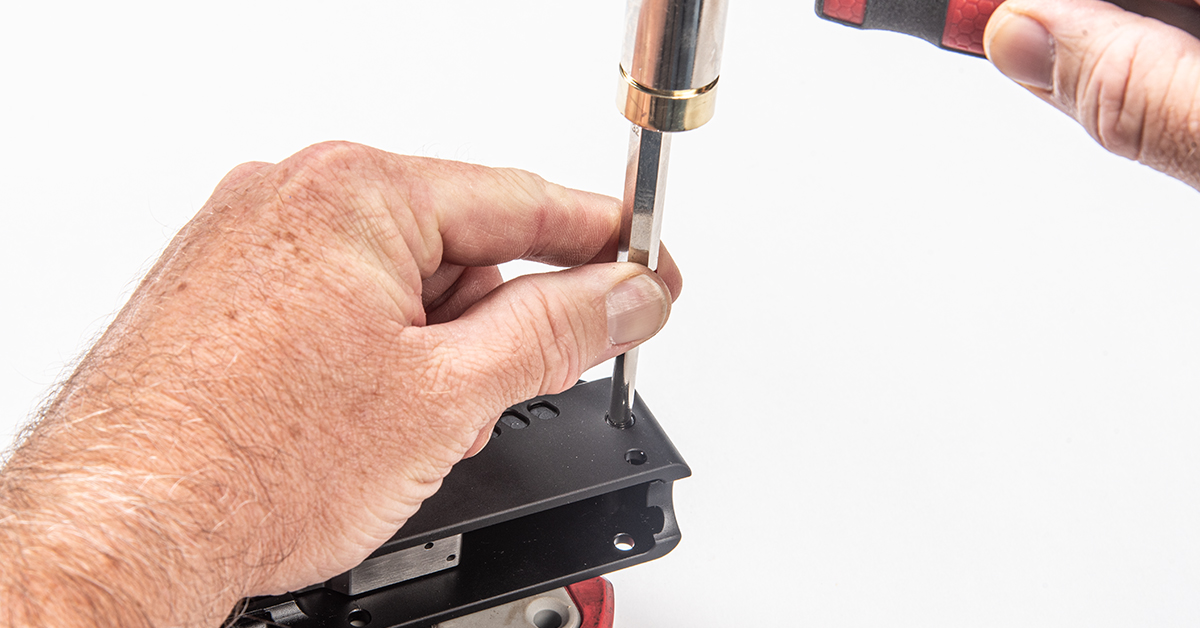
Place the assembly into the stock and ensure that it is fully seated.
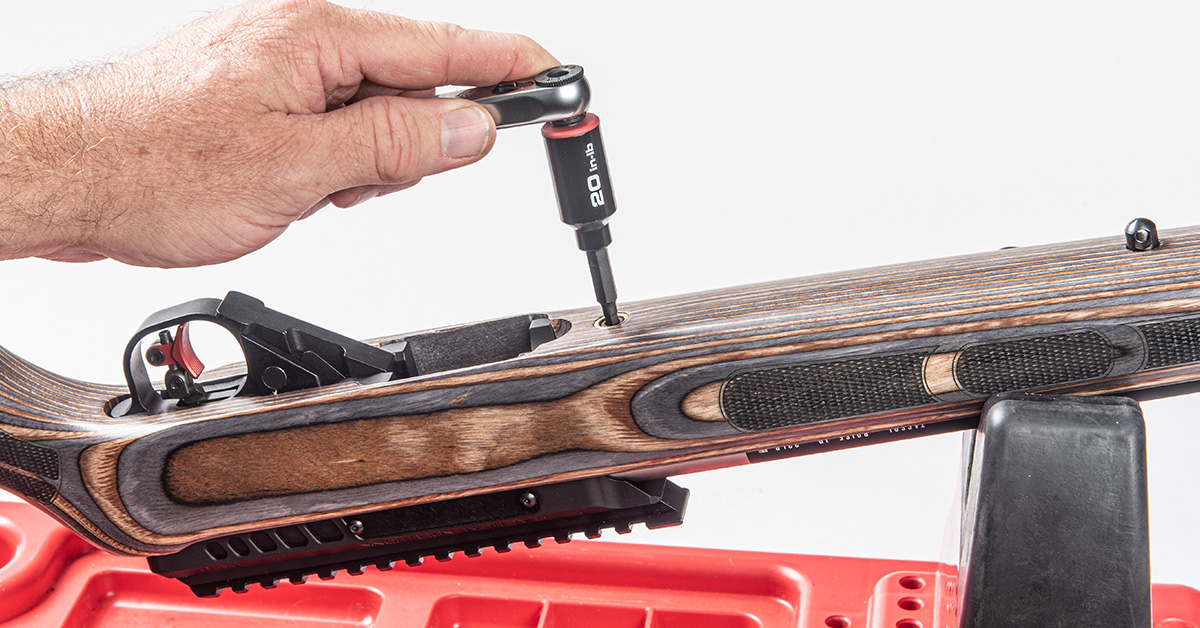
Snug the action screw and torque to around 20 in/lbs.
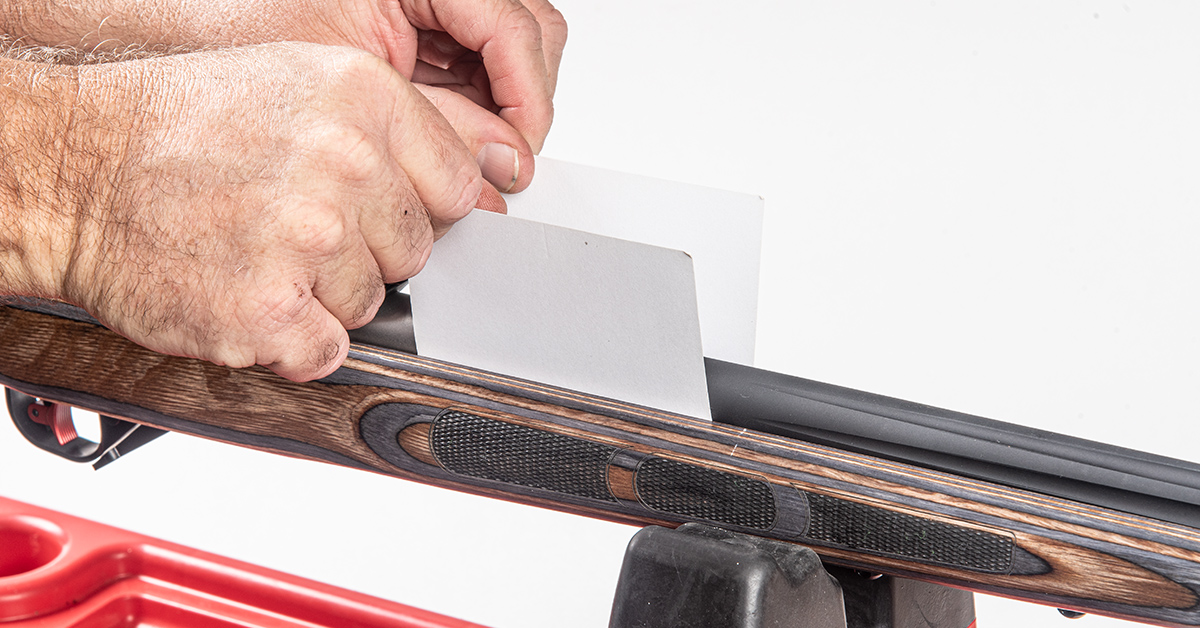
Since this is intended to be a free-floating barrel configuration, use a piece of paper or dollar bill and slide it between the barrel and the stock, beginning at the front and moving back to the receiver. The paper should slide all the way back without interference. Any interference will need to be located and the excess material removed from the stock with a scraper.
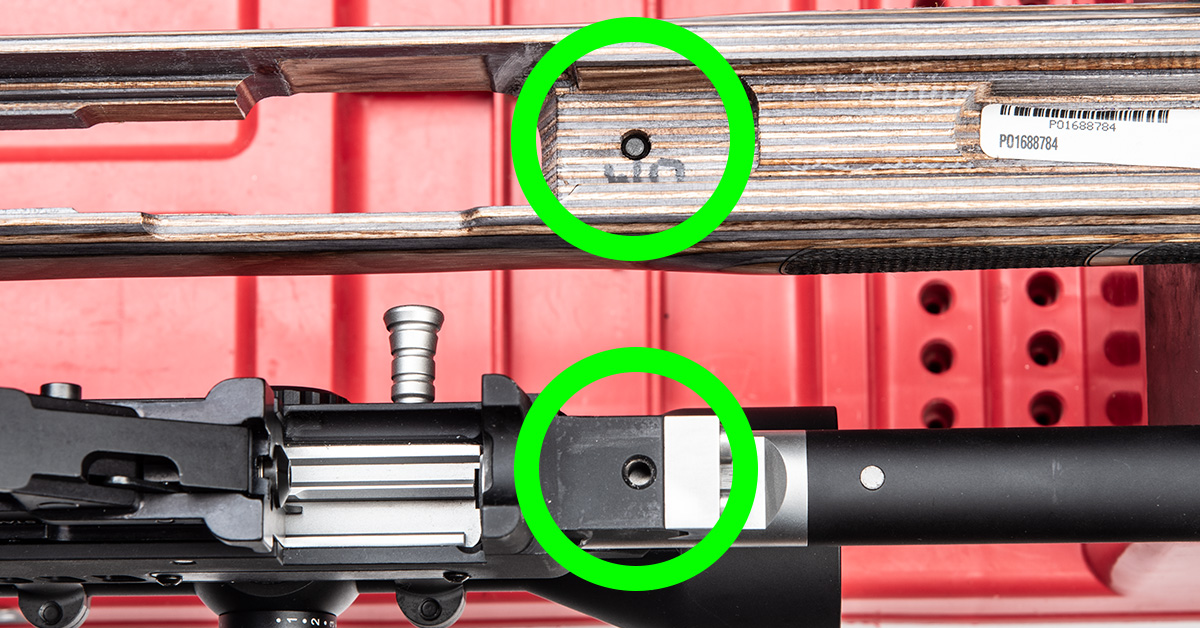
The 10/22’s barreled action only secures to the stock with a single action screw. It is important that the receiver sits flat against the stock at this location (circles). If it does not, the receiver may not be properly “grounded” and the result could be that the barreled action will rock under recoil. To ensure a flat mating surface, we use inletting black and a scraper to achieve the desired fitment.

A light coat of inletting black is first applied to the bottom of the receiver as shown.
The assembly is then carefully installed into the stock.
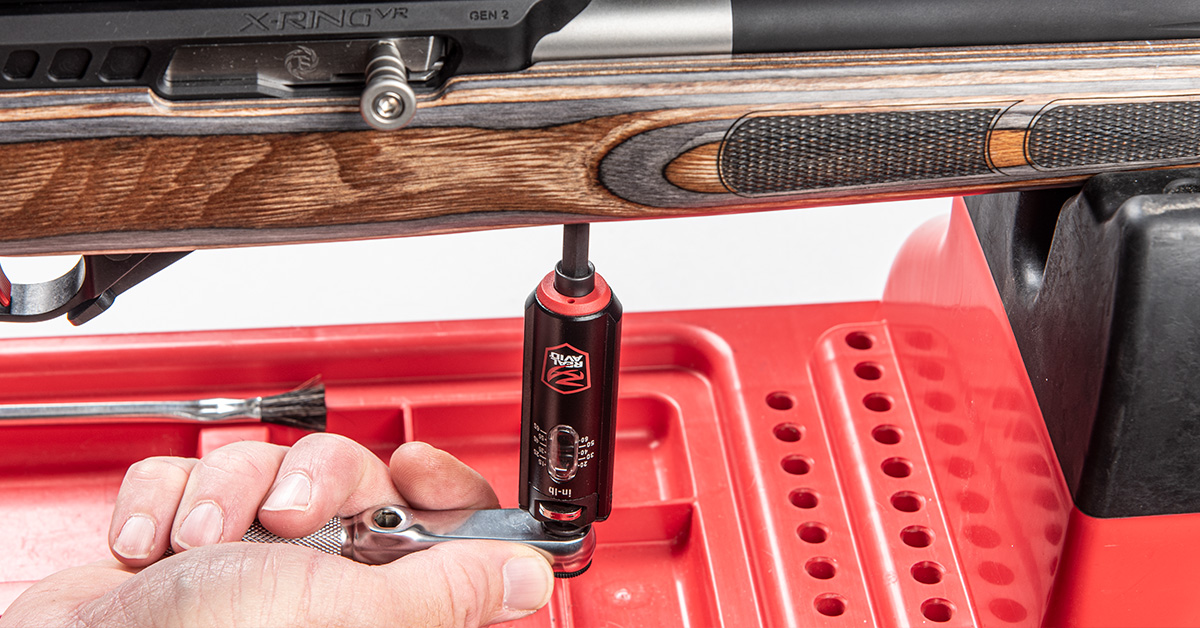
The action screw is torqued to the desired specification. The barreled action is then removed from the stock.
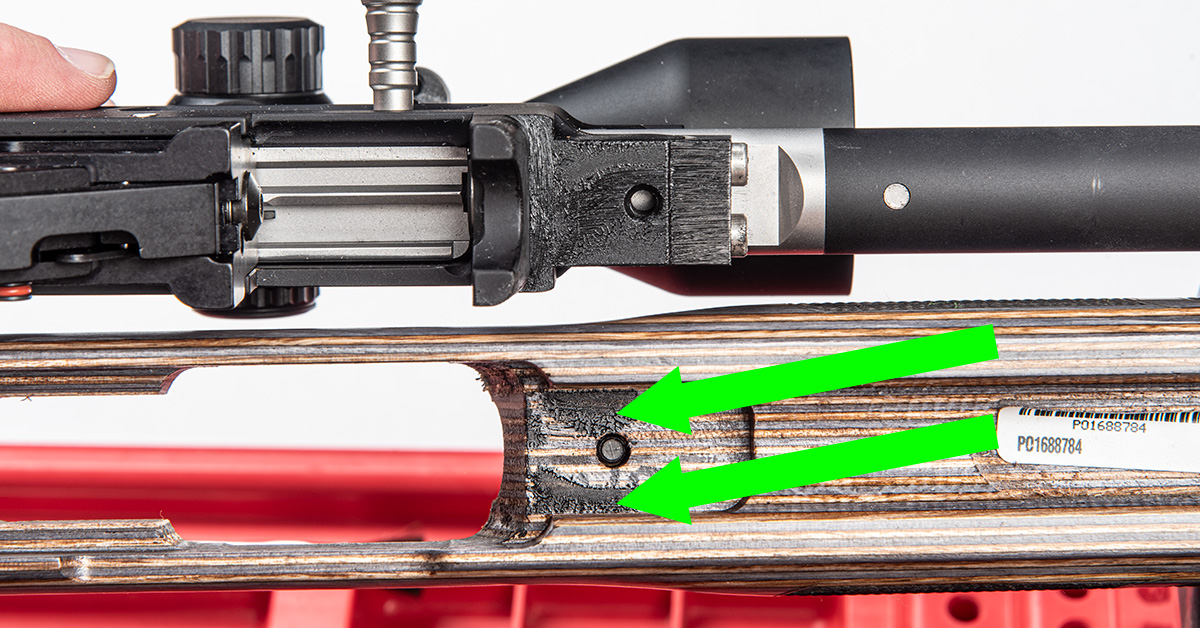
This process will indicate the high points where the receiver is contacting the stock (arrows). The low points are where there is no inletting black (between the two arrows).
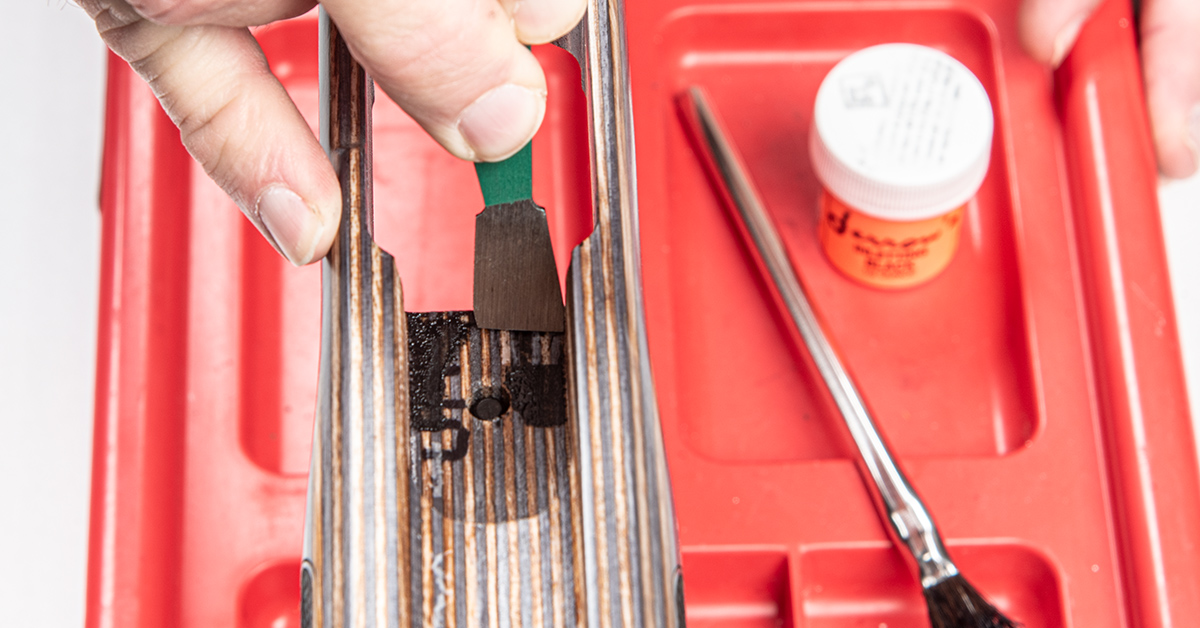
Since the goal is to have inletting black across the entire stock-to-receiver mating surface, it is necessary to remove material from the stock (the high points) where the inletting black transferred. Use the scraper to slowly remove a small amount of material at a time. Once the inletting black and a minor amount of stock material has been removed, repeat the process again. When I say minor, I mean it. In practice, I apply firm pressure to remove the inletting black and just a tad of what’s underneath. That’s it. This is a slow and methodical process.
Note that you will not need to add additional inletting black to the receiver. Simply rebrush the flat until you have a fresh surface. A small amount of inletting black will go a long, long way.
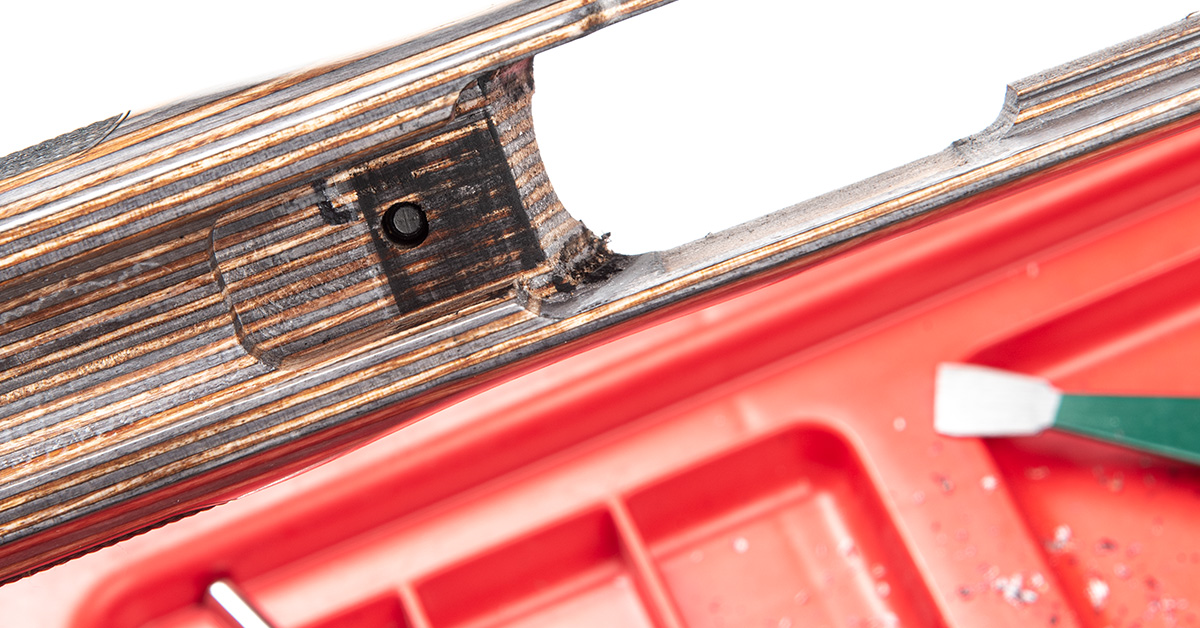
It may take several repeats of this process until you achieve a flat mating surface as seen here. This is what you are looking for. It took me 8-10 repeats to get the desired imprint. Go slowly because if you remove too much material, you can’t put it back and you can’t keep scraping to level it up.
And with that, the build process is complete. Be sure to perform a function check to ensure the trigger, reset, safety, bolt hold-back, and magazine release lever are all working properly.
Now it is time to head to the range and work through the load selection process, which we cover in Part 2. Will this gun pass the magic sub-half-inch mark at 50 yards?
Go find out.