Those of us who relish taking our guns beyond factory specs jokingly refer to our condition as “The Disease.” Moving that metaphor to the next level, the Ruger 10/22 platform can be likened to an aggressive strain of the virus. This little carbine, relatively inexpensive and built by the zillions since its 1964 debut, has been the vector for many wayward hours at the gun bench and the range for thousands of rimfire enthusiasts.
The reason is simple. Arguably no other firearm platform on the market is so effortlessly adaptable to a broad range of shooting styles or so easily worked on with so few tools. Of course, being an easy gun to work on does not make for a gun that should necessarily be worked on. The 10/22, though, is a gun worth “doing.” It is remarkably reliable and accurate straight from the factory, so it’s not like you’re trying to turn a four-cylinder sedan into a drag-race champion. The DNA is already there.
The aftermarket recognized a long time ago the viability of the Ruger 10/22 as a premiere player in the customized rimfire segment. Because it is so simple to work on, it presented many opportunities for the tinkering crowd. The trigger—without question the one area where the factory 10/22 does not receive high praise—begged for help and the aftermarket responded, followed by specialty barrels for various shooting applications, stocks, receiver parts, and so on. Today, you can build your own 10/22-style rifle without even having to buy the base rifle. Much like the AR-15, the 10/22 can now be purchased in parts—right down to the stripped receiver—and then assembled as you like it.

And that, really, is the addictive appeal of this rifle platform for those who may have already taken that first customizing step. With so many aftermarket options to choose from, you can build from scratch or transform a factory rifle into something that suits your needs and style of shooting.
How diverse can the venerable 10/22 be? We took one regular-production rifle and used two different barrels and stocks to create two different rimfire rifle packages with totally divergent personalities and functions.
When casting about for ideas, our eyes first turned to Green Mountain Rifle Barrel Company. GMRB is a known quantity in the aftermarket rifle barrel business, having started in the precision muzzleloader segment before expanding into other channels, including the Ruger 10/22. Their competition-level bull barrels are among the top choices of serious rimfire competition shooters, so we were confident that we were shopping in the right aisle.
One of the things, aside from quality manufacturing, that sets GMRB apart in the 10/22 segment is their diverse barrel offerings. In addition to their robust competition barrels, the company also makes specialty barrels that really let you transform a 10/22 into several distinct flavors.
The Beater

The barrel that caught our eyes right off was the military-style finned model. Offered as a “military conversion package,” this tube features classic cooling fins in unabashed Thompson submachine gun style, ending with a machined Cutts compensator and hooded iron front sight. Included in the package is a Williams adjustable rear aperture sight and a “nothin’ fancy” solid walnut stock that also has an old military whiff about it.
The thought behind this build was quite simple—create the ultimate throw-it-in-your-truck .22 rifle. With no delicate or obtrusive parts to succumb to rough ranch handling and with an austere wooden stock that practically begs for a few dings and scratches to give it that comfortably worn-in look, this GMRB conversion has it going on for busting varmints on the Back Forty or for day’s end plinking after putting up hay.

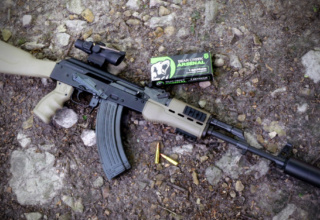
Even if farm duty isn’t part of your repertoire, this 10/22 conversion has a lot to offer. What we mean is that it is a simple gun that allows you to rediscover the fun of open sight shooting (if you’ve been away from it for a while) or to learn the fundamentals and develop the techniques of shooting with iron sights (a skill set that has seriously fallen away in this age of long-range shooting focus and advanced optics). It’s sort of like shooting precision, tricked-out, and scoped-up ARs for years and then picking up a rowdy AK at the range. After burning through a few mags, you realize, “DANG…that was FUN!”

The aperture rear sight and fine-blade front sight straddling the GMRB finned military barrel is, in our opinion, the way to go if you want to shoot with iron sights. The aperture, or peep, as many people call it, allows the eye to naturally align with the front post annular shroud and easily center the tip of the front post on your target, providing quicker and often more accurate sight alignment than what you get with conventional slotted rear sights.
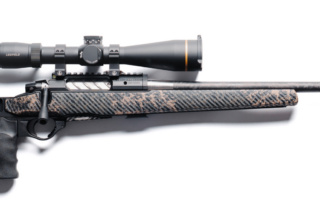
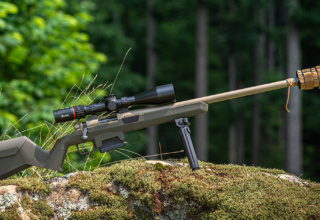
The Bushytail Buster
So, we had a plenty of fun with our 10/22 “military” conversion but with hunting season upon us, there were squirrels to put in the pot. Could we transform our rifle again—only this time, turn it into the end-all, be-all squirrel rifle?

Once more, we turned to Green Mountain Rifle Barrels and took a fancy to their M4-style fluted barrel for the 10/22. This one comes with a manganese phosphate finish, which is perfect for a hunting barrel. It is fluted for improved cooling and weight reduction (another hunting plus) and comes with a 1/2×28 threaded muzzle should we opt for a suppressor down the road. While this “M4” profile may seem an odd choice for a carbine hunting rifle, we like it and say, “To each his own. That’s what customizing is all about.” Plus, GMRB button-rifles and stress-relieves this barrel, so we had high confidence in its accuracy potential.

As for the stock, there were two key objectives in our selection. First, we wanted to give the barrel plenty of opportunity to show its mettle, so a free-float stock configuration was in order. Second, we wanted a high ergonomic factor, sturdiness, light weight, compact dimensions, and a color scheme that lent itself to the hunt. Having had great experiences with Boyds Custom Gunstocks in the past, we perused their 10/22 offerings and settled on their “skeletonized” SS Evolution model.
This stock offers an abbreviated forend that works with any barrel contour, meaning it would easily free-float our GMRB barrel. The cored-out buttstock significantly reduces weight for a laminated hardwood stock and offers an ambidextrous pistol grip profile that we find promotes more natural hand placement for better trigger control. The pistol grip also makes the rifle more comfortable to carry across the chest, allowing it to be quickly shouldered when game is located. Finally, since Boyds offers all their stocks in custom colors, we chose Forest Camo for its natural concealment properties.

Because distant accuracy was the driving force behind this build, we required two additional components. First, of course, was a quality optic that would allow us to zero the crosshairs on a squirrel’s eyeball at 50 yards. Second was addressing the weak link in the Ruger 10/22—the trigger. For this, we opted for the budget-priced (compared to most aftermarket trigger systems) BX-Trigger from Ruger. You can read more about that in the accompanying sidebar.
In this configuration, our 10/22 bore out on the range and in the woods. At our 50-yard zero, the rifle delivered consistent 1/2-inch groups with bulk ammo. In the oak and hickory stands, squirrels shuddered.
Of course, these are just two examples of how easy it is to transform a Ruger 10/22 into something that not only reflects your personal tastes but also your shooting needs. Many 10/22 owners, once they start down this road, get a terminal case of the “make it even better” bug. Bull barrels, high-dollar triggers, fancy sighting systems, and true custom stocks are next on the menu—all in the name of wringing out the last ounce of accuracy or gaining bragging rights on the competition scene.
You have been warned.
The Ruger BX-Trigger

You can work all the magic you want to transform your 10/22 into a precision bullet hole-cutter, but until you ditch the stock trigger, you’ll be chasing dreams instead of splitting X rings. The stock trigger is long, heavy, and crunky, which, in an already short and lightweight rifle, means trouble.
Replacing the stock trigger assembly with a precise and crisp aftermarket unit is arguably the first, most important modification you want to make if consistent and repeatable point-of-impact is your goal. There are many high-quality options available, with manufacturers such as Volquartsen Firearms, Timney Triggers, and KIDD Innovative Design among the pack leaders. The challenge with premium-performance aftermarket trigger systems is that they cost a good coin—around $200-$300.
Those just starting out in the 10/22 modification game may want to consider a lower-cost alternative in the form of the Ruger BX-Trigger. This is a drop-in replacement system manufactured by Ruger. It looks almost identical to the stock trigger, but alterations to the internals make the difference. The trigger pull weight is a pleasing 2.5-3 pounds and exhibits a fairly crisp break. That’s a tad more than the 1.5-2.5 pounds you’ll find in most of the premium triggers, but half the pull weight of the 6-lb. stock Ruger trigger. We find this to be an ideal weight for a hunting rifle and certainly in the zone for target shooting. And the price? The MSRP is $89.95 but we’ve seen the street price as low as $60.

- Remove the magazine and ensure there are no rounds in the chamber. Begin by removing the barrel band.

- Turn the gun upside down and center the safety block in the trigger housing. This is necessary for the barreled action to be removed from the stock.

- A single action screw secures the barreled action to the stock. Use a slot-head screwdriver to disconnect the barreled action. If you are replacing your stock, you may need to remove this screw from the factory stock.

- Turn the rifle over and carefully lift the barreled action out of the stock. Be mindful of the safety block, as it tends to easily move out of its centered position. If replacing your factory stock with an aftermarket stock is the extent of your modifications, this completes the disassembly process. Installing a new stock is the reverse of the disassembly.

- Place the receiver onto a bench block and, using an appropriate-sized punch and small hammer, lightly tap out the receiver cross pin and the two trigger pins. Push the pins out from the left side of the receiver, as shown.

- Remove the trigger housing from the receiver. If all you wanted to do was swap the trigger on your rifle, this is the extent of the disassembly process. Installation is the reverse of the disassembly, except the cross pin and trigger pins would be installed from the right side of the receiver.

- To remove the bolt, pull back on the bolt handle and lift the bolt out of the receiver. You may have to turn the receiver over and shake the bolt out, if you find it difficult to lift it free. Once the bolt is out, remove the guide rod/recoil spring assembly through the ejection port.

- The 10/22’s barrel is secured to the receiver with a V-block barrel retainer and two socket head barrel retaining screws. Use an Allen wrench to remove both retaining screws.

- Remove the V-block from the barreled action. Here you can see how the retaining block design and the barrel’s milled retaining block channel work to both secure and to align the barrel in the receiver.

- With the retaining block and screws removed, the barrel can be removed from the receiver. Be careful when removing the barrel. You should pull it straight out without applying excessive torque to the aluminum receiver. A generous application of penetrating lubricant often helps loosen a tight-fitting barrel.

- Installation of the new barrel is the reverse of the disassembly. Apply a thin coating of light oil to the shank and insert into the receiver.

- Do your best to line up the milled retainer slot in the barrel parallel to the receiver’s retaining block extension. Once the screws touch the retainer, alternate tightening the screws into place to ensure even pressure across the retainer (similar to tightening wheel lugs). The factory torque for the barrel retaining screws is around 28 in/lbs (not foot/pounds!), although this number seems to vary greatly among barrel manufacturer recommendations and among gunsmiths. We have found that “comfortably snug” works well. The key is to not over-torque the screws because doing so could damage the threads in the aluminum receiver.
Note that any barrel or bolt swap should include a headspace check using caliber-appropriate GO and NO-GO gauges. The process described on page XX applies to this or any other firearm application.

- Reassembly of the rifle is the reverse of the disassembly. The only challenging part is getting the bolt mated to the guide rod/recoil spring assembly. Before you start, examine how the bolt and guide rod/recoil spring assembly fit together in the receiver. This will help you visualize what’s going on when you try to reinstall them. The bolt handle fits into this recess in the bottom of the bolt.

- The process is straightforward—reinstall the guide rod/recoil spring assembly into the receiver, pull back on the bolt handle, and place the bolt in the receiver so that the bolt handle fits into the milled slot in the receiver. The challenge is getting the bolt handle to align in the slot since the handle wants to pivot. It can be aggravating but keep at it until you get it.

- When you reinstall the trigger assembly, be sure the ejector is in its proper position as shown (arrow). This little bugger has a way of sliding around and flopping back toward the hammer if you’re not careful.