Here’s how easy it is to transform the already formidable Mossberg 500/590 platform into a customized fighting shotgun with select Mesa Tactical upgrade kits
by Rob Reaser
I’ve focused a lot of personal attention these last few years on the defensive shotgun. Prior to 2020, I mostly relegated the platform to the hunting arena, leaving the home defense tasks to AR carbines, SBRs, and assorted handguns. For me, the insane antics of mid-2020 that we all endured, though, really put the spotlight on the shotgun as the one gun you need no matter what.
Since then, I’ve experimented with various 18-inch models with both pump and semi-auto actions, tried out numerous ammunition types, and really pushed the limits of what a short-barrel, cylinder bore 12-gauge is capable of with everything from bird and buckshot to slugs. Suffice to say, while I most enjoy shooting my M4/M16 clones and 1911s, the defensive shotgun has earned the preeminent, “must-have” status in my world. I’ve even upscaled my handloading operation to include shotshells, complete with shot molding capability and who knows how many pounds of greasy, lead tire weights I’ve scavenged at the corner repair shop — all to melt down into beautiful .33-inch balls of terminal destruction.

My platform of choice is the Mossberg 500/590. These guns are well built, utterly reliable, and super-versatile when you include assorted barrels as part of your do-it-all kit, like a slug barrel for deer hunting and a longer, choke-compatible barrel for bird and small-game hunting. As for its defensive credentials, police officers and soldiers through decades past will readily attest to the platform’s tactical capabilities.
What I don’t fancy about the Mossberg is the slightly too-long length of pull and forearm reach for my build. These dimensions are just a hair over the comfortable line for me. Plus, whenever I’m shooting slugs or high-velocity loads, I must be careful of my hand positioning because I frequently get a nose full of thumb knuckle under heavy recoil.
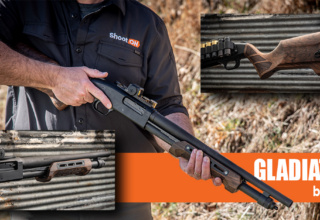
The solution to all of this is the LEO Gen II Telescoping Stock Adapter and Conversion Kit from Mesa Tactical. With this kit you can replace your factory buttstock with an AR-style telescoping stock and pistol grip. This isn’t anything new, of course, since Mossberg, Remington, Benelli, Stoeger, MAC, and many other shotgun manufacturer between here and Turkey offer defensive models with tactical-style stocks and pistol grips; however, if you have a Mossberg 500/590 or a Remington 870 that has the standard furniture, Mesa Tactical has what you need to make the conversion to the AR-style stock and grip of your choice.
Several years ago, I converted a Mossberg 500 with a Mesa Tactical kit, and it worked well, giving the gun the ideal geometry for my taste. Last year, I picked up a new Mossberg 590 for a sweet price and immediately mapped out a similar Mesa Tactical conversion. This time, though, I wanted to go with the LEO Hydraulic Recoil Stock Kit, part #90120.
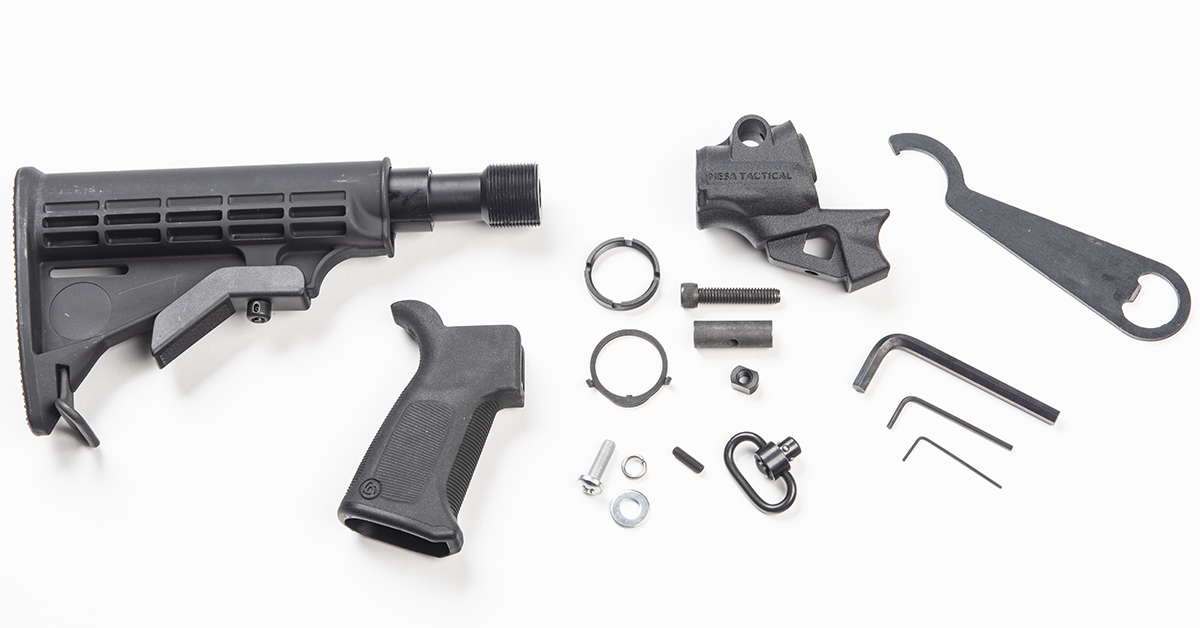
The kit includes an adjustable AR stock, recoil-reducing buffer system, Mesatac Trego rubber overmold grip, stock adapter, essential wrenches, and all necessary attaching hardware.
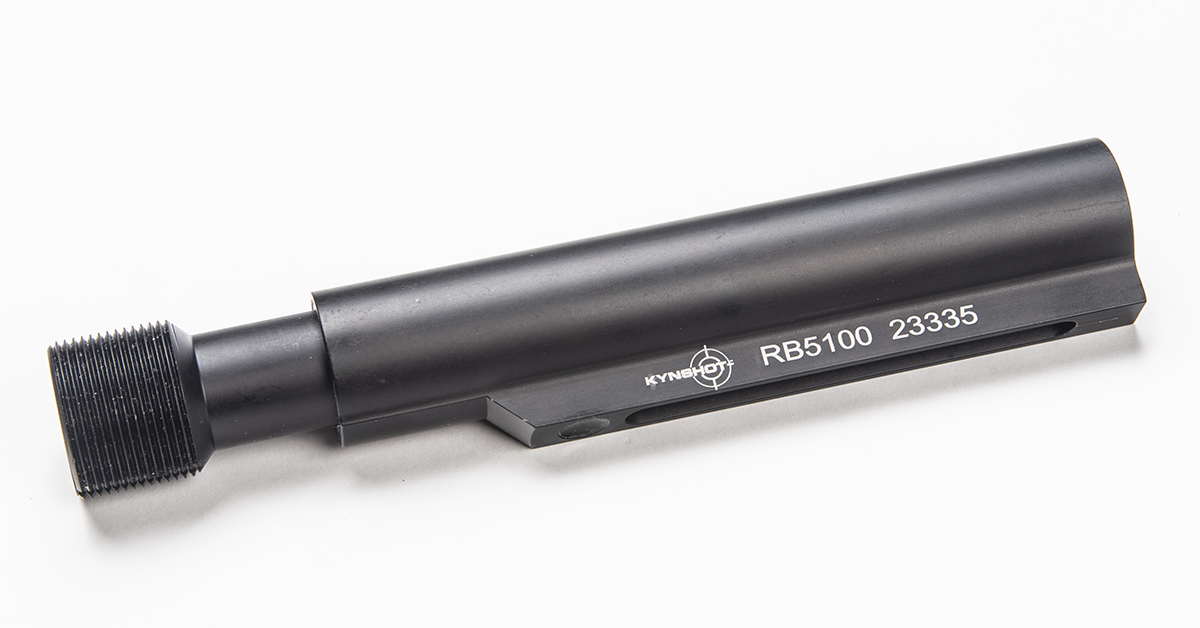
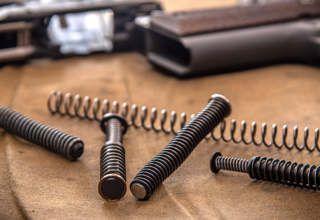
Last year, Mesa Tactical announced that it had entered into an agreement with Kintec Technologies — manufacturer of the KynSHOT hydraulic recoil reducing buffer system — with the exclusive right of distribution of the KynSHOT shotgun recoil buffers, and those buffers are now offered as an option with Mesa Tactical’s LEO and High-Tube line of telescoping stock kits. This is an adjustable buffer (RB5100) that replaces the standard AR-15 buffer tube and allows the user to change the recoil damping setting to match your shooting style, load, and recoil preference. The company claims this buffer can reduce felt recoil up to 90%. I can’t verify that independently, but it sure softens the blow when pushing slugs or high-velocity payloads down the barrel. This is a perfect upgrade for a pump-action shotgun since, unlike a semi-auto shotgun, the damper can reduce recoil without interfering with the cycle of operation.
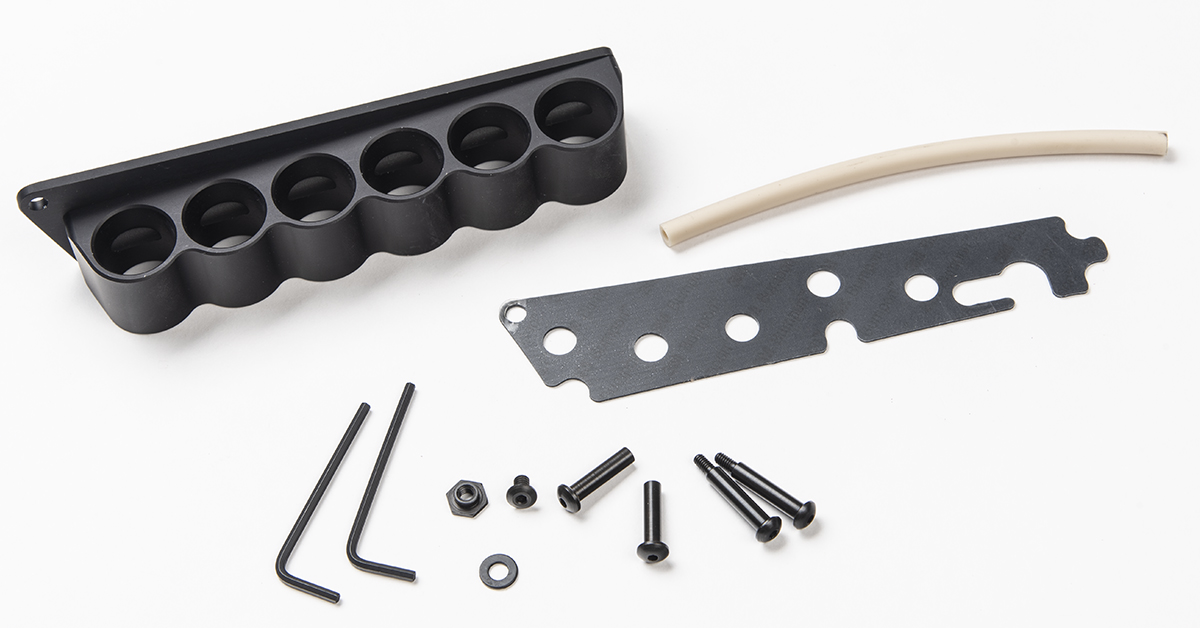
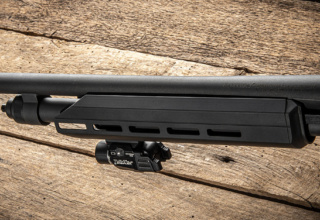
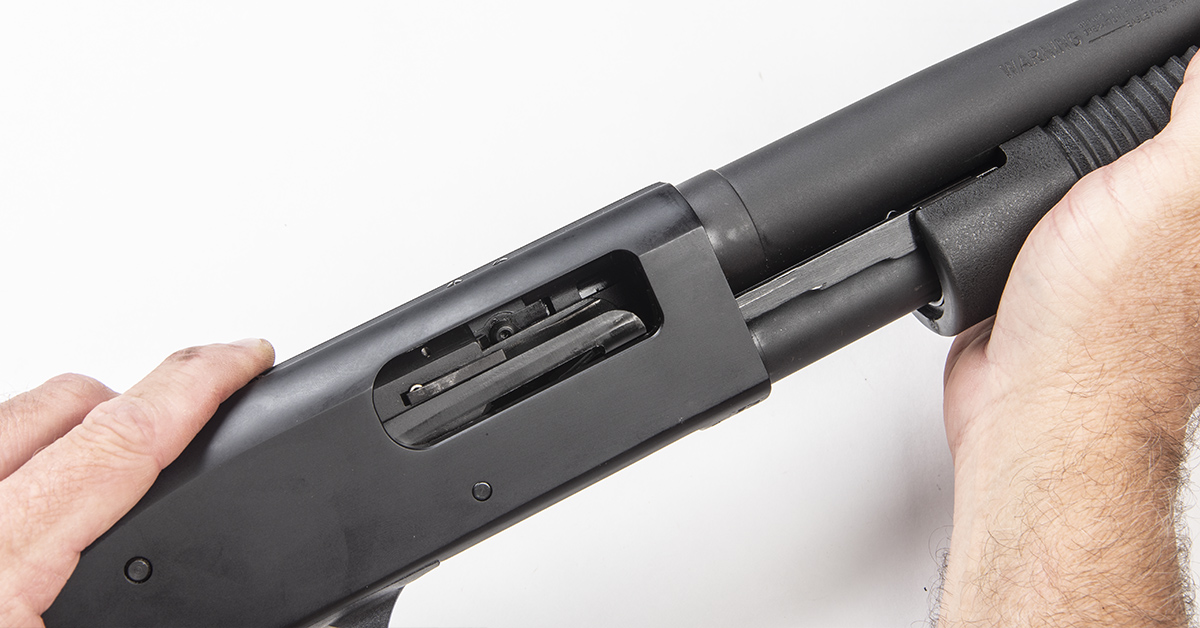
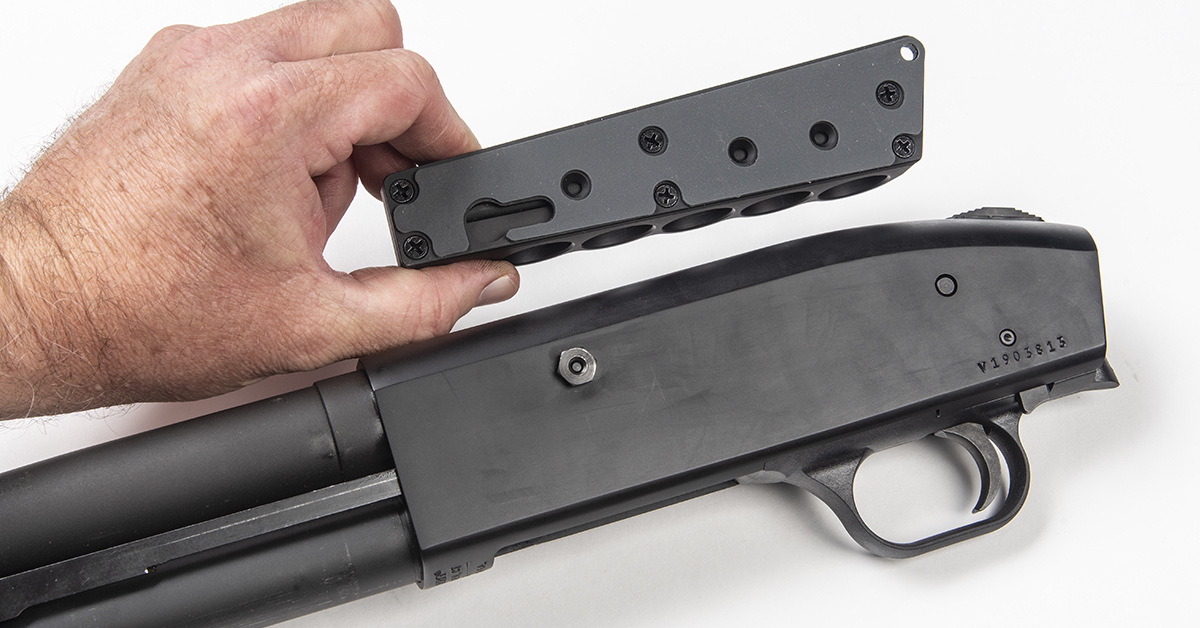
While the stock/grip conversion was the foremost upgrade for this 590, most trainers will agree that an on-board shell holder is essential for any defensive shotgun. Mesa Tactical offers their SureShell Carriers for a wide range of shotgun models in both aluminum and polymer construction. My pick was the 6-shell aluminum carrier in the receiver sidemount configuration. It uses a rubber tube to provide the friction fit needed to secure the shells in the carrier and utilizes the ejector screw and trigger assembly pin holes for the mounting points. Installation doesn’t even require takedown of the receiver internals, making it exceptionally DIY-friendly.
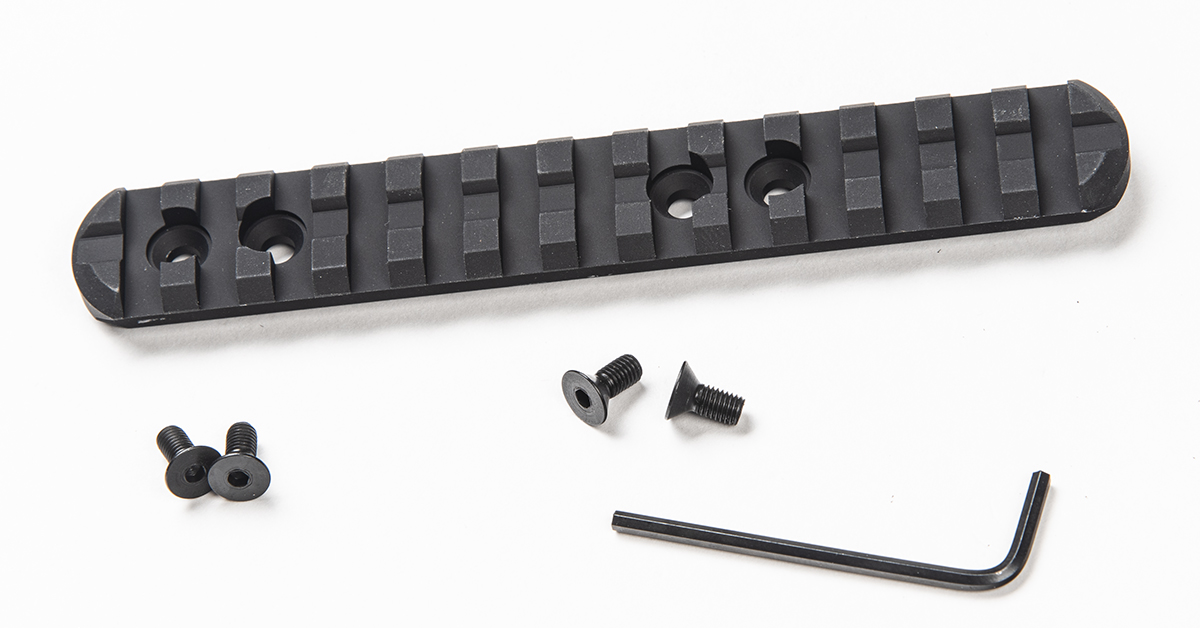
To take this Mossberg upgrade to the final step, Mesa Tactical offers a receiver mount Picatinny rail for installing an optic. I’m not yet sold on the red dot concept for this shotgun but am going to give it a quick test drive. What I will do is replace this with an XS Sights ghost ring and banded front sight system after the red dot trial, so stay tuned for that DIY project.
SureShot Carrier Installation
Ensure the shotgun is clear of any ammunition and that there is no ammunition in the work area before you begin.
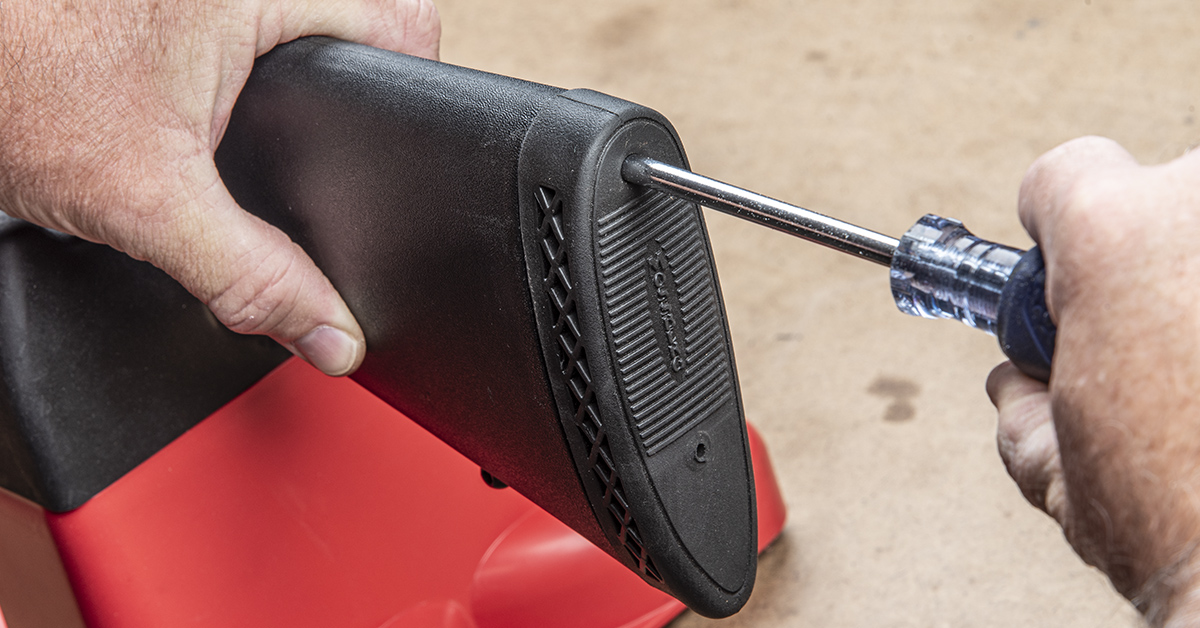
While it is not necessary to remove the stock to install the shotshell carrier, I went ahead and got it out of the way for the stock conversion process. Use a Phillips screwdriver to remove the two screws securing the recoil pad to the stock. Be sure to use a solid-shank driver and not an interchangeable bit driver because the bit may get stuck in the pad.
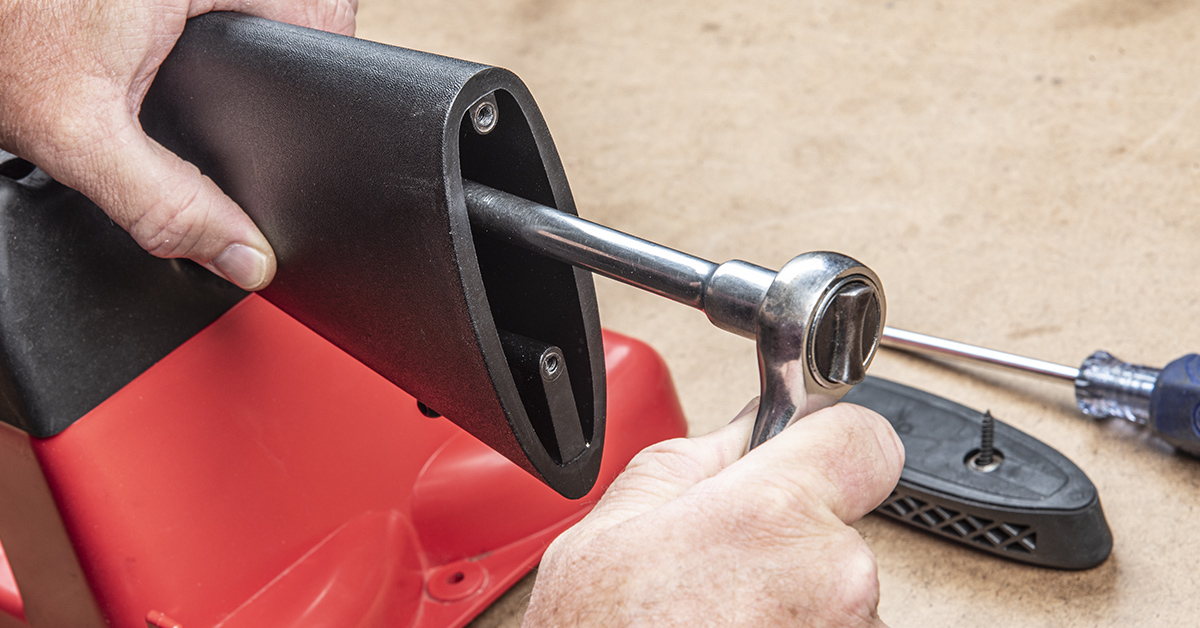
Remove the stock retaining bolt from the stock. A ratchet driver and long extension makes this job easy.
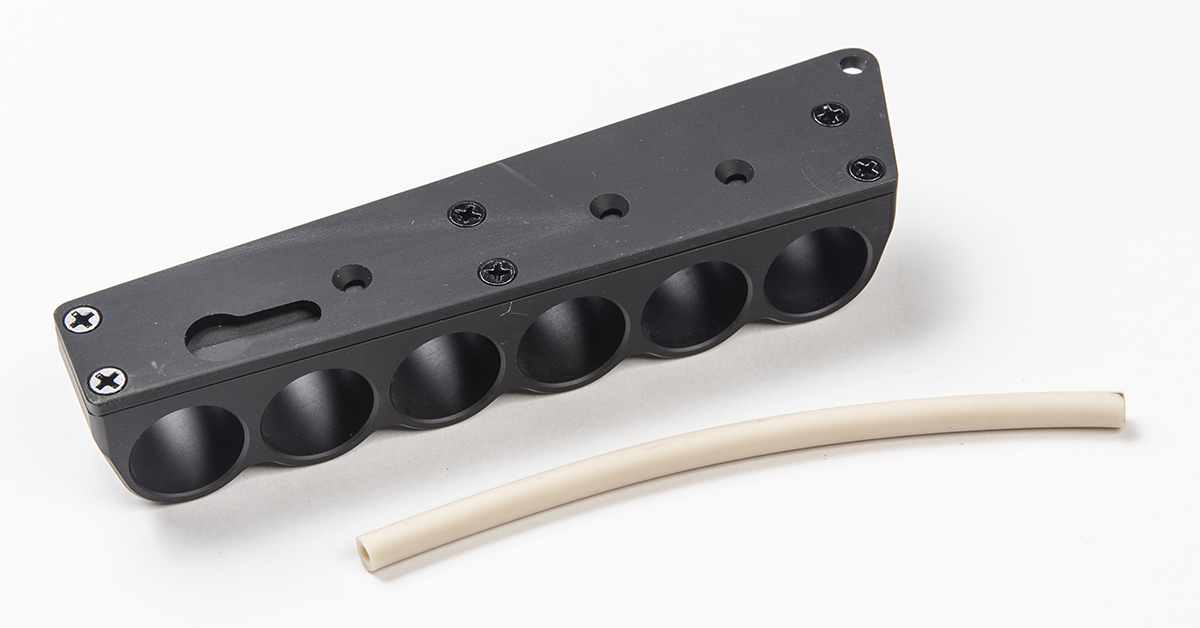
The SureShell Carrier comes with an extra length of rubber tubing to replace the original if it should wear out. To change, remove the backing plate from the carrier and swap the tubes.

Test-fit the supplied Chicago screws to make sure they will fit through the rear hole in the carrier plate. If not, this hole will need to be slightly enlarged with a needle file or tightly rolled emory cloth.
Remove the adhesive backing from the carrier gasket and carefully affix it to the carrier in the correct orientation. It is a good idea to use denatured alcohol to remove any oils from the back of the carrier before doing this.

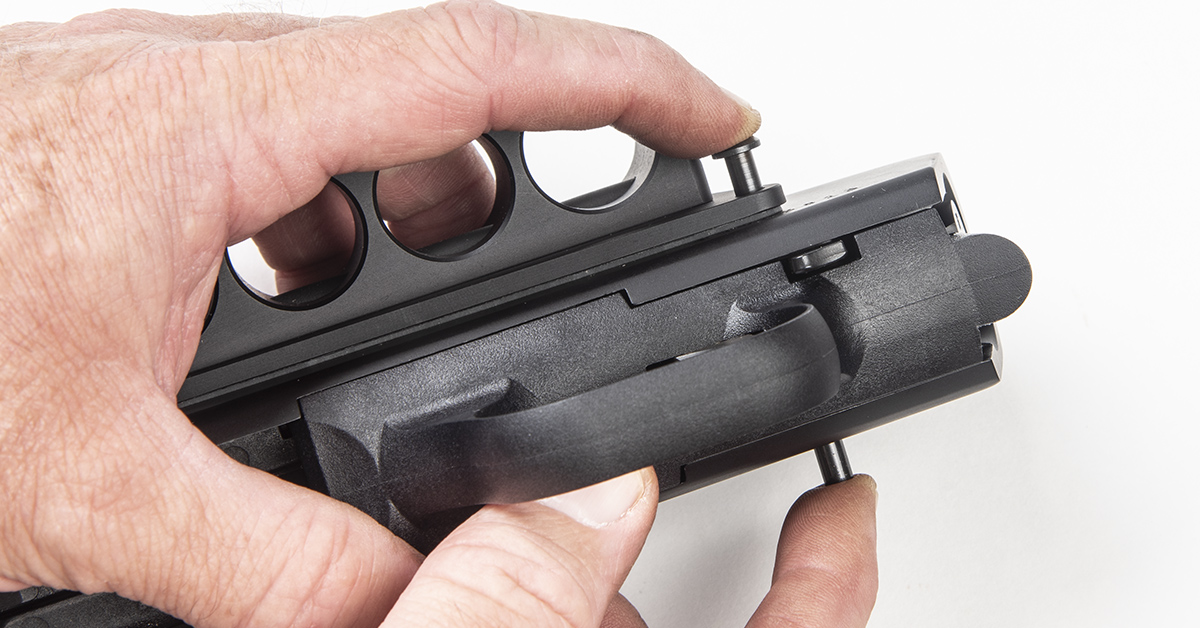
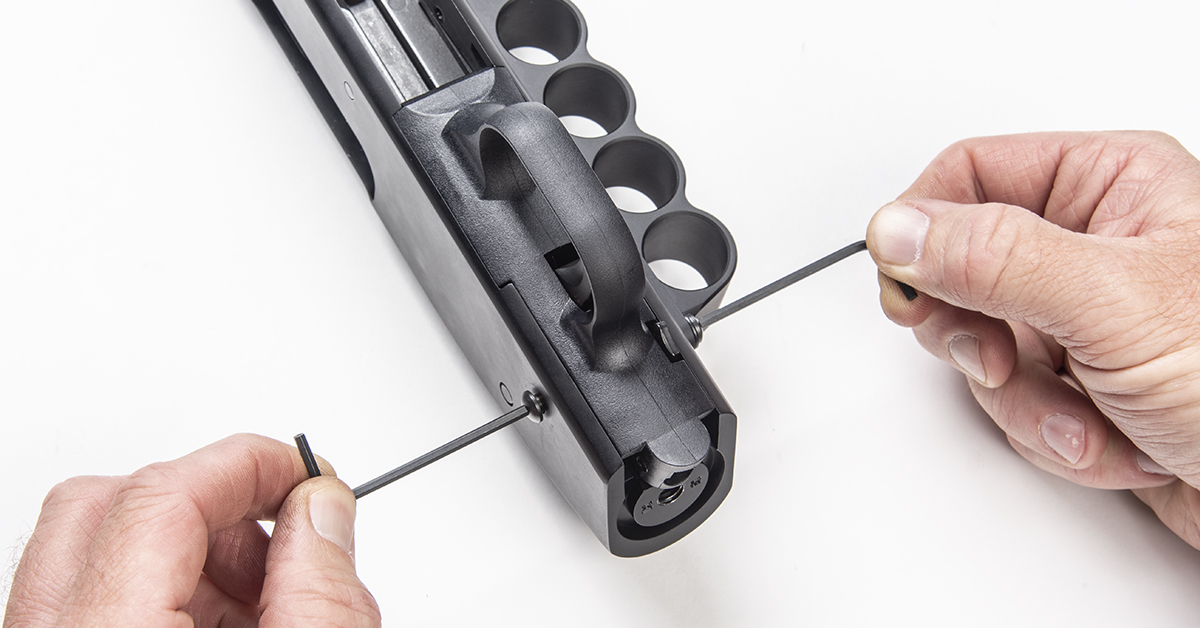
Open the action and, using a properly sized hollow ground flat bit, remove the ejector retaining screw located opposite the ejection port. Be careful to keep the ejector in place when you remove the screw.
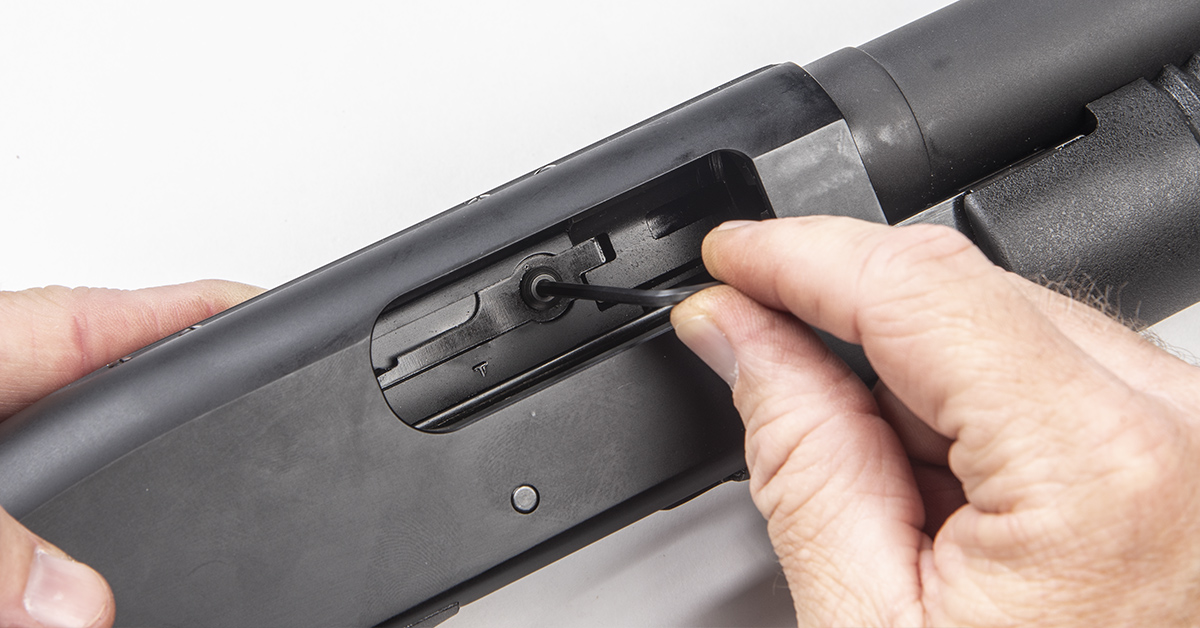
Install the new button head screw provided in the SureShell kit. Snug securely with the included hex wrench.
From the left side of the receiver, install the hex head T-nut onto the new ejector screw with the flat side facing out. This does not need to be tight, but the top flat does need to be parallel to the top of the receiver.
Cycle the action to ensure that the new ejector screw does not interfere with the bolt.
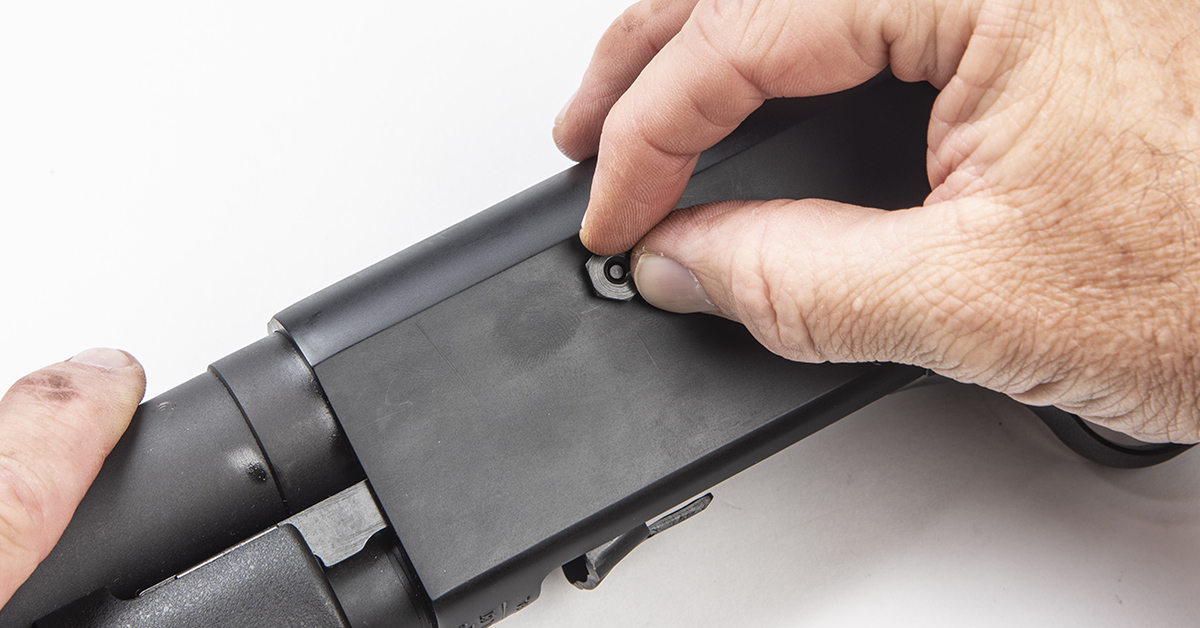
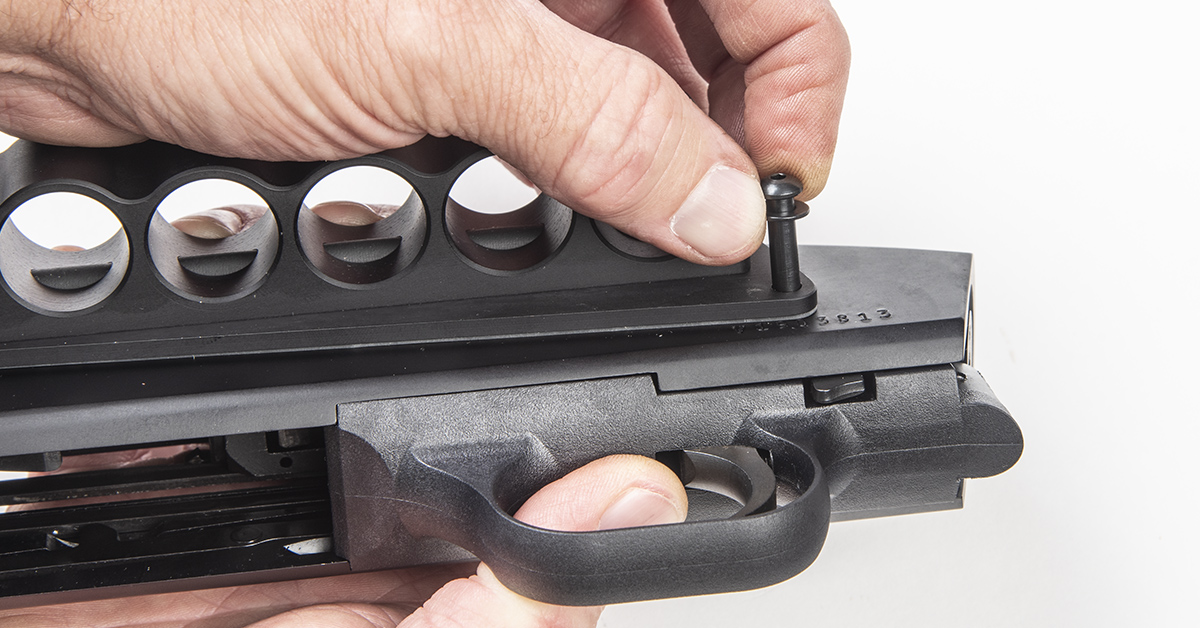
The keyhole slot in the carrier will engage the T-nut to keep it secured to the receiver. Install the carrier over the T-nut and then slide the carrier forward to engage the slot. The rear hole of the carrier should then line up with the trigger pin hole at the back of the receiver.
Install the supplied washer onto the male Chicago screw.
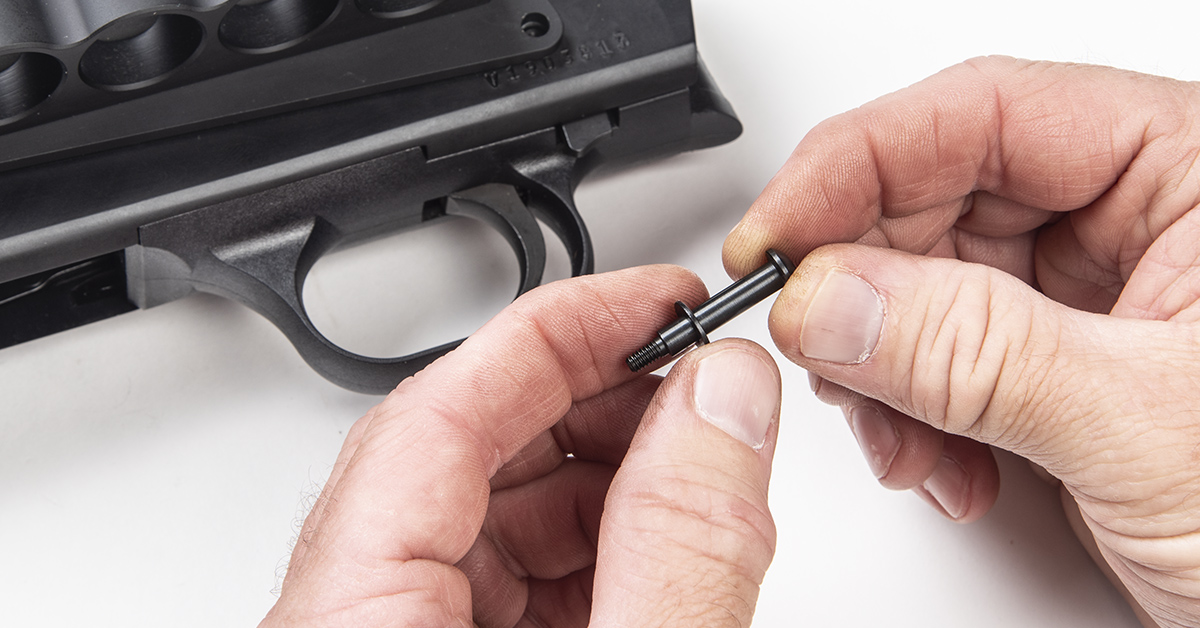
You can use the female Chicago screw to drive out the trigger pin as shown or just use an appropriately sized pin punch.
With the trigger pin removed, remove the female screw or pin punch and insert the male Chicago screw through the carrier plate and into the trigger assembly housing. Be sure to maintain the trigger assembly in its correct position as you insert the Chicago screw.
Insert the female Chicago screw into the right side of the trigger pin hole and secure both screws together with the supplied wrenches.
[You may wish to use a medium-strength thread adhesive on the Chicago screws to ensure they stay in place or if you detect them coming loose after use. Because these are also securing the trigger assembly and I prefer the option of being able to remove the trigger for occasional cleaning or lubrication, I did not use a thread adhesive. If you choose to use a medium-strength thread adhesive, always remove all oils with denatured alcohol before applying.]
Stock Kit Installation
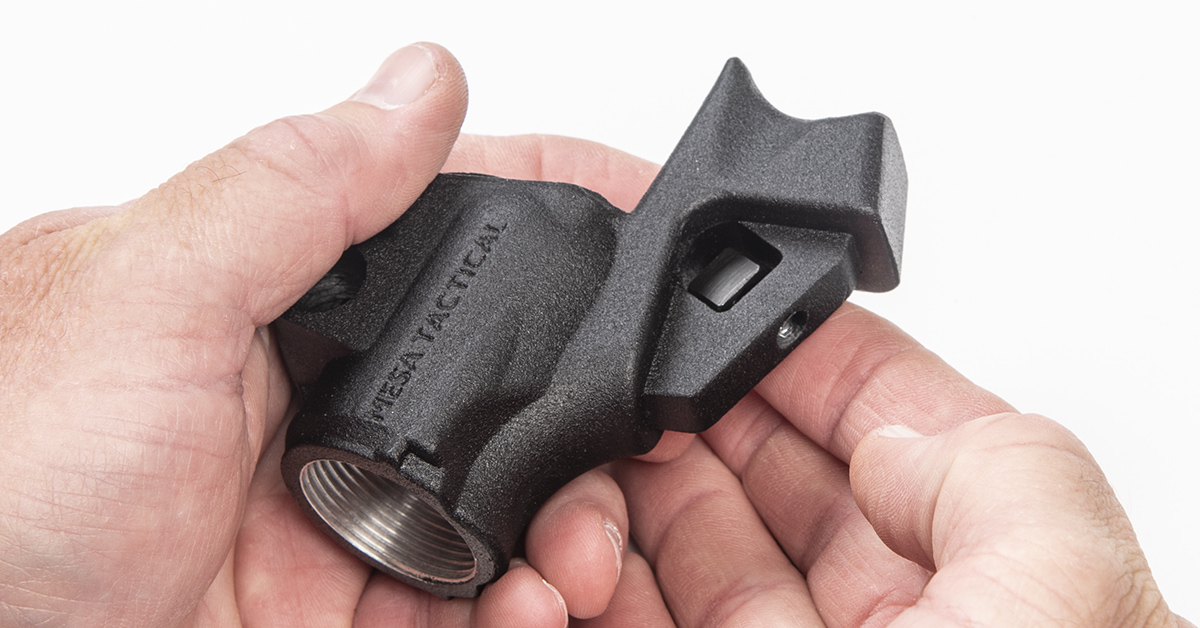
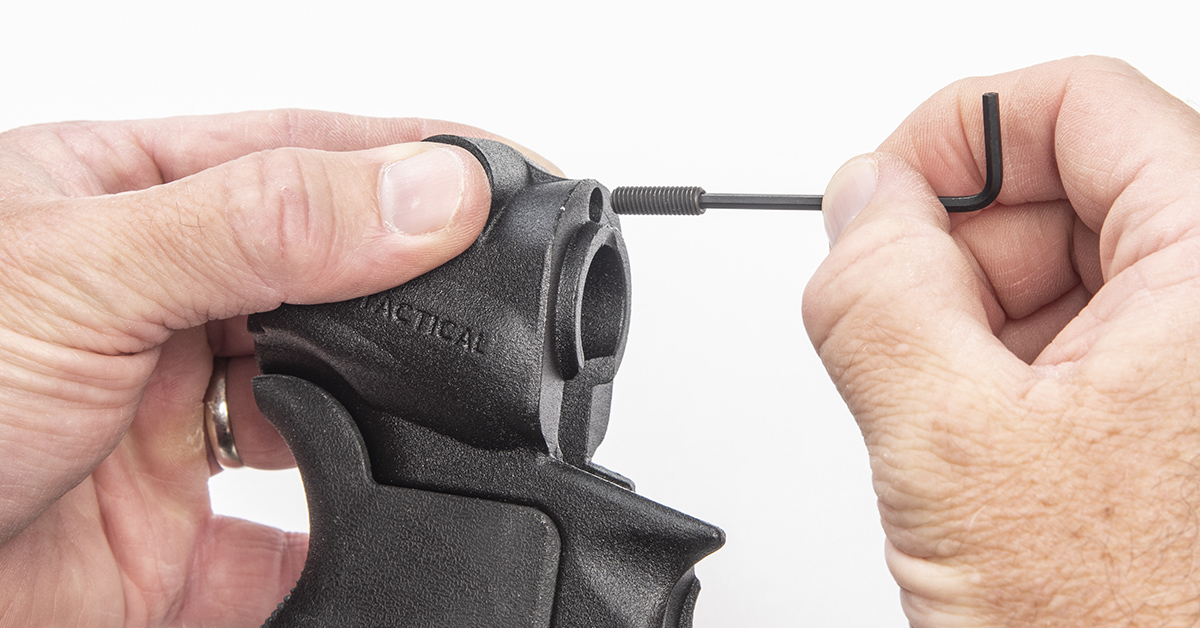
With the factory stock removed, begin by installing the pocket nut into the adapter.
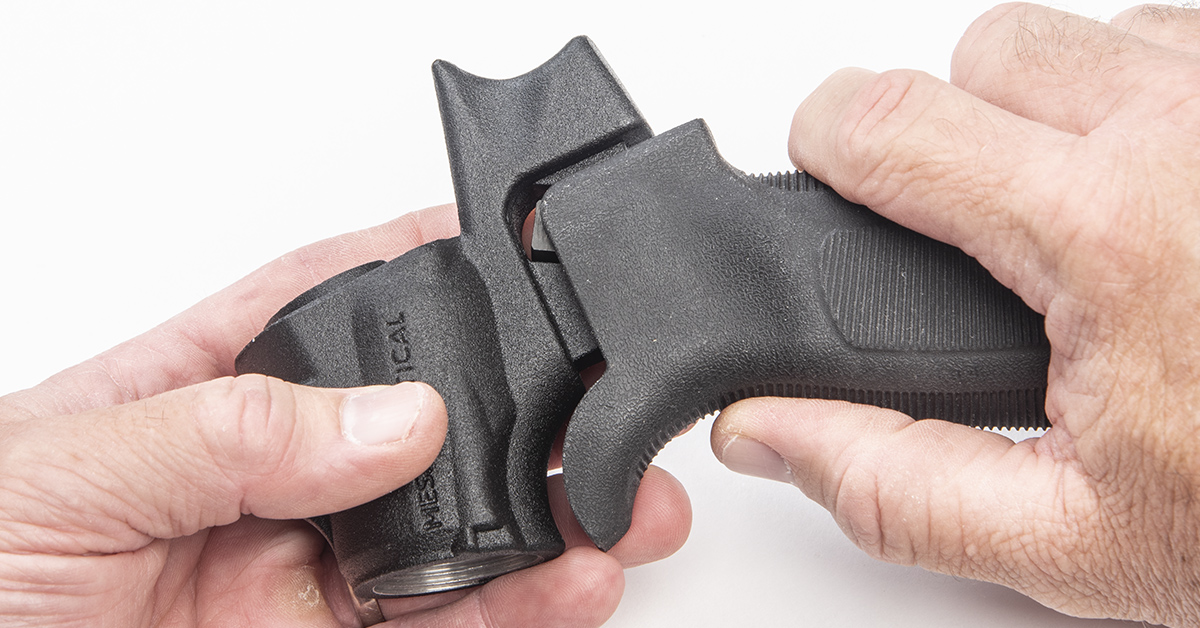
While keeping the pocket nut in its position, install the grip onto the adapter.
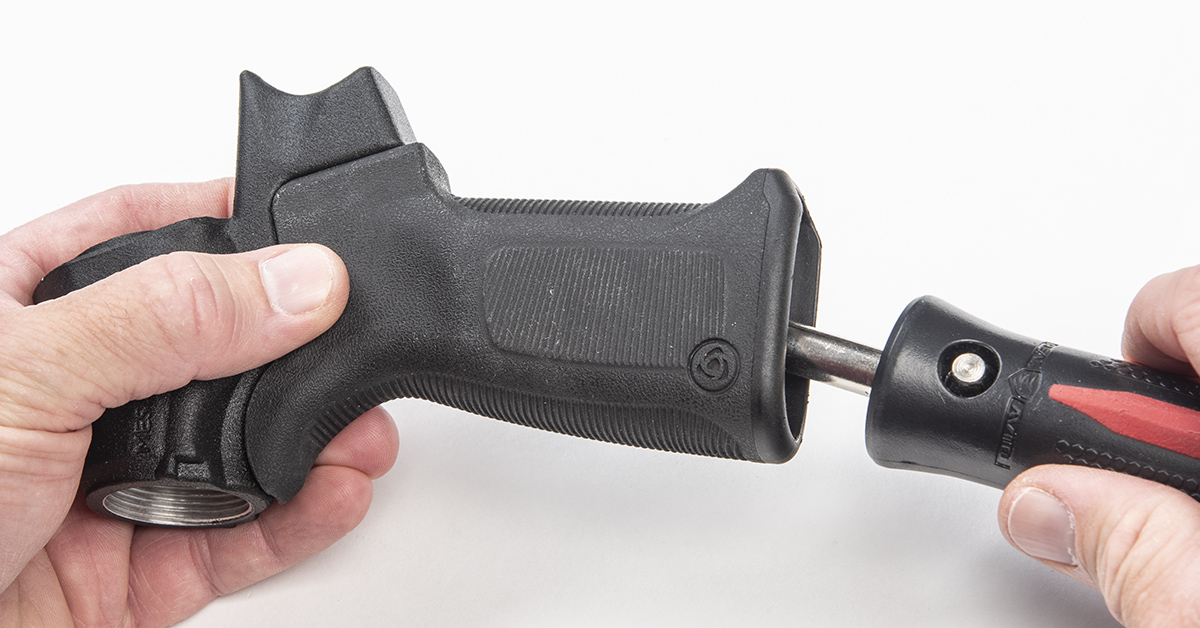
Install the supplied grip screw, allowing it to engage the pocket nut, and tighten to 10 ft/lbs.

Install the flush cup through the top of the adapter. This cup allows for the ambidextrous use of Quick-Detach sling swivels. Align the threaded hole in the flush cup with the access hole in the back of the adapter, as shown.
Install the flush cup retaining screw into the assembly and tighten to 30 in/lbs.
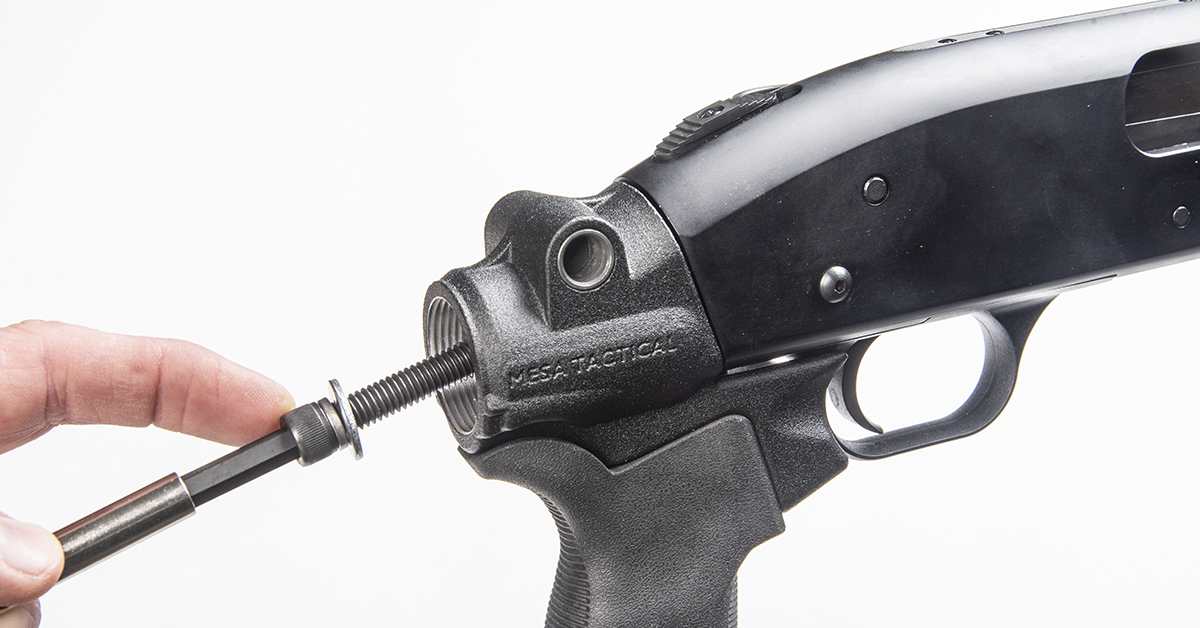
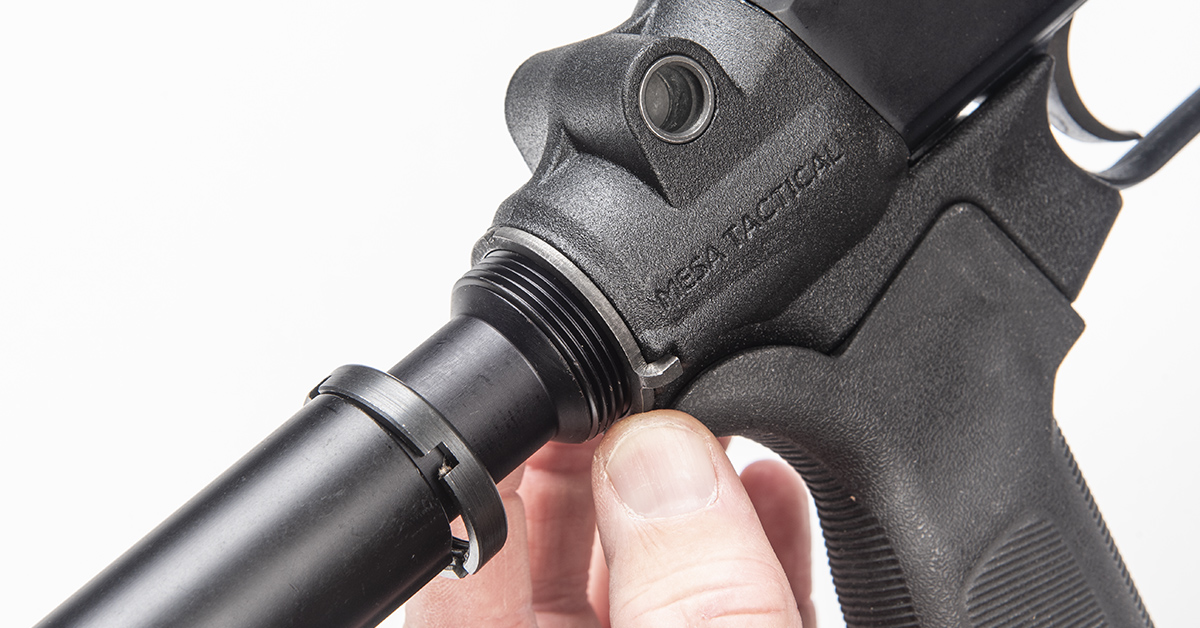
With the adapter assembled, place the supplied split washer and then the flat washer onto the receiver cap screw and install the adapter assembly to the back of the receiver.

Torque the receiver screw to 20 ft/lbs.

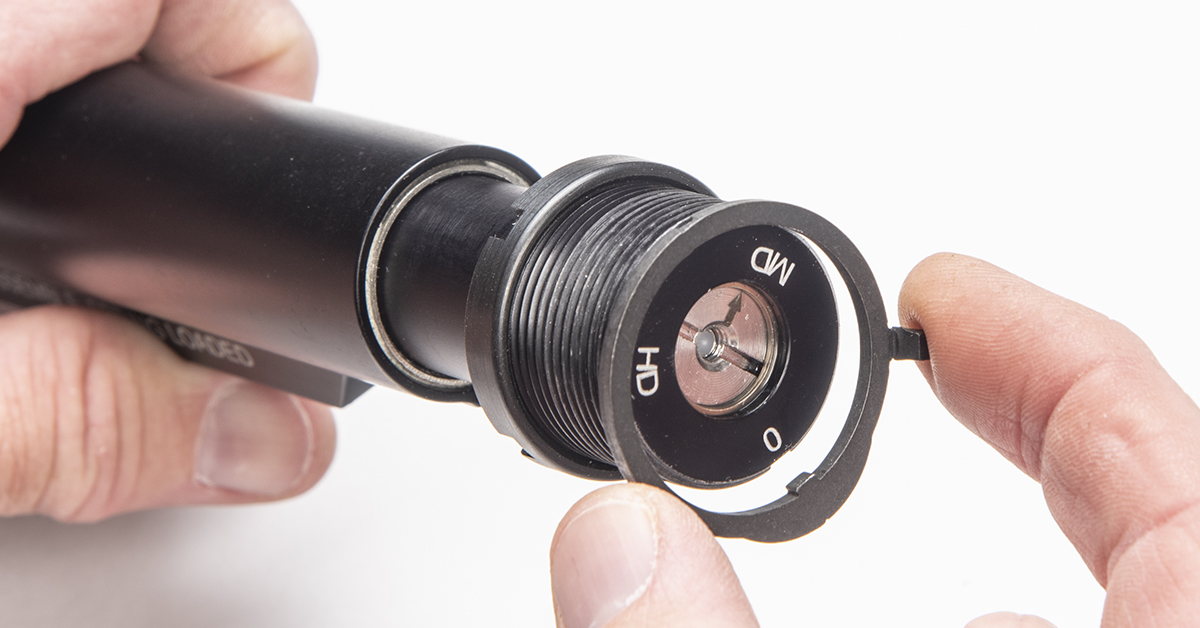
As previously mentioned, the KynSHOT recoil reducing buffer can be adjusted for three damping profiles — low, medium, and heavy.
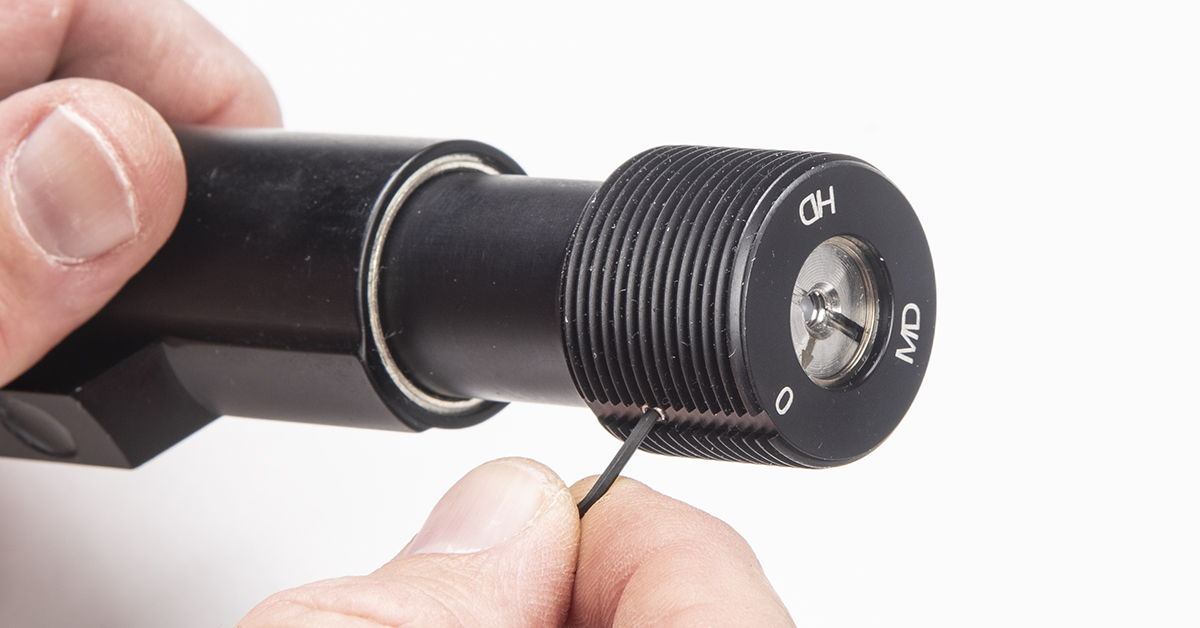
To adjust the setting, loosen the set screw with the supplied wrench…
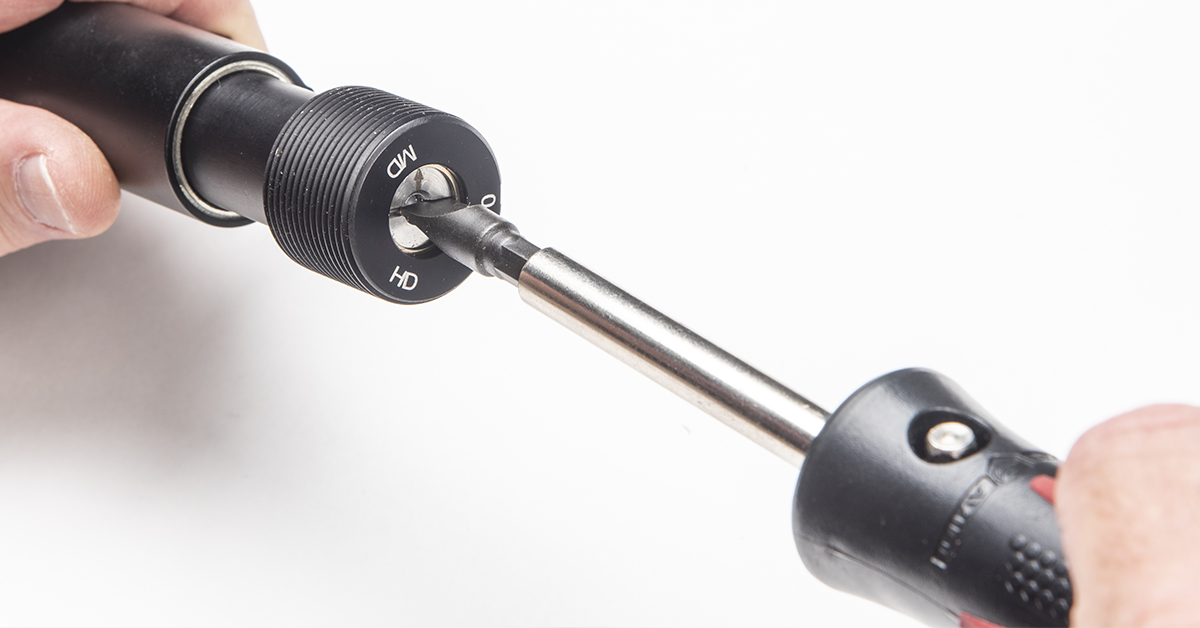
…and with a flat-blade screwdriver, rotate the damper to the desired position. Finish by retightening the set screw.
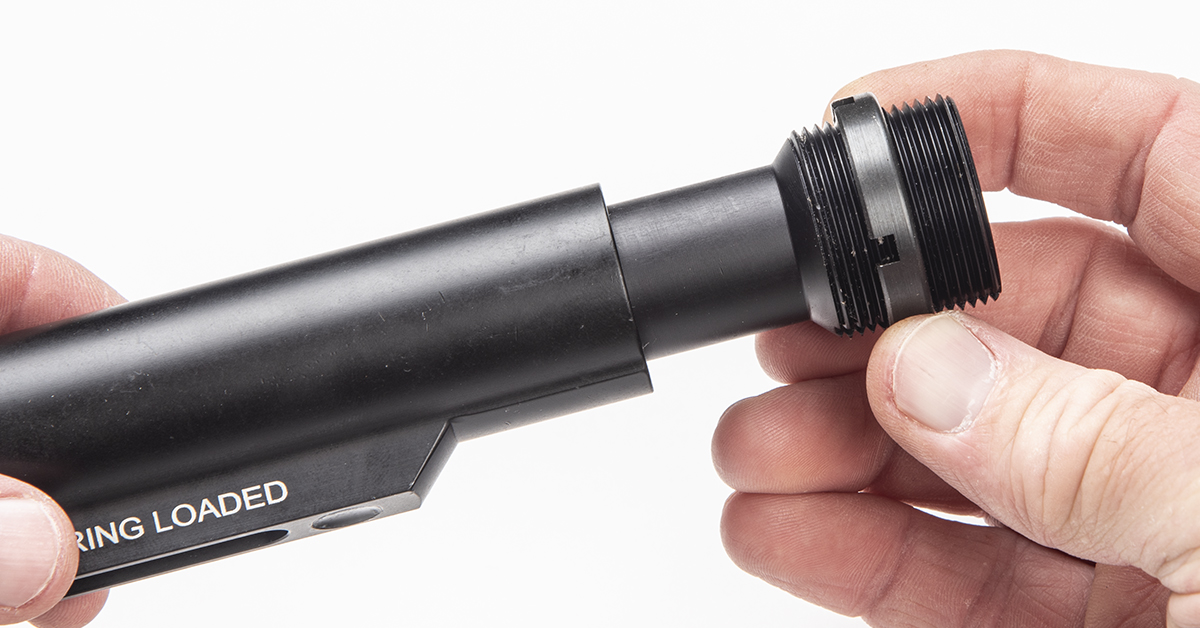
Install the buffer retaining nut onto the buffer tube with the slots oriented rearward.
Install the end plate onto the buffer tube with the “claws” oriented toward the front and the tab engaging the ventral groove in the threads.
Screw the buffer tube into the back of the stock adapter. I found this interface to have fairly tight tolerance and the cast aluminum adapter threads didn’t allow a silky-smooth rotation of the buffer. You may want to apply a light lubricant or a thin coat of molybdenum grease to the buffer threads if you run into too much “thread chatter.”
Screw the buffer tube all the way into the adapter and then rotate the tube counterclockwise until the end plate claws can properly engage the adapter bosses. Next, thread the buffer retaining nut up against the end plate. The nut should fully engage the buffer tube threads. If it does not, rotate the buffer tube one or two rotations counterclockwise.
With everything in proper position, use the supplied spanner wrench to final-tighten the retaining nut.
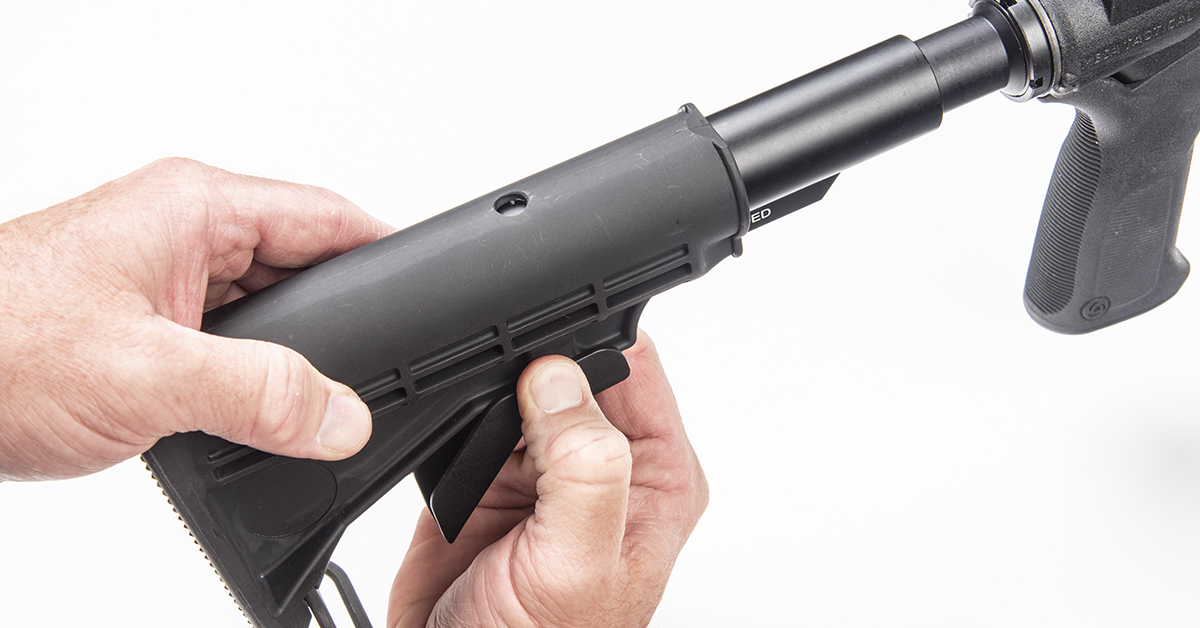
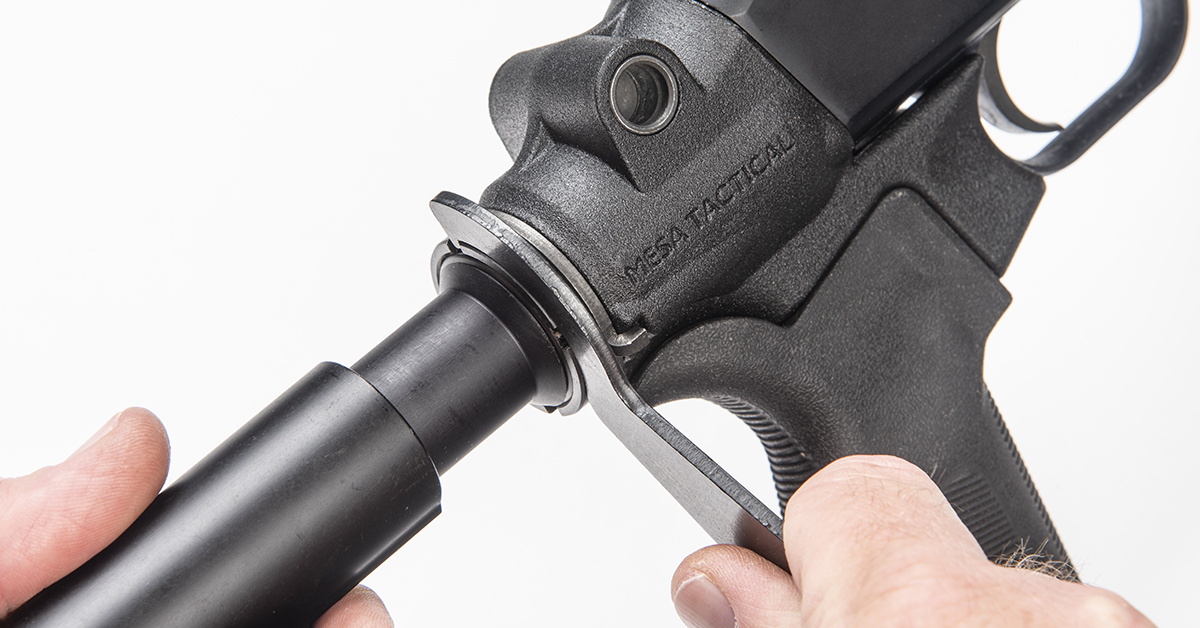
To install the stock, pull down on the adjustment lever and slide the stock onto the buffer tube. The stock can now be positioned for your desired length-of-pull.
Receiver Picatinny Rail
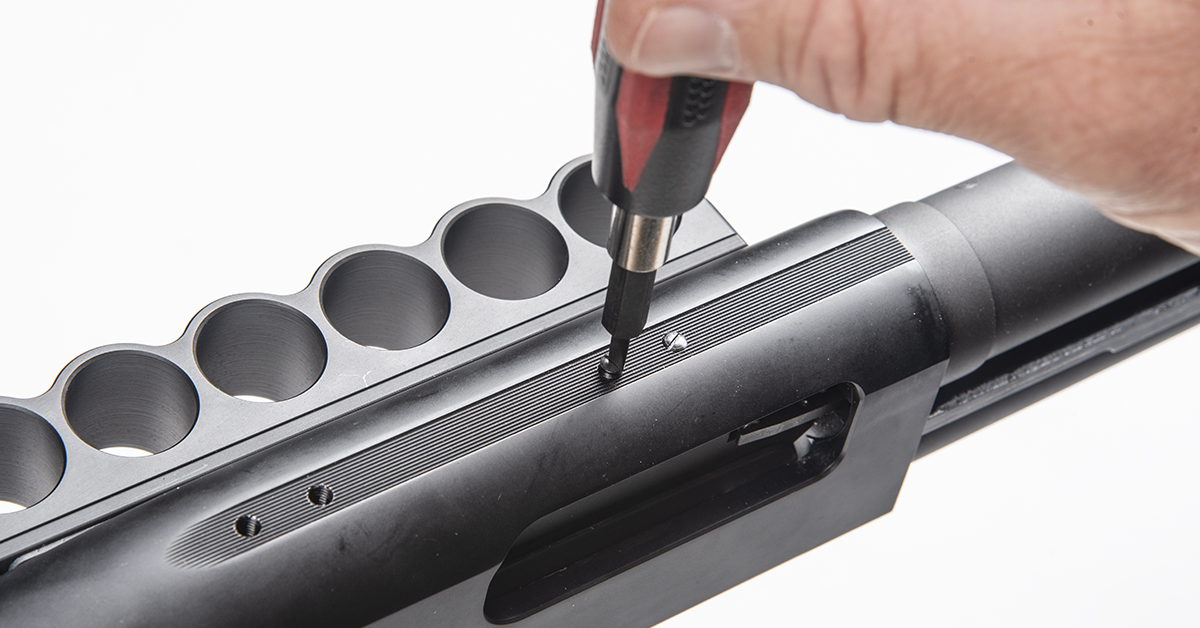
There isn’t much to installing the receiver Picatinny rail. Start by removing the factory plug screws. The caution here is to use a correctly sized, hollow ground flat driver bit to prevent damaging the screws (in case they are tight) or scratching the top of the receiver.
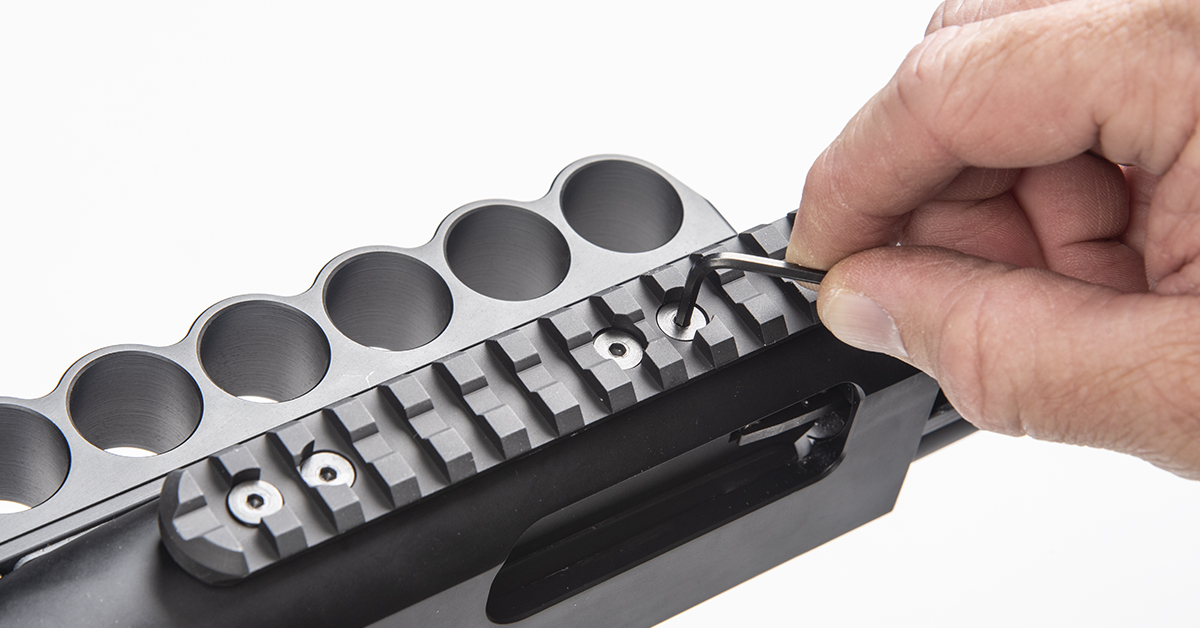
The new rail simply installs with the supplied hardware. Clean the threads with denatured alcohol and apply a small drop of medium-strength thread adhesive to the screws before installing the rail.
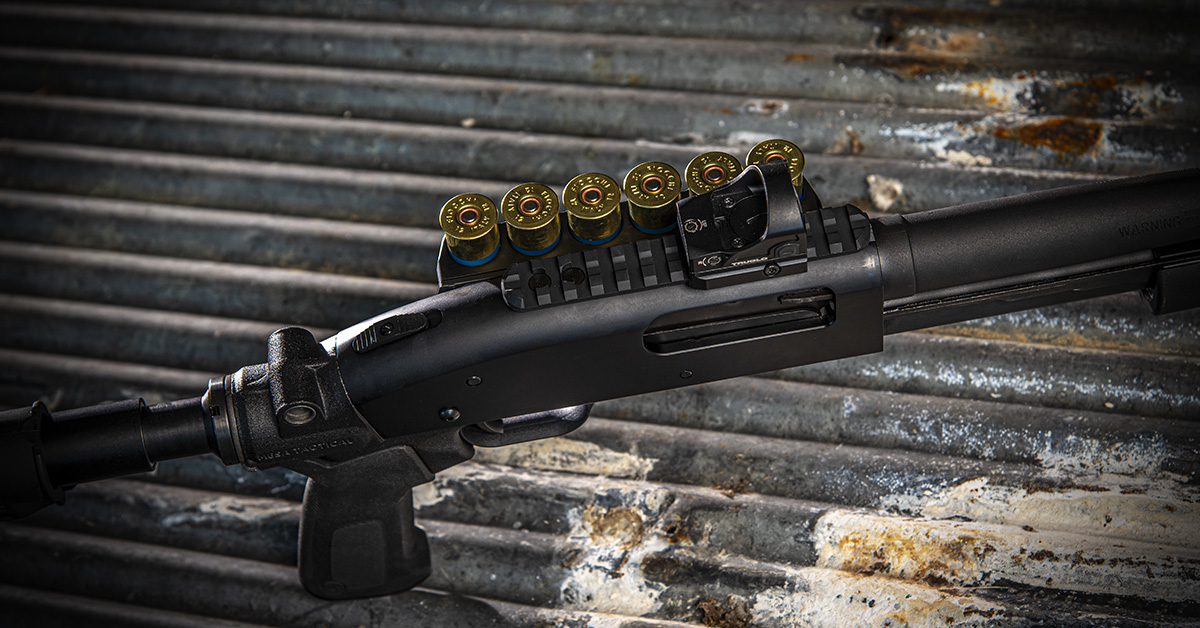
With the Mesa Tactical upgrade complete, this formerly bone-stock 590 is going to deliver the same accurate and terminally decisive firepower as it did in its factory form, but it will be much more comfortable and convenient for the shooter in the doing. And who would argue the value of having an extra six rounds Fiocchi’s #00 on board? Not me!