This afternoon project will put a custom spin on that short-action Remington 700 sitting in the gun cabinet
by Rob Reaser
Those of you who have been paying attention to the tactical and long-range rifle world over the last few years have probably taken note of the chassis rifle movement. A favorite platform among the precision rifle competition crowd, chassis systems generally offer a more shooter-customizable rifle foundation than that of high-end custom rifle stocks built in the conventional monolithic style (think one-piece carbon and fiberglass custom stocks). Since most rifle chassis systems are designed to be compatible with standard AR-15 furniture—at least the buttstock and grip—and accessory mounting options, this opens the door for multiple variations on the theme and provides the continuity of familiarity for shooters who are comfortable with the Modern Sporting Rifle.
A quick online search will reveal scads of machined aluminum chassis systems for the always popular Remington 700 barreled action. You will also discover a broad range of prices, design cues, and so on. The common denominator, though, is this. Chassis systems developed for the Remington 700 represent one of the easiest custom rifle builds for the do-it-yourself firearm enthusiast. What’s more, they deliver a significant improvement over factory polymer stocks due to their increased rigidity, which is essential for accuracy enhancement.
Last month, we built a custom 10/22-style rifle based on Rival Arms‘ new chassis for that that rimfire breed. Since Rival Arms introduced a chassis system for the Remington 700 short-action late last year, we decided to give that one a go as well. As you will see, if you are able to work a bit driver, a hammer, and a punch, that’s about all it takes to craft your own chassis rifle.

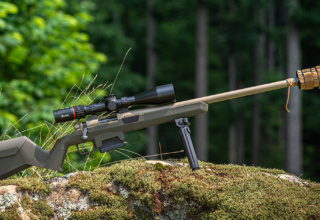
The Rival Arms R-700 chassis is designed for Remington 700 short-actions. The unit is CNC-machined from aluminum billet and is offered in black anodized, FDE, and satin gray finishes. Precision inletting means a drop-in fit for most barreled actions with a maximum barrel diameter of one inch.

The R-700 features a radiused bedding block versus the V-block that is common in many chassis systems. We prefer the radiused profile because, when combined with an optional bedding job, it ensures optimal barreled action-to-stock fitment and rigidity.
Included as part of the chassis is a prominent mag release lever. This chassis utilizes the AICS magazine pattern, so you won’t need to worry about bottom metal fitment or an AICS conversion kit. You do need to understand that compatibility is limited to those Remington 700 short-actions for which AICS magazines are commonly available, such as .308 Win., 6mm Creedmoor, 6.5 Creedmoor, .260 Rem., 7mm-08, .243, and 7.62x51mm NATO.

The chassis is tapped to accept MILSPEC buffer tubes and is compatible with most AR-15 grips. For these components, we reached for Rock River Arms’ Marksman 6-position stock kit and Hogue rubber pistol grip. This stock is an ideal choice because it allows you to adjust the length of pull and cheek riser height. Should you go this route on the grip, you will need to purchase separately a standard AR grip screw and washer.

Every Remington 700 needs a quality trigger and Timney is one of the top-tier manufacturers on our list. For this project, we chose Timney’s Remington 700 HIT trigger, developed specifically for long-range and competition work. The trigger shoe is offered in curved or straight profiles, and the pull weight can be adjusted between 8 ounces and two pounds. It’s a sweet system for range work, and when set toward the heavier end of the pull weight, makes a terrific field trigger for hunting.

To top off our build, we wanted an optic that would serve longer-range shooting needs without going overboard on size and weight. TRUGLO’s Eminus 24 fit the bill nicely. This scope, offered in three power and objective size configurations, features TRUGLO’s illunimated TacPlex Reticle system that offers a crisp and clean sight picture with 5 and 10 MOA drops. We chose the 6×24 magnification model for its long-range work potential. Combined with 1/4-MOA locking turrets and a 30mm tube, the Eminus 24 covers all the bases for a practical field rifle optic.
As mentioned, a chassis build is a terrific way for the DIY-inclined shooter to repurpose a neglected factory rifle or simply to put your own spin on a precision target or hunting gun that is customizable on a piece-by-piece schedule, depending on your budget. The process is easy and tool requirements are minimal. Follow along as we turn this “stocker” into—as the Monty Python troupe used to say—”something completely different.”

The transformation begins by disassembling the stock rifle. The Remington 700 stock is secured to the barreled action by two action screws. Support the rifle (we’re using MTM’s Gun Vise for this project) and remove the actions screws and the bottom metal.

Separate the stock from the barreled action.

Replacing a stock M700 trigger assembly is an easy process but one that can be frustrating for the beginner lacking procedural know-how. We’re going to show you the easy way to do this, but in case you let the rear trigger pin get away from you, we suggest taking a photo of the left side of the trigger housing—specifically of the bolt stop lever and lever spring arrangement. This is the frustrating part if those items come loose.
Start by tapping the front trigger pin from left to right using a 3/16-inch punch. You do not want to tap the pin all the way out of the action—just enough to allow the trigger assembly to pivot out of the action.

With the safety lever moved to the safe position, carefully tap or push the rear trigger pin from the right to the left side until the pin clears the trigger housing. You want the pin to remain in the action so that the bolt stop lever and spring remain in place. This will make installing the new trigger much easier. The sear safety cam and sear spring (on the matt) will fall out of the factory trigger assembly when the front trigger pin is removed. These parts will not be used with the new Timney HIT trigger.

With the rear trigger pin pushed out of the way, the trigger assembly can now be removed from the action. Note the rear trigger pin securing the bolt stop lever and spring in their proper place in the action (arrow). Should the pin come out during the trigger replacement process, this is the required orientation for reassembly.

Install the new trigger into the action. The sear safety cam and spring are integrated in the Timney HIT trigger system, so there’s no fussing with those components during the installation.

Align the front trigger pin holes in the action and trigger box and tap the pin into place, working from the right side to the left.

With the front pin centered in the action, push down on the rear of the bolt stop lever to ensure it is not bound against the pin. If it is, back the pin off slightly until the bolt stop lever moves freely.

The sear safety cam is properly positioned beneath the rear trigger pin when installed, with the pin atop this recess in the cam.

Turn the barreled action upright, pivot the trigger assembly into place, and push or tap the rear trigger pin until it starts into the opposite side of the action. The pin will cross the top of the sear safety cam as shown (arrow).

Finish seating the rear trigger pin into the action.

Install the bolt and test the trigger function and safety function. If there is a problem, disassemble and diagnose the issue. Test the trigger function again after the rifle is completely assembled. When you do this, place the safety in the fire position and slam the bolt forward and lock it closed several times to ensure the sear does not release and there are no slam-fires.

Chassis assembly can begin by installing the grip. Be sure to clean the grip screw threads with denatured alcohol and apply a small amount of blue Locktite to the threads upon assembly.

Likewise, clean the buffer tube threads with denatured alcohol and install a small amount of blue Locktite to the threads before screwing the tube into the chassis. The R-700 chassis features the recess for the buffer tube end plate to ensure proper alignment.

Moving to a bench vise, apply a small amount of blue Locktite to the buffer tube threads behind the end plate and screw the buffer tube retaining nut into place. Torque the castle nut to 40 in-lbs and install the stock.

The R-700 chassis comes with its own action screws of the same length. If you do not intend to bed the action, simply place the barreled action into the chassis and secure with the supplied action screws and torque to 45-65 in/lbs.

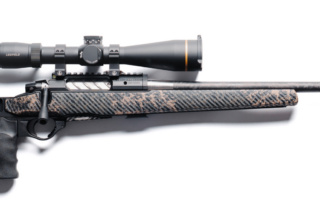
Next up, optic mount and optic installation and you’re finished.

Check out our video on how to properly set up a scope on a bolt-action rifle if you don’t intend to bed the mount.

A far cry from the factory configuration and completed in an afternoon!